
Yamaha BWS20-120/BWS20W-120 Installation Instruction
Ceiling/Wall Mount Speaker Bracket
Thank you for choosing a Yamaha Ceiling/Wall-mount Speaker bracket. Please read this manual carefully before installing your speaker bracket and keep it in a safe place for later reference.
PRECAUTION
- This speaker bracket can ONLY be used with a speaker that weighs less than 7 kilograms (15.4 lbs.).
- Check to make sure that the mounting surface (well or ceiling) can fully support the combined weight of the speaker and bracket before installation.
- Make sure to tighten each screw and bolt securely. After installation check that each screw and bolt are free from looseness and that the speaker system is securely fixed.
- When adjusting the speaker angle or direction, be sure to loosen the applicable rotation locks screw or joint bolt first.
- The manufacturer accepts no liability for any injury or damage resulting from improper selection of the mounting position, improper installation or misuse of the product.
CONSTRUCTION DIAGRAM

Supplied accessory:
2 hexagonal wrenches (of small and large sizes)4 M5x12 screws
- Never loosen the lock screw which is to prevent the unit from coming apart. It can be identified by its head as shown below.

- Prepare M5 bolts (4 pcs.), M5 hexagonal nuts (8 pcs.) and ∅5 plain washers (8 pcs.). They are necessary to fix the ceiling/wall side bracket.
- Prepare M5 bolts (2 pcs.) and M5 hexagonal nuts (4 pcs.) to fix the speaker side bracket to the speaker. (They are not necessary when using a YAMAHA speaker system which this product is intended for.)
INSTALLATION PROCEDURE
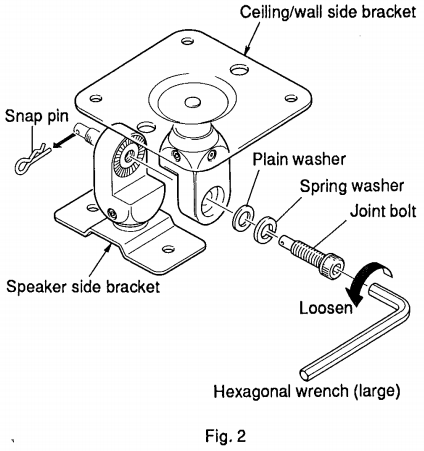
- Separate the ceiling/wall side bracket and the speaker side bracket.
 With the snap pin removed first, remove the joint bolt (with a plain washer and spring washer) by using the supplied hexagonal wrench (large).
 - Securely attach the speaker side bracket to the speaker as shown below.When attaching the bracket to the speaker system of wooden enclosure, remove the woofer first and fix the bracket with 2 M5 bolts and 4 M5 hexagonal nuts. (double-nut installation). Add sub board for security if possible.*When using this bracket for the YAMAHA speaker system which it is intended for, fix the bracket with supplied 2 M5x12 screws securely.
- Attach the ceiling/wall side bracket to a sufficiently strong wall or ceiling.For installation, use 2 M5 hexagonal nuts and 2 ∅5 plain washers for each of 4 M5 bolts as shown above (double-nut installation).*To get the speaker cord from behind the wall or ceiling, make a hole through it at such position that the speaker cord hole in the bracket and draw the speaker cord out of the wall or ceiling to the speaker without slack by using the clamps. It is easy to clamp and unclamp the speaker cord.
- Connect the ceiling/wall side bracket and speaker side bracket.Align two joint parts of both bracket so that their serrations fit each other properly and fasten them with the joint bolt, for this installation, make sure not to leave out a spring washer, plain washer and snap pin.
 With the snap pin removed first, remove the joint bolt (with a plain washer and spring washer) by using the supplied hexagonal wrench (large).
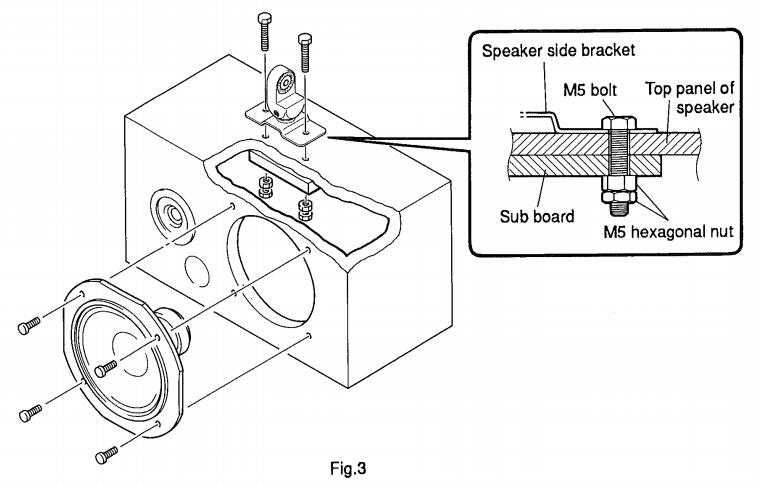 When attaching the bracket to the speaker system of wooden enclosure, remove the woofer first and fix the bracket with 2 M5 bolts and 4 M5 hexagonal nuts. (double-nut installation). Add sub board for security if possible.*When using this bracket for the YAMAHA speaker system which it is intended for, fix the bracket with supplied 2 M5x12 screws securely.
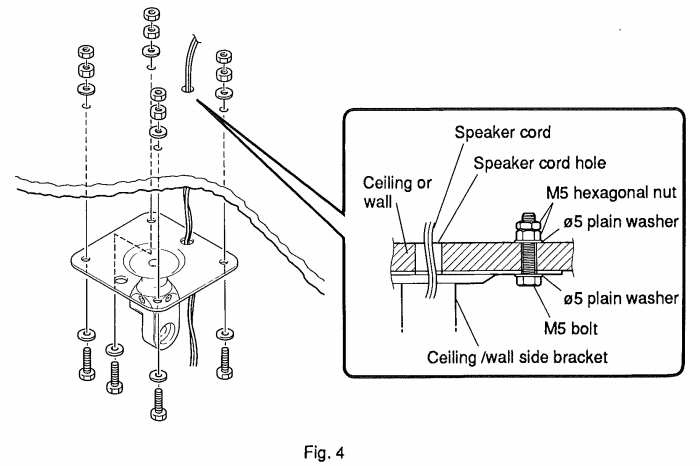 For installation, use 2 M5 hexagonal nuts and 2 ∅5 plain washers for each of 4 M5 bolts as shown above (double-nut installation).*To get the speaker cord from behind the wall or ceiling, make a hole through it at such position that the speaker cord hole in the bracket and draw the speaker cord out of the wall or ceiling to the speaker without slack by using the clamps. It is easy to clamp and unclamp the speaker cord.
 Align two joint parts of both bracket so that their serrations fit each other properly and fasten them with the joint bolt, for this installation, make sure not to leave out a spring washer, plain washer and snap pin.
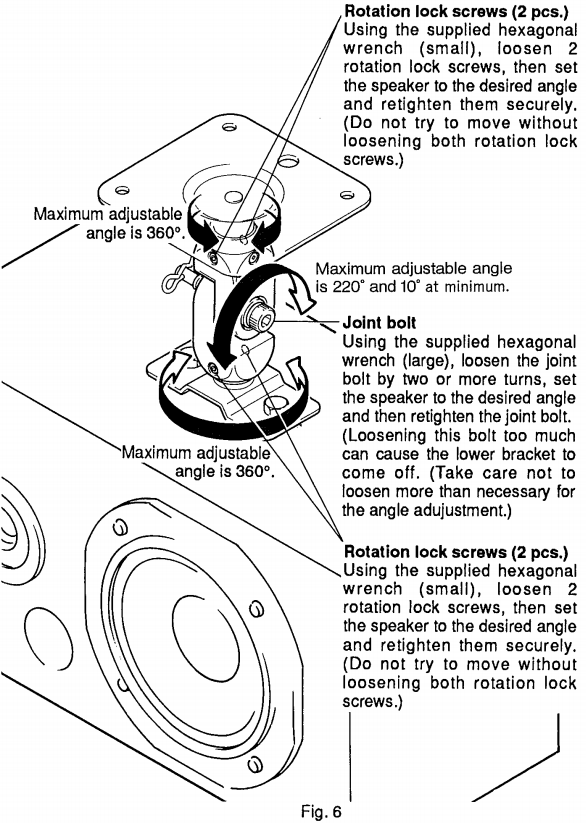
SPEAKER ANGLE ADJUSTMENT
The bracket can be adjusted so that the speaker is set for the desired listening position.
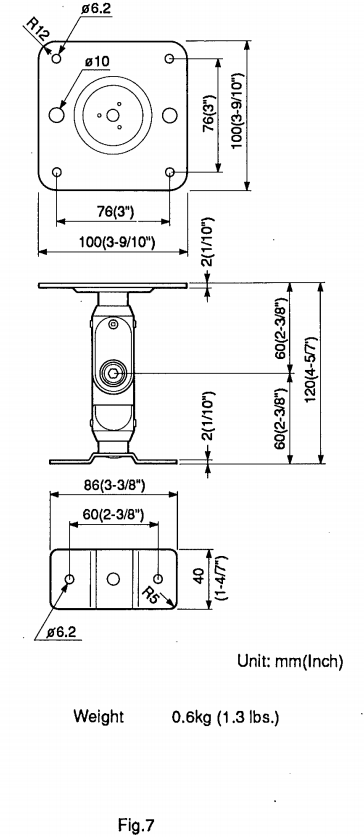
DIMENSIONS
YAMAHA CORPORATION
Pro Audio Division, #18/3
P.O. Box 3, Hamamatsu, 430-8651 Japan
[xyz-ips snippet=”download-snippet”]