
YAMAHA Keyboard Stand Instruction Manual
This Keyboard Stand is only for use with 88- keys Digital Pianos. To confirm whether your instrument is compatible with this stand or not, refer to the owner’s manual of your particular instrument.
![]() CAUTIONRead these precautions carefully before you assemble or use the keyboard stand.
CAUTIONRead these precautions carefully before you assemble or use the keyboard stand.
These precautions are to promote safe use of the stand and to prevent injury and damage from occurring to you and others.By following these precautions carefully, you will be able to get long and safe usage from your keyboard stand.Please keep this manual in a safe and handy place for future reference.
- Be careful not to confuse any of the parts, and be sure to install all parts in the correct direction. Please assemble according to the sequence given below.
- Assembly should be carried out by at least two persons.
- Assemble the stand on a hard and flat floor with ample space.
- Use only the screws provided when assembling the stand. Use of any other screws may result in an inadequate assembly that may cause damage to both the keyboard and the stand.
- Use the stand only after assembly is complete.An incomplete assembly may result in overturning of the stand and damage to the keyboard.
- Always place the stand on a flat, stable surface.Placing the stand on uneven surfaces may result in it becoming unstable or overturn, causing the keyboard to drop and possibly resulting in injury.
- Do not use the stand for anything other than its designed purpose. The stand is not designed to hold anything other than the specified keyboard.Placing any object other than the specified keyboard on the stand may result in the object dropping or the stand overturning.
- Do not apply excessive force to the keyboard as it may cause the stand to overturn or the keyboard to drop.
- Make sure the stand is sturdy and safe, and all screws have been tight and firm before use. If not, the stand may overturn, the keyboard may drop, or may result in injury to the user.
- To disassemble, reverse the assembly sequence given below.
NOTICE
- Do not expose the stand in direct sunlight (outside or in a car during the day etc.) to prevent damage to the unit.
* The illustrations as shown in this Assembly Instructions are for instructional purposes only, and may appear somewhat different from those on your stand or keyboard.
Keyboard Stand Assembly
- Have a Phillips-head (+) screwdriver ready.
The parts shown in the “Assembly Parts” illustration will be used. Follow the assembly instructions and select the parts as needed.
Assembly Parts
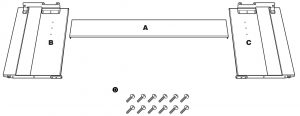
6 x 16 mm screws (12 pcs.)
- Attach A to B and C.
 Attach A using screws D.There are four threaded holes for attaching the pedal unit (sold separately) to this stand at the rear of A. When attaching A to B and C, the surface with the holes should be at the rear of the keyboard. Also, make sure that the non-colored surface is facing down. CAUTION:
- Be careful not to drop the parts or touch the sharp metal fittings.
- Put the keyboard on the stand.Be sure to place your hands at least 15 cm away from either end of the keyboard and carefully place the keyboard on the side boards.CAUTION:
- Be careful not to drop the keyboard or to get your fingers caught between the keyboard and the stand parts.
- Do not hold the keyboard in any position other than the position shown in the illustration.
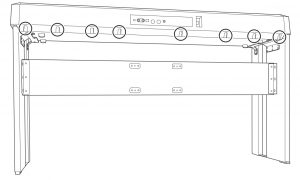
- Fix the keyboard to the stand.
Slowly move the keyboard so that the holes on the bottom of the keyboard are properly aligned with the holes on the angle brackets, and then lightly tighten the screws D. With the holes properly aligned, finally tighten all screws securely.
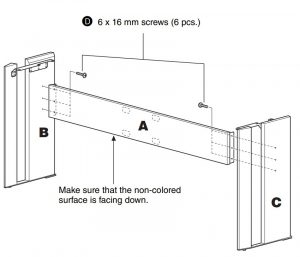 Attach A using screws D.There are four threaded holes for attaching the pedal unit (sold separately) to this stand at the rear of A. When attaching A to B and C, the surface with the holes should be at the rear of the keyboard. Also, make sure that the non-colored surface is facing down.
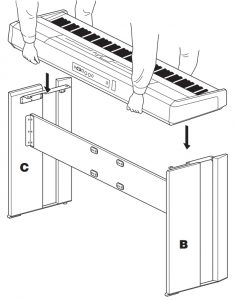 Be sure to place your hands at least 15 cm away from either end of the keyboard and carefully place the keyboard on the side boards.
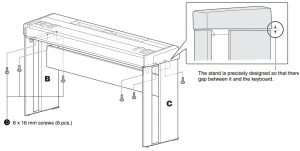
When moving the instrument
When moving the instrument after assembly, always lift it securely and do not drag it.
![]() CAUTION:
CAUTION:
- When transporting or moving the instrument, always use two or more people.Attempting to lift the instrument by yourself may damage your back, result in other injury, or cause damage to the instrument itself.
- When moving the instrument, make sure to grip it securely from the bottom and avoid putting your hands or fingers inside the screw hole indentations shown at right (which are not meant for holding the instrument). Doing so may result in injure your hands or fingers, or cause damage to the instrument itself
NOTICE
- If the pedal unit (sold separately) is attached, loosen the long screws of the section attached to the stand and separate the pedal unit from the floor before moving the instrument. If not done, the floor may be damaged.
Post-assembly checklist
Once you’ve assembled the stand, check the following points:
- Are there any parts left over?
- If so, read the assembly instructions again and correct any mistakes you might have made.
- Is the instrument clear of doors and other movable fixtures?
- If not, move the instrument to an appropriate location.
- Does the instrument make a rattling noise when you play it or move it?
- If so, properly tighten all screws.
- Also, if the instrument makes a creaking noise or seems unsteady when you play it, refer carefully to the assembly instructions and diagrams and retighten all screws.
[xyz-ips snippet=”download-snippet”]