
![]() POWERED SPEAKER SYSTEMMSP3AOwner’s Manual
POWERED SPEAKER SYSTEMMSP3AOwner’s Manual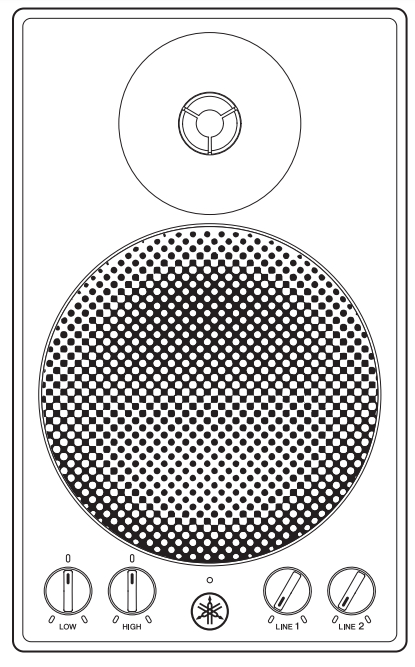
Thank you for purchasing the Yamaha MSP3A powered speaker system. The MSP3A features a compact bass reflex cabinet, with a 10 cm two-way cone speaker and a 2.2 cm dome speaker. This powered speaker system faithfully reproduces sound and can be used for a wide range of applications, from personal home recordings to serious professional use. Please read this Owner’s Manual thoroughly to make the best use of the MSP3A’s quality functions for the longest period of time, and keep the manual in a safe place.
Included Accessories
- AC power cord
- Owner’s manual (this book)
About disposal
- This product contains recyclable components. When disposing of this product, please contact the appropriate local authorities.
Yamaha cannot be held responsible for damage caused by improper use or modifications to the product.
IMPORTANTPlease record the serial number of this unit in the space below.Model…..Serial No…….The serial number is located on the bottom or rear of the unit. Retain this Owner’s Manual in a safe place for future reference.(ser. No)
- This applies only to products distributed by YAMAHA CORPORATION OF AMERICA.
PRECAUTIONS
PLEASE READ CAREFULLY BEFORE PROCEEDINGPlease keep this manual in a safe place for future reference.
 WARNINGAlways follow the basic precautions listed below to avoid the possibility of serious injury or even death from electrical shock, short-circuiting, damages, fire, or other hazards. These precautions include, but are not limited to, the following:
If you notice any abnormality
- If any of the following problems occur, immediately turn off the power switch and disconnect the electric plug from the outlet.– The power cord or plug becomes frayed or damaged.– Unusual smells or smoke is emitted.– Some object, or water has been dropped into the product.– There is a sudden loss of sound during the use of the product.– Cracks or other visible damage appear on the product.
Then have the product inspected or repaired by qualified Yamaha service personnel.
Power supply
- Do not place the power cord near heat sources such as heaters or radiators, and do not excessively bend or otherwise, damage the cord, place heavy objects on it, or place it in a position where anyone could walk on, trip over, or roll anything over it.
- Only use the voltage specified as correct for the product. The required voltage is printed on the name plate of the product.
- Use only the supplied power cord/plug. If you intend to use the product in an area other than in the one you purchased, the included power cord may not be compatible. Please check with your Yamaha dealer.
- Check the electric plug periodically and remove any dirt or dust which may have accumulated on it.
- Make sure to fully insert the electric plug to prevent electric shocks or fire.
- When setting up the product, make sure that the AC outlet you are using is easily accessible. If some trouble or malfunction occurs, immediately turn off the power switch and disconnect the plug from the outlet. Even when the power switch is turned off, as long as the power cord is not unplugged from the wall AC outlet, the product will not be disconnected from the power source.
- Remove the electric plug from the outlet when the product is not to be used for extended periods of time.
- Do not touch the product or the electric plug during an electrical storm.
- Be sure to connect to an appropriate outlet with a protective grounding connection. Improper grounding can result in electrical shock, fire, or damage.
Do not open
- This product contains no user-serviceable parts. Do not attempt to disassemble the internal parts or modify them in any way.
Water warning
- Do not expose the product to rain, use it near water or in damp or wet conditions, or place on it any containers (such as vases, bottles or glasses) containing liquids which might spill into any openings.
- Never insert or remove an electric plug with wet hands.
Fire warning
- Do not place any burning items or open flames near the product, since they may cause a fire.
Hearing loss
- Before turning the power of all devices on or off, make sure that all volume levels are set to the minimum. Failing to do so may result in hearing loss, electric shock, or device damage.
- When turning on the AC power in your audio system, always turn on the product LAST, to avoid hearing loss and speaker damage. When turning the power off, the product should be turned off FIRST for the same reason.
CAUTIONAlways follow the basic precautions listed below to avoid the possibility of physical injury to you or others. These precautions include, but are not limited to, the following:Power supply
- When removing the electric plug from the product or an outlet, always hold the plug itself and not the cord. Pulling by the cord can damage it.
Location and connection
- Do not place the product in an unstable position or a location with excessive vibration, where it might accidentally fall over and cause injury.
- Keep this product out of reach of children. This product is not suitable for use in locations where children are likely to be present.
- To ensure proper heat dissipation of the product when mounting this speaker in a rack, make sure that there is adequate space around the product: at least 30 cm above, 10 cm at the sides, and 20 cm behind. Inadequate ventilation can result in overheating, possibly causing damage to the product(s), or even fire. For normal ventilation during use, remove the rear of the rack or open a ventilation hole.
- Secure the product with non-skid pads, etc. to prevent it from moving. If the product is placed unsecured on a table or platform, it will move gradually due to its vibration and may fall off the table, causing damage or injury.
- Do not place the product in a location where it may come into contact with corrosive gases or salt air. Doing so may result in malfunction.
- Before moving the product, remove all connected cables.
- Do not press the rear panel of the product against the wall. Doing so may cause the plug to come in contact with the wall and detach from the power cord, resulting in short-circuiting, malfunction, or even fire.
Maintenance
- Remove the power plug from the AC outlet when cleaning the product. Handling caution
- Do not insert your fingers or hands in any gaps or openings on the product (ports).
- Do not rest your weight on the product or place heavy objects on it.
- Do not operate the product if the sound is distorting. Prolonged use in this condition could cause overheating and result in fire.
NoticeTo avoid the possibility of malfunction/damage to the product or damage to other property, follow the notices below. Handling and maintenance
- Do not use the product in the vicinity of a TV, radio, or other electric products. Otherwise, the product, TV, or radio may generate noise.
- Do not expose the product to excessive dust or vibration, or extreme cold or heat, in order to prevent the possibility of panel disfiguration, unstable operation, or damage to the internal components.
- Do not install in locations where temperature changes are severe. Otherwise, condensation may form on the inside or the surface of the product, causing it to break.
- If there is reason to believe that condensation might have occurred, leave the product for several hours without turning on the power until the condensation has completely dried out, in order to prevent possible damage.
- Do not touch the speaker driver unit, since it might cause malfunction.
- Do not place vinyl, plastic or rubber objects on the product, since this might cause alteration or discoloration of the panel.
- When cleaning the product, use a dry and soft cloth. Do not use paint thinners, solvents, cleaning fluids, or chemical-impregnated wiping cloths, since this might cause alteration or discoloration.
InformationAbout functions/data bundled with the product
- XLR-type connectors are wired as follows (IEC60268 standard): pin 1: ground, pin 2: hot (+), and pin 3: cold (−).
About this manual
- The illustrations as shown in this manual are for instructional purposes only.
- The company names and product names in this manual are the trademarks or registered trademarks of their respective companies.
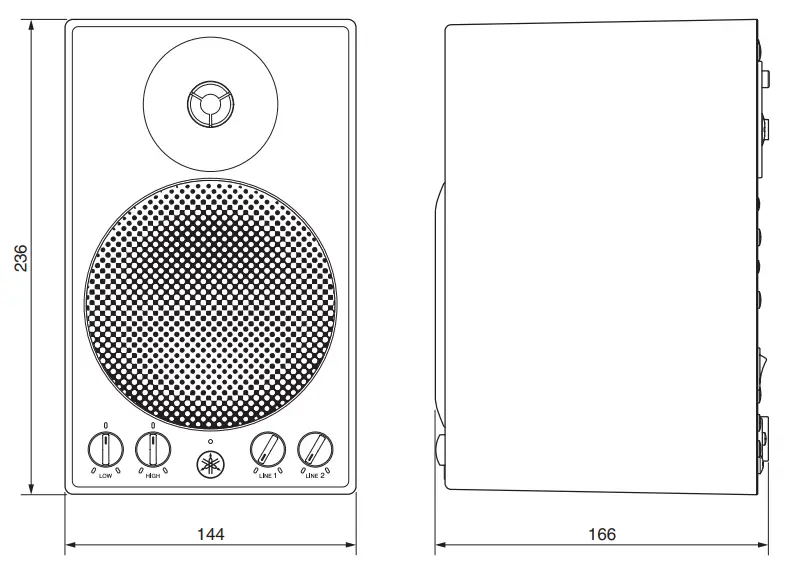
Front panel/Rear panel
NOTICEDo not place the speaker face down.
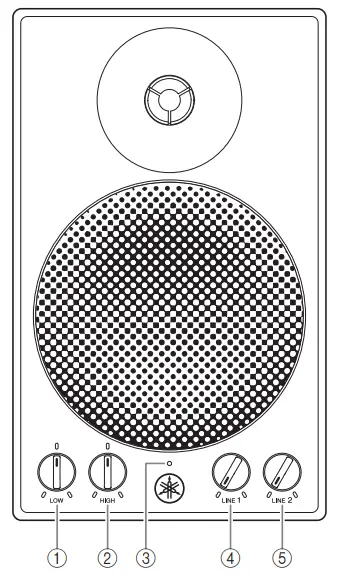
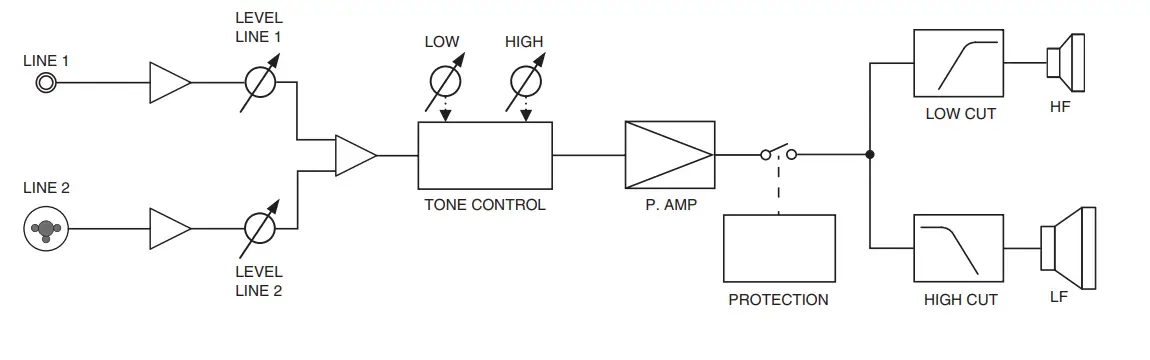
- LOW controlThis control knob enables you to adjust the bass in the range of –3dB to +3dB based on a reference value of 100Hz. The bass range is flat with the knob set at 12 o’clock, boosted when the knob is turned clockwise and cut when the knob is turned counter-clockwise.
- HIGH controlThis control knob enables you to adjust the treble in the range of –3dB to +3dB based on a reference value of 10kHz. The treble range is flat with the knob set at 12 o’clock, boosted when the knob is turned clockwise and cut when the knob is turned counter-clockwise.
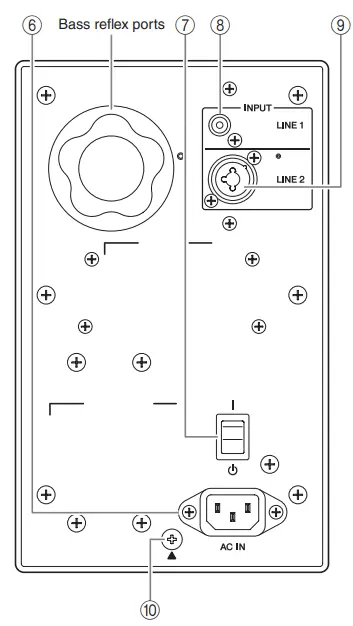
 NOTICEAir blowing out of the bass reflex ports is normal, and often occurs when the speaker is handling program material with heavy bass content.
 - Power indicatorThis indicator lights up green when you turn the power switch on the rear panel on.
- LINE 1 level controlThis control knob enables you to adjust the volume level of the signal input at the INPUT LINE 1 jack (8) on the rear panel. Turning the knob counter-clockwise lowers the volume level, and turning it clockwise raise the level.
- LINE 2 level controlThis control knob enables you to adjust the volume level of the signal input at the INPUT LINE 2 jack (9) on the rear panel. Turning the knob counter-clockwise lowers the volume level, and turning it clockwise raises the level.
- [AC IN] connectorConnect the supplied power cord in the order below. Before connecting the power cord, make sure that the MSP3A power is turned off.1. Insert the plug of the power cord into this socket.2. Plug the other end of the cord into the AC outlet. When removing the power cord, perform this procedure in reverse order.WARNINGUse only the supplied power cord.CAUTIONTurn off the power before you connect or disconnectthe power cord.
- Power switchThis switch turns the power to the MSP3A on ( I ) and off (A). When you turn this switch on, the power indicator (3) lights up green.NOTICERapidly turning the unit on and off in succession can cause it to malfunction. After turning the unit off, wait for about 6 seconds before turning it on again.
- INPUT LINE 1 jackThis input jack is used to connect an RCA pin plug.
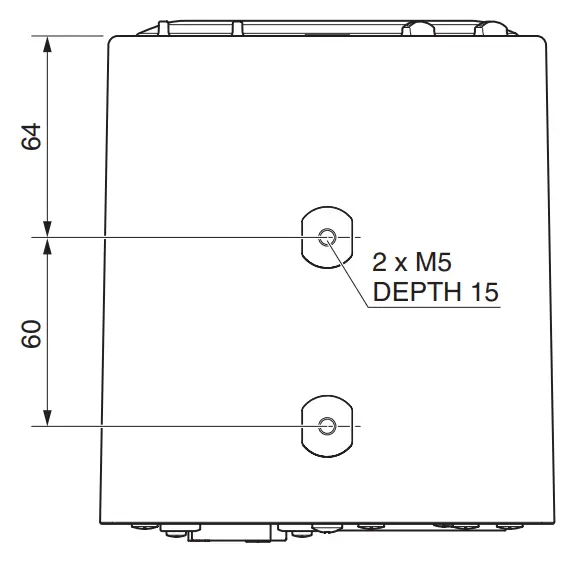
- INPUT LINE 2 jackThis balanced combo jack is used to connect an XLR-3-32 type connector or a TRS phone plug to input line-level signals from a mixing console.Mounting on ceiling or wallYou can mount the MSP3A on a ceiling or wall by attaching an optional bracket to the bottom panel of the MSP3A, using two screws (M5 x 12-15 mm).CAUTIONMake sure to secure the bracket so that the speaker does not move.
- Safety wire fastening screwWhen using the optional bracket, remove this screw (0) from the bottom panel (as shown), thread it through one end of the safety wire, and tighten them together.
 NOTICEAir blowing out of the bass reflex ports is normal, and often occurs when the speaker is handling program material with heavy bass content.
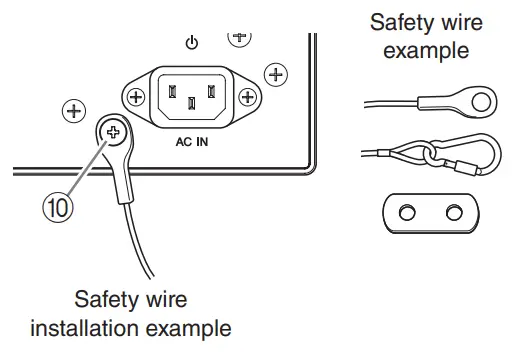
CAUTION
- Make sure to take precautionary measures using wires to prevent the speaker from falling down in the event of an installation failure.
- The wire is not included. Prepare and assemble it referring to the illustration.
- When choosing the installation location, suspension wire and mounting hardware, make sure all are strong enough to support the weight of the speaker.
- When installing the safety wire to the wall, install it higher than the wire’s attachment point on the speaker, with as little slack as possible. If the wire is too long, and the speaker happens to fall, the wire may snap as a result of too much strain.
- The installation should be checked thoroughly at regular intervals. Some fittings may deteriorate over extended periods of time due to wear and/or corrosion.
Troubleshooting
| Symptom | Possible Cause |
Solution |
| Power won’t turn on / front panel power indicator doesn’t light. | The power cord might not be connected properly. | Check and connect the power cord. |
| The power switch might not be turned on. | Turn the power switch ON. If the problem persists, contact your Yamaha dealer | |
|
No sound. |
One or more cables might not be connected properly. | Check that all cables are properly connected. |
| The source equipment might not be supplying an audio signal. | Make sure that the source equipment is functioning properly and delivering the required signal. | |
| The level setting might be too low. | Adjust the output level setting of the source equipment, or use the LEVEL control to increase the output level. | |
| Noisy or distorted sound. | One or more cables might be corroded, shorted, or otherwise broken. | Replace faulty cable(s). |
| The system might be picking up external noise. | Try changing the positions or layout of the cables. | |
| Try changing the location of other electrical/ electronic devices that are near the speakers. |
Specifications
Main Specifications
| System Type | Powered speaker |
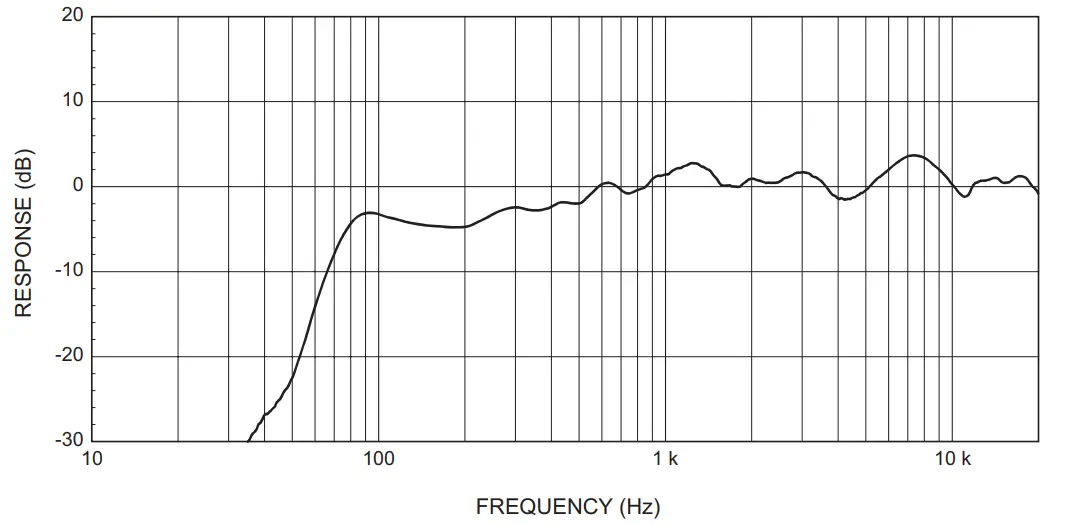
| Frequency Response (-10 dB) | 67 Hz – 22 kHz |
| Crossover Frequency | 4 kHz |
| Maximum Output Level (Measured peak, IEC ) | 99 dB SPL |
| Power Requirements *1 | 110 – 240 V, 50/60 Hz |
| Power Consumption | 30 W |
| Dimensions (W x H x D) | System (maximum) 144 x 236 x 166 mm |
| Weight | 3.6 kg |
Amplifier section
|
Maximum Output |
THD 0.1%, 1kHz, RL=4 Ω |
22 W |
| Input Sensitivity | Input Sensitivity, Input Impedance | LINE 1 : -10 dBu, 10 kΩ (RCA) |
| Input Sensitivity, Input Impedance | LINE 2 : +4.0 dBu, 10 kΩ (COMBO) | |
| Input Connectors | LINE 1 : RCA | |
| LINE 2 : COMBO (XLR/PHONE) | ||
| Level control | LINE1, LINE2 | |
| Tone ControlCharacteristic | LOW = CENTERREF = 100 Hz, 2 V | MIN -3.0 ± 2.0 dB |
| MAX +3.0 ± 2.0 dB | ||
| HIGH = CENTERREF = 10 kHz, 2 V | MIN -3.0 ± 2.0 dB | |
| MAX +3.0 ± 2.0 dB | ||
| Indicator | Green LED |
Speaker section
| Enclosure | 2Way, Bass-reflex type |
| Speaker Unit | HF (Tweeter) : 0.8″ (2.2 cm) Dome |
| LF (Woofer) : 4″ (10 cm) Cone |
Accessories
| Included in the package | Power cord x1, Owner’s Manual |
- 1: Make sure to use this product at the supply voltage indicated on the rear panel of this product.
- The contents of this manual apply to the latest specifications as of the publishing date. To obtain the latest manual, access the Yamaha website then download the manual file.
Dimensions
 Unit: mm
Block Diagram
Performance graph
Important Notice: Guarantee Information for customers in European Economic Area (EEA) and SwitzerlandImportant Notice: Guarantee Information for customers in EEA* and Switzerland For detailed guarantee information about this Yamaha product, and Pan-EEA’ and Switzerland warranty service, please either visit the website address below (Printable file is available at our website) or contact the Yamaha representative office for your country. • EEA: European Economic Area
ADDRESS LIST
NORTH AMERICACANADAYamaha Canada Music Ltd.135 Milner Avenue. Toronto, Ontario. MIS 3R1, CanadaTel: +1-416-298-1311
U.S.A.Yamaha Corporation of America6600 Orangethorpe Avenue. Buena Park. CA 90620. U.S.A.Tel: +1-714-522-9011
I CENTRAL & SOUTH AMERICA
MEXICOYamaha de Maxim, S.A. de C.V.Av. Insurgentcs Sur 1647 Piso 9, Col. San Jose Insurgentes, Delegaeign Benito Juarez. Mexico. D.E. C.P. 03900. MexicoTel: +52-55-5804-0600BRAZILYamaha Musical do Brasil Ltda.Praca Professorkse Lanncs, 40, Cjs 21 e 22, Brooklin Paulista Novo CEP 0457 1-100 — Sao Paulo— SR BrazilTel: +55-11-3704-1377
ARGENTINAYamaha Music Latin America, SA, Sucursal ArgentinaOlga Cossenini 1553. Piso 4 None. Madero Este-C1107CEK,Buenos Aires, ArgentinaTel: +54-11-4119-7000
PANAMA AND OTHER LATIN AMERICAN/CARIBBEAN REGIONSYamaha Music Latin America, S.A.Edit Torre Banco General. Piso 7. Urbanizacien Marbella, Calle 47 y Aquilino de la Guardia, Ciudad dc Panama, Republica de PanamaTel: +507-269-5311
EUROPETHE. UNITED KINGDOM/IRELAND Yamaha Music Europe GmbH (UK)Sherboume Drive, Tilbrook, Milton Keynes, MK? 8BL U.K.Tel: +44-1908-366700
GERMANYYamaha Music Europe GmbHSiemensstrasse 22-34, 25462 Rellingen, Germany Tel: +494101-303-0
SWITZERLAND/LIECHTENSTEINYamaha Music Europe Gmbh, Branch Switzerland In ThalwIlSCCSITI1SSC 18a, 8800 Thalwil, Switzerland Tel: +41-443878080
AUSTRIA/BULGARIA/
CZECH REPUBLIC/HUNGARY/ RONIANIA/SLOVAKIA/SLOYENIAYamaha Music Europe GmbH Branch AustriaSchleiergasse 20. 1100 Wien. Austria Tel: +43-1-60203900
POLANDYamaha Music Europe GmbHSp.z o.o. Oddzial w PolsceWielicka 52.02-657 Warszawa. Poland Tel: +48-22-880-08-88
MALTAOlimpus Musk Ltd.Valletta Road, Most MST9010, Malta Tel: +356-2133-2093
NETHERLANDS/BELGIUM/ LUXEMBOURGYamaha Music Europe Branch BeneluxClarissenhof 5b, 4133 AB Vianen, The NetherlandsTel: +31-347-358040
FRANCEYamaha Music Europe7 me Ambroise Croizat. Zone d’activitis de Pariest. 77183 Croissy-Beaubourg, FianceTel: +33-1-6461-4000
ITALYYamaha Music Europe GmbH, Branch Italy Via linen’ N.67/69 20855 Gemo di Lesmo (MB). ItalyTel: +39-039-9%5-1
SPAIN/PORTUGALYamaha Music Europe GmbH Mirka, Sucursal en EspaiaCtra. de la Corolla km. 17.200. 28231Las Rozas de Madrid, SpainTel: +3491439-8848
GREECE
Philippos Nakas S.A. The Music House19th klm. Leof. Lavriou 190 02 Peania— Attiki. GreeceTel: +30-210-6686168
SWEDEN/FINLAND/ICELAND
Yamaha Music Europe GmbH Germany filial Scandinavia
JA Wettergrensgata I. 400 43 Goteborg. Sweden Tel: +46-31-89-34-00
DENMARK
Yamaha Music Denmark,
Finial of Yamaha Music Europe GmbH, Tysldand Generatorvej 8C. ST. TH.. 2860 Soborg. Denmark Tel: +45-44-92-49-00
NORWAYYamaha Music Europe GmbH Germany-Norwegian BranchGrini Nxringspark I. 1332 Osteras. Norway Tel: +47-6716-7800
CYPRUSYamaha Musk Europe GmbHSiemensstrassc 22-34, 25462 Rellingen, Germany Tel: +49-4101-303-0
RUSSIAYamaha Music (Russia) LLC.Room 37. entrance 7. bid. 7. Kievskaya street, Moscow, 121059, RussiaTel: +7495-626-5005
OTHER EUROPEAN REGIONSYamaha Music Europe GmbllSiemensstrasse 22-34, 25462 Rellingen. Germany Tel: +49-4101-3030
AFRICAYamaha Musk Gulf FZEJAFZA-I 6, Office 512, P.O.Box 17328, Jebel Ali FZE, Dubai, UAETel: +9714-801-1500
MIDDLE EASTTURKEYYamaha Music Europe GmbHMerkezi Almanya Tikkiye Istanbul Subs”‘ Mor Sumbul Sokak Varyap Meridian Business I.Blok No:1 113-114-115Bati Atasehir Istanbul, TurkeyTel: 140-216-275-7960
OTHER REGIONSYamaha Music Gulf FZEJAFZA-16, Office 512, P.O.Box 17328. Jebel Ali FZE, Dubai, UAETel: +9714-801-1500
ASIATHE PEOPLE’S REPUBLIC OF CHINA Yamaha Music & Electronics (China) Co.,Ltd. 2F, Yunhedasha, 1818 Xinzha-lu,Shanghai, ChinaTel: +86-400-051-7700
INDIAYamaha Music India Private LimitedP401, JMD Megapolis, Sector-48. Sohna Road, Gurugram-122018, Haryana, IndiaTel: +91-124-485-3300
INDONESIAPT Yamaha Musik Indonesia Distributor Yamaha Music Center Bldg. Jalan Jend. Gatot Subroto Kay. 4, Jakarta 12930, IndonesiaTel: +62-21-520-2577
KOREAYamaha Music Korea Ltd.I I F, Prudential Tower, 298, Gangnam-dacro, Gangnam-gu, Seoul, 06253, KoreaTel: +82-2-3467-3300
MALAYSIAYamaha Music (Malaysia) Sdn. Bhd. No.8, Jalan Perbandaran, Kelana Jaya, 47301 Petaling Jaya, Selangor, MalaysiaTel: +60-3-78030900
SINGAPOREYamaha Music (Asia) Private Limited Block 202 Hougang Street 21, #02-00, Singapore 530202, SingaporeTel: +65-6740-9200
TAIWANYamaha Music & Electronics Taiwan Co.,Ltd. 2E, No.1, Yuandong Rd., Banqiao Dist.,New Taipei City 22063, Taiwan (R.O.C.)Tel: +886-2-7741-8888
THAILANDSiam Music Yamaha Co., Ltd.3, 4, 15, 16th Fl., Siam Motors Building, 891/1 Rama 1 Road, Wangmai, Pathumwan, Bangkok 10330, ThailandTel: +66-2215-2622
VIETNAM
Yamaha Music Vietnam Company Limited 15th Floor, Nam A Bank Tower, 201-203 Cach Mang Thang Tam St., Ward 4, Dist.3,Ho Chi Minh City, Vietnam.Tel: +84-8-3818-1122OTHER ASIAN REGIONS http://asia.yamaha.com/
OCEANIA
 report this ad
AUSTRALIAYamaha Music Australia Pty. Ltd.Level I, 80 Market Street, South Melbourne, VIC 3205, AustraliaTel: +61-3-9693-5111REGIONS AND TRUST TERRITORIES IN PACIFIC OCEAN http://asia.yamaha.com/
Head Office/Manufacturer: Yamaha Corporation 10-1, Nakazawa-cho, Naka-ku, Hamamatsu, 430-8650, Japan (For European Countries) Importer: Yamaha Music Europe GmbH Siemensstrasse 22-34, 25462 Rellingen, Germany
Yamaha Pro Audio global websitehttp://www.yamahaproaudio.com/Yamaha Downloadshttps://download.yamaha.com/
Manual Development Group© 2020 Yamaha CorporationPublished 11/2020
[xyz-ips snippet=”download-snippet”]