
YAMAHA Saxophone

Congratulations!Thank you for purchasing this Yamaha Brass Instrument. For instructions on the proper assembly of the instrument, and how to keep the instrument in optimum condition for as long as possible, we urge you to read this Owner’s Manual thoroughly
Precautions
Please read before using
The precautions given below concern the proper and safe use of the instrument, and are to protect you and others from any damage or injuries. Please follow and obey these precautions.If children are using the instrument, a guardian should clearly explain these precautions to the child and make sure they are fully understood and obeyed. After reading this manual, please keep it in a safe place for future reference.
About the Icons
![]() : This icon indicates points which should be paid attention to.
: This icon indicates points which should be paid attention to.
![]() Caution
Caution
![]() Do not throw or swing the instrument when others are close by.The mouthpiece or other parts may fall off hitting otherpeople. Always treat the instrument gently.
Do not throw or swing the instrument when others are close by.The mouthpiece or other parts may fall off hitting otherpeople. Always treat the instrument gently.
![]() Keep the oil, polish, etc., out of children’s mouths.Keep the oil, polish, etc., out of children’s reach and do maintenance when children are not present.
Keep the oil, polish, etc., out of children’s mouths.Keep the oil, polish, etc., out of children’s reach and do maintenance when children are not present.
![]() Be careful not to touch the pin springs during maintenance, etc.The end of the pin springs found on high-end models is sharpened to provide greater key action.
Be careful not to touch the pin springs during maintenance, etc.The end of the pin springs found on high-end models is sharpened to provide greater key action.
![]() Be aware of climatic conditions such as temperature, humidity, etc.Keep the instrument away from heat sources such as heaters, etc. Also, do not use or store the instrument in any extreme conditions of temperature or humidity.Doing so may result in damage to key balance, linkage, or pads, resulting in problems during performance.
Be aware of climatic conditions such as temperature, humidity, etc.Keep the instrument away from heat sources such as heaters, etc. Also, do not use or store the instrument in any extreme conditions of temperature or humidity.Doing so may result in damage to key balance, linkage, or pads, resulting in problems during performance.
![]() : This icon indicates actions that are prohibited.
: This icon indicates actions that are prohibited.
Disobeying the points indicated with this mark may lead to damage or injury.
![]() Never use benzene or thinner for maintenance on instruments with a lacquer finish.Doing so may result in damage to the finish’s top coat.
Never use benzene or thinner for maintenance on instruments with a lacquer finish.Doing so may result in damage to the finish’s top coat.
![]() Take care not to disfigure the instrument.Placing the instrument where it is unstable may cause the instrument to fall or drop resulting in disfigurement. Take care as to where and how you place the instrument.
Take care not to disfigure the instrument.Placing the instrument where it is unstable may cause the instrument to fall or drop resulting in disfigurement. Take care as to where and how you place the instrument.
![]() Do not modify the instrument.Besides voiding the warranty, modification of the instrument may make repairs impossible.
Do not modify the instrument.Besides voiding the warranty, modification of the instrument may make repairs impossible.
In regards to brass instruments with a plate finish, the color of the finish may change over time however, it should be of no concern in regards to the instrument’s performance. Discoloration in its early stage can easily be removed with maintenance. (As discoloration progresses, it may be difficult to remove.)
|
To obtain maximum life out of the instrument
- Before assembling the instrument, use a cloth to remove dust or dirt from the joint section.
- After playing, remove moisture from the instrument. (➞ Check “Instrument Maintenance” Down below.)
- Check and perform maintenance on the instrument regularly. (➞ Check “Instrument Maintenance” Down below.)
- When taking the instrument out of its case, hold the instrument at a position that provides good balance without placing pressure on the keys.
Nomenclature
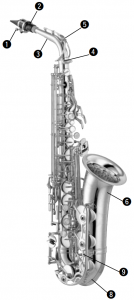
Alto Saxophone Tenor Saxophone
- An alto saxophone is shown in the photo.
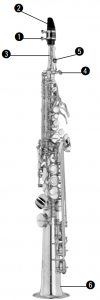
Soprano Saxophone
Baritone Saxophone


- Ligature
- Mouthpiece
- Neck
- Neck Screw
- Octave Key
- Bell
- Upper Bow
- Bow
- Key Guard
- Water Key
- Strap Ring
- Thumb Hook
Assembly
| Before Assembling the InstrumentSince the walls of the saxophone’s body are thin, it is important to remember not to put too much pressure on the instrument in any particular position when holding it. Also, be careful not to damage the instrument by using excessive force during assembly or while handling |
Assembling the Instrument
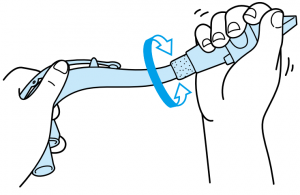
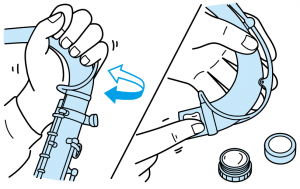
- Attach the mouthpiece to the neck.Hold the mouthpiece and push it about 3/4 of the way onto the neck cork using a slow twisting motion.
 ● If it is difficult to attach the mouthpiece, apply a little cork grease on the neck cork. Be careful not to use excessive force, which may damage the instrument.
 - Attach the neck to the body.Loosen the neck screw, hold the neck then insert it directly into the neck receiver using a slow twisting motion.● If it is difficult to insert into the neck receiver, apply a little cork grease on the neck’s joint section.
- After aligning the neck, tighten the neck screw to secure it.
- Moisten the end of the reed in your mouth (or in some water).
- Attach the reed onto the mouthpiece.First, place the reed so that the tip of the mouthpiece is seen over the end of the reed then tighten the ligature screws (two screws) to secure the reed.
- Place the strap around your neck then hook the strap onto the strap ring on the instrument.
- While holding the instrument, adjust the mouthpiece position and strap length.
 ● If it is difficult to attach the mouthpiece, apply a little cork grease on the neck cork. Be careful not to use excessive force, which may damage the instrument.
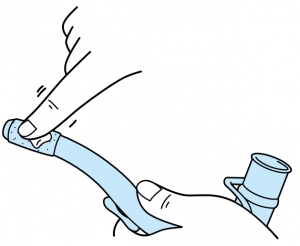


Tuning the Instrument
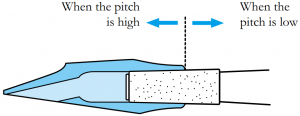
Tuning is accomplished by adjusting the position of the mouthpiece on the neck.Since air temperature or the temperature of the instrument will have an effect on tuning, the instrument should be warmed up beforehand by blowing into it.
Play a tuning note —
- If the pitch is high, pull the mouthpiece slightly off of the neck.
- If the pitch is low, push the mouthpiece a little further onto the neck.
Instrument Maintenance
Instrument Maintenance After Playing
After playing the instrument, use the following procedures to remove moisture and dirt from the inside of the instrument.
- Remove the reed, then use a cleaning swab (sold separately) to clean the inside of the mouthpiece.The cleaning swab is also used to clean the inside of the instrument’s neck and body.* To prevent damage to the end of the mouthpiece, do not pull the swab all the way through the mouthpiece.* Always keep the cleaning swab clean and dry.
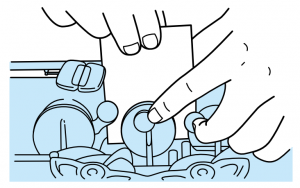
- When the pads are wet, place a cleaning paper (sold separately) between the pad and the tone hole and press the pads lightly to completely remove the moisture.
- On baritone saxophones, remove moisture using the water keys.
- Use a polishing cloth to wipe the instrument’s surface.* When wiping be careful not to apply excessive force on the keys or damage the pads.* Take care not to let the polishing cloth get caught on the pin springs, etc.
- Since the tonehole on the octave key is small and becomes easily clogged, use a tonehole cleaner (sold separately) to clean the hole periodically.


Once or Twice a Month Maintenance
- Apply a small amount of key oil (sold separately) to the mechanism then move the keys to allow the oil to spread evenly.* Do not apply too much oil.* Completely remove any oil on key surfaces.
- Remove dirt from the side surfaces of keys and key posts. Use a small piece of gauze to wipe the surfaces taking care not to place any excessive pressure on the keys.* Make sure that the pin springs, key cork, etc., are not effected when wiping the instrument.
- Use a tone hole cleaner (sold separately) to remove fine dirt or dust from between the keys.* Be careful not to damage the pads.


Cleaning the Neck (Once Every Six Months)
The neck should be cleaned once about every six months.
- Make a lukewarm soap solution mixing brass soap (sold separately) with warm water (30 to 40 degrees Centigrade: 86 to 104 degrees Fahrenheit) in a soap to water ratio of 1:10 or 1:15.* Do not put the neck directly into the brass soap/ water solution.
- Use a screwdriver to remove the key from the neck.
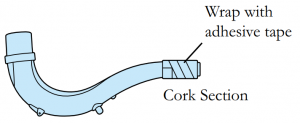
- Wrap the cork section with adhesive tape to protect it from the brass soap/water solution.* Take care to keep the cork from getting wet which may result in the cork becoming deformed.
- Apply some of the soap solution to the saxophone neck brush (sold separately) and scrub the interior of the neck.
- After the dirt is removed, apply some clean water to the brush to remove any remaining dirt and the brass soap from the neck interior.
- After removing all the water from the neck interior, dry with a cleaning swab drawn through the neck to remove all moisture.* The neck on the soprano saxophone is narrow making it hard to draw the swab all the way through. Do not force the swab past the point where it stops in the neck.
Troubleshooting
The sound is not clear or the instrument plays out of tune
▶ Take the instrument to your dealer for repair.
The problem may be related to the pads.
- The pads may not be aligned with the tone holes.➞ Do not apply pressure to the keys. Also, when placing the saxophone in the case, make sure that there is nothing placed on the instrument.
- The pad’s surface is torn.➞ Sand or dust can easily collect on pads when performing outdoors. Clean thoroughly after playing.
- The pad does not open sufficiently.➞ Excessive pressure on the keys may result in damage to the keys or removal of the felts under the keys, which can cause the instrument to play out of tune. Please treat the instrument with care.
Soldered joints become loose
▶ Take the instrument to your dealer for repair.
Solder can break off if the case is closed when there is something placed on the key guards, or from shock due to dropping the instrument, etc. Be careful and treat the instrument with care.
Mouthpiece is difficult to attach to the neck
Apply some cork grease to the neck cork, and try pushing the mouthpiece onto the neck two or three times. Forcing the mouthpiece onto the neck without cork grease may result in damage to the cork. Make sure the cork is properly greased.
The keys do not move or are stiff
▶ If the key is bent, take the instrument to your dealer for repair.
Keys can become bent if excessive force is placed on the key mechanism, if the instrument is dropped, or if the case is closed with something placed on the instrument.When you’re finished playing the instrument, place it in the case making sure that there is nothing in the case that will apply pressure to the instrument when the case is closed. During assembly, do not apply unnecessary pressure on the keys. Also, be careful how you hold the instrument in the intervals between performance.
▶ If a spring has become dislodged, returning it to its proper position may correct the problem.During maintenance, a spring might become dislodged when wiping the instrument with a cloth. Please be careful.
The keys are noisy
▶ Take the instrument to your dealer for repair.
One of the following may be the source of the problem.
- The cork or felt on the keys has fallen off, torn, or become thin.➞ Make sure that corks or felts have not fallen off.
- The instrument may have been dropped or bumped causing keys to touch or come into contact with the body.➞ Make sure that the instrument is placed in the case after playing. Also, be careful how you hold the instrument in the intervals between performance.
- Key mechanisms are worn.➞ To prevent keys from becoming worn, apply key oil about once a month (1-2 drops per place).
- The screws are loose.➞ Woodwind instruments have many screws and they become loose from time to time. Always check for loose screws and tighten.
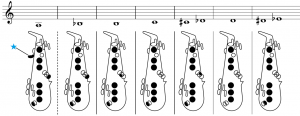
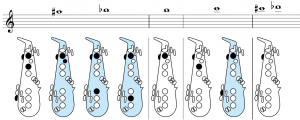
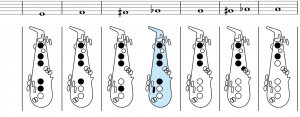
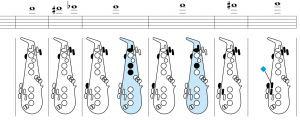
Fingering chart
|
⚫ Hold down |
⚪ Let go |
| Close |
Open |
- The low “A” key is available on the baritone saxophone only

Typed graph
- The high “G” key is available on the soprano saxophone (YSS-875EXHG) only.


[xyz-ips snippet=”download-snippet”]