
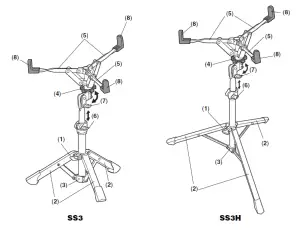
SS3 Snare stand

Thank you for purchasing this Yamaha product.This product is made from aluminum, which makes it lighter yet retains the rigidityof conventional drum hardware. To use the product safely and get the most out ofits features, be sure to read this Owner’s Manual carefully. After reading, be sureto keep it with the product so that you can easily refer back to it again as needed.
Package Contents : Inner bag (SS3 only), Precautions (leaflet), Service Offices list (leaflet)
Safety Precautions
- Compared to conventional chrome plating, the surface on this product tends to scratch easily. When transporting, try to avoid hitting or scraping the product.
- Unusually heavy instruments may be difficult to balance on these stands as the stand itself is light in weight. After setting up and before using for performance or display, check the instrument for stability.
Setup
Setting Up the Snare Stand
- Loosen the wing bolt (1) and extend the three legs (2).
- Place the stand in a stable position, and then tighten the wing bolt (1).NOTE Make sure that the bottom of the pipe (3) is not in contact with the floor, to avoid scratching the floor surface (SS3 only).
- Loosen the rotary nut (4), and open the arms (5).
- Loosen the wing nut (6), adjust to the suitable height, and then securely tighten the wing nut (6).
- Loosen the wing nut (7), adjust the angle, and then securely tighten the wing nut (7).
Attaching the Snare Drum
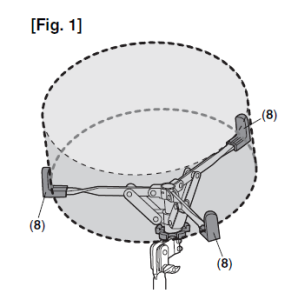
- Place the snare drum so that the three arm covers (8) are supportingthe snare drum’s hoop. [Fig. 1]
- Tighten the rotary nut (4) to lightly secure the drum in place.NOTE Take care not to over-tighten the rotary nut. Doing so can preventthe drum from resonating properly.
Arm Cover (8) Replacement
The arm covers (8) are removable and replaceable. If the arm covers (8)become lost or damaged, contact the dealer from whom you purchased theproduct.
[xyz-ips snippet=”download-snippet”]