YAMAHA Wall Mounted Speaker Brackets Instruction Manual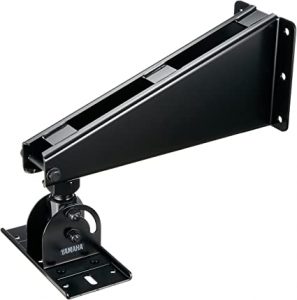
Precautions
- This speaker bracket is for a speaker than weighs no more than 30 kg.
- Make sure that the surface this bracket is being mounted on has the strength to handle the weight of the speaker and this bracket.
- Use bolts, nuts, and washers for installation and tighten them down firmly so that the speaker does not move. After completing the installation, always double check the installation one more time for safety’s sake.
- Always loosen the corresponding screw before adjusting the angle or direction of the speaker. Never force this adjustment with the screw still tightened down.
- Yamaha can not assume any responsibility whatsoever for any damage caused by such incidents as the speaker falling due to an improper installation method or location.
- We recommend that you consult a carpenter or other qualified professional before installing the speaker bracket.
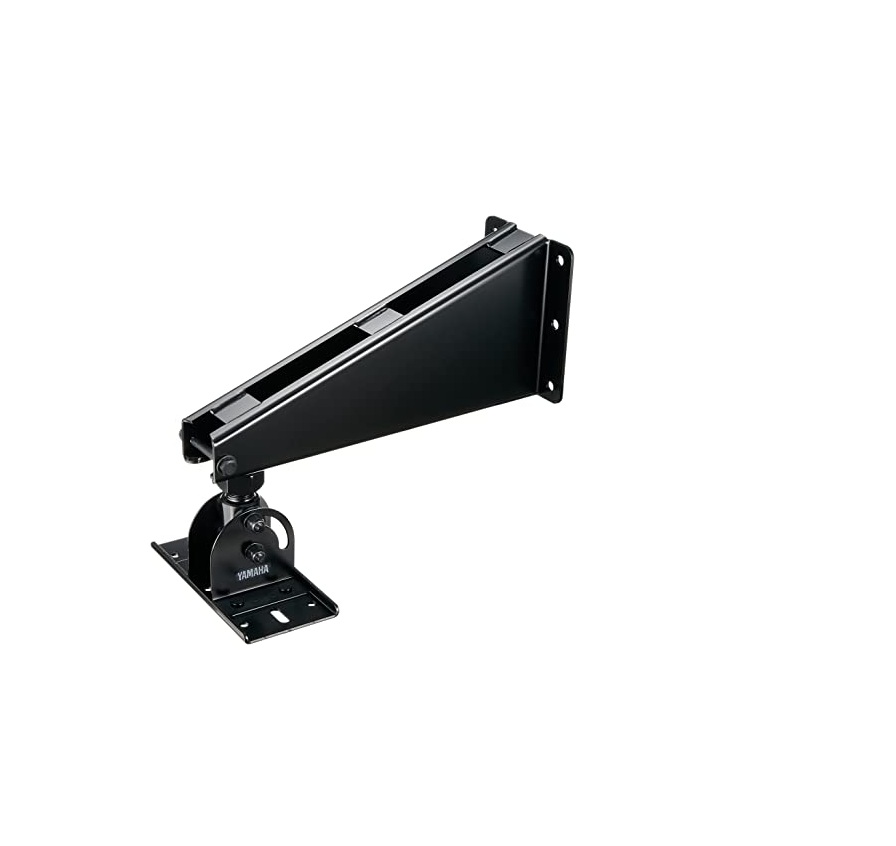
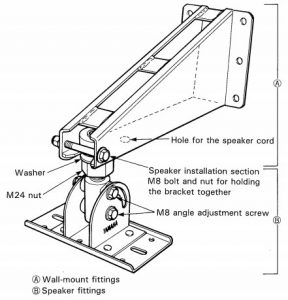
Assembly Drawing
Installation Procedure
- Remove the 2 fixing bolts from the speaker. Using those 2 bolts, attach the base plate to the speaker and tighten the bolts to secure firmly. (Figure 1).
 Figure 1.
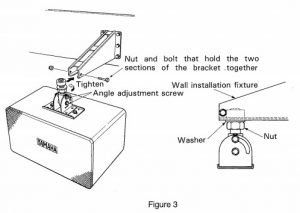
 - After removing the nut and bolt that hold the two sections of the bracket together, use six sets of M8 bolts and nuts and 12 washers to install the wall installation fixture on an adequately strong wall. lighten the nuts and bolts firmly. (Figure 2) Always double check that the wall is strong enough to handle the weight of the speaker and the bracket. We recommend that the wall bracket be Installed during construction of the structure or room. If the bracket is to be installed on an existing wall, additional construction will be necessary. Please consult a carpenter or other qualified professional and check the wall’s construction making sure that it is adequately strong.Warning: The M8 bolts and nuts and washers used to attach the speaker bracket to the wall are not supplied. Please furnish bolts, along with nuts and washers, that are of sufficient length for the wall’s thickness.
- Mount the fixture to which the speaker has been fastened on the wall installation fixture so that washers come to the fastening nut (bottom) as shown in Figure 3. Next, firmly tighten the nut and bolt that hold the two sections of the bracket together. To set the vertical direction for the speaker, loosen the two M8 angle adjustment screws, adjust the angle, then tighten the screws back down again. Do not force the adjustment with the screws still tightened.Warning: Since the angle adjustment screws may come out altogether if they are loosened too far, loosen them only the bare minimum necessary for adjusting the angle.When passing the speaker cord in from the rear side of the wall, use the speaker cord hole in the installation fixture (Figure 4).Warning: If your speaker’s owner’s manual Instructs you to install the speakers at specific angles, please follow those instructions when attaching the bracket.
 Figure 1.
 When passing the speaker cord in from the rear side of the wall, use the speaker cord hole in the installation fixture (Figure 4).Warning: If your speaker’s owner’s manual Instructs you to install the speakers at specific angles, please follow those instructions when attaching the bracket.
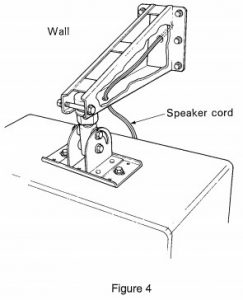
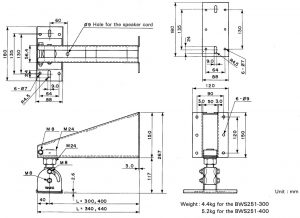
Dimension
[xyz-ips snippet=”download-snippet”]