

Yedi Package Air Fryer Lid GV025
For more recipes and cooking videos go to: www.yedihousewareappliances.comFollow us on Instagram @yedihouseware
INTRODUCTION
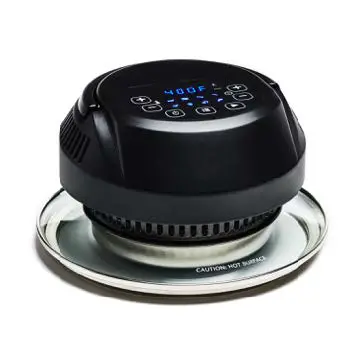
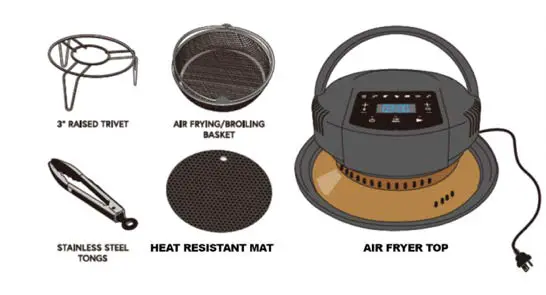
The Yedi Air Fryer Lid is built to anticipate your every broiling, crisping and air-frying needs. The Air Fryer Lid comes packed with a raised trivet, air-frying/broiling basket, heat resistant mat and stainless-steel tongs.
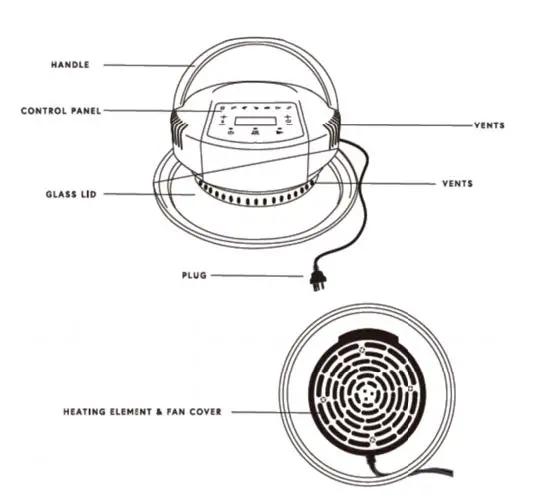
Your Air Fryer Lid consists of the main housing with heating unit and control panel situated on a glass lid. Use your Yedi Air Fryer Lid only with a stainless-steel electric pressure cooker inner pot.
IMPORTANT SAFEGUARDS
Read all instructions before use, save this guide for future reference!
- NEVER USE THE AIR FRYER LID WHILE YOUR ELECTRIC PRESSURE COOKER IS ON!
- MAKE SURE TO ALWAYS UNPLUG YOUR ELECTRIC PRESSURE COOKER BEFORE USING THIS APPLIANCE.
- Never use an extension cord with your Air Fryer Lid. The short power cord is playing with the cord, and to keep you from tripping over a long cord.
- Never use the Air Fryer Lid without the inner pressure cooker cooking pot in place. Never use the Air Fryer Lid with bowls or pots other than the inner stainless-steel pot of the electric pressure cooker. Never use the Air Fryer Lid with ceramic or aluminum pressure cooker pots.
- The Air Fryer Lid is intended for countertop use only with an electric pressure cooker. Ensure the surface is level, clean and dry.
- To prevent overheating, temperatures at or above 450°F have a maximum cook time of 20 minutes. Always let inner steel pot and Air Fryer Lid cool for at least 10 minutes before cooking at or above 450°F again.
- Always ensure Air Fryer Lid is properly positioned before use.
- Always use caution when operating your Air Fryer Lid. Keep Air Fryer Lid away from children or individuals whose physical, sensory, or mental abilities may prevent safe use of the appliance.
- Never use Air Fryer Lid when pressure cooker is on or plugged in.
- To reduce the risk of electric shock, cook only in the stainless-steel pot of an electric pressure cooker. Never use an aluminum or ceramic-coated pot with your Air Fryer Lid.
- Never place the Air Fryer Lid on or near hot gas, ceramic, induction or electric burners. Doing so can cause damage, injury and will void your warranty.
- Never place Air Fryer Lid in an oven. Doing so can cause damage, injury and will void your warranty.
- To prevent electrical shock. Never immerse cord or Air Fryer Lid in water or any other liquid. Do not rinse the Air Fryer Lid under a tap. Doing so may cause damage, injury and will void your warranty.
- Use extreme caution when handling hot foods and hot surfaces to avoid injury.
- Always ensure the electric pressure cooker is off and unplugged when using your Air Fryer Lid.
- Pressure cooker stainless steel pot will be extremely hot during and after cooking. Always use protective gloves/mitts.
- Regularly inspect your Air Fryer Lid and its power cord and plug. Do not use the Air Fryer Lid if there is damage to the power cord or plug. If the Air Fryer Lid malfunctions or is damaged in any way, immediately stop use and call customer service.
- The Air Fryer Lid is for household use only. Never use the Air Fryer Lid for anything other than intended use. Do not use in moving vehicles or boats. Do not use outdoors. Doing so can cause damage, injury and will void your warranty.
- Never tamper with, disassemble or otherwise remove any portion of the Air Fryer Lid. This can damage your Air Fryer Lid and will void your warranty.
- Do not use abrasive cleaners, steel wool, or scouring pads to clean your Air Fryer Lid. Refer to Care and Cleaning for more information.
- To avoid injury, never drape cord over counter edge.
- Do not cover air intake vent or air outlet vent while the Air Fryer Lid is in use. This can cause uneven cooking and damage the Air Fryer Lid.
- The Air Fryer Lid becomes extremely hot during cooking process. Always use care and caution when removing Air Fryer Lid.
- Always set the hot Air Fryer Lid on the heat resistant mat or other heat-resistant surface after use until device cools down. Never place the hot Air Fryer Lid directly on the countertop or heat-sensitive surfaces.
- Never connect the Air Fryer Lid to an external timer switch or separateremote-control system.
- Always provide adequate space above and around the Air Fryer Lid forproper air circulation.
- Never use the Air Fryer Lid or accessories in a microwave, toaster oven, convection oven, conventional oven, or on a ceramic, electric, gas, or induction cooktop, or outdoor grill. This can damage your Air Fryer Lid and will void your warranty.
- Always ensure the Air Fryer Lid is clean before using. Never let the power cord come in contact with the hot surface.
- Your Air Fryer Lid has a UL plug. Always plug power cord into a grounded electrical outlet.
- Press the stop button to ensure no programs are running before unplugging.
- Always unplug and let Air Fryer Lid cool down before cleaning or storing.
- The heat from your Air Fryer Lid can cause stickers in the interior base of your electric pressure cooker to lose their adhesive qualities and come off. Always check stickers
- Never put sealed canned food into pot when using your Air Fryer Lid. Doing so can cause damage, injury, and will void your warranty.
- Never use plastic bag or plastic wrap in pot when using your Air Fryer Lid. Never use slow cooker liners or plastic pot liners when using your Air Fryer Lid. Doing so can cause damage, injury, and will void your warranty.
- Only use provided or approved accessories with your Air Fryer Lid. Using unapproved or other accessories can cause damage and void your warranty.
SETUP AND USE
Getting started with your Air Fryer Lid is quick and convenient.
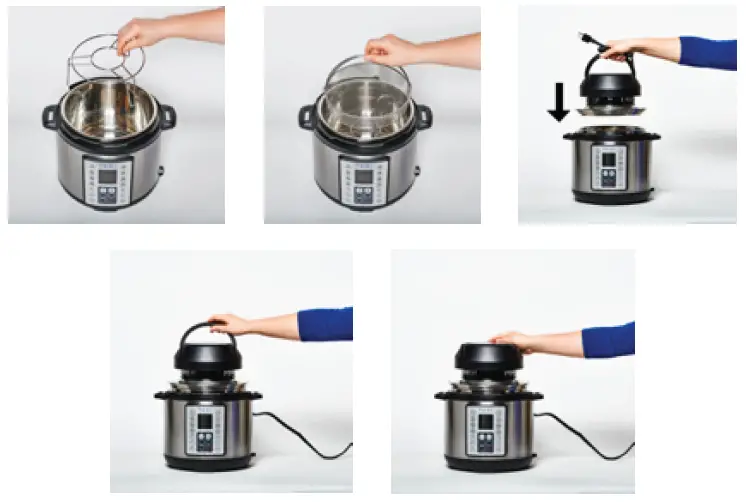
- Ensure pressure cooker is off and unplugged and the inner pot is in place & empty.
- Place trivet into inner pot.
- Place frying basket on top of the trivet.
- Place your food in the frying basket.
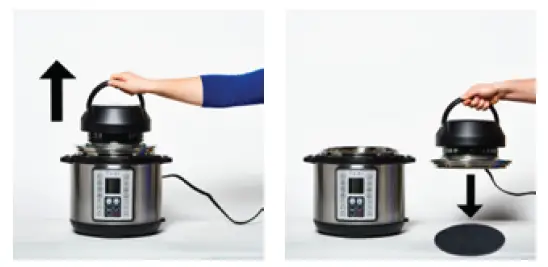
- Set the Air Fryer Lid on top of inner pot and plug Air Fryer Lid into a grounded 3- prong outlet.
- Make sure to push the handle all the way down so it clicks into place (Air Fryer Lid won’t power on unless the handle is down).
- Select your desired preset or manually adjust the time and temperature.

- during the cooking cycle. To do this, pull the handle of the Air Fryer Lid up. Always place the Air Fryer Lid on the provided heat resistant mat when not in useor still hot.
- original position and press the handle back into the down position. Caution: Always use tongs and oven/silicon mitts when working with hot items to prevent burns.
- Once the Air Fryer Lid is back on the inner stainless-steel pot press to resume the cycle, or verify time and temperature then press to restart the cooking process.
 Caution: Always use tongs and oven/silicon mitts when working with hot items to prevent burns.
CONTROLS
The Air Fryer Lid control panel consists of seven buttons (temperature: +/-, time: +/-, stop, menu and start) and an LED screen which is outlined below. The LED screen displays time or temperature, depending on the setting.Note: As a safety measure the handle of your Air Fryer Lid pauses the cooking process when raised. To pause cooking, simply lift the handle into the raised position. To restart the cooking process, lower the handle back down until it clicks into the locked position.Press to resume cooking.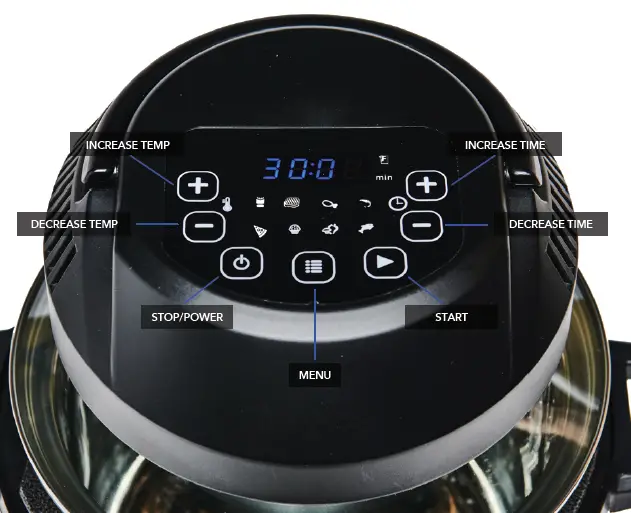
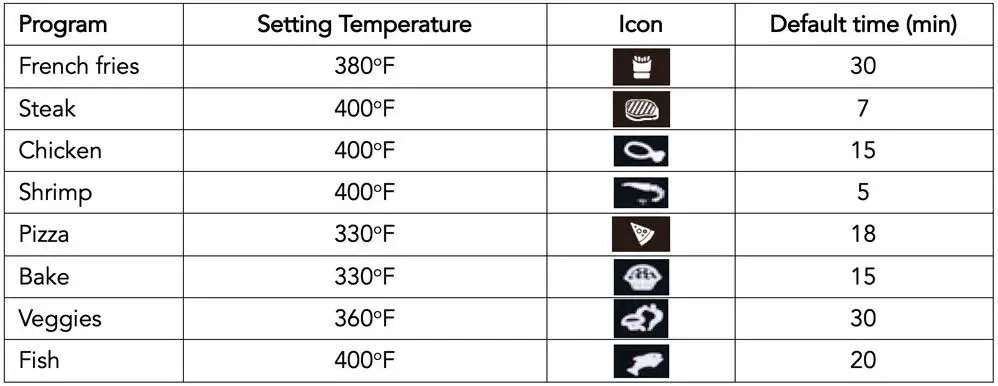
The presets are a basic guideline and the temperature/time dependson the actual ingredients/thickness/weight, etc.The Air Fryer Lid is programmed to operate at nine different temperatures for air frying/broiling. The following table outlines the air fryingpresets and maximum adjustable minutes.
DEHYDRATION
The dehydration process only works in one of the following 5 temperatures: 115°F, 125°F, 135°F, 145°F, 155°F.When manually set to any of these temps, the Air Fryer Lid timer will now show in hours instead of minutes, with a default cooking time of 12hours and an adjustable time range of 1h-24h.
Follow these steps to dehydrate using your Air Fryer Lid.
- Ensure pressure cooker is off and unplugged and the inner pot is in place and empty.
- Place trivet into inner pot.
- Place frying basket on top of the trivet.
- Place your food you want to dehydrate in the frying basket.
- Set the Air Fryer Lid on top of inner pot and plug Air Fryer Lid into a grounded 3-prong outlet.
- Make sure to push the handle all the way down so it clicks into place (Air Fryer Lid won’t power on unless the handle is down).
- Make sure not to select any preset. Just Manually adjust the time & temperature.
- during the dehydration cycle. To do this, pull the handle of the Air Fryer Lid up. Always place the Air Fryer Lid on the provided heat resistant mat when not in use or still hot.
- its original position and press the handle back into the down position.
- Once the Air Fryer Lid is back on the inner stainless-steel pot press to resume the cycle, or verify time and temperature then press to restart the cooking process.
Tip to Adjust SoundMake sure the Air Fryer Lid is not running when doing this process.To turn off the sound, press and hold until S OFF displays.To turn off the sound, press and hold until S ON displays.
CLEANING & CARE
Wait until the unit has completely cooled before attempting to clean. Use a clean damp cloth to wipe down the interior of the lid.The perforated steel heating element cover canbecome discolored after use.This is a normal occurrence with stainless steel that is exposed to high heat and does not indicate damage or affect performance. To restore the original shine to the steel portions of your Air Fryer Lid, dip a clean cloth in white vinegar and rub into steel.Dry/buff immediately with a clean, dry cloth.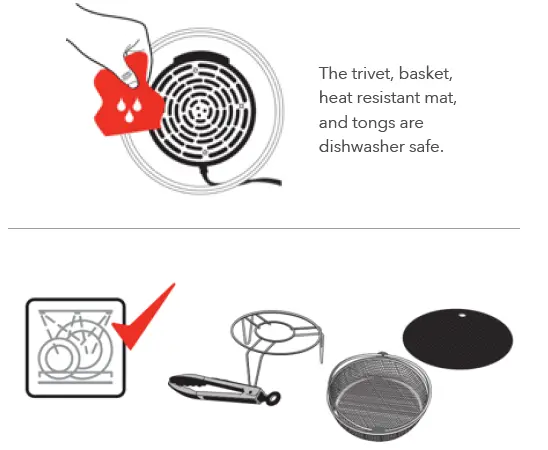
Caution: Never remove perforated steel cover, screws, or dismantle lid in any way when cleaning; doing so can damage your Air Fryer Lid and will void your warranty.
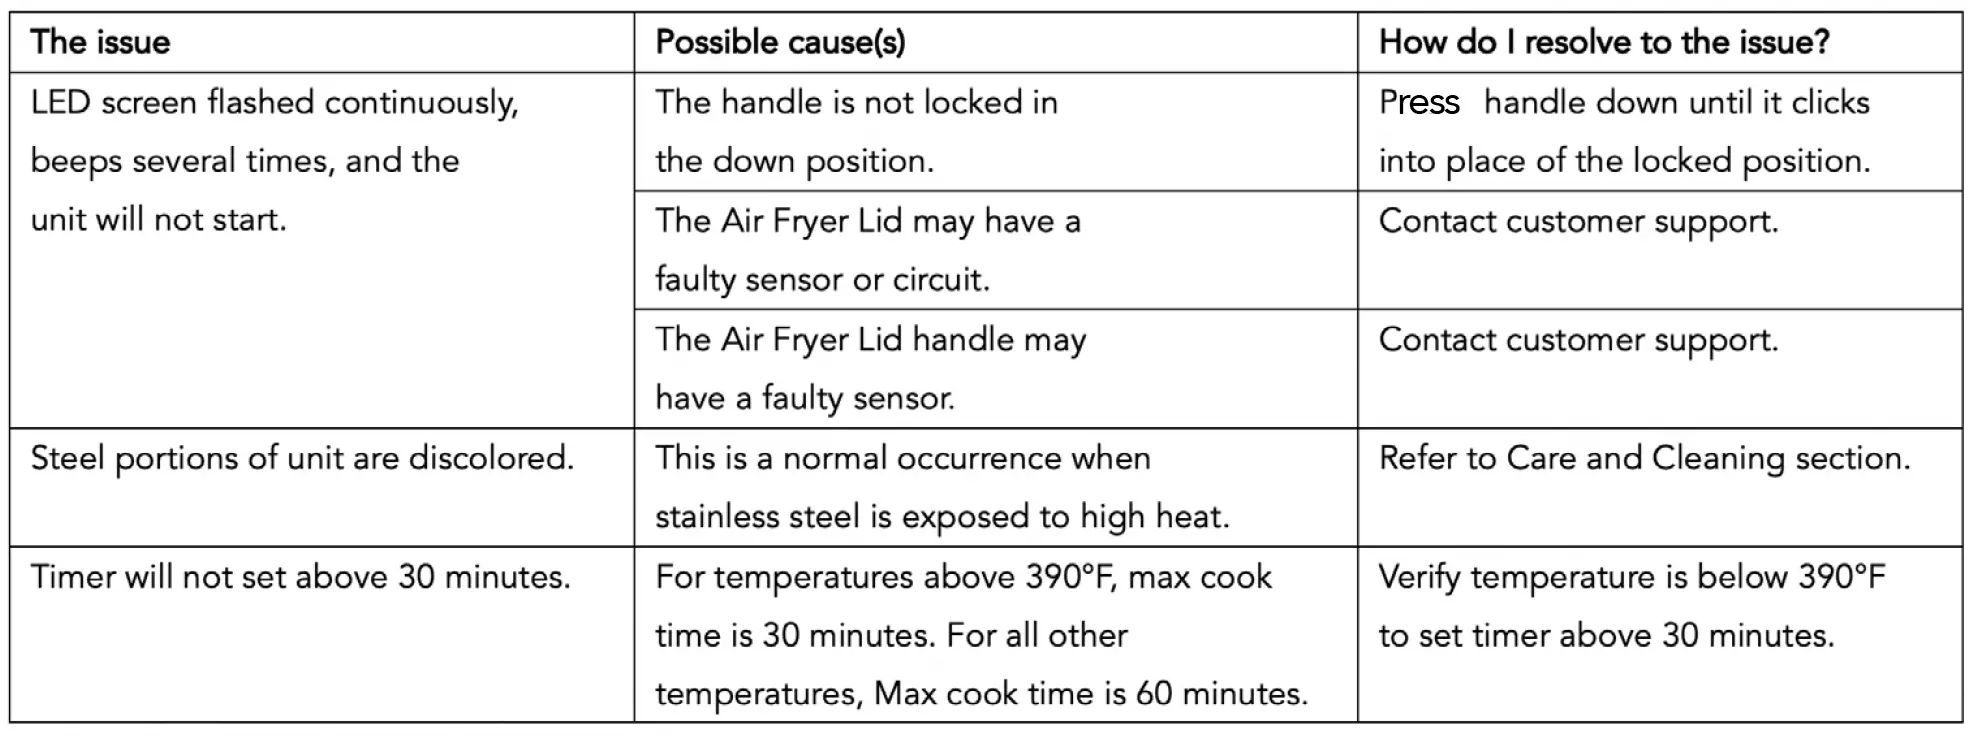
TROUBLESHOOTING
The issues outlined in the following table do not necessarily indicate a faulty Air Fryer Lid. If you need additional support, we are always ready to assist you.
In certain rare situations an error code will display on the LED screen and the unit will beep several times. Use this table to determine the cause of the error and its corresponding solution.
 report this ad
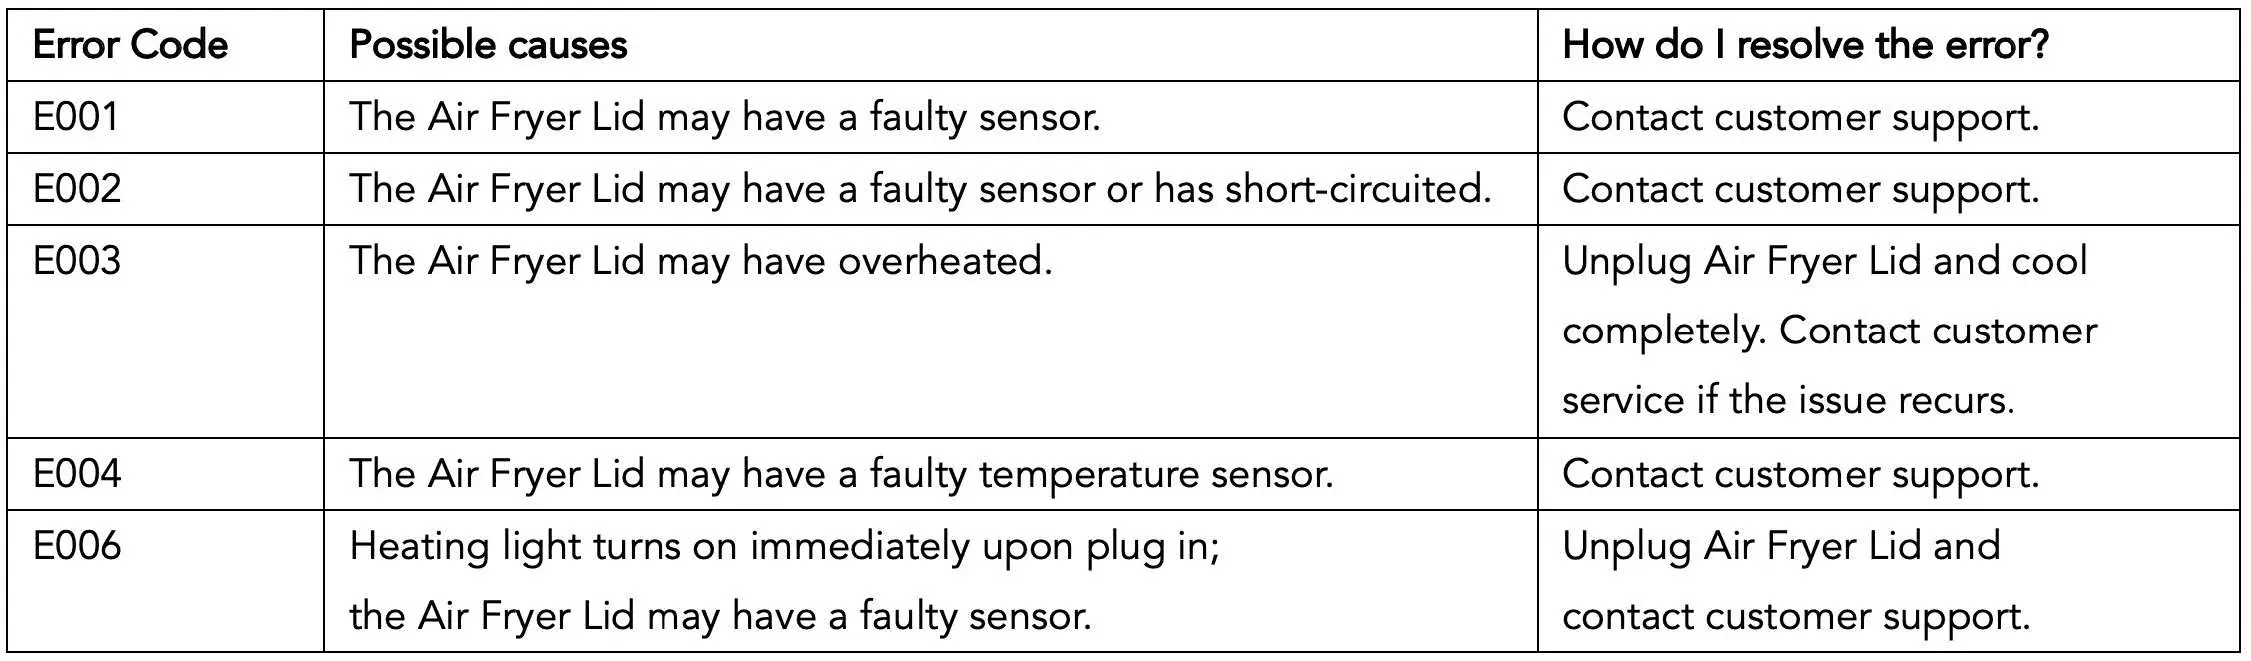
References
[xyz-ips snippet=”download-snippet”]