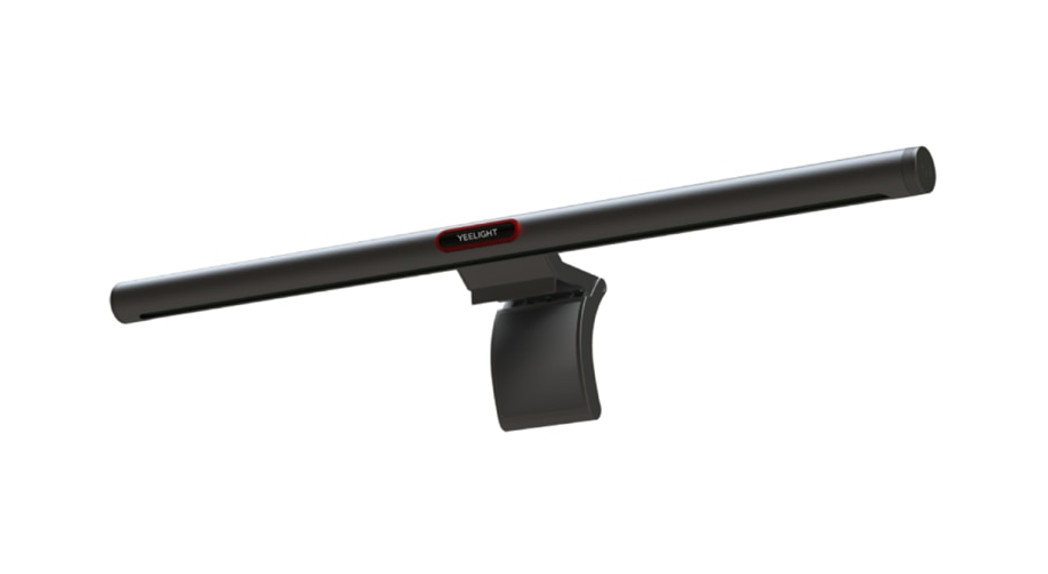
Yeelight Display Hanging Lamp ProUser Manual
Product Description
Please read this manual carefully before use and keep it properly.


Note: The illustrations for the product, accessories and user interface in the manual are all schematic diagrams for reference only. Due to updates and upgrades of the product, the actual product may be slightly different from that shown in the schematic diagram, and the actual product shall govern.
Installation and Use
1. Install the light bar:
- With the main light area facing downward, connect the power contact point of the lamp body to that of the base;
- Place the base in the middle of the upper part of the display to fasten the fixing buckle to the display screen, with the lower part of the base holding up the back of the display (please remove the protective film from the base surface when placing the base);

Tips:
- This product is suitable for displays with a thickness ≤ 32mm and adaptable to hairtail screen, curved screen, iMac, etc.
- The product can be hung stably on displays with a thickness < 10 mm, but the lower part of the base cannot hold up the display.
- The gravity shaft of the base is adjustable within 40°.
- Do not pull with excessive force.
- This product can not be used on laptops.
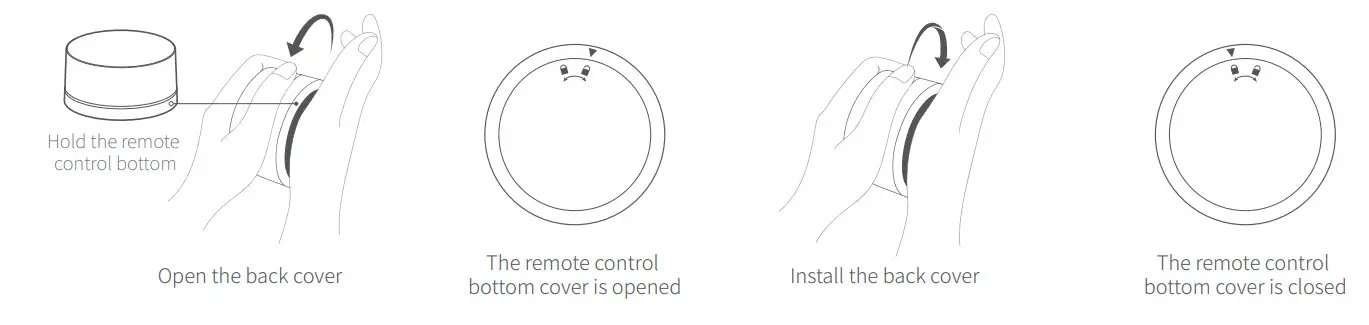
2. Install the remote control battery
- Hold the bottom edge of the remote control with one hand, press the bottom anti-skid pad with the other hand, and rotate counterclockwise to open the back cover of the remote control.
- Install two AAA batteries according to the markings indicating positive and negative terminals of the battery compartment.
- Align the triangular arrow at the bottom edge with the area indicating the anti-skid padlock (the bottom cover of the remote control is opened), and put the back cover in place.
- Hold the bottom edge of the remote control with one hand, press the bottom anti-skid pad with the other hand, and rotate clockwise to lock the back cover and complete installation.
Power supply and use
1. Power supplyUse a 5V2A or 5V3A adapter to connect to the USB power cord and insert it into the Type-C interface;
 Tips:
Tips:
- Do not use adapters such as 5V1A with power less than 10W for the power supply!
- Please use the original power cord. Do not use any USB extension cord or USB hub, otherwise, it may result in the abnormality of the hanging lamp.
- Do not connect the power contact point of the lamp body or base to other metal conductors, otherwise, it may cause damage or other hazards to the product.
- The original power cord is a dedicated accessory for the Yeelight display hanging lamp, and cannot be used for fast charging or data transmission for other devices.
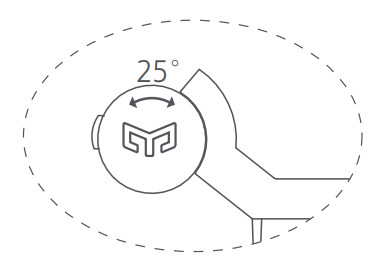
2. Adjustment The lamp is adjustable within 25° by rotating the lamp body.
Light control
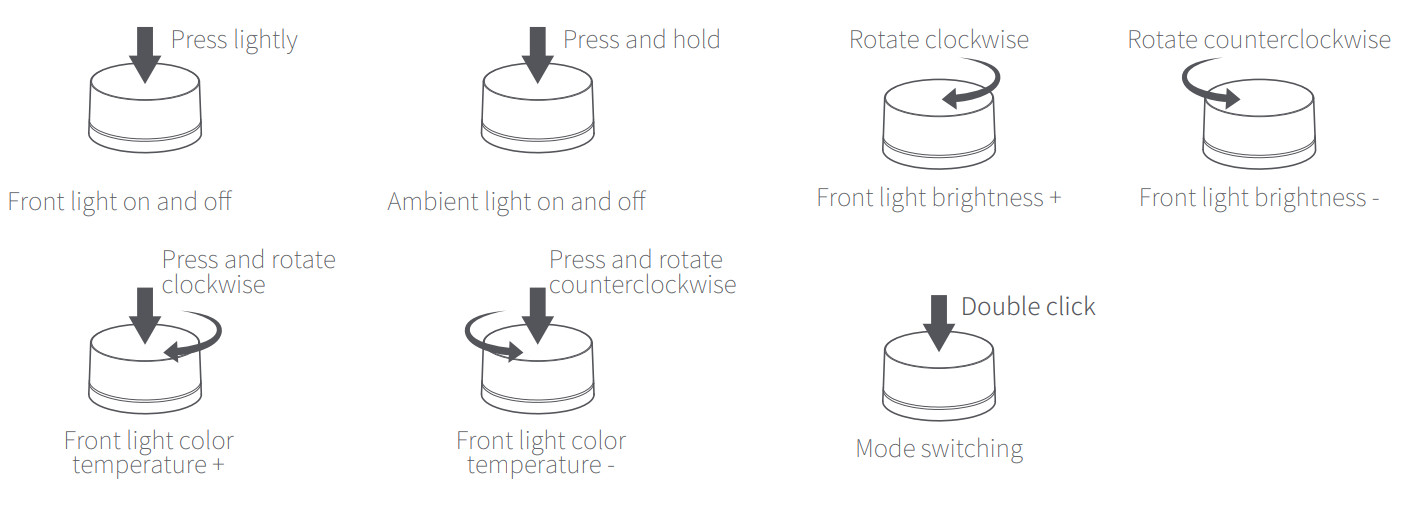
Tip:
- The remote control has been matched with the hanging lamp by default and can be used directly.
- If the remote control needs to be matched with other non-original accessories of the same model, please press and hold the knob of the remote control within 20 seconds after the hanging lamp is powered on, and matching is successful if the hanging lamp shows breathing effect.
- Four modes are preset initially and users can customize the number and order of modes to be switched in [Device Settings] – [Knob Settings].
Specifications
Model: YLTD003Supported operating systems: Android 4.4 or iOS 9.0 and laterConnectivity: Wi-Fi IEEE 802.11 b/n/g 2.4GHzRated power: 10W (80×0.2W/LED module+40×0.2W/LED module)Operating humidity: 0%—85%RHColor rendering index: Ra95Lamp body size: φ23.0 × 485.5mmRemote control size: φ66.5×34mm
Notes
- This product comes with no adapter. Please use a 5V adapter with power greater than or equal to 10W for the power supply, otherwise, the product will not work.
- Remote control can control multiple hanging lamps, but a hanging lamp can only be controlled by one remote control.
- Please clean the product surface with a soft cotton cloth and do not clean it with corrosive solvent.
- After the replacement of the remote control batteries, please recycle the waste batteries to avoid environmental pollution.
- The light source is irreplaceable. The entire hanging lamp should be replaced when the light source is at the end of its service life.
- This product can only be used indoors.
Connect to Yeelight App
This product can be controlled on Yeelight App and be configured to interact with other Yeelight products.

http://www.yeelight.com/ctd/download
- Download AppSearch for “Yeelight” in an App Store or scan the QR code on the right to download and install the App.
- Add Device1. Go to the Yeelight App homepage, and click “+” in the upper right corner to add your device.2. Proceed with the configuration as instructed on the App.3. Once you’ve added a device successfully, you can find it in the device list.
Note: The operation procedure may differ from what’s described here due to App updates. Please proceed as instructed on the App.This product can also be controlled on Mi home, Google Home App, and Amazon Alexa. You can download and install one of these Apps from an App store, and configure your device as instructed on the App. After you have finished the configuration, you can use the App to control the light.
Game platform access guide
Procedure for Access to Razer Chroma Platform
- Download Razer Synapse on Windows desktop at https://www.razer.com/synapse-3 (Select Chroma-related components to complete installation)
- Download the Yeelight Chroma Connector plug-in at https://www2.razer.com/chroma-workshop-apps, and follow the tips for the default installation. After installing, a Yeelight Chroma Connector shortcut icon is generated on the desktop.Double click to open the program;
- Open the installed Razer Synapse, which will automatically detect the Yeelight Chroma Connector plug-in;
- Double click the connected Yeelight icon to enter the configuration interface, and turn on the corresponding switch;
- Link the corresponding display hanging lamp to the network and complete configuration with Yeelight APP.
- Then go to Yeelight APP-[Device Settings]-[Third Party Integration], turn on the third-party integration switch (a very important step without which the device will not be found via search)
- The Yeelight Chroma Connector plug-in will automatically find devices within LAN that support Chroma linkage (the display hanging the lamp is marked with lamp15-xxxx)
- Click on the [Disable] button in the device, and [Enable] displayed on the button indicates that the device has been turned on and accessed.Then, you can start the game!
Plug-in Features
- The Enable/Disable button controls the linkage between the device and Razer Chroma components;1. Disable shown on the button: The current device is not triggered and linkage cannot be established;2. Enable shown on the button: The current device has been triggered and linkage can be established;
- Preview button, which indicates the correspondence with the actual device (in the Disable state, when Preview button is clicked on, the corresponding lamp will flash to remind you);
- Brightness, used to adjust the brightness; the brightness can be edited manually in the edit box on the right;
- Select Group, used to select which LED light the lamp will correspond to in Chroma components;
- Click on the Guidance icon in the top right corner to pop up Help notes;
- Device List is used to indicating the number of devices;
- The top right corner area is used for turning pages;
Procedure for Access to Overwolf Platform
- Download Overwolf application on Windows operating systems at: https://www.overwolf.com/
- Install the Overwolf client and open the client interface;
- Download Yeelight Game plug-in at: https://www.overwolf.com/app/Yeelight-Yeelight_Overwolf_Connector.
- After downloading, double click to install the plug-in. A Yeelight Overwolf Connector shortcut icon is generated on the desktop after installation. Double click the icon to open the plug-in program;
- In-Game List, you can select the game list matched with the device, and click on the switch for [Open/Close] operations;
- Click on the PUBG icon (the red box below for selection) to set and edit detailed key event parameters, such as color, color temperature and brightness, and also set the concept of a multi-frame trigger, which may be customized by the user;
- After setting the game parameters, go to [Settings] on the left to scan the device:1. After the lamp is configured, turn on the third-party integration switch by going to Yeelight APP – [Device Settings] – [Third-Party Integration];2. The device can only be found when the computer and the lamp are in the same LAN;3. In the plug-in, refresh the device and you can find devices in the LAN. Click on Disable to display Enable, and then click on the device icon (the red box below for selection), and the lamp will show breathing effect accordingly;
- After the device is configured, enter the game you have just started to experience the pleasure brought by the lamp!
 report this ad
Website: www.yeelight.comManufacturer: Qingdao Yeelink Information Technology Co., Ltd.Address: 10F-B4, Bldg. B, International Innovation Park, 169 Songling Rd., Laoshan District, Qingdao, China
References
[xyz-ips snippet=”download-snippet”]