INSTRUCTION MANUAL—-SOLAR MOBILE LIGHTING SYSTEM
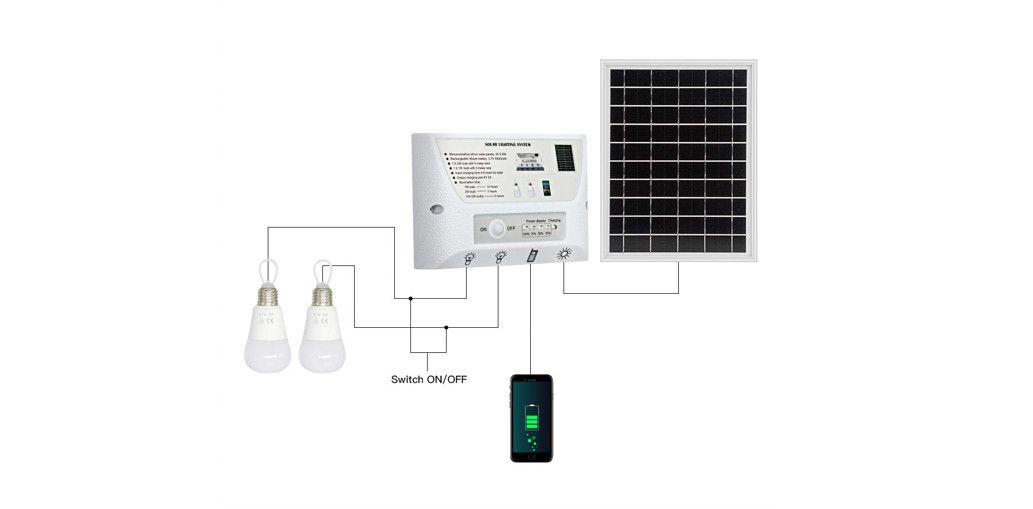
This solar mobile lighting system comprises of solar panel, controller with premium lithium battery inside, LED bulbs and related wires. It features the benefit of environmentally friendly, safe, easy to install, versatile utility, widely used for wild and home lighting.

- Specifications
 Solar panel: polycrystalline sinicon, 14V 30WRechargeable battery: LiFePO4 9.6V 12AHIP44 Lamps: 2X 2W LED light bulbs with 5 meter wire, 2X 3W LED light bulbs with 5 meter wire, both with seperate ON/OFF switch.Mobile charging outlet: any of the all 4 outlets can charge cellphone, each outlet output 5V 2A, maximum 5 cellphones can be chargedsimutaniously(total output SV 6A maximum). Incorporated with short circuit protection, over-discharge prevention andturning to energy saving mode without any output loadSolar panel charging time: about 6-8 hours(strong and direct light).Illumination time after battery fully charged: 9.6 V 12 AH: 2x 2W—–13-14hours; 2x 3W——10-12hours. 2X2W +2X3W——5-7hours
 - System Accessories(1) 2pc 5 meter wire for each of 2W LED light and 3W LED light with seperate ON/OFF switch. Solar panel with 5 meter wire [Fig 2].(2) 3pc of cellphone charging wire, 1 meter long, with ordinary android plug [Fig 3]. 1pc of converter plug for Iphone [Fig 5].(3) 3 pcs supporting shelves [Fig 4].(4) 8 pcs stainless steel screw with plate 3M10 [Fig 6].(5) 8 pcs Hexagon stainless steel nuts M3 [Fig 6].(6) 1 pc Galvanized spanner [Fig 6],(7) 6pCS M660 Stainless steel expansion bolts [Fig 6],
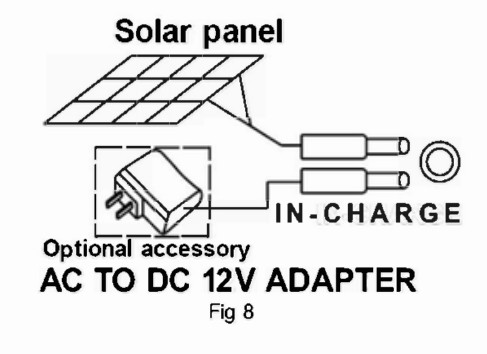
- FunctionalityTHE PANEL OF THE SYSTEM:CHARGE: The red indicator light will turn on when connect to solar panel and there is a input power from solar panel.LOAD: The indicator light will turn on once any of the five outlets has been connect to load and there is a output of power.BATTERY VOLTAGE: Yellow area: low level of power stored in battery, the protection of over-discharge function initiates; Green area: medium level of power, this area shows the battery works in normal condition. Red area: high level of power, the protection of over charge function initiates.POWER: the switch for the whole system(1) When turn on this switch, all five outlets are ready to export power. The battery voltage needle points to Green area and shows how much power is stored in the battery.(2) When turn off this switch, all five outlets stop to export power. The battery voltage needle points to zero.IN CHARGE: connect to solar panel to charge the battery. The solar panel will charge the battery no matter the switch is being Turned ONor OFF. When the solar panel is connected to IN CHARGE and the switch is turned ON, the CHARGE indicator will be lit up and the BATTERYVOLTAGE shows how much power the battery stores. The system can be charged and export power at the same time.Note: Except solar panel, this system can be charged by AC or Dc power. Recommend to use transformer: AC: 100V-240V with a power output Dc: 12V 2A
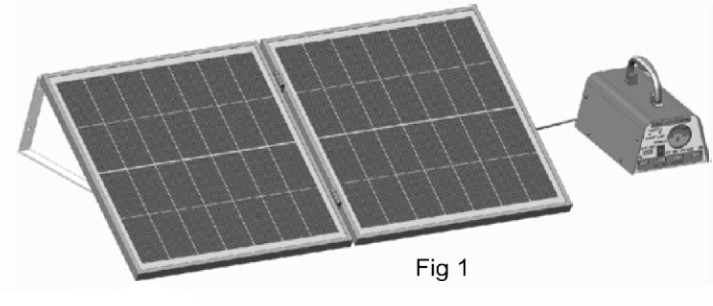
- Installation of solar panel(1) Install the triangle supporting shelf with the solar panel by M3’10mm screw and M3 nut.(2) Fasten the supporting shelf onto the desired place by M6’60 Stainless steel expansion bolts.ATTENTIONS:(1) Please be aware the function of this device is completely on the sunlight exposure of the solar panel. Avoid the shadow or shade, tress, high building, or other obstruction. Ensure solar panel has the maximum exposure of sunlight, 3-4 hours a day is the best requirement to keep the device working normally. The Illumination time will become less if the sun exposure is insufficient.(2) Avoid bumping or collision during installation and daily usage, careful handlin.
 Solar panel: polycrystalline sinicon, 14V 30WRechargeable battery: LiFePO4 9.6V 12AHIP44 Lamps: 2X 2W LED light bulbs with 5 meter wire, 2X 3W LED light bulbs with 5 meter wire, both with seperate ON/OFF switch.Mobile charging outlet: any of the all 4 outlets can charge cellphone, each outlet output 5V 2A, maximum 5 cellphones can be chargedsimutaniously(total output SV 6A maximum). Incorporated with short circuit protection, over-discharge prevention andturning to energy saving mode without any output loadSolar panel charging time: about 6-8 hours(strong and direct light).Illumination time after battery fully charged: 9.6 V 12 AH: 2x 2W—–13-14hours; 2x 3W——10-12hours. 2X2W +2X3W——5-7hours
 (1) 2pc 5 meter wire for each of 2W LED light and 3W LED light with seperate ON/OFF switch. Solar panel with 5 meter wire [Fig 2].(2) 3pc of cellphone charging wire, 1 meter long, with ordinary android plug [Fig 3]. 1pc of converter plug for Iphone [Fig 5].(3) 3 pcs supporting shelves [Fig 4].(4) 8 pcs stainless steel screw with plate 3M10 [Fig 6].(5) 8 pcs Hexagon stainless steel nuts M3 [Fig 6].(6) 1 pc Galvanized spanner [Fig 6],(7) 6pCS M660 Stainless steel expansion bolts [Fig 6],
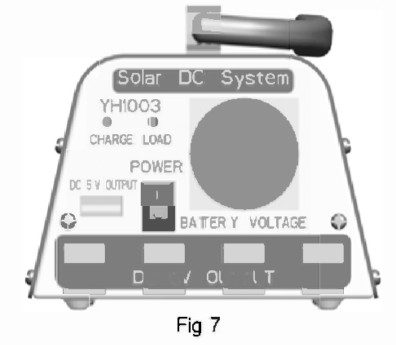
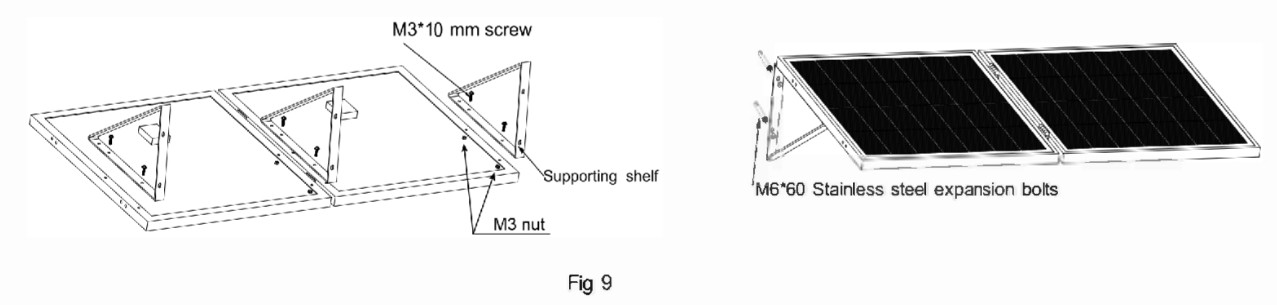 (1) Install the triangle supporting shelf with the solar panel by M3’10mm screw and M3 nut.(2) Fasten the supporting shelf onto the desired place by M6’60 Stainless steel expansion bolts.
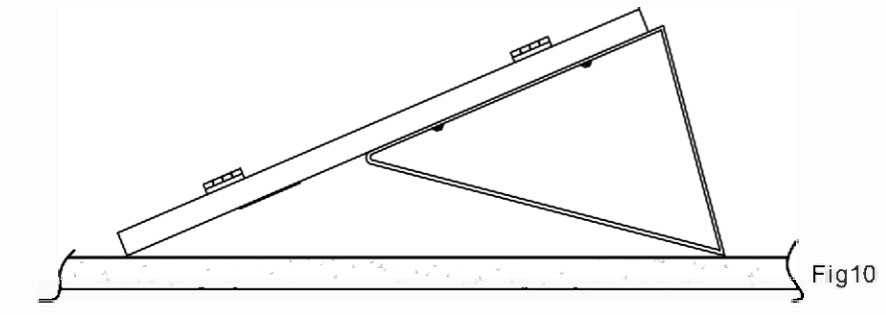 ATTENTIONS:(1) Please be aware the function of this device is completely on the sunlight exposure of the solar panel. Avoid the shadow or shade, tress, high building, or other obstruction. Ensure solar panel has the maximum exposure of sunlight, 3-4 hours a day is the best requirement to keep the device working normally. The Illumination time will become less if the sun exposure is insufficient.(2) Avoid bumping or collision during installation and daily usage, careful handlin.
[xyz-ips snippet=”download-snippet”]