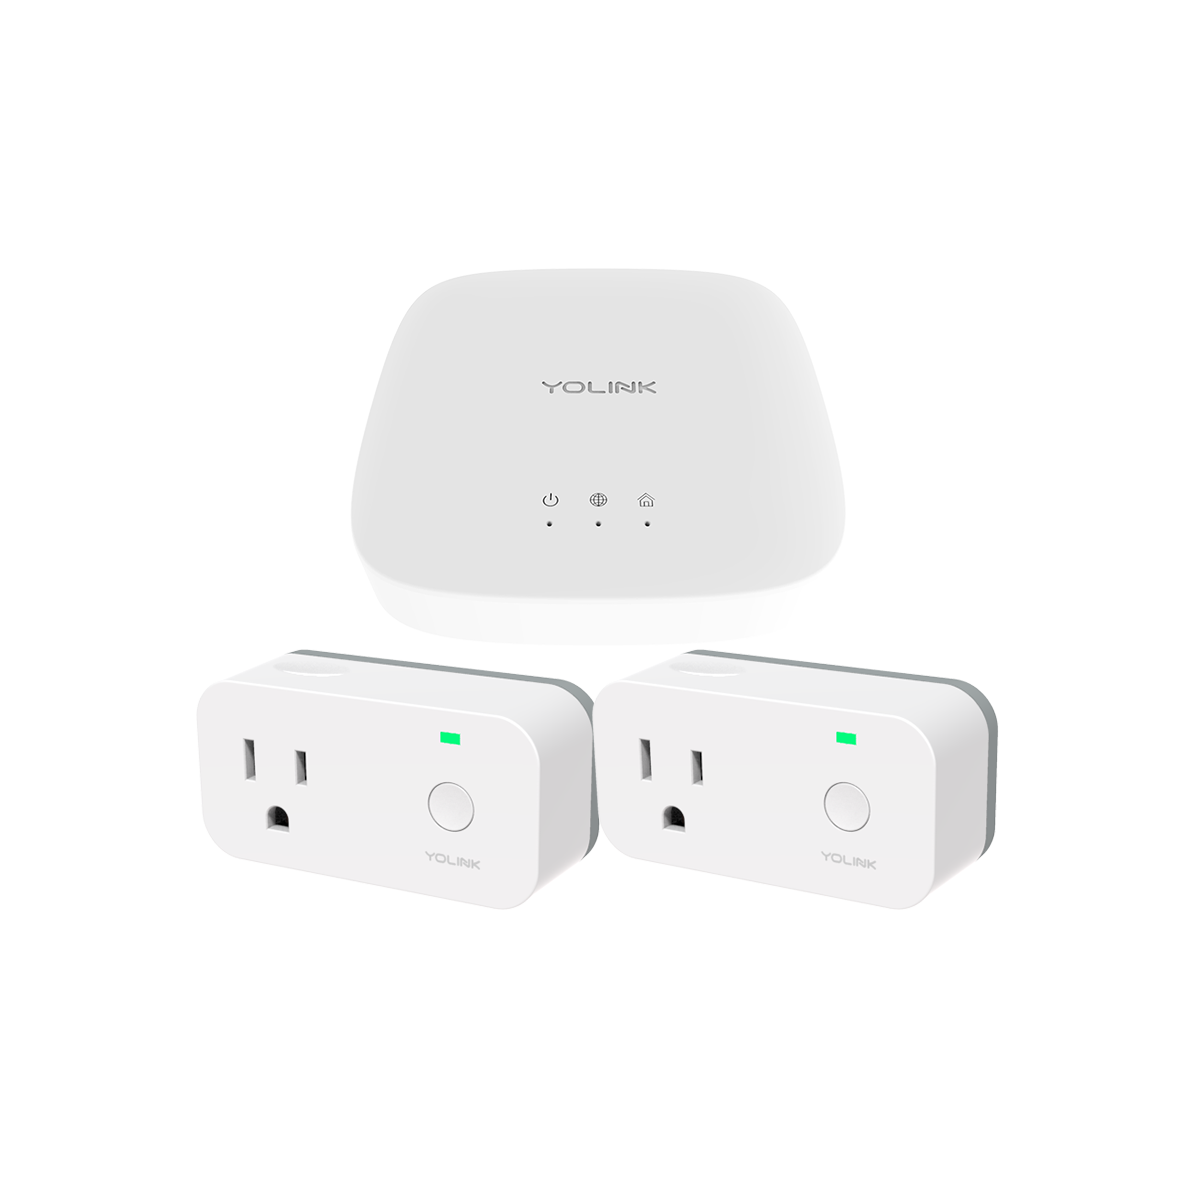
YOLINK YS1603-UC Hub

Introduction
Thank you for purchasing YoLink products! Whether you are adding additional hubs to expand your system’s range or if this is your first YoLink system, we appreciate you trusting YoLink for your smart home/home automation needs. Your 100% satisfaction is our goal. If you experience any problems with your installation, with our product or if you have any questions that this manual does not answer, please contact us right away. See the Customer Support section for more info. The YoLink Hub is the central controller of your YoLink system and the gateway to the Internet for your YoLink devices. As opposed to many smart home systems, the individual devices (sensors, switches, outlets, etc.) are not on your network or Wi-FI and are not directly connected to the internet. Instead, your devices communicate with the Hub, which connects to the internet, the cloud server and the app.
The Hub connects to the internet via a wired and/or WiFi connection to your network. As the wired method is “plug & play” we recommend using this method, because it is the easiest to set-up and it does not require making changes to settings for your phone or network equipment (now, or in the future — changing your WiFi password later would require changing the password for the Hub). The Hub may otherwise be connected to the internet via a 2.4GHz (only*) band WiFi provided by your network. See the Support section of this manual for more information. *5GHz band is not supported at this time.
Your system may have more than one Hub, due to the number of devices (one Hub can support at least 300 devices), and/or the physical size of your home or building(s) and/or property. YoLink’s unique Semtech® LoRa®-based long-range/low-power system offers industry-leading range – up to 1/4 mile reach in open air!
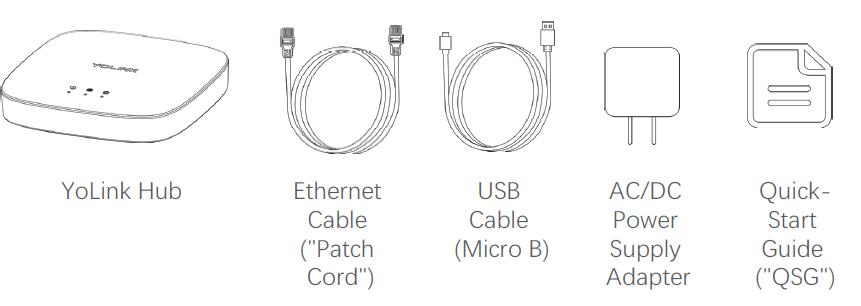
In the Box
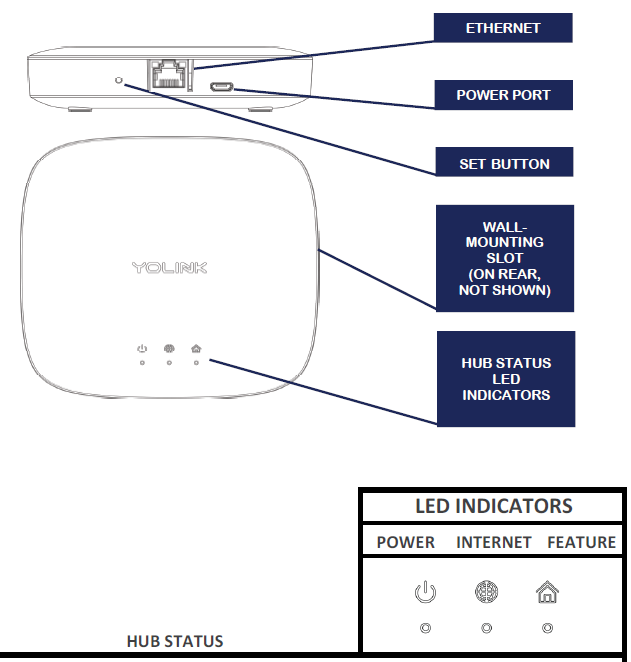
Get to Know Your Hub
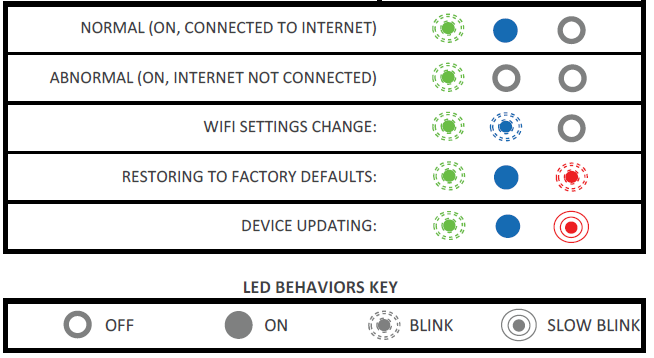
ETHERNET JACK LED BEHAVIORS
Fast blinking yellow indicates normal data transmission Slow blinking yellow indicates no response from the router Green light on indicates port is connected to router or switch Either light off indicates something is wrong (Disregard LEDs if port is not being used)
Wired and/or WiFi?
Your Hub must be connected to the Internet via WiFi and/or a wired connection. For easy plug & play installation with no need to change phone or Hub settings, now or later, a wired connection, only, is recommended. A wired connection may be best for you, if any of these apply to you:
- You’d rather not share your WiFi password with additional apps or systems
- You’d rather not have to update the app settings if you ever change your WiFi password or make changes to the network equipment or internet service provider.
- You have only a hot spot and/or do not have a permanently-installed WiFi (no hot spots!)
- Your WiFi has a second verification process or additional security
- You forgot or do not have your password
- Your WiFi is not dependable.
Set-Up: Install YoLink App
- Install the free YoLink app on your phone or tablet (search in the store or click the QR code below)
- Allow the app to send notifications, if requested
- Click on Sign up for an account to create your new accountPlease retain your password in a secure location, as the Hub is the gateway to your YoLink smart home environment!
If you encounter an error message attempting to create an account, please turn off your phone’s Wi-Fi, ensuring you are connected to the internet via your phone’s cell service, and try again.
Add Your Hub to the App
The Hub must first be added to the app (to your account). This is called “binding”
- In the app, click on the device scanner icon:Accept the request to access your camera, if needed4
- The scanner screen appears as shown below. Holding your phone over the Hub, place the QR code within the viewing window.
- When prompted, click Bind Device. A message the device has been bound appears
- Close the pop-up message by clicking Close
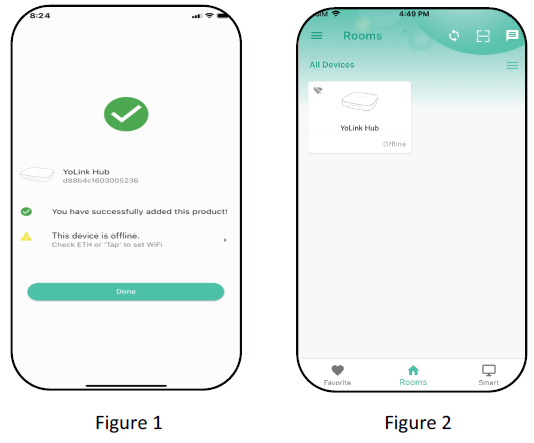
- Click Done (Figure 1)
- Refer to Figure 2 for the Hub successfully added to the app.

Installation Considerations
- Please consider where you will install your Hub. Whether you plan to use a wired or WiFi internet connection, your Hub should be plugged in to your network switch or router for the initial set-up. This will be the permanent installation if you’re only using the wired method and the permanent or temporary connection (for express set-up) if using the WiFi method.
- Due to the industry-leading long-range of YoLink’s LoRa-based wireless communication technology, most customers will experience no issues whatsoever with system signal strength, no matter where they place their Hub in their home or business. Generally, most place their
- Hub next to their router, which is often a convenient location, with open Ethernet ports. Larger homes or applications requiring coverage to out-buildings and more remote outdoor areas may require alternative placement or additional Hubs, for optimal coverage.
- You may wish to set-up your Hub at a temporary location, until you are ready to put it in its permanent location, and that is OK. This may be at the router/switch/satelite or at a desk, as long as your Ethernet cord can reach (or perhaps your home or business has in-wall data jacks), Plan to use the included Ethernet cable (sometimes referred to as a “patch cord”) to connect your Hub to your network equipment. Or, if you need lengths longer than 3 feet, longer cords are readily available where computer accessories are sold. Your Hub may be shelfor countertop- or wall-mounted. If wall-mounting, utilize the mounting slot on the back of the Hub, and hang the Hub from a screw or nail in the wall. Mounting it in a vertical or horizontal position will not impact the operation of Hub.
- For systems with critical equipment monitoring and control, a UPS or other form of back-up power for the Hub is recommended. Your router, your internet service provider’s equipment and additional network equipment for the Hub’s internet connection must also be on backup power. Your internet service may already be protected against power outages by your internet service provider.
Power-Up & Connect to Network (Wired & WiFi Internet Connection)
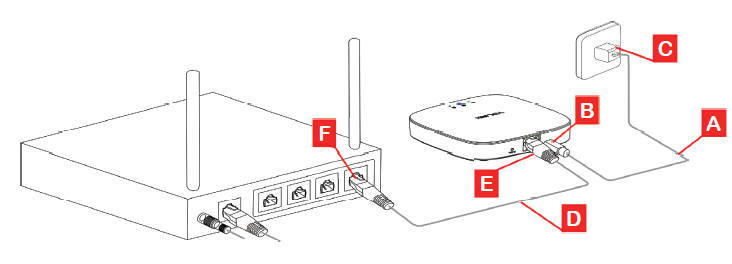
- As shown, power up the Hub by connecting one end the USB cable (A) to the power jack (B) on the Hub, and the other end to the power adapter (C), plugged into an outlet.
- The green power indicator should flash:
- Using the supplied Ethernet patch cord (D), connect one end (E) to the Hub, and the other end (F) to an open port on your router or switch. The blue Internet indicator should turn on:
- The Hub is now shown to be Online, Ethernet icon illuminated
- If you are only using the Wired Connection method, please proceed to section. For WiFi connection method set-up, proceed to section.If your Hub is NOT Online after this step, please doublecheck your cable connections. Check LED indicators on the Ethernet jack on your Hub (refer to section C). There should be similar LED activity on your router or switch (refer to router/switch documentation)

Wi-Fi Internet Connection
- Enable Location Services on your phone:
- Go to Settings
- Tap Privacy
- Tap Location Services
- Ensure Location Services is on/enabled
- Scroll down to the YoLink app, click
- Select While Using the App
- Enable Precise Location
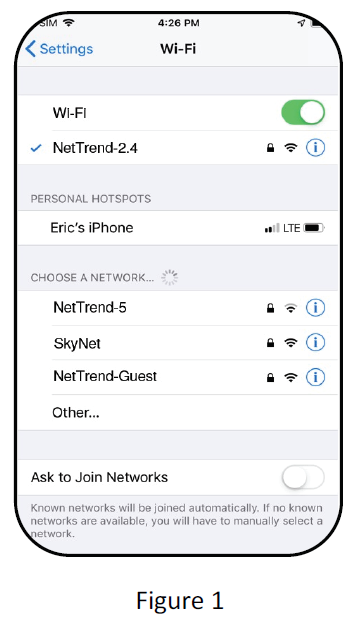
- In your phone, open WiFi settings: (Settings, WiFi) See Figure 1 for an example Wi-Fi settings screen (iOS)
- Identify your 2.4GHz network, if possible. If you recognize only one network as yours, this is the one you will use.If your SSID is hidden, you must manually log into it on your phone, by selecting “Other…” in Other Networks or Choose A Network.
- Select the appropriate network, and log-in, if needed
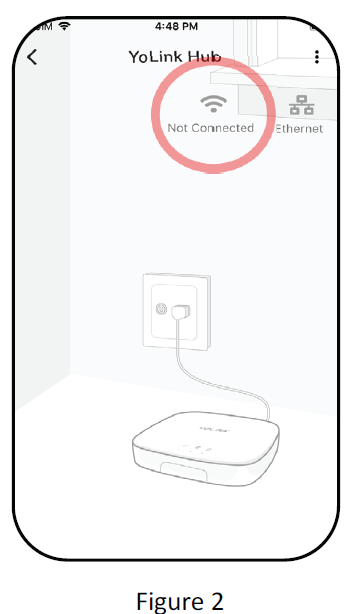
- In the app, click on the Hub, then click on the Wi- Fi icon (As shown in Figure 2)
- Ensure the network is displayed in the Current WiFi SSID box.
- Enter your Wi-Fi password in the Password box. Click Continue
- As directed in the app, press and hold the Hub’s SET button for 5 seconds, until the blue internet indicator on the top of the Hub blinks. The Hub is now in Linking Mode. Linking Mode will cease if no action is taken; please proceed to the next step right away
- Use Caution: holding the SET button for 20 or more seconds puts the Hub in Reset Mode, restoring all settings to factory defaults.
- In the app, click the “Please confirm above operation” checkbox, click Continue. A “Connecting” screen will appear on the app, as shown in Figure 3
- Please wait until a Connected Successfully screen is displayed. At this time, you may leave the patch cord connected (for dual wired/wireless internet connection) or remove it. Click Done and proceed to Installation.

Installation
- Once your Hub is working satisfactorily, if you temporarily set up your Hub before a more permanent installation, find a suitable permanent location for it. Please familiarize yourself with the Installation Considerations section before you finalize your installation
- Wall-mount the Hub, or place it on a stable surface, as desired
Introduction to the App
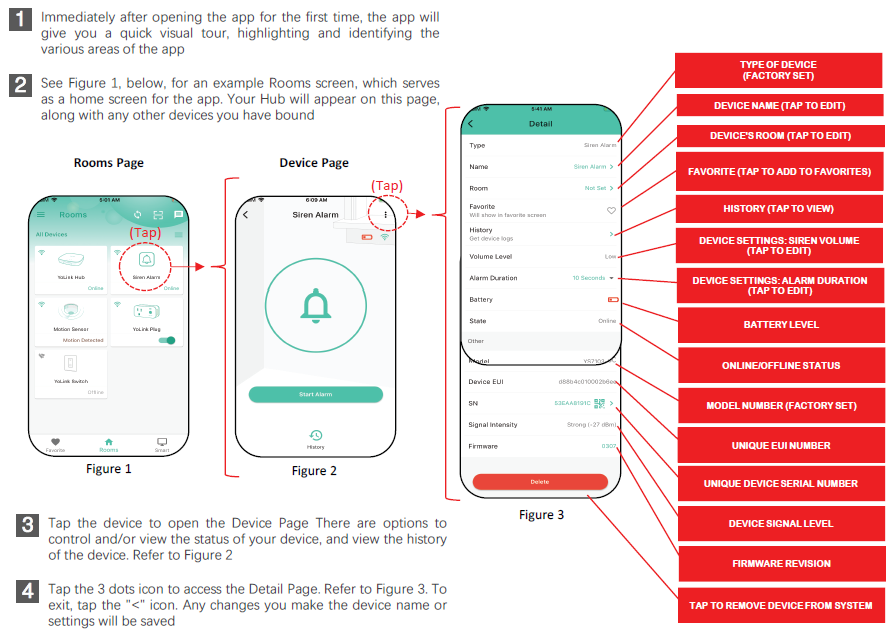
- Immediately after opening the app for the first time, the app will give you a quick visual tour, highlighting and identifying the various areas of the app.
- See Figure 1, below, for an example Rooms screen, which serves as a home screen for the app. Your Hub will appear on this page, along with any other devices you have bound.
- Tap the device to open the Device Page There are options to control and/or view the status of your device, and view the history of the device. Refer to Figure 2
- Tap the 3 dots icon to access the Detail Page. Refer to Figure 3. To exit, tap the “<” icon. Any changes you make the device name or settings will be saved.
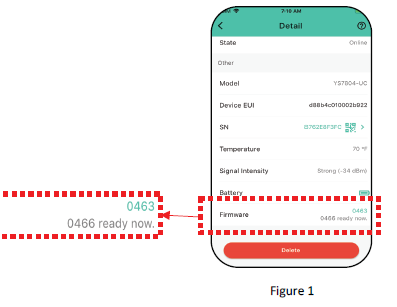
Firmware Update
Your YoLink products are constantly being improved, with new features added. It is periodically necessary to make changes to your device’s firmware. For optimal performanceof your system, and to give you access to all available features for your devices, these firmware updates should be installed when they become available.
- Refer to Figure 1. An update is available, as indicated by the ### ready now” information
- Tap on the revision number to start the update
- The device will update automatically, indicating progress in a percentage complete. You may use your device during the update, as the update is performed “in the background”. The feature indicating light will slowly blink red during the update, and the update may continue for several minutes beyond the light turning off.
Specifications
Hub: 5 Volts DC, 1 AmpFrequency: LoRa: 923.3 MHz WiFi: 2412 – 2462 MHzDimensions: 4.33 x 4.33 x 1.06 InchesEnvironment: -4° – 104°F (-20° – 50°) Humidity: <90% Condensing
Warnings
- Power the Hub with the provided adapter, only.
- The hub is designed and intended for indoor use and is not waterproof. Install indoors, avoiding subjecting the Hub to water or damp conditions.
- Do not install the hub inside or near metals, ferromagnetism or any other environment which may interface with the signal.
- Do not install the Hub near flames/fire or expose to high temperatures.
- Please do not use strong chemicals or cleaning agents to clean the hub. Please use a clean, dry cloth to wipe the hub to avoid dust and other foreign elements entering the Hub and affecting the operation of the Hub.
- Avoid allowing the hub to be exposed to strong impacts or vibration, which may damage the device, causing malfunctions or failure.
Warranty: 2 Year Limited Electrical Warranty
YoSmart warrants to the original residential user of this product that it will be free from defects in materials and workmanship, under normal use, for 2 years from the date of purchase. User must provide a copy of original purchase receipt. This warranty does not cover abuse or misused products or products used in commercial applications. This warranty does not apply to YoLink Hubs that have been improperly installed, modified, put to a use other than designed, or subjected to acts of God (such as floods, lightning, earthquakes, etc.). This warranty is limited to repair or replacement of the YoLink Hub only at YoSmart’s sole discretion. YoSmart will NOT be liable for the cost of installing, removing, nor reinstalling this product, nor direct, indirect, or consequential damages to persons or property resulting from the use of this product. This warranty only covers the cost of replacement parts or replacement units, it does not cover shipping & handling fees. Please contact us, to implement this warranty (see Customer Support, below, for contact information)
FCC Statement
This equipment has been tested and found to comply with the limits for a Class B digital device, pursuant to part 15 of the FCC Rules. These limits are designed to provide reasonable protection against harmful interference in a residential installation. This equipment generates, uses and can radiate radio frequency energy and, if not installed and used in accordance with the instructions, may cause harmful interference to radio communications. However, there is no guarantee that interference will not occur in a particular installation. If this equipment does cause harmful interference to radio or television reception, which can be determined by turning the equipment off and on, the user is encouraged to try to correct the interference by one or more of the following measures: Reorient or relocate the receiving antenna, connect the equipment into an outlet on a circuit different from that to which the receiver is connected, increase the separation between the equipment and receiver, consult the dealer or an experienced radio / TV technician for help.This device complies with part 15 of the FCC Rules. Operation is subject to the following two conditions:
- This device may not cause harmful interference
- This device must accept any interference received, including interference that may cause undesired operation. Any changes or modifications not expressly approved by the party responsible for compliance could void the user’s authority to operate the equipment.
Customer Support
We are here for you, if you ever need any assistance installing, setting up or using a YoLink product, including our app. Please contact us at (949) 825-5958 during our business hours (9AM – 5PM Pacific Time) or email us 24/7 at [email protected] You can also reach us via our website Contact Us page, by visiting www.yosmart.com or scanning the QR code.
You can also reach us via our Contact Us page at www.yosmart.com/contact-us
![]()
References
[xyz-ips snippet=”download-snippet”]