![]()
CRUNCHAIR FRYER OVENUser’s Manual
![]()
Scan here to download a free recipe book with more than 20 delicious recipes to use in your Crunch Air Fryer Oven.
![]()
http://zavor.us/getcrunchcookbook?qr=1
Introduction
Thank you for purchasing this state-of-the-art Zavor Crunch Air Fryer Oven! The Zavor Crunch Air Fryer Oven can be used as an air fryer, rotisserie, dehydrator, and more! The user-friendly electronic controls are simple and straightforward, allowing you to set recipe times with ease.The Zavor Air Fryer user’s manual contains information on the use and care of this product. Please read this manual carefully before operating the Zavor Air Fryer to ensure proper usage and maintenance of the unit. Carefully following the directions in this manual enables you to optimize the performance and lifespan of the unit.
 IMPORTANT SAFEGUARDS

The product you have purchased is a state-of-the-art appliance. It adheres to all of the latest safety and technology standards; however, as with any electric appliance, there are some potential risks. Only operate this cooker following the instructions provided and only for its intended household use.PLEASE READ THE INSTRUCTIONS BELOW BEFORE USING THE APPLIANCE FOR THE FIRST TIME.
- Read all of the instructions contained in this manual before using the appliance.
- This product is not intended for commercial or outdoor use; it is only for household and indoor use.
- Do not operate the unit if the electric cord or plug is damaged. If the appliance is not working correctly, has been dropped or damaged, left outdoors or submerged in water, discontinue use immediately and contact our customer service department at 1-855-928-6748.
- This appliance should only be used by persons who are capable of understanding the user guide or are supervised by those who have an adequate understanding of the appliance’s features, use, and operating instructions. Children must be supervised and should not be left alone with any appliance during operation.
- Using accessories or replacement parts that are not recommended or sold by the manufacturer may cause damage to the air fryer or personal injury. Using unauthorized components will void the manufacturer’s warranty.
- Place the air fryer on a flat, sturdy, heat-resistant surface. Do not place the air fryer near or on any type of heat sources, such as a gas or electric burner, stove, or oven. Do not use near an open flame or flammable materials.
- Never operate the air fryer on a gas or electric stovetop, even if the stovetop is off and completely cool.
- Always use the air fryer in a well-ventilated area. Do not block the vents.
- Before using the air fryer, inspect the plug and cord line for any damage. Do not use the air fryer if it is damaged in any way. In such cases, contact Zavor Customer Service for assistance at 1-855-928-6748.
- Insert the plug by grasping it firmly and guiding it into your home’s grounded electrical outlet. Disconnect by grasping the plug, not the cord, and removing it from your home’s grounded electrical outlet.
- Never wrap the cord around the appliance during use or storage; this may cause the cord to fray and break.
- This appliance is not intended for use by persons (including children) with reduced physical, sensory or mental capabilities, or lack of experience and knowledge unless they have been given supervision or instruction concerning use of the appliance by a person responsible for their safety.
- If using an extension cord, please note that a damaged extension cord can cause the unit to malfunction. Always check your extension cord for damage and be sure it is compliant with the required voltage. Do not let the electric cord hang over the edge of the table or counter. Do not let the electric cord touch hot surfaces.
- To reduce the risk of an electric shock, never immerse the plug, power cable or housing in water or any other liquid. Only the removable accessories can be placed in the dishwasher.
- Only qualified experts may repair and perform maintenance work on the air fryer using authentic Zavor replacement and accessory parts. Never attempt to disassemble and repair the air fryer yourself.
- This product is not a deep fryer. It is NOT meant to be filled with oil. Never fill any parts of the air fryer with oil. If you choose to use oil, toss food with oil in a separate bowl and then transfer food to the removable trays.
- Do not leave uncooked ingredients in the air fryer for more than a short period of time before cooking; raw meat, poultry, fish, fruits, and vegetables can spoil.
- Do not move the air fryer while it is in use. During initial use, you may notice some smoke and/or a slight odor. This is normal and should quickly dissipate.It should not reoccur after the appliance has been used a few more times.
- Do not leave the air fryer unattended during use.
- The exterior of the air fryer is designed to be cool to the touch. Some areas do get HOT during use. Do not touch the heating elements. Do not place hands or other body parts near the air vents while the air fryer is in use as burns may result.Take caution when handling the hot trays and all removable parts.
- Use protective mitts and/or tongs to remove hot food from the air fryer.
- NEVER use an air fryer outside.
- NEVER use the air fryer door as a place to rest any food. This could damage the air fryer door or cause the unit to tip over and cause injury.
- Unplug the air fryer when you are done cooking.
- When the cooking time is done, the heating element will turn off but the fan WILL CONTINUE RUNNING for 20 seconds to help cool the unit down.
- If the air fryer is used improperly or for professional or semi-professional purposes or if it is not used according to the instructions in the user manual, the warranty becomes invalid, and the manufacturer will not be held liable for damages.
- Should the inner temperature control system fail, the overheating protection system will be activated, and the unit will not function. Should this happen, unplug the power cord. Allow time for the unit to cool completely before restarting or storing.
- The appliance has a built-in “shut-off” device that will automatically shut down the unit when the timer reaches zero. You can manually switch off the appliance by pressing the Start/Stop button. The fan will continue running for 20 seconds to cool the unit down.
- Before cleaning, make sure that the air fryer is off, unplugged, and cooled to room temperature.
- Do not immerse the air fryer housing in water or place it in the dishwasher for cleaning. It is NOT dishwasher safe.
- All removable parts may be washed with a sponge and warm, soapy water. All removable parts are dishwasher safe.
- Do not use scouring pads to clean any component of this air fryer.
- Store the air fryer oven in a cool, dry place.
- In case of any electric emergency, such as a fire, call 911.
SAVE THESE INSTRUCTIONS
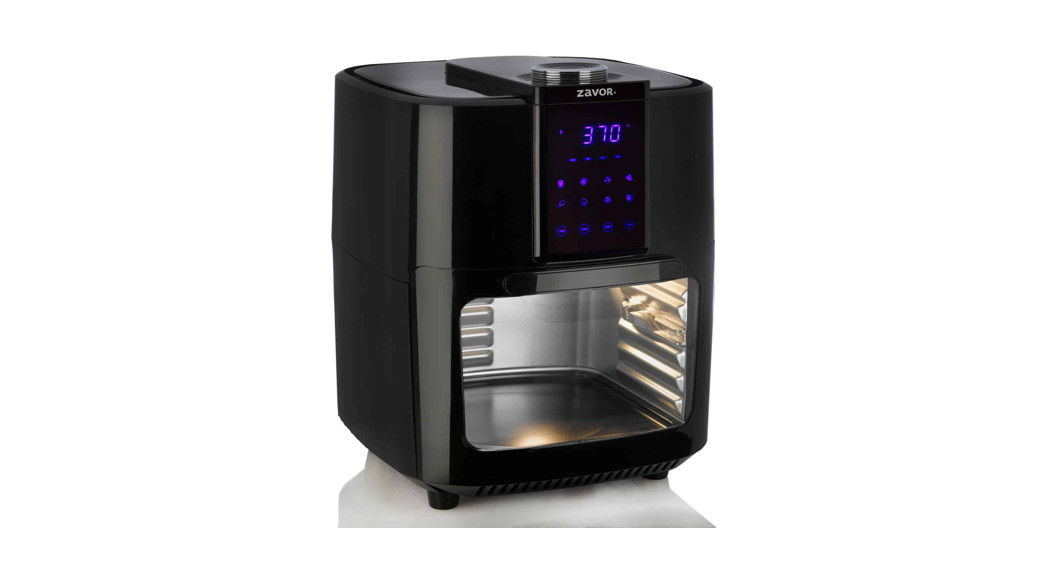
Features and Functions

- Start/Stop Button: Pressing the Start/Stop Button once will cause the full panel to illuminate. Pressing the Start/Stop Button a second time (while the panel is illuminated) will activate the cooking process at the default temperature of 370°F and time of 15 minutes. Pressing the Start/Stop Button at any time during the cooking process will cancel the cooking program.Mute Feature: Pressing and holding the Start/Stop button for 3 seconds will activate the mute feature which silences all unit beeps and alerts. To unmute, press and hold the Start/Stop button for 3 seconds until the unit beeps.
- Time & Temperature Dial: The outer part of the Start/Stop button functions as a dial to help you scroll through times and temperatures when programming the air fryer. Either can be programmed after pressing the corresponding button on the control panel.
- Air Fryer Housing: The body of the air fryer where all the electrical components and heating elements are housed. The housing also holds the air fryer cavity which measures approximately 6.5” high x 10” wide x 9.5” deep.
- Control Panel: The interactive panel allows you to select different programs such as French fries, chicken, seafood, and even dehydrate. In addition, it has the time and temperature programs where you can set your own times and temperatures as well as the rotate button to use the rotisserie feature.
- Cooking Tray Positions: The Zavor air fryer has 5 different cooking tray positions, including rotisserie support to use the rotisserie accessories.
- Air Fryer Door: Much like an oven door, the air fryer door drops down to allow access to the inside of the fryer. It must be firmly pushed and will click into place to ensure a proper close. The air fryer will not operate if the door is not properly closed.
Parts and Accessories
- Removable Non-stick Trays (2): Ceramic-coated mesh trays for a more convenient, nonstick cooking experience.
- Rotisserie Basket: Stainless steel rotisserie basket is the perfect accessory for air frying French fries, tater tots, onion rings, and more.
- Rotisserie Retrieval Tool: Allows users to safely remove the rotisserie basket or rotisserie forks from the air fryer.
- Removable Drip Tray: Placed at the very bottom of the air fryer cavity to catch any liquid, oil, crumbs, food particles, etc. that may fall during cooking.
- Rotisserie Spit: The rod that food will be suspended on while rotisserie cooking.
- Rotisserie Forks with Removable Screws: Used to secure the food onto the rotisserie spit.

Getting Started: Before First Use
Read the safety instructions found in this manual before plugging in and operating the unit. Before using the air fryer for the first time, follow these steps:
- Remove all packing materials and stickers from the inside and outside of the air fryer, but don’t throw away the packing materials just yet! The rotisserie spit and 2 rotisserie forks are packaged outside the air fryer in Styrofoam.
- The rotisserie retrieval tool is packaged vertically next to the air fryer in cardboard.
- The rest of the tools (the rotisserie basket, 2 removable trays, and 1 drip tray) are packaged inside the air fryer.
- Once everything is removed, gently wipe down the exterior with a damp cloth or paper towel. Never immerse the air fryer or its plug-in water or any other liquid. The air fryer’s housing is NOT dishwasher safe.
- Wash all removable parts with a sponge and warm, soapy water. Trays and rotisserie baskets may be washed with a soft-bristled brush. Do NOT use abrasive cleaning agents or scouring pads. All removable parts are dishwasher safe.
- Dry thoroughly.
Operating Functions:
Control Panel and Functions

Preset Functions Time & Temperature Chart
| Cooking Function: | Preset Temp: | Preset Time: | Timer. |
| Fries | 400°F | 20 minutes | 1-60 minutes,1-minute increments |
| Meat | 400°F | 18 minutes | 1-60 minutes,1-minute increments |
| Seafood | 390°F | 12 minutes | 1-60 minutes,1-minute increments |
| Pizza | 350°F | 15 minutes | 1-60 minutes,increments |
| Chicken | 380°F | 18 minutes | 1-60 minutes,1-minute increments |
| Vegetables | 350°F | 20 minutes | 1-60 minutes,1-minute increments |
| Bake | 350°F | 30 minutes | 1-60 minutes,increments |
| Dehydrate | 180°F | 1 hour (60 minutes) | 1 – 24 hours,30-minute increments |
- LED Screen: Will show cooking temperature and cooking time.
- Fahrenheit Indicator: Will illuminate when programming the temperature to let users know the degrees are presented in Fahrenheit. It will also illuminate while the unit is running and the cooking temperature is displayed on the screen.
- Minutes Indicator: Will illuminate when programming the cooking time. It will also illuminate while the unit is running and the cooking time is displayed on the screen.
- Temperature Indicator: Illuminates when the unit is cooking and the temperature is displayed on the screen.
- Time Indicator: Illuminates when the unit is cooking and the cooking time is displayed on the screen.
- Running Lights: 4 lights beneath the LED screen will blink in sequence while cooking to alert you that the unit is running.
- Preset Functions: 8 functions come with preprogrammed times and temperatures. You may over-ride these presets with the Time and Temperature buttons. For the present times and temperatures, please refer to the Time & Temperature Chart. The icon will blink while in use.
- Time Button: This button allows you to select your own cooking time from 1 minute to 60 minutes in all modes except when dehydrating, which uses 30- minute intervals and an operating time from 1 to 24 hours.
- Temp. Button: This button allows you to program the cooking temperature.It is adjustable in 5°F intervals; the programmable temperature ranges from 150°F to 400°F. The dehydration temperature range is from 90°F to 180°F.
- Rotate Button: Select this button when cooking anything using the rotisserie accessories. The rotisserie accessories and rotation feature can be used with any of the preset functions. The button will blink while in use.
- Light Button: Turns the interior light on and off while cooking to easily check your food.
NOTE: Whenever any button on the panel is pushed, it will beep and start to blink to confirm it was selected.
How to Use the Air Fryer
This section of the manual will instruct you on how to use the air fryer and the preset functions. For rotisserie instructions, see the ROTISSERIE section of the manual on page 18.
- Place the air fryer on a flat, steady surface away from all sources of heat and water and plug it in.
- Ensure the drip tray is in place on the bottom of the air fryer.NOTE: The door of the air fryer will not close if the drip tray is not placed in the unit properly.
- Place seasoned food on cooking trays and place cooking trays on the appropriate rack position. Close the door, making sure it clicks into place.NOTE: If the door is opened at any point while the air fryer is running, it will pause the cooking time.
- Press the TEMP button and turn the Time & Temp dial on top of the air fryer until the display reads your desired temperature.
- Once the desired temperature is displayed on the screen, press the TIME button to program your cooking time. Turn the Time & Temp dial on the top of the air fryer until the display reads your desired cooking time.
- Press the START/STOP button located on the top of the air fryer to begin the cooking process.NOTE: For the best and most even results, rotate the trays from the top positions to the bottom positions, and vice versa, halfway through cooking.
- While the air fryer is running, the display will toggle between the set temperature and the remaining time. The Fahrenheit Indicator and Minutes Indicator will confirm whether the screen is showing the cooking temperature or cooking time.NOTE: Press START/STOP at any time to stop the cooking process. The time and temperature will disappear from the screen and only the running lights will remain. The fan will stay on for about 20 seconds before the unit completely shuts off.
- Once the cooking time is done, the unit will beep 3 times and will automatically shut off.
- Use oven mitts to remove hot trays from air fryer and tongs to handle hot food.
Air Fryer Cooking Charts
Air fryer cooking times are approximate times. Use these cooking times as a general guideline. Size and variety of food will most likely alter cooking times.
Fresh Food Air Fryer Cooking Chart
| Fresh Food Item | Amount | Temperature | Tine | Extra Into |
| Thin Fries | 16 oz | 400°F | 36 minutes | On two trays, switch tray positions at halfway mark |
| Baby Potatoes | 16 oz | 375°F | 16-20 minutes | Potatoes should be quartered, on one tray on the second rack position from the top |
| Onion Rings | 4 oz | 400°F | 14 minutes | On two trays, switch tray positions at halfway mark |
| Chicken Breasts | 2 pcs- 4 oz each | 375°F | 30 minutes | On one tray on the second rack position from the top |
| Meatballs | 4 pcs- 2 oz each | 360°F | 15 minutes | On one tray on the second rack position from the top |
| Chicken Wings/ Drumsticks | 4-5 pcs | 375°F | 28-30 minutes | On one tray on the second rack position from the top |
| Ash Fillet | 4 oz | 390°F | 12 minutes | On one tray on the second rack position from the top |
| Jumbo Shrimp | 13-14 oz | 390°F | 14 minutes | On two trays, switch tray positions at halfway mark |
| Broccoli | 8 oz | 350°F | 15 minutes | On one tray on the second rack position from the top |
| Mushrooms | 8 oz | 400°F | 18 minutes | Sliced, and one tray on the second rack position from the top |
| Corn on the Cob | 2 ears | 400°F | 12-14 minutes | On one tray on the second rack position from the top |
| Zucchini | 1 pc | 400°F | 22 minutes | Sliced, on one tray on the second rack position from the top |
| Pies | 3 pcs- 3 oz each | Mini Fruit Hand350°F | 15 minutes | one tray on the second rack position from the top |
| White Toast | 2 pcs | 400°F | 4-6 minutes | Flip the slices halfway through the time, adjust the time for desired darkness |
| Whole Wheat Toast | 2 pcs | 400°F | 3-5 minutes | Flip the slices halfway through the time, adjust the time for desired darkness |
| Bagel | 1, sliced | 400°F | 5 minutes | Adjust time for desired darkness. |
| Personal Pizza | 7 oz | 325°F | 24-26 minutes | On one tray on the second rack position from the top |
Frozen Food Air Fryer Cooking Chart
| Frozen Food Item | Amount | Temperature | Time | Extra Into |
| Thin Fries | 8 oz | 400°F | 20 minutes | In the mesh basket on rotating |
| Thick Fries | 8 oz | 400°F | 24 minutes | In the mesh basket on rotating |
| Onion Rings | 8 oz | 400°F | 12-15 minutes | In the mesh basket on rotating |
| Chicken Nuggets | 8 oz | 400°F | 12 minutes | On two trays, switch position at the halfway mark |
| Chicken Wings | 7 oz | 380°F | 18 minutes | On one tray on the second rack position from the top |
| Fish Sticks | 8 oz | 390°F | 12- 14 minutes | On one tray on the second rack. position from the bottom |
| Breaded Fish Fillet | 2 pcs- 5 oz each | 400°F | 18-20 minutes | On one tray on the second rack position from the bottom |
| Popcorn Shrimp | 8 oz | 360°F | 12-14 minutes | On one tray on the second rackfrom the top |
| Breakfast Sausage | 8 oz | 400°F | 18 minutes | On one tray on the second rackfrom the bottom |
| Mini Hand Pies | 2 pcs- 3 oz each | 350°F | 30 minutes | On one tray on the second rack position from the bottom |
| Personal Pizza | 1 pc- 5 oz | 350°F | 15 minutes | On one tray on the second rack position from the bottom |
| Hamburger Patty | 1 pc | 380°F | 20 minutes | On one tray, flip at the halfway mark |
| Chicken Fingers | 8 oz | 400°F | 12-15 minutes | On one tray, flip at the halfway mark |
How to Use the Preset Functions
- Place the air fryer on a flat, steady surface away from all sources of heat and water and plug it in.
- Ensure the drip tray is in place on the bottom of the air fryer.NOTE: The door of the air fryer will not close if the drip tray is not placed in the unit properly.
- Place seasoned food on cooking trays and place cooking trays on the appropriate rack position. Close the door, making sure it clicks into place.NOTE: If the door is opened at any point while the air fryer is running, it will pause the cooking time.
- Select the desired setting by pressing the correct button on the control panel.
- If desired, you can adjust the preset time and temperature by pressing the TIME and/or TEMP buttons and rotating the Time & Temp dial to adjust accordingly.
- Press the START/STOP button located on the top of the air fryer to begin the cooking process.NOTE: For the best and most even results, rotate the trays from the top positions to the bottom positions, and vice versa, halfway through cooking.
- While the air fryer is running, the display will toggle between the set temperature and the remaining time. The Fahrenheit Indicator and Minutes Indicator will confirm whether the screen is showing the cooking temperature or cooking time.NOTE: Press START/STOP at any time to stop the cooking process. The time and temperature will disappear from the screen and only the running lights will remain. The fan will stay on for about 20 seconds before the unit completely shuts off.
- Once the cooking time is done, the unit will beep 3 times and will automatically shut off.
- Use oven mitts to remove hot trays from the air fryer and tongs to handle hot food.
How to Dehydrate
Dehydrating foods such as vegetables, fruits, meats, and more is perfect for cooking, traveling, camping, and snacking. Dehydrating fresh, ripe foods will preserve nutrients and intensify the flavor. Using bruised fruits or vegetables are acceptable for dehydrating and helps create less food waste. Trim off any bruises with a knife. The Crunch Air Fryer Oven’s automated drying makes home dehydration both rewarding and simple.
- Place the air fryer on a flat, steady surface away from all sources of heat and water and plug it in.
- Ensure the drip tray is in place on the bottom of the air fryer.NOTE: The door of the air fryer will not close if the drip tray is not placed in the unit properly.
- Place food on cooking trays and place cooking trays on the appropriate rack position. Close the door, making sure it clicks into place.NOTE: If the door is opened at any point while the air fryer is running, it will pause the cooking time.
- Select the Dehydrate setting on the control panel.
- Adjust the preset time and temperature by pressing the TIME and/or TEMP buttons and rotating the Time & Temp dial to adjust accordingly.
- Press the START/STOP button located on the top of the air fryer to begin the dehydrating process.NOTE: For the best and most even results, rotate the trays from the top positions to the bottom positions, and vice versa, halfway through cooking.
- While the air fryer is running, the display will toggle between the set temperature and the remaining time.NOTE: Press START/STOP at any time to stop the cooking process. The time and temperature will disappear from the screen and only the running lights will remain. The fan will stay on for about 20 seconds before the unit completely shuts off.
- Once the cooking time is done, the unit will beep 3 times and will automatically shut off.
- Use oven mitts to remove hot trays from air fryer and tongs to handle hot food.
Air Fryer Dehydrating Chart
Follow the chart for common foods that can be dehydrated using the suggested time, temperature, and instructions.
| FOOD ITEM | TEMP | TIME | INSTRUCTIONS |
| Fruit | |||
| App.es | 135:F | 8-10 hours | Core/slice into 1/4-in. rounds. Soak in ac.iri,laka water. Switch tray positions halfway through. |
| Apricots | 135°F | 10 hours | PeeVslice into 1/4-in. pieces. Switch tray positions halfway through. |
| Mango/Papaya | 135°F | 10 hours | PeeVslice into 1/4-in. pieces. Switch tray positions halfway through. |
| Kiwi | 135°F | 6 hours | 1/4-in. rounds. Switch tray positions halfway through. |
| Orange Slices | 135°F | 10 hours | Citrus is crisp when fully dried. Switch tray positions halfway through. |
| Strawberries | 135°F | 6 hours | Core/slice into 1/4-in. rounds or slices. Switch tray positions halfway through. |
| Bananas | 135°F | 5- 6 hours | 1/4-in. rounds. Switch tray positions halfway through. |
| Vegetables | |||
| Carrots | 145°F | 10- 11 hours | Peel, cut 1/8 thickness. Switch tray positions halfway through. |
| Garlic | 145°F | 6-7 hours | Chop and peel well. Switch tray positions halfway through. |
| Tomatoes | 145°F | 10- 11 hours | Skin-side down. Switch tray positions halfway through. |
| Mushrooms | 145°F | 3-5 hours | Skin-side down. Switch tray positions halfway through. |
| Peppers | 145°F | 4-8 hours | Skin-side down. Switch tray positions halfway through. |
| Zucchini | 145°F | 7-9 hours | Chop and Skin-side down. Switch tray positions halfway through. |
| Jerky | |||
| Meat Jerky | 145°F | 5-6 hours | Flip and Switch tray positions halfway through. |
Rotisserie: Before First Use
- Read all material and warning stickers and labels.
- Wash all parts and accessories used in the cooking process with warm soapy water.NOTE: Only the accessories are dishwasher safe.
- Wipe the inside and outside of the air fryer with a clean moist cloth.
- Place the air fryer on a stable, level, horizontal, and heat resistant surface.
- Select the appropriate cooking accessory for your recipe.
How to Prepare the Rotisserie Spit
Chicken: If cooking a chicken on the rotisserie spit, ensure that all the innards have been removed, that it is seasoned, and properly trussed.
- Insert the rotisserie spit into the chicken’s cavity so that the chicken can hang securely on the rod. Place the chicken with the rod on a cutting board and clean any food bits off the ends of the spit.
- Hold the rod in one hand, and one of the rotisserie forks with the prongs pointed toward the chicken in the other hand. Insert the rod into the square notches on the rotisserie fork.CAUTION: Forks are sharp. Handle with care.
- Poke the chicken with the fork and insert the prongs completely. Secure the fork by tightening the screw. Repeat on the other side.NOTE: Once the screws are tightened, there should be at least 1 inch of free space on both ends of the rod. The chicken should also be secure; it should not be able to slide back and forth on the rod.
Boneless meat (beef, pork, etc.) or fruit (pineapple, etc.)
- Insert the rotisserie spit, lengthwise, into the center of the meat or fruit. Place the meat, or fruit, with the rod onto a cutting board and clean any food bits off the ends of the spit.NOTE: If the spit doesn’t pierce your food well enough to insert, carefully make an incision with a sharp kitchen knife to assist the initial puncture.
- Hold the rod in one hand, and the rotisserie fork, with the prongs, pointed toward the food, in the other hand. Insert the rod into the square notches on the rotisserie fork. Use forks only if needed to hold foods larger than the width of the forks.CAUTION: Forks are sharp. Handle with care.
- Stick the meat or fruit with the fork and insert the prongs completely. Secure the fork by tightening the screw. Repeat on the other side.NOTE: Once the screws are tightened, there should be at least 1 inch of free space on both ends of the rod. The food should also be secure; it should not be able to slide back and forth on the rod.
How to Use the Rotisserie Spit
The rotisserie spit accessory must be used with the rotisserie forks. The rotisserie spit accessory allows you to cook a whole chicken, large cuts of meat, fruits, and more to perfection. The maximum weight the rotisserie spit allows is 4 lbs.
- Place the air fryer on a flat, steady surface away from all sources of heat and water and plug it in.
- Ensure the drip tray is in place on the bottom of the air fryer.NOTE: The door of the air fryer will not close if the drip tray is not placed in the unit properly.
- Hold the left side of the rotisserie spit in your left hand and the right side in your right.
- Guide the prepared rotisserie spit into the air fryer in the rotisserie rack position. Place the left side of the rotisserie spit into the round rotisserie gear located on the left interior wall. Once it is in place, lift the right side of the rotisserie spit and place it on the rotisserie holder on the right interior wall. Slide it until it reaches the rotisserie support and is in line with the left side. Close the air fryer the door, making sure it clicks into place.NOTE: If the door is opened at any point while the air fryer is running, it will pause the cooking time.
- Select your desired preset button by pressing the desired icon.
- If desired, press the TIME button to adjust the time by rotating the time and temperature dial on the top of the air fryer.
- If desired, press the TEMP button to adjust the temperature by rotating the time and temperature dial on the top of the air fryer.
- Press the START/STOP button located on the top of the air fryer to begin the cooking process.
- Once the air fryer is running, press the ROTATE button to begin the rotisserie rotation. While the air fryer is running, the display will toggle between the set temperature and the remaining time.NOTE: Press START/STOP at any time to stop the cooking process. The time and temperature will disappear from the screen and only the running lights will remain. The fan will stay on for about 20 seconds before the unit completely shuts off.
- Once the cooking time is done, the unit will beep 3 times and will automatically shut off.
- Use oven mitts with the rotisserie retrieval tool to remove the hot spit with the hot food from the air fryer. Spit and forks will be HOT, use extreme caution when unscrewing the forks.
How to Use the Rotisserie Basket
The rotisserie basket accessory is perfect for making evenly air-fried foods such as French fries, tater tots, chicken nuggets, and more. The maximum weight the rotisserie basket allows is 4 lbs.
- Place the air fryer on a flat, steady surface away from all sources of heat and water and plug it in.
- Remove all trays except for the drip tray. Ensure the drip tray is properly in place on the bottom of the air fryer.NOTE: The door of the air fryer will not close if the drip tray is not placed in the unit properly.
- Place seasoned food inside the rotisserie basket and close it.
- Hold the sealed rotisserie basket in your hands so that the side with the door is in your right hand.
- Guide the basket into the rotisserie rack position in the air fryer. Place the left side of the basket into the round rotisserie gear located on the left interior wall. Once it’s in place, lift the right side of the basket and place the protruding pin on the rotisserie rail on the right interior wall. Slide it until it reaches the rotisserie support and is in line with the left side. Close the air fryer of the door, making sure it clicks into place.NOTE: If the door is opened at any point while the air fryer is running, it will pause the cooking time.
- Select your desired preset button by pressing the desired icon.
- Press the TIME button to adjust the time by rotating the time and temperature dial on the top of the air fryer.
- Press the TEMP button to adjust the temperature by rotating the time and temperature dial on the top of the air fryer.
- Press the START/STOP button located on the top of the air fryer to begin the cooking process.
- Once the air fryer is running, press the ROTATE button to begin the rotisserie rotation. While the air fryer is running, the display will toggle between the set temperature and the remaining time.NOTE: Press START/STOP at any time to stop the cooking process. The time and temperature will disappear from the screen and only the running lights will remain. The fan will stay on for about 20 seconds before the unit completely shuts off.
- Once the cooking time is done, the unit will beep 3 times and will automatically shut off.
- Use oven mitts with the rotisserie retrieval tool to remove the hot basket from the air fryer. Use oven mitts or a kitchen towel to open the basket door.
How to Use the Rotisserie Retrieval Tool
- Hold the retrieval tool by its handle.
- Guide the retrieval tool into the air fryer. Position it below the rotisserie spit or basket.
- Use the retrieval tool to lift the right side of the rotisserie spit. Once it is free, lift the left side.
- Carefully remove the hot rotisserie spit or basket and food from the air fryer.
Air Frying Tips
- Almost any food you cook in the oven can be air-fried.
- Foods cook best and most evenly when they are of similar size and thickness.Smaller pieces of food require less cooking time than larger items.
- Smaller pieces of food may be cooked at higher temperatures than larger items because they generally require less time to cook.
- For best results in the shortest amount of time, air fry food in single layers.
- Most prepared foods do not need to be tossed in oil before air frying. Most already contain oil and other ingredients that enhance browning and crispiness.
- Frozen appetizers and hors d’oeuvres air fry very well.
- Rotate trays halfway through the cooking cycle to ensure the evenest results.
- Toss foods you are preparing from scratch, such as French fries, with oil, in a separate bowl, to improve browning and crispiness. Fresh foods do not contain the same oils, fats, and other ingredients that prepared foods contain, which promote browning and crispiness.
- When making French fries using fresh potatoes, ensure they are completely dry before cooking in the air fryer. Even the smallest droplets of moisture will prevent them from getting crispy.
- When air frying battered food, stick to thick, pasty batters. Thin batters, such as the batters used to make tempura, will run and not set fast enough like they do in a deep fryer.
- Coating battered foods in panko breadcrumbs or puffed rice, and then spraying them with oil, can help create crispy, healthier versions of your favorite fried foods.
- Cook chicken until it reaches an internal temperature of 165°F.
- The air fryer is great for reheating food. To reheat your food, set the temperature to 300°F for up to 10 minutes. Use a thermometer to ensure food reaches an internal temperature of 165°F, the recommended food-safe temperature for reheating food.
- Do not use any paper or plastic plates/containers in the air fryer.
- Aluminum foil and parchment paper can be used in the air fryer on the cooking trays only. Do not place aluminum foil or parchment paper in the rotating basket.
- It is not recommended to use any of the fryer’s tools for anything other than their intended use with the air fryer as this may damage the components.
- Do not use the drip tray as a baking pan.
Cleaning and Maintenance
Do not wash any parts of the air fryer in the dishwasher except for the removable accessories. Always wash the cooking trays, rotisserie tools, and drip tray thoroughly after every use.
- When the air fryer is unplugged and completely cool, gently wipe down the exterior with a damp cloth or paper towel. Never immerse the air fryer or its plug-in water or any other liquid. The air fryer housing is NOT dishwasher safe.
- Wash all removable parts with a sponge and warm, soapy water. Trays and rotisserie baskets may be washed with a soft-bristled brush. Do not use abrasive cleaning agents or scouring pads. All removable parts are dishwasher safe.NOTE: If crumbs or food particles become lodged in the air fryer door hinges or crevices, use a small brush to clean them out. Do not attempt to remove the door for cleaning.
- Dry thoroughly and store in a cool, dry place.
Troubleshooting
If you experience any issues while using your air fryer, here is a list of simple solutions to assist you. If the issue persists, please call our customer service department for assistance at 1-855-928-6748.
| Problem | The air fryer door won’t close after I put the cooking trays inside. |
| Solution | Make sure the trays are inserted with the curved side in first. If the trays have been inserted backward, the door will not close. |
| Problem | The air fryer won’t turn on. |
| Solution | Make sure the unit is properly plugged in and that the air fryer door is properly shut. Make sure you set a cooking time before pressing the Start/Stop button. |
| Problem | The rotisserie basket/spit isn’t rotating. |
| Solution | Make sure you press the ROTATE button in order to use the rotisserie feature. Make sure you don’t exceed the 4 lb. weight limit when loading the food. |
| Problem | I feel a little bit of air escape around the door when using the air fryer. |
| Solution | This is normal. The door is not sealed airtight. There are a few spots around where air circulates for ventilation purposes. |
| Problem | There is white smoke coming out of the air fryer. |
| Solution | White smoke is often caused when cooking greasy foods or if there is leftover grease residue from previous use Make sure the vents are not blocked and that you properly clean your air fryer and accessories after every use. |
Limited Warranty
This manufacturer’s product warranty extends to the original consumer purchaser of the product. Neither the retailer nor any other company involved in the sale or promotion of this product is a co-warrantor of this manufacturer warranty.WARRANTY DURATION: The air fryer is guaranteed to be free from defects in material and workmanship for a period of one (1) year from the date of purchase by the first user or gift recipient, provided that the unit is used in accordance with the use and care instructions supplied, and it is for household use only.WARRANTY COVERAGE: This product is warranted against defective materials or workmanship. This warranty is void if the product has been damaged by accident, in shipment, unreasonable use, misuse, neglect, improper service, commercial use, repairs by unauthorized personnel, or other causes not arising out of defects in materials or workmanship. This warranty is effective only if the product is purchased and operated in the USA and Canada. It does not extend to any units which have been used in violation of written instructions furnished by the manufacturer or to units that have been altered or modified or to damage to products or parts thereof that have had the serial number removed, altered, defaced or rendered illegible.A valid proof of purchase is required. A valid proof-of-purchase is a receipt specifying the item, date purchased, and cost of the item. A gift receipt with the date of purchase and item is also acceptable proof of warranty.Moving and/or perishable parts such as accessories, internal component parts, etc. which are subject to normal wear and tear are excluded from the warranty.WARRANTY DISCLAIMERS: This warranty is in lieu of all warranties expressed or implied, and no representative or person is authorized to assume for manufacturer any other liability in connection with the sale of our products. There shall be no claims for defects or failure under any theory of tort, contract or commercial law including, but not limited to, negligence, gross negligence, strict liability, breach of warranty and breach of contract.WARRANTY PERFORMANCE: During the above one-year warranty period, a product with a defect can either be repaired or replaced with a reconditioned comparable model (at manufacturer’s option). The repaired or replacement product is in warranty for the balance of the one-year warranty period and an additional one-month period. There cannot be a charge for such repair or replacement.SERVICE AND REPAIR: If service is required for an appliance, you should first call toll-free 1-855-928-6748 between the hours of 8:00 A.M. and 5:00 P.M. Monday through Thursday.On Friday the hours are between 8:00 A.M. and 2:30 P.M. Eastern Standard Time.If repairs become necessary during the warranty period, you might need to return the unit, postage pre-paid to:MARKET SOLUTIONS GROUP125 BROAD AVENUEUNIT C-18NORTH BERGEN, NJ 07047NOTE: Manufacturers cannot assume responsibility for loss or damage during incoming shipment. For your protection, carefully package the product for shipment and insure it with the carrier. Be sure to enclose the following items with your appliance: your full name, return address, and daytime phone number; a note describing the problem you experienced; a copy of your sales receipt or other proof of purchase to determine warranty status. C.O.D. shipments cannot be accepted.For spare parts or assistance not requiring the return of the product itself, please contact our Customer Service Department at 1-855-ZAVOR4U (1-855-928-6748).
ZAVOR PRODUCT REGISTRATIONRegister your product on our website at www.zavor.us/register or scan below:

 report this ad
The manufacturer reserves the right to modify the terms described in this manual.
![]() P.O. Box 704Lyndhurst, NJ 07071www.zavoramerica.com1-855-928-6748Version 2.00
P.O. Box 704Lyndhurst, NJ 07071www.zavoramerica.com1-855-928-6748Version 2.00
References
[xyz-ips snippet=”download-snippet”]