Zenitel ITSV-2 IP Touch Station with Video
The ITSV-2 is a product developed for Zenitel Norway AS and is primarily used as part of a Zenitel IP Intercom solution. The ITSV-2 is not pre-configured to support or carry emergency calls to any type of hospital, law enforcement agency, medical care unit (“Emergency Service(s)”) or any other kind of Emergency Service. You must make additional arrangements to access Emergency Services. It is your responsibility to purchase SIP compliant Internet telephone service, properly configure the ITSV-2 to use that service, and periodically test your configuration to confirm that it works as you expect. If you do not do so, it is your responsibility to purchase traditional wireless or landline telephone services to access Emergency Services.Zenitel Norway does not provide connections to emergency services via the ITSV-2. Neither Zenitel Norway nor its officers, employees or affiliates may be held liable for any claim, damage, or loss. You hereby waive any and all such claims or causes of action arising from or relating to your inability to use the ITSV-2 to contact emergency services, and your failure to make additional arrangements to access emergency services in accordance with the immediately preceding paragraph.
Precautions
Warning: Please DO NOT power cycle the ITSV-2 during system boot-up or firmware upgrade. You may corrupt firmware images and cause the unit to malfunction.Warning: Use only the power adapter included in the ITSV-2 package. Using an alternative non-qualified power adapter may possibly damage the unit.
Package Contents

Overview
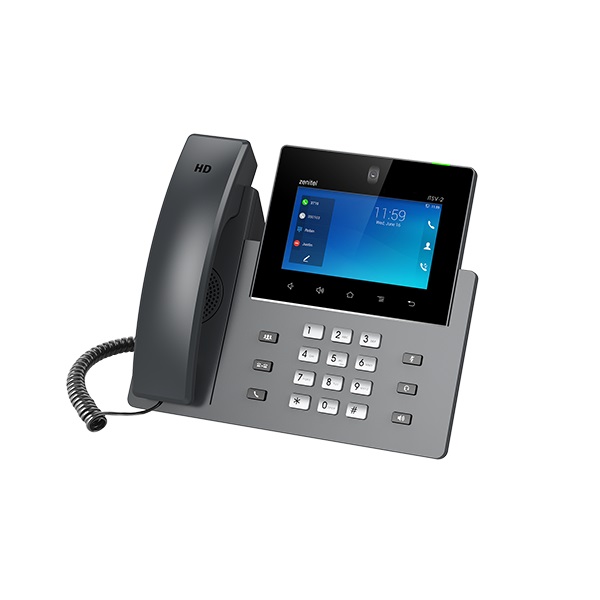
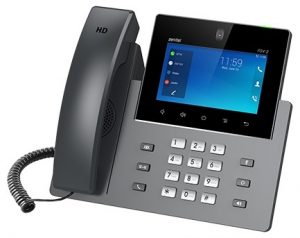
- ITSV-2 IP Touch Station with Video (Item Number: 1490002010)
The ITSV-2 features a 5-inch 1080×720 capacitive touch screen, tillable camera, HDMI output, dual microphones, support for 720p HD video, and runs Android 7.0. The ITSV-2 delivers HD audio & video, leading edge SIP intercom features and integration with IC-EDGE and ICX-Alpha Com IP Intercom Platforms developed by Zenitel. ITSV-2 redefines the desktop communication experience with a raised level of innovation and integration of state-of-the-art real-time video conferencing, and personalized rich media presentation & delivery.
ITSV-2 Setup

Installing the ITSV-2 Stand
- Attach the stand spacers to the slots on the back of the unit as shown below.
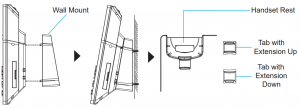
Installing the Wall Mount (sold separately)
- Attach the wall mount spacers to the slots on the back of the unit.
- Attach the unit to the wall via the wall mount hole.
- Pull out the tab from the handset cradle (see figure below).
- Rotate the tab and plug it back into the slot with the extension up to hold the handset while the unit is mounted on the wall.

Connecting the ITSV-2
- Connect the handset and main unit case with the phone cord.
- Connect the LAN Port of the unit to the RJ45 socket of a hub/switch or a router (LAN side of the router) using the Ethernet cable.
- Connect the 12V DC output plug to the power jack on the unit and plug the power adapter into an electrical outlet. If a PoE switch is used in step 2, this step can be skipped.
- The LCD will display booting up or firmware upgrading information. Before continuing, please wait for the main screen display to appear.
- Using the web configuration interface or the menu of the touch screen, you can further configure network connection using static IP, DHCP, etc.

Tips for Using the ITSV-2 Keys
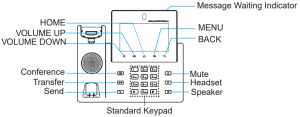
- VOLUME: Press the UP or DOWN keys to adjust the volume on the ITSV-2.
- HOME: Press the HOME key to return to the default idle screen. Press and hold the HOME key for 2 seconds to take a screenshot.
- MENU: Press the MENU key to access the unit’s display settings, edit widgets and thread manager. Press and hold the MENU key for 2 seconds to enter the managing application interface directly.
- BACK: Press the BACK key to go back to the previous menu.
ITSV-2 Configuration
- For further information on the configuration for ICX-AlphaCom, SIP, and IC-EDGE, please see Zenitel Wiki
Configuring the ITSV-2 Using Touch Screen
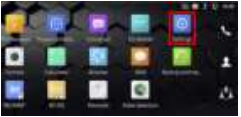
- Make sure the unit is properly powered up, in idle screen mode and connected to the network.
- Select Settings > Advanced > Account settings. Tap on one of the Accounts to configure Account name, SIP server (ICX-AlphaCom or IC-EDGE), SIP User ID (Extension Number), SIP authentication ID (if required) and SIP authentication password (if required).Note: For changes to take immediate effect, it may be necessary to temporarily disable the account. Do this by setting Account activation to OFF and tapping OK. Then reenable your account by setting Account activation to ON and tapping OK.
- Follow the LCD menu options to configure other settings on the unit. For example, to configure static IP on the ITSV-2, set up static IP address via menu Settings > Network > Ethernet settings.
- If you want to see your accounts on your home screen, press the Home button. Press the Menu button, and select Widgets. Several account display widgets will appear. Select and drag the widget to the home screen.
Configuring the ITSV-2 Using Web Browser
- Ensure your ITSV-2 is properly powered up and connected to the Internet.
- To find the IP address of the ITSV-2, use the touch screen and tap Settings > Status > Network status > IPv4 address
- Enter the IP address of the ITSV-2 into your browser.
- Log in by entering the default username / password: admin / alphaadminNote: After logging in for the very first time, you will be prompted to change the password.
- To register an account on the ITSV-2: Select Account > Account 1/2/3/4/5/6… > General Settings6. Set Account Name, SIP Server (ICX-AlphaCom or IC-EDGE), SIP User ID (Directory Number), SIP Authentication ID (if required) and SIP Authentication Password (if required).Note: For changes to take immediate effect, it may be necessary to temporarily disable the account. First uncheck the box for Account Active, then click Save and Apply (button appears in yellow bar at top of browser). Once this is done, re-enable the account by checking the box for Account Active followed by Save and Apply again.
 Note: For changes to take immediate effect, it may be necessary to temporarily disable the account. First uncheck the box for Account Active, then click Save and Apply (button appears in yellow bar at top of browser). Once this is done, re-enable the account by checking the box for Account Active followed by Save and Apply again.
The following sections describes how the ITSV-2 is configured to work together with the TCIV+ Video Intercoms TCIV-2+/TCIV-3+/TCIV 5+/TCIV-6+.
ICX-AlphaCom Configuration
- Log into the ITSV-2 by entering default username / password: admin / alphaadmin
ICX-AlphaCom ITSV-2 Account Setup
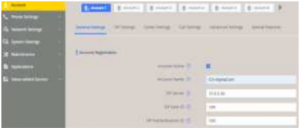
- Select Account > Account 1 > General Settings
- Enter values the Account Registration parametersAccount Active: Check Yes boxSIP Server: IP address of ICX-AlphaCom (see Main Settings in TCIV+)SIP User ID: Directory Number of ITSV-2SIP Authentication ID: Same as SIP User ID
ICX-AlphaCom ITSV-2 Codec Settings
- Check in AlphaPro under Users & Stations the codec that has been selected for SIP phones (normally G722)
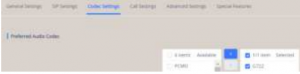
- Select Account 1 > Codec Settings
- Under Preferred Audio Codec remove all codecs from the Selected list except the one defined in AlphaPro, i.e. G722
- Under Preferred Video Codec select H264
ICX-AlphaCom ITSV-2 Video Configuration
The video is streamed in H.264 format over RTSP protocol from the TCIV+ camera to the ITSV-2. The TCIV+ camera must have a static IP address.
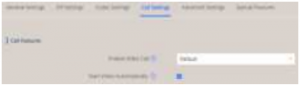
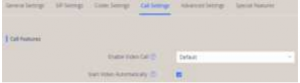
- Select Account 1 > Call Settings
- Check the box for Start Video Automatically
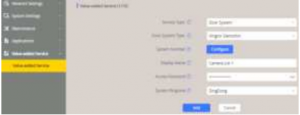
- Select Value-added Service > Add
- Service Type: Select Door System from the dropdown box
- Door System Type: Select Vingtor Stentofon from the dropdown box
- Display Name: Name of Camera List
- System Ringtone: This will be used for calls from any station in the camera list. It is possible to add several camera lists and use a different ringtone for each list.
- Click Configure for System Number to open the camera listEnter the directory number and camera URL of the TCIV+ station
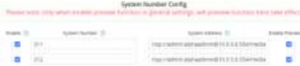
System Number: Directory Number of TCIV+ stationSystem Address: rtsp://<user:password>@<TCIV+ IP address>:<port no.>/media?encoder=H264Example: rtsp://admin::554/media?encoder=H264 Note: For TCIV units, System Address = rtsp://admin::554/1/RTSP/video
IC-EDGE Configuration
The ITSV-2 has to be manually added to the Edge Controller.
- Log on to the Edge Controller
- Select Edge Controller > System Configuration > Directory
- Under Manually Added Devices click the + button to select Vingtor-Stentofon Device from the dropdown listFor further information on the configuration of IC-EDGE, please see Zenitel Wiki
- Log into the ITSV-2 by entering default username / password: admin / alphaadmin
IC-EDGE ITSV-2 Account Setup
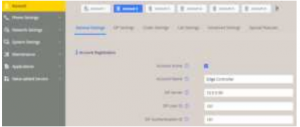
- Select Account > Account 2 > General Settings
- Enter values for the Account Registration parametersAccount Active: Check Yes boxSIP Server: IP address of intercom station set as Edge ControllerSIP User ID: Directory Number of the ITSV-2SIP Authentication ID: Same as SIP User ID
IC-EDGE ITSV-2 Video Configuration
The video is streamed directly from the TCIV+ camera to the ITSV-2. The TCIV+ camera must have a static IP address.
- Select Account 1 > Call Settings
- Check the box for Start Video Automatically
CONTACT CUSTOMER SERVICEGlobal: +47 4000 2700USA: 800 654 3140Mon-Fri 09:00 to 17:00 CST[email protected]
References
[xyz-ips snippet=”download-snippet”]