
VL9-M REMOTE READER FOR (MIU/ABSOLUTE ENCODER REGISTERS)

OPERATION
The VL9 is activated by striking the gold disc, making an acoustic vibration. You can use your fingernail, coin, key, or even the tip of your screwdriver. The VL9 has an 8-digit 14-segment alphanumeric display capable of displaying both letters and numbers. More than 8 digits can be displayed by showing part of a value, then the rest of it. Characters may be alphanumeric (letters or numbers). All letters will be shown as capital letters. Other displayable characters include the decimal point, the space, and the dash (“-“). Any undisplayable character or error character (such as a question mark) will be shown as a dash.
When displaying a meter reading, the letters “RD” will appear at the far left taking 2 display digits. Meter readings of 6 digits or less will appear at the same time, right-justified, and will be displayed for 10 seconds. For a meter reading of more than 6 digits, the “RD” label will appear by itself for 2 seconds, the complete meter reading (up to 8 digits) will appear for 10 seconds. The meter/register ID will appear next. For an ID of 8 or fewer characters, the label “ID” will appear for 2 seconds, then the ID will appear for 10 seconds. For an ID of more than 8 (up to 12) characters, the label “ID” and the most significant characters (up to 4) will appear for 5 seconds, then the rest of the ID will appear for 10 seconds.
WIRING DIAGRAMS

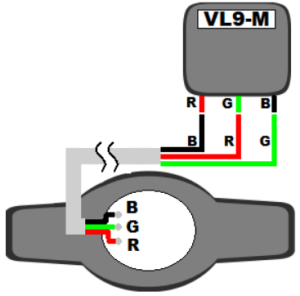
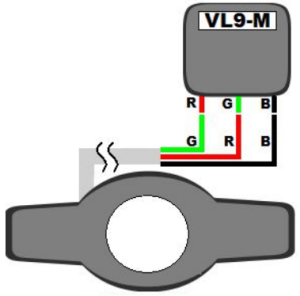
Sensus, Badger Neptune Amco, Kent
USER ERROR MESSAGES
The display will indicate one of the following messages if an error is encountered:
| Message | Description |
| CHECK WIRING | No meter register appears to be connected–verify that the register wires are all connected correctly. |
| UNKNOWN REGISTER | Some type of response was obtained, but not from a supported register type. Verify that the connected meter is a supported type. |
| FRAMING ERROR | The data was corrupted: a STOP bit did not occur where it should have. Check the integrity of cable connections. |
| PARITY ERROR | An incorrect parity error check bit was received. Check the integrity of cable connections. |
TECHNICAL SPECIFICATIONS
- APPLICATIONS: This unit is used whenever a water meter is not easily accessed. Whether the meter is mounted in a ceiling, a pit, or an inaccessible room, these units give remote access to the meter reading.
- CONSTRUCTION: Size is 4.6” X 4.3” X 2” thick (11.7cm X 10.9cm X 5.1cm thick) Weight 9oz (254g). Environmentally sealed to keep unit waterproof and to ensure no internal fogging. Operating temperature is -22 to 176 °F (-30 to 80 °C)
- WIRING: Recommended cable is a 3 conductor 24 gauge stranded wire with shielding. Maximum distance between the meter and remote reader is 500 ft.
- BATTERY: The VL9-M has an internal 3.6 Volt Lithium Battery. It has a calculated life of 10 years.
- PROTOCOLS: Sensus, Neptune, and Kent protocols are supported by the VL9-M. Most meter manufactures use one of these three protocols for communication.
VL9 Visu-LinkInstallation
Suggested Tools: Materials Required:Electric Drill Masonry fasteners3/16 Carbide Masonry Drill Calking CompoundScrewdriverWire StripperWire CuttersTerminal Crimp Tool
Installation:
The Visu-Link electronics and battery are environmentally sealed and suitable for outdoor installation, the wire terminals are not sealed for moisture. The unit should not be installed in locations below grade or in a submersible environment.
1. Using the VL9 base as a template, locate and mark mounting holes on outside wall of building. For best results the VL9 should be located at eye level in an easily accessible location.
2. Remove VL9 cover.
3. Secure VL9 base to wall using the mounting dimensions in the drawing shown to drill the locating holes.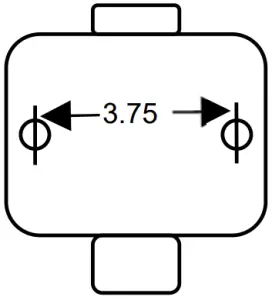
4. Run the cable from the meter to the VL9. Cable per UL 2464 24 gauge 7/32, with foil shield and drain.Note: Never place the cable in a conduit with conductors carrying A/C.
5. Attach cable to meter and to VL9, be sure to follow the connecting schematic. Be sure connections are secure and protected.
6. Tap VL9 (with key or coin) to test installation, the meter reading and serial number will be displayed. You may also see one of the following error messages:
“Check Wiring”-meter appears to be not connected“Unknown register”-verify that the meter connected is a supported type.“Framing error”-check cable connections.“Parity error”-check cable connections.
7. Comply with all the necessary ordinances and codes.
8. Caution when drilling holes in walls, there may be electricals inside. Wear safety glasses. Secure and clean all debris from the install.
9. If connecting to a Sensus Omni, you must remove touchpad, (small round cylinder), from the black insulated cable. Connect VL-9 to the three conductors in the black insulated cable. Do not connect the VL9 to the conductors in the white insulated cable.
Kemp-Meek MFG. INC.101 Park CentralMineola, TX 75773903.569.9700www.kempmeek.com
 report this ad
* Trade Names Acknowledged 7/2/20 Rev1.1
References
[xyz-ips snippet=”download-snippet”]