
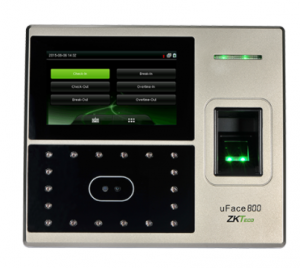
ZGTECO Fingerprint Time Attendance System Installation Guide
1. Components

2. Installation
- Installation Environment
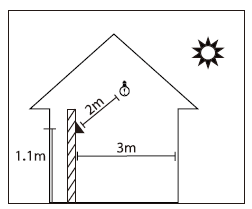
- Install the device indoor at least 10 feet (3ml away from the window and 6.5 feet (2ml from any light source.
- It is not recommended to install the device outdoor or on windows.
2. Installation Steps
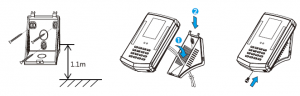
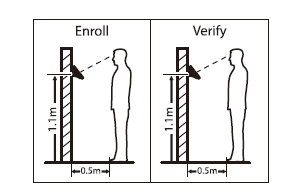
a. Drill holes on the wall and fix the mounting plate as shown in the above image.Note: The distance between the mounting plate and ground must be 1.1m when the user’s height range is between 1.55m to 1.85m. If the user’s height is above 1.65m, then the distance between the mounting plate and ground must be 1.2m.b. Pass the power cable through the hole at the bottom of the mounting plate. Then, fix the upper hooks to the mounting plate.c. Finally, tighten the screw at the bottom of the device.
3. Face Recognition
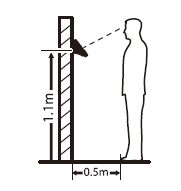
- Recommended standing position
- The distance between the user and device should be O.Sm for the user’s height range of 1.55m to 1.85m which can be adjusted as per the requirements.
- The distance between the user and the device should be same while enrolling and verifying. Also, the distance between the device and the ground must be same while enrolling and verifying.
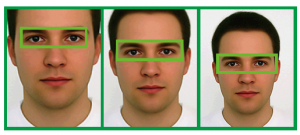
2. Recommended Facial Expression
- Please move your eyes to fit into the green box by moving forward or backward during enrollment.
- Please move your face to fit inside the green box to make it at the center of the screen during verification.
4. Add a New User on Clock
- Long press the <M/OK> key to enter the menu.
- Go to [Users] and then [Add User].
- Enter the First Name, Last Name ofthe user.
- Select Face to enroll the face. (Note: Every time the user registers the face, he/she needs to agree with the privacy policy.)
- Select Password to enroll the password.
- Set the User Role as Employee/Admin. (J) Press the <ESC> key to exit and save the data.
5. Enroll Users in Batch through USB
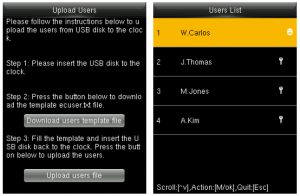
- Go to [Users] then select [Upload Users].
- Insert the USB drive to the clock, then select [Download users template file].
- Add the user details to the template file ecuser.txt on PC and save.
- Insert the USB drive back to the clock and select [Upload users file] on the same screen.
- Then go to [User List], select the user and enroll the face.
6. Reset Date and Time
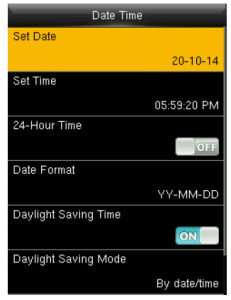
- Go to [System] and then [Date and Time].
- Set the Date, Time and the Format.
- Enable Daylight Saving Time if required.
- Press the <ESC> key to exit.
7. Setup Pay Period
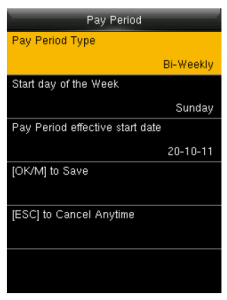
- Go to [Pay Period].
- You can choose Weekly, Biweekly, Semi-monthly or Monthly pay period type according to the payroll policy.
- The Time Report will be generated based on the selected pay period type.
8. Configure Attendance Rule
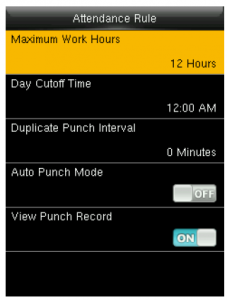
- Go to [Rule].
- Maximum Work Hours: Verifies if there is a missing punch when the total worked hours exceeds this value.
- Day Cutoff Time: It is the time that determines whether to count the worked hours to the previous day or next day.
- Duplicate Punch Interval: Avoids multiple checkin/ out within the specified time.
- Auto Punch Mode: When this mode is turned off, the users need to select the check-in/out status manually after verification. If it is turned on, the clock willautomatically determine the attendance status based on the last recorded attendance status of the same user.
- View Punch Record: When this option is turned on, the users can verify their attendance records by themselves.
9. Face Verification for Check-in/out
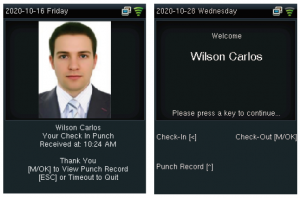
- When the Auto Punch Mode is turned on, after successful verification, the clock will create an attendance recordimmediately. The user can press the <M/OK> key to view the record or press <ESC> key to quit.
- When the Auto Punch Mode is turned off, the user should select the desired key after verification. Then, the attendance record will be created.
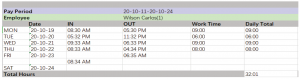
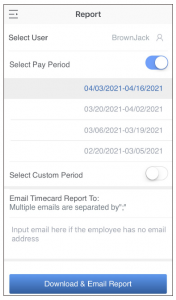
10. Download Time Report

- Insert the USB drive to the clock.
- Go to [Time Report] and select the required time period.
- Select the time format to be displayed on the report.
- Press <M/OK> key to download the report.
11. Add Missing Punch
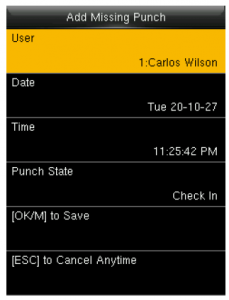
- Go to [Time Data], then select [Add Missing Punch].
- Select the User, then enter the Date, Time and Punch state.
- Press <M/OK> key to save.
12. Backup User Data
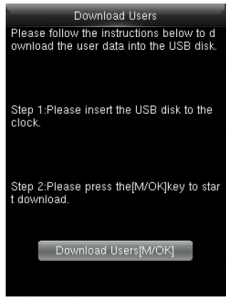
- Insert a USB drive to the clock.
- Go to [Users] and then [Download users].
- When you need to recover the data, rename the downloaded file to ecuser.txt and upload it.
13. Delete Data
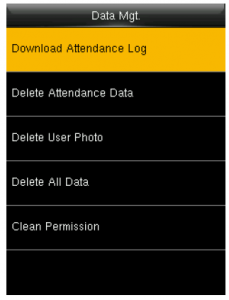
- CD Go to [Data Mgt.] and click [Delete All Data] to clean all the clock data.
- Go to [Data Mgt.] and click [Delete Attendance Data] to clean all the attendance data.
14. Upgrade Firmware
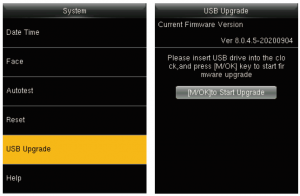
- Initially, download the firmware from the website and save it to the root folder of the USB drive.
- Plug the USB drive to the clock.
- Go to [System] and then [USB Upgrade].
- Then press, <M/OK> to start upgrading the Firmware. 15. Setup
15. Setup Wi-Fi Manually
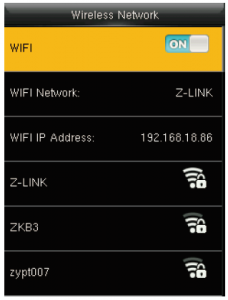
- Go to [Comm.] then [Wireless Network].
- Select the required Wi-Fi connection.
- Navigate to [Password] and then enter the correct password.
- Press the <M/OK> key to connect.
16. Setup Wi-Fi through USB
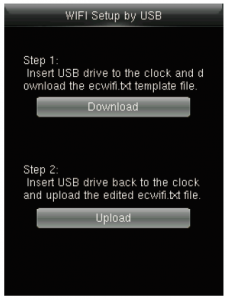
- CD Go to [Comm.] then [Wireless Network] and then select [WIFI Setup by USB]. Cg) Insert the USB drive to the clock then select [Download] to save the config file as ecwifi.txt.
- Open ecwifi.txt on PC, enter the Wi-Fi Name(SSID) and Password then save.
- Insert the USB drive back to the clock, then navigate to [Upload] on the same screen to upload the Wi-Fi details.
17. Connect to Mobile App
Download the “NGTeco Time” App from the Google Play store or Apple store from your mobile.
- Connect your mobile to the same Wi-Fi network of the clock.
- Go to [Comm.] then click [App Connection] to view the QR code.
- Open the Mobile App and press the ~ icon to scan the QR code from the clock.
- Then the mobile app connects to the clock automatically.
- After successful connection, you can setup the clock options from the App.

18. Register users from App

- Go to Users menu
- Click the Add User icon to add a new user.
- The User ID can be auto-generated or manually assigned.
- Enter the First Name, Last Name and Password.
- Set the permission.
- Click Save & Sync to sync the user details to the time clock.
- Open User List on the clock to enroll user’s face.
19. Add Missing Punch from App
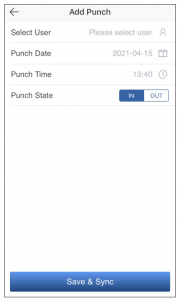
- Go to Attendance menu.
- Click the Add Punch icon.
- Select the user to add the missing check-in/out.
- Select the Punch Date (on the Attendance page). The default date is today, which can be selected manually.
- Select the Punch Time and Punch State.
- Click Save & Sync to sync the attendance details to the clock.
20. Edit Punch from App
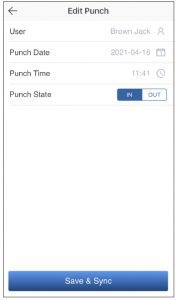
- Go to Attendance menu.
- Select the user and click the Edit Punch icon.
- Select the Punch Date (on the Attendance page). The default date is today, which can be selected manually.
- Select the Punch Time and Punch State.
- Click Save & Sync to sync the attendance details to the clock.
22. Setup Pay Period and Attendance Rule from App

- Go to Setup menu. Pay
- Set the Pay Period.
- Set the Start Day of the week.
- Set the Day Cutoff Time.
- Set the Duplicate Punch Interval.
- Set the Maximum Work Hours.
- Set the Time format for report generation.
- Click Save & Sync to sync the settings to the clock.
23. Help and Support
For further details, scan the QR code from the Help menu of the device or package box to visit the on line help center.
Website : www.ngteco.comEmail : Phone: (770) 800-2321Support: www.ngteco.com/supportFor more product information, please scan and visit our website .

Read More About This Manual & Download PDF:
[xyz-ips snippet=”download-snippet”]