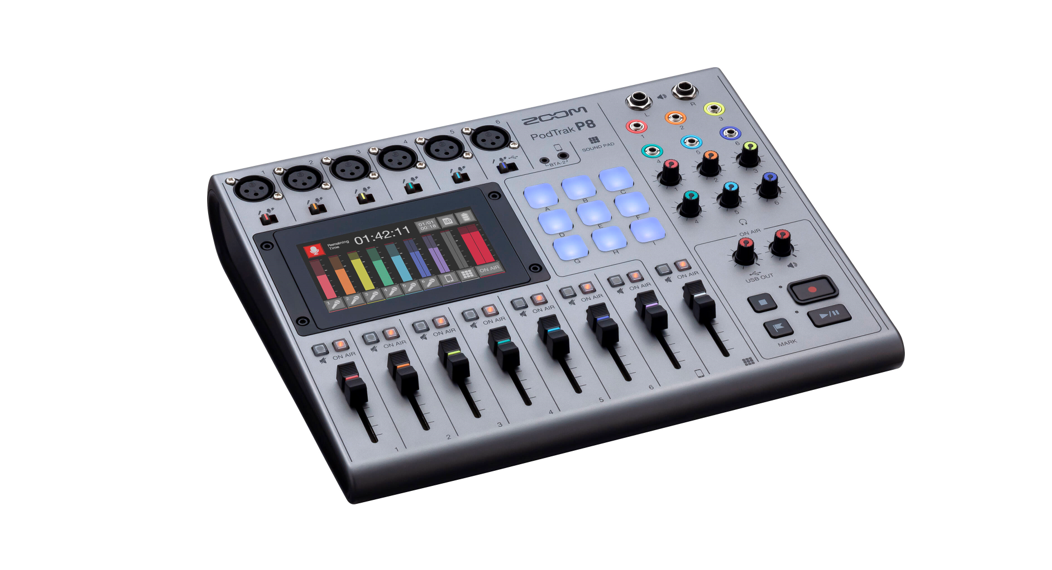
![]() P8PodTrak
P8PodTrak
 Quick Guide
You must read the Usage and Safety Precautions before use.The Operation Manual can be downloaded from the ZOOM website (www.zoom.jp/docs/p8). This page has files in PDF and ePub formats.The PDF file format is suitable for printing on paper and reading on a computer.The ePub format can be read with electronic document readers and is designed for reading on smartphones and tablets.

© 2020 ZOOM CORPORATIONCopying or reprinting this manual in part or in whole without permission is prohibited.Product names, registered trademarks, and company names in this document are the property of their respective companies.All trademarks and registered trademarks in this document are for identification purposes only and are not intended to infringe on the copyrights of their respective owners.You might need this manual in the future. Always keep it in a place where you can access it easily.The contents of this manual and the specifications of the product could be changed without notice.
Podcasting with the P8
1. RecordUsing the P8, podcasts can be recorded as follows.
- Podcasts with up to 6 people can be recorded. (6 mics and 6 pairs of headphones can be connected at the same time.)
- The clarity of voices can be enhanced using various additional functions (Limiter, Low Cut, Tone, Comp/DeEsser, and Noise Reduction).
- Jingles and interview sounds can be triggered using SOUND PAD buttons.
- By connecting a smartphone, guests in remote locations can participate in podcasts.
- Background music can be played from a computer, for example, using the USB audio return function.
- Podcasts can be created easily using stereo files for podcasting.
- Fine adjustments to volume can be made on a computer, for example, using multitrack files.
2. EditThe P8 can be used to edit recorded stereo files for podcasting in the following ways.
- Unnecessary parts can be cut, and fade-ins/outs can be added.
- Background music can be added.
- Openings and closings that have been prepared in advance can be attached to the beginnings and ends.
- The loudness normalization function can level the volume ideally for podcasting.
- Files can be converted to MP3s.
3. ReleaseEdited files can be transferred to a computer, for example, using the USB FILE TRANSFER mode.Upload them to the podcasting service* or server you are using.* Services that provide servers for saving podcast files
Explanation of terms
USB audio returnThis is the output from a computer, smartphone, or tablet that is being used as an audio interface.Background music can be played from a computer or other device during podcasting.SOUND PAD buttonsAudio files can be assigned to these. Press one to play the assigned file. These are convenient to play opening and closing music as well as interviews that have been recorded in advance.USB Mix-MinusWhen using the P8 as an audio interface, signals input by USB can be set to not be output back to USB. This can prevent feedback to the person at the other end when recording while calling through a computer, smartphone, or tablet.ON AIR buttonsWhen ON AIR buttons are turned off, input sounds are not output to the USB port (streaming audio) or SPEAKER OUT jacks, nor are they recorded to the podcast stereo file. This function is convenient, for example, when participants are discussing the next topic among themselves while music is playing.
Connection examples
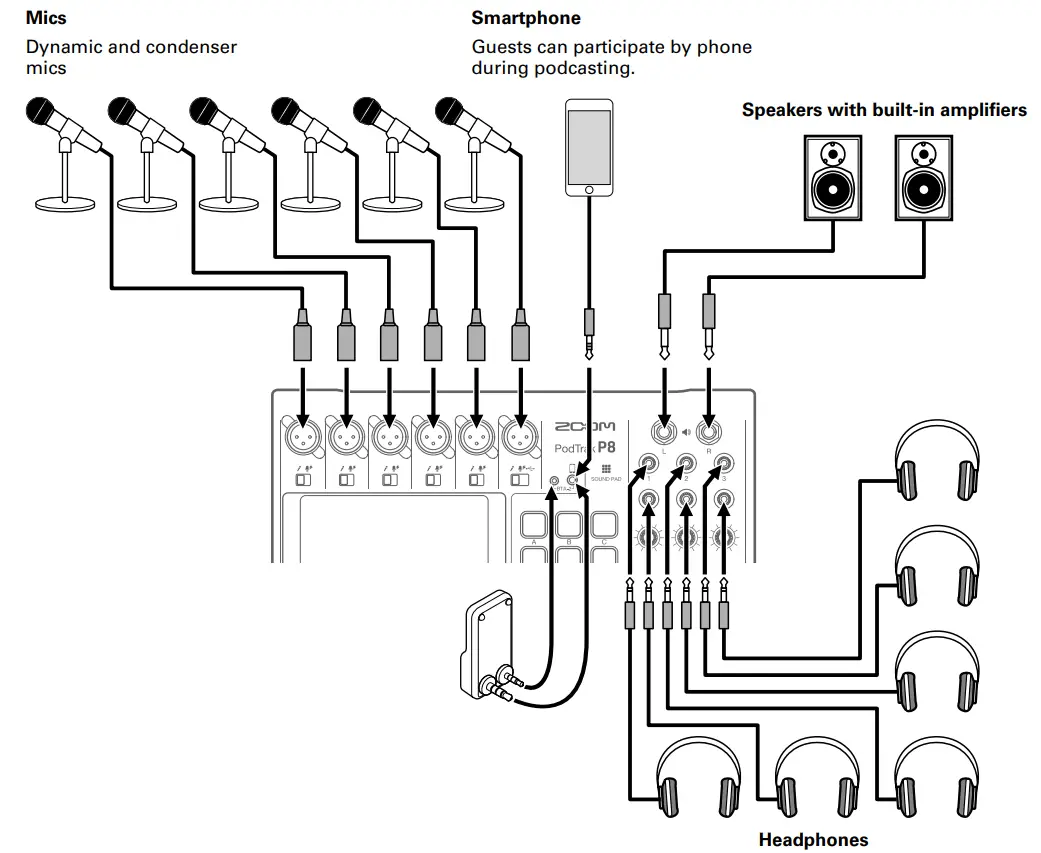
Wireless adapter (ZOOM BTA-2)This enables wireless connection to smartphones and tablets.
Computer, smartphone, or tabletUsing the audio interface function, audio can be shared with a computer, for example, and recordings on the SD card can be transferred for editing. This might not be usable with some communication apps.
Functions of parts
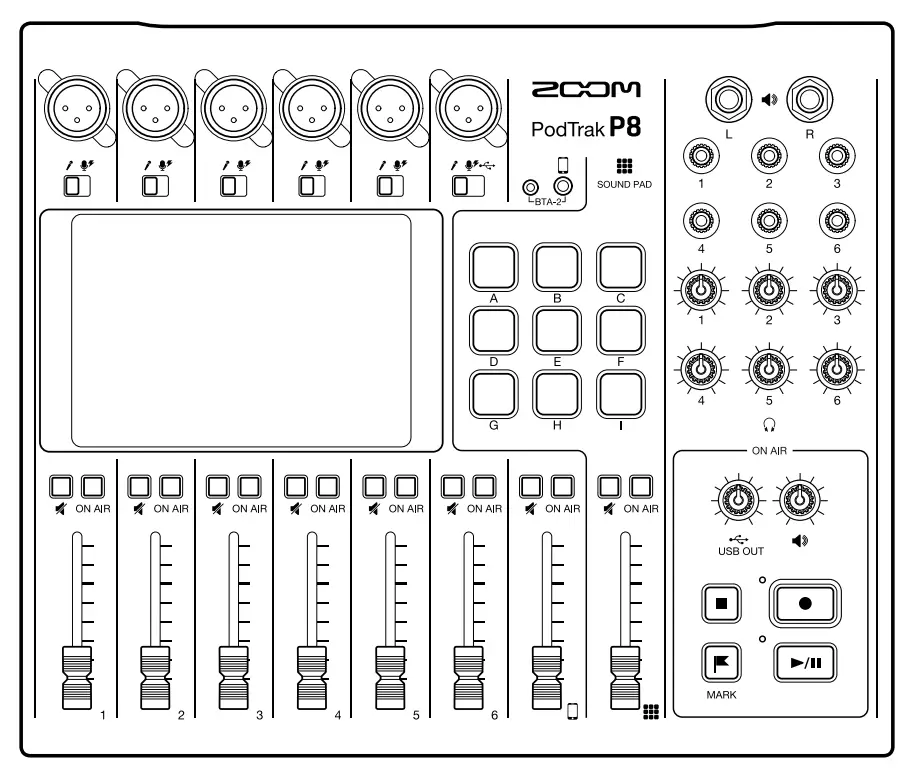
Top
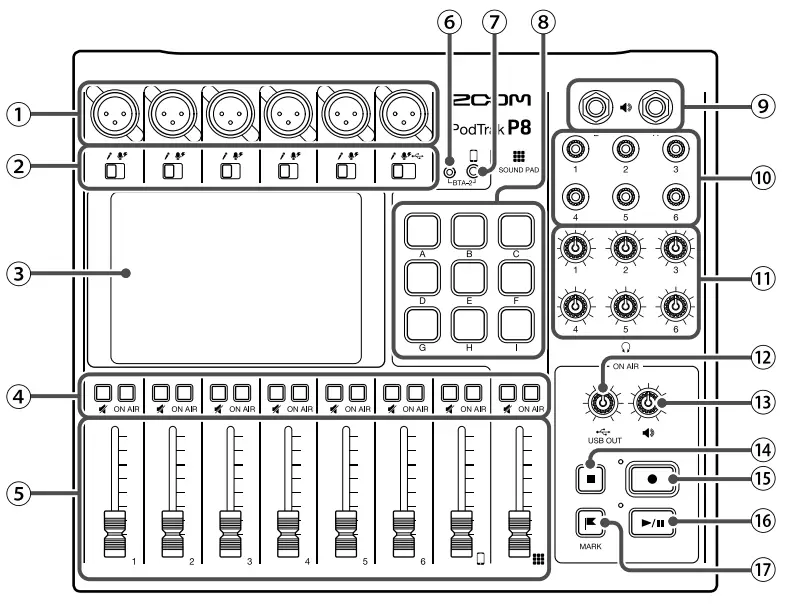
- INPUT jacksThese input jacks have built-in mic preamps.
- INPUT SELECT switchesSet these according to the connected equipment.
 Dynamic micA condenser mic (supplies +48 V phantom power)USB audio return signal output from computer, smartphone, or tablet
 - TouchscreenThis shows the status of the P8 and can be operated by touch to make various settings and edit files.
- MUTE buttonPress to mute (lit) and unmute (unlit) signals.To mute signals, press these buttons to light them.ON AIR buttonsWhen lit, channel signals are recorded in the podcast stereo file and sent to the USB port, SPEAKER OUT jacks, PHONES jacks and smartphone connection jack.When unlit, channel signals are only sent to the PHONES jacks and smartphone connection jack.
- Channel fadersUse to adjust channel signal levels in ranges from −∞ to +10 dB.
- Power supply connector for BTA-2Use this power supply connector when connecting a BTA-2 wireless adapter.
- Smartphone connection jackConnect a smartphone here.
- SOUND PAD A–I buttonsPress these to play the sounds assigned to them.
- SPEAKER OUT jacksThis output a stereo mix of the signals from all the channels. Connect them to a power amplifier, a PA system, or speakers with built-in amplifiers, for example.
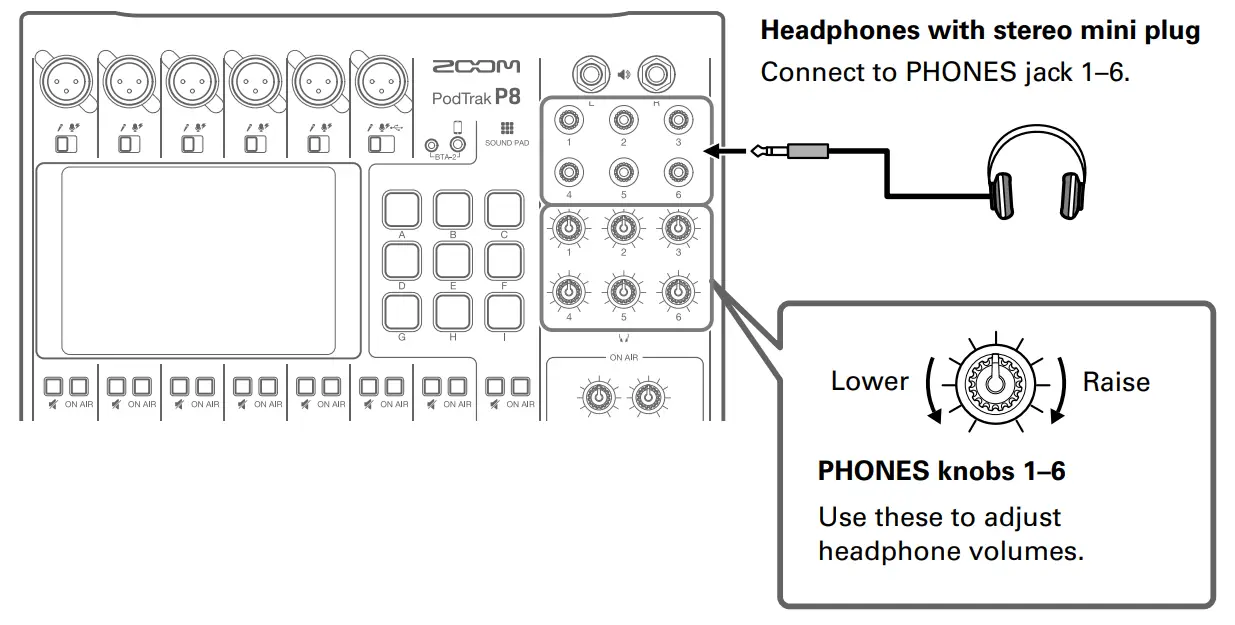
- PHONES jacksThis output a stereo mix of the signals from all the channels. Connect headphones to these.
- PHONES knobsUse to adjust the volumes of the signals output from the PHONES jacks.
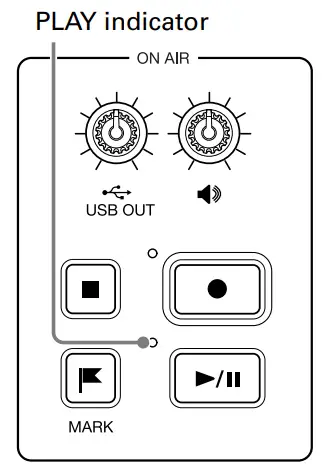
- USB OUT knobUse to adjust the volume of the signal output from the USB port.
- SPEAKER OUT knobUse to adjust the volume of the signals output from the SPEAKER OUT jacks.
- STOP buttonPress to stop recording/playback.
- REC buttonPress to start/stop recording.
- PLAY/PAUSE buttonPress to play/pause recorded files.
- MARK buttonPress to add marks to recording files during recording/playback. These provide editing guides.
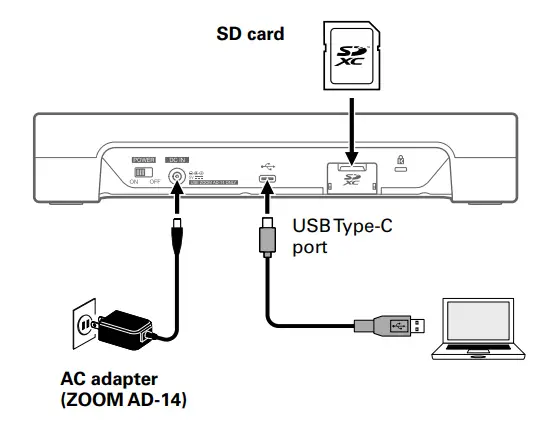
Back

- POWER switchPress to turn the power ON/OFF.
- DC IN 5V AC adapter connectorConnect the included AC adapter here.
- USB Type-C portThis USB port is for connecting with a computer, smartphone, or tablet.
- SD card slotCards that conform to SDHC and SDXC specifications are supported. Format the SD card with the P8 before use.
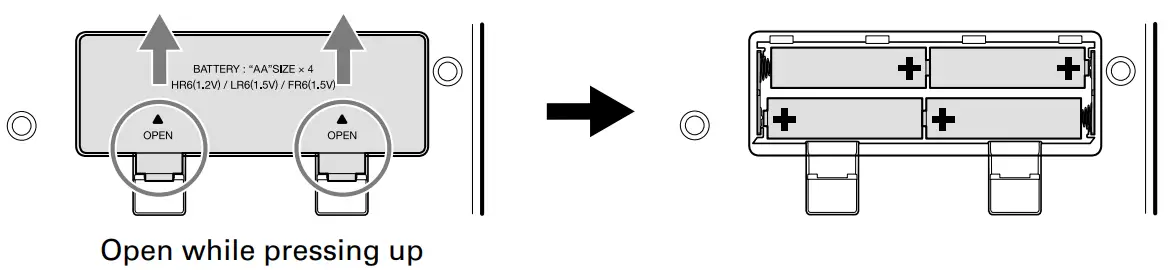
Installing batteries
To run the P8 on battery power, open the battery compartment cover on the bottom and install 4 AA batteries.
NOTE
- Use only one type of battery (alkaline, NiMH, or lithium) at a time.
- Set the type of battery used correctly so that the amount of remaining battery charge can be shown accurately.
- The battery charge can be checked on the Home Screen.
Signal flow
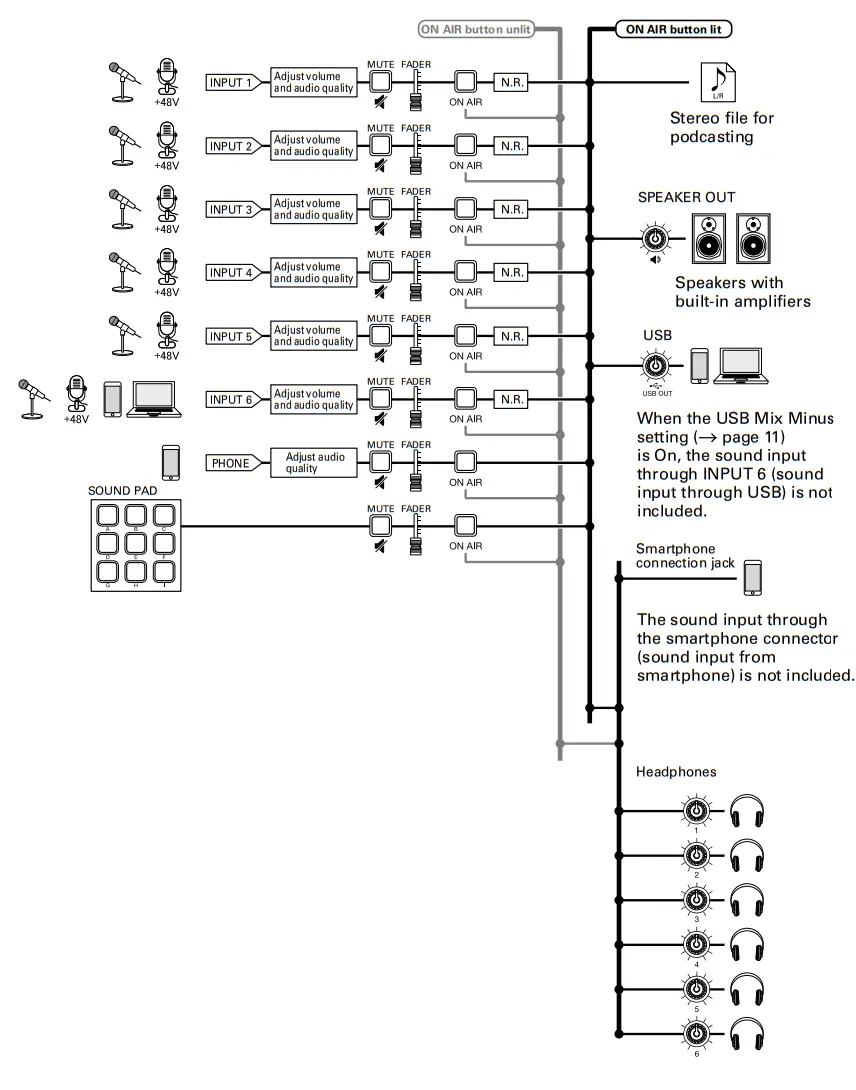
HINT
- When the ON AIR button is OFF (unlit), the sound will not be output to the podcast stereo file, SPEAKER OUT jacks, or USB port.
- Individual files can also be recorded for INPUT 1–6, PHONE, and SOUND PAD channels.
- “N.R.” is an abbreviation for “noise reduction”.
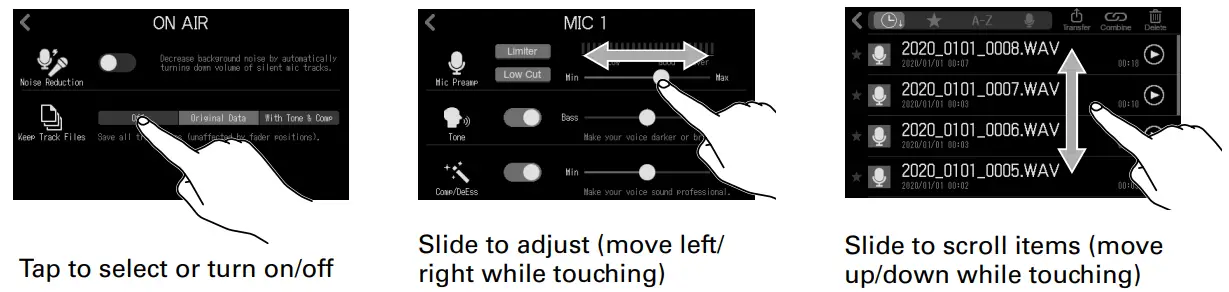
Touchscreen operations
Home Screen OverviewThis appears on the touchscreen when the P8 power is turned on. This shows the state of the P8, including recording conditions and input levels. In addition, various functions can easily be accessed by tapping buttons on them.
Using various screensOperate by tapping and sliding.
Returning to the previous screenTap ![]() at the top left of the screen.To return to the Home Screen, tap
at the top left of the screen.To return to the Home Screen, tap ![]() repeatedly until it appears.
repeatedly until it appears.
HINTIn this Quick Guide, item names on the touchscreen are shown with a gray background.Example: Noise Reduction
Making preparations
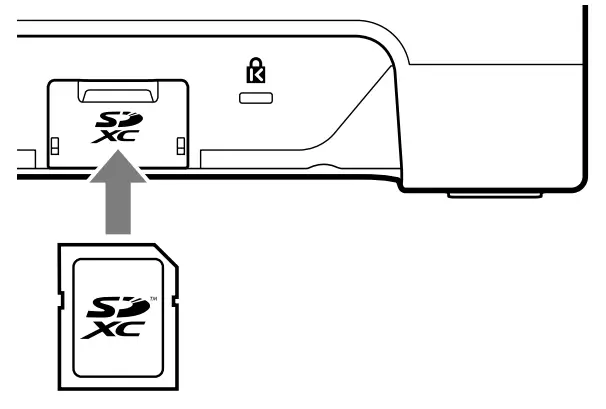
Inserting SD cardsWith the power, off, open the SD card slot cover and insert an SD card all the way into the slot.To remove an SD card, push it further into the slot and then pull it out.
NOTE
- Inserting or removing an SD card while the power is on could result in data loss.
- Before using SD cards that have just been purchased or that have been formatted on a computer, they must be formatted by the P8.
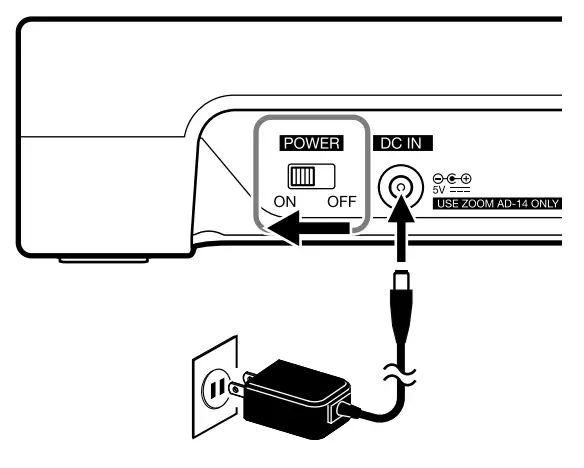
Turning the power onBefore operating the POWER switch, confirm that the P8 output volume is minimized and that device connected to it are turned off.
- Plug the specified adapter (AD-14) into an outlet.
- Set to ON.This turns the power on and opens the Home Screen on the touchscreen.To turn the power off, set to OFF.
NOTEIf you want the power to stay on always, turn the power on while pressing SOUND PAD, ![]() and disable Auto Power Off.Setting the date/time and languageThe first time the power is turned ON after purchase, a screen where the date/time and language can be set opens on the touchscreen.
and disable Auto Power Off.Setting the date/time and languageThe first time the power is turned ON after purchase, a screen where the date/time and language can be set opens on the touchscreen.
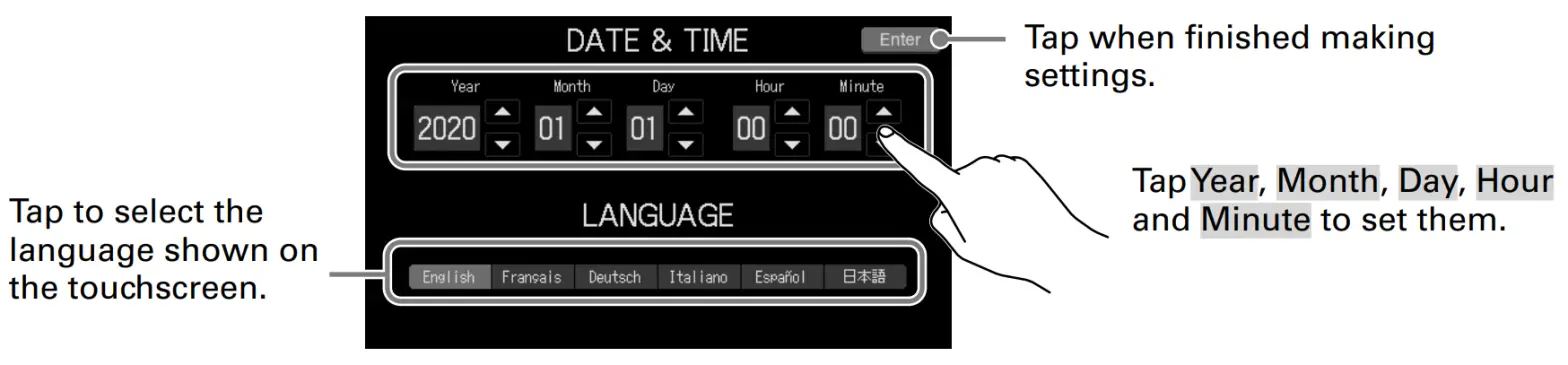
The date/time and language settings can be changed later by tapping the date/time on the Home Screen.Setting noise reduction and recording file typesAfter setting the date/time and language, the noise reduction on/off and recording file type settings screen opens.
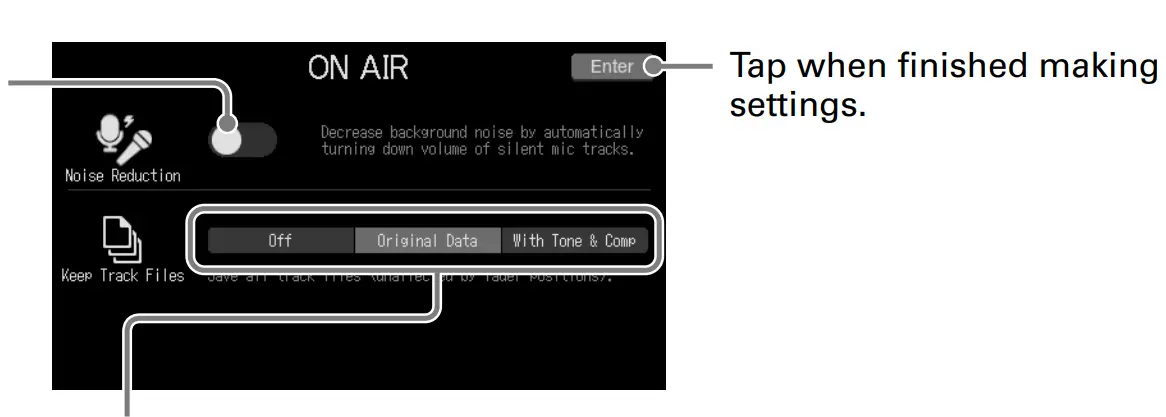
Noise Reduction on/offsettingWhen multiple mics are being used to record sound, the noise reduction function of the P8 suppresses background noise to a constant level by automatically reducing the levels of the mic inputs not being used by people.Recording file settingsOff:: Only record podcast stereo files.Original Data: In addition to podcast stereo files, also record the input signals of each channel to separate files on the SD card at the same time.With Tone & Comp: In addition to podcast stereo files, also record the input signals of each channel after adjustment to separate files on the SD card at the same time.The noise reduction and recording file settings can be changed later by tapping![]() on the Home Screen.Connecting mics
on the Home Screen.Connecting mics
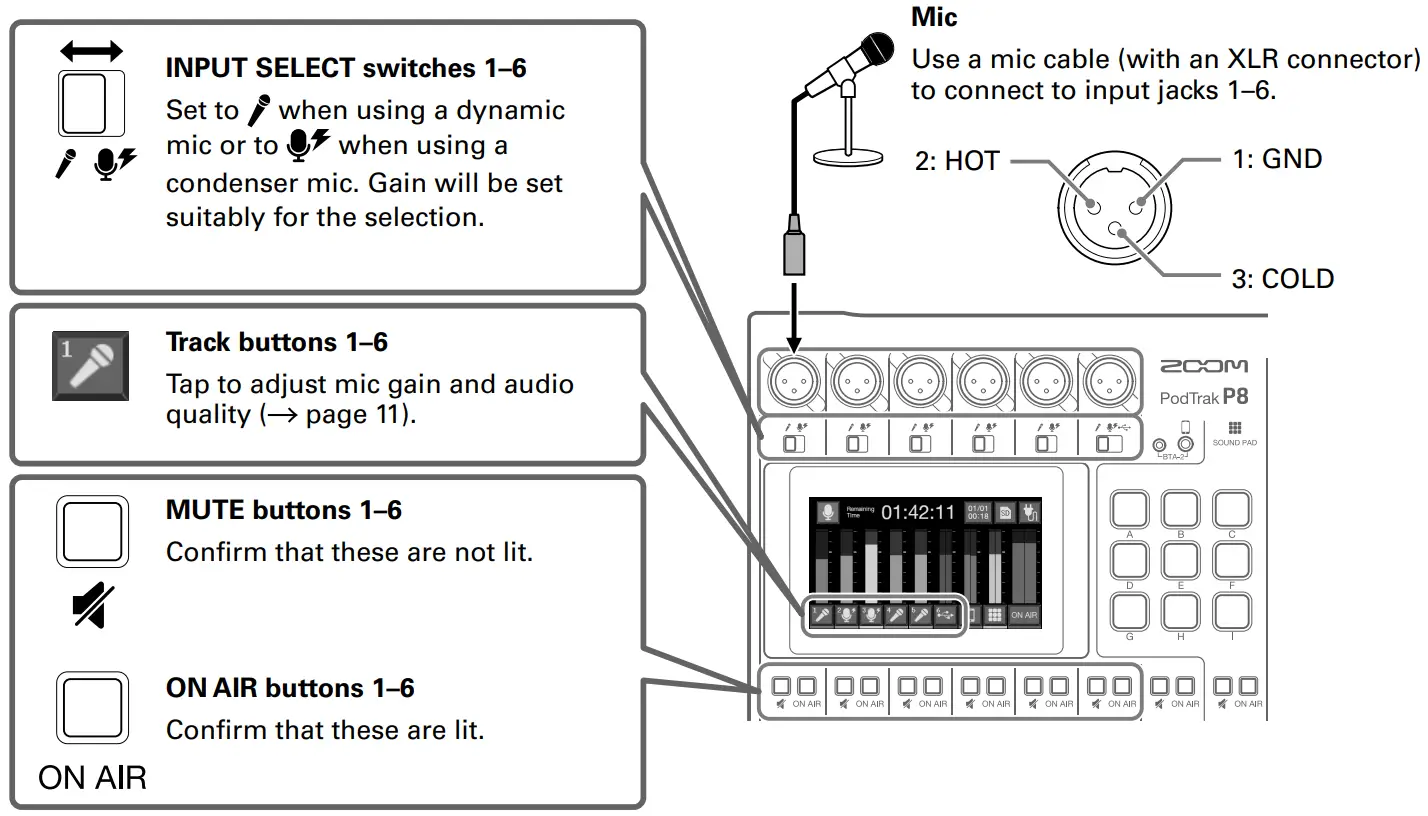
NOTEWhen an INPUT SELECT switch is set ![]() to, +48V phantom power is supplied to that input jack.When connecting a device that is not compatible with phantom power, do not set the INPUT SELECT switch to
to, +48V phantom power is supplied to that input jack.When connecting a device that is not compatible with phantom power, do not set the INPUT SELECT switch to![]() . Doing so could damage the device.Connecting headphones
. Doing so could damage the device.Connecting headphones
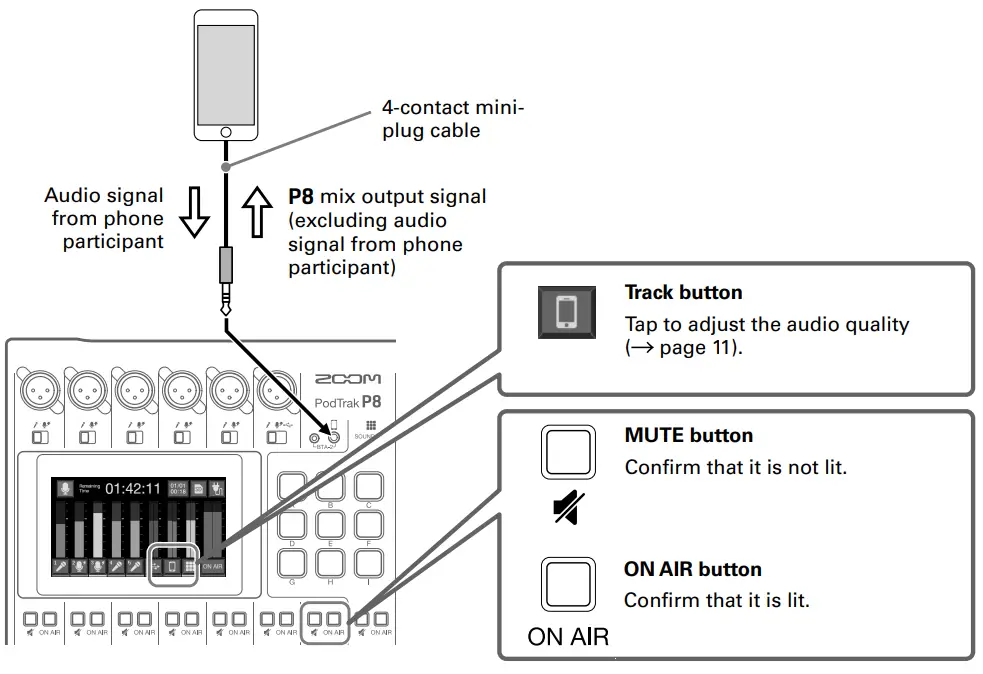
Connecting smartphonesWhen podcasting, the voice of a guest participating by phone can be input. By using a 4-contact mini-plug cable, a signal can be input from a smartphone and a mono signal can be sent back to it simultaneously. Since this output signal does not include the sound from the smartphone, guests participating by phone will not have an echo.
Connecting a computer, smartphone, or tablet by USBUsing the audio interface function, music, interviews and other audio played back on a computer, for example, can be input through channel 6. Sound input through the P8 and sound played withSOUND PAD buttons can also be streamed live directly.Audio recorded on SD cards can also be transferred for editing ( page 13).
NOTE
- Use a Lightning to USB Camera Adapter (or Lightning to USB 3 Camera Adapter) to connect to an iOS/iPadOS device with a lightning connector.
- Before connecting a smartphone or tablet, enable Tablet Mode on the POWER settings screen.
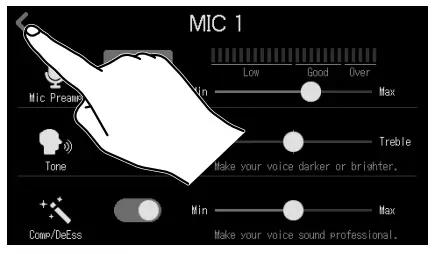
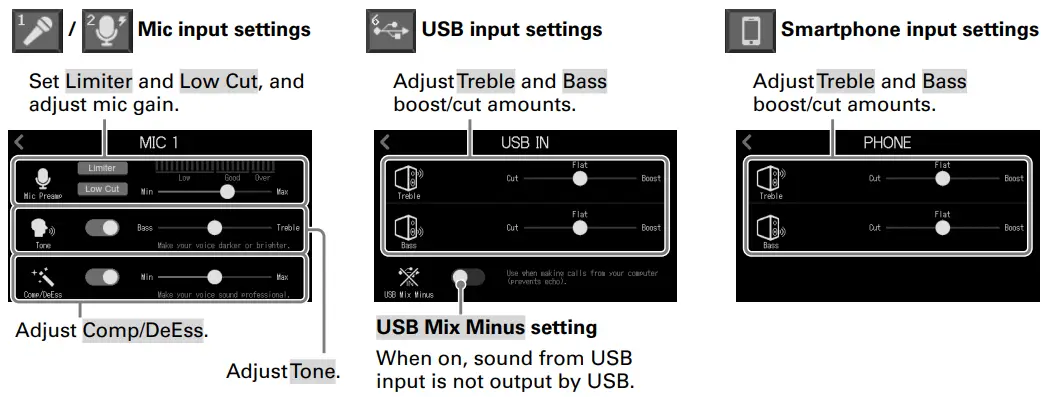
HINTOutput to the USB port is possible even when INPUT SELECT switch 6 is not set to![]() Adjusting audio quality on individual tracksTap track buttons (
Adjusting audio quality on individual tracksTap track buttons (![]() ) on the Home Screen to open their individual settings screens where audio quality can be adjusted.
) on the Home Screen to open their individual settings screens where audio quality can be adjusted.
Recording
Using faders to adjust the balance between channelsAdjust them so that the stereo mix clipping indicators do not light.
RecordingFiles can be recorded to the SD card according to the settings made in“Setting noise reduction and recording file types” ( page 9).
- PressThe recording will start and the REC indicator will light red.Presswhen recording to pause recording. (The REC indicator will blink). Press again to resume recording. The elapsed recording time will be shown on the Home Screen.
- PressThe recording will stop.Press during recording to add marks to recording files. These are convenient as guides when editing.Fader volume adjustments do not affect the individual files of the recorded channels.

Playing recordings
Recorded files can be played back.
- PressThe file editing screen appears on the touchscreen and the most recently recorded file starts playing. (The PLAY indicator lights green.)Press to start/pause playback alternately. (The PLAY indicator will blink when paused.) Pressto stop playback.On the file editing screen, in addition to editing, icons and names can be changed, and files can be assigned to SOUND PAD buttons, for example.
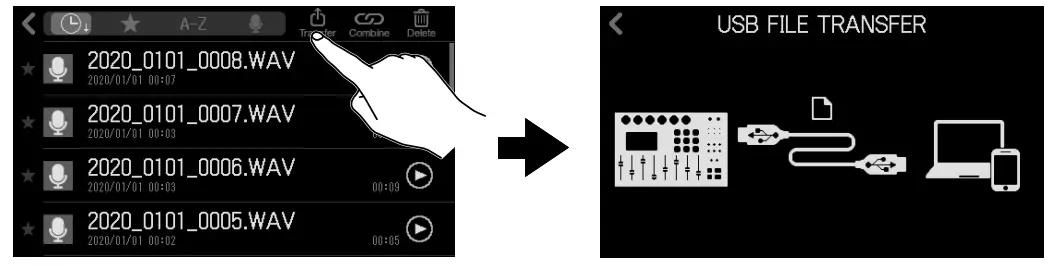
Transferring files to a computer, smartphone, or tablet
Connecting
- Tap on the Home Screen.
- Tap
- Use a USB cable to connect the P8 with a computer, smartphone, or tablet ( page 11).
P8 folder and file structureWhen recording with the P8, folders and files are created on SD cards in the following manner.
Using SOUND PAD functions
Audio files can be assigned to the SOUND PAD buttons. Press one to play the assigned file. The 9 SOUND PAD buttons can have audio files assigned in 4 banks, for a total of 36 files. These are convenient to play opening and closing music, jingles, and interviews that have been recorded in advance. The volume and playback method can be set for each pad.Making SOUND PAD settingsAudio files can be assigned to SOUND PAD buttons and their volume and playback methods can be set individually.
- Tap on the Home Screen, and tap the SOUND PAD that you want to set.
- Making SOUND PAD settings

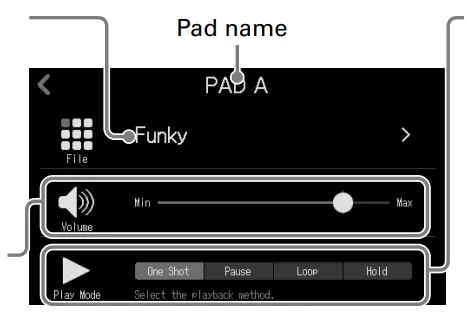
Assigning audio filesTap a file name to open a list of built-in sound sources and audio files stored on the SD card.Select the audio file you want to assign.SOUND PAD volume adjustmentSlide to adjust.Play Mode is used when the SOUND PAD button pressed
- One-Shot: Each press plays the file once from beginning to end.
- Pause: Each press alternately plays and pauses. Playback stops at the end of the file. Press and hold (for 2 seconds) to return to the beginning.
- Loop: Each press alternately plays and stops. Playback will loop until stopped.
- Hold: While pressing, loop playback will continue. When released, playback will stop.
Playing SOUND PAD buttons

NOTEFiles that are not inside the P8_Multitrack and P8_Settings folders on the SD card can be assigned to the SOUND PAD buttons. When adding files from a computer, save them outside these folders.
Function list
| Mixer | The built-in mixer can mix input sounds from up to six mics, the USB audio return, and a smartphone with SOUND PAD playback. | |
| Mic inputs | The mic inputs have high-quality mic preamps built-in. Each channel includes Limiter, Low Cut, Tone, and Comp/DeEsser functions. Noise Reduction is also included to reduce background noise. | |
| Smartphone/BTA-2 input | A smartphone can be connected using a 4-contact mini-plug (TRRS) cable. By connecting a BTA-2 specialized wireless adapter to the P8, a smartphone can also, be connected to it via Bluetooth. | |
| SOUND PAD buttons | Audio files (WAV format) can be assigned to the SOUND PAD buttons. Press one to play the assigned file. With 9 pads and 4 banks, up to 36 files can be assigned. The level and playback method can be set for each pad. When shipped new, 13 sounds are included for use. | |
| Recorder | In addition to podcast stereo files that are mixes of all the channels, each channel can also be recorded as an individual file. The recordings on each channel can be set to either before or after the Tone and omp/DeEsser effects. | |
| USB | Audio interface | Use as a USB audio interface with 2 inputs and 2 outputs is possible.The USB Mix Minus function prevents call-in guests from having echoes. |
| USB FILE TRANSFER | Use as a card reader is possible when connected to a computer, smartphone or tablet. | |
| File editing | The P8 can be used to edit the podcast stereo file that is a mix of all channels.The following operations can be used on these files. | |
| •Delete file•Trim•Fade in•Add background music•Add to favorites•Convert to MP3 | •Combine files•Divide file•Fade out•Loudness normalization•Register icon•Change filename | |
| Settings | SD card | FormatTest card performanceSave/load device settings |
| Power | Battery settingsPower setting for smartphone/tablet USB connectionAdjust touchscreen brightnessDisable automatic power-saving | |
| Other settings | Set date and timeSet language |
 report this ad
HINTSee the Operation Manual for details.
Main specifications
| Number of input channels | Mic inputs: 6 (mono)Smartphone input: 1 (stereo) | |
| Number of output channels | 2 (6 headphones and L/R speaker outputs) | |
| Connectors | MIC | XLR jacks (2: HOT) |
| Smartphone connection jack | TRRS mini-jack (4 contacts, TIP: L, RING 1: R, RING 2: GND, SLEEVE: MIC) | |
| USB | USB Type-C (audio interface and mass storage functions)• Use a USB cable that supports data transfer. USB bus power is supported. | |
| Headphones | 3.5mm stereo mini | |
| Speaker output | TRS jacks (balanced) | |
| AC adapter | Power supply connector for AD-14 | |
| Phantom power | +48 V | |
| Recorder | Formats | WAV 44.1kHz, 16-bit, mono/stereo |
| Recording media | 4–32 GB cards compatible with the SDHC specification (class 10 or higher)64–512 GB cards compatible with the SDXC specification (class 10 or higher) | |
| Audio interface | 44.1kHz, 16-bit, 2-in/2-out | |
| Display | 4.3″ (480×272) full-color touchscreen LCD | |
| Power | 4 AA batteries (alkaline, lithium, or rechargeable NiMH)AC adapter (ZOOM AD-14): DC 5 V/1 A (supports USB bus power) | |
| Estimated continuous operation time using batteries | Recording 44.1kHz/16-bit/4ch audio to SD card (when +48 V is OFF and headphone impedance is 32 Ω) Alkaline batteries: about 2 hours NiMH batteries (1900 mAh): about 3.5 hours Lithium batteries: about 6.5 hours• The above values are approximate.• Continuous battery operation times were determined using in-house testing methods. They will vary greatly according to use conditions. | |
| External dimensions | 295 mm (W) × 248 mm (D) × 61 mm (H) | |
| Weight (unit only) | 1.43 kg |
![]() ZOOM CORPORATION4-4-3 Kanda-surugadai, Chiyoda-ku, Tokyo 101-0062 Japanwww.zoom.co.jpZ2I-3967-01
ZOOM CORPORATION4-4-3 Kanda-surugadai, Chiyoda-ku, Tokyo 101-0062 Japanwww.zoom.co.jpZ2I-3967-01
References
[xyz-ips snippet=”download-snippet”]