
ZOTAC VR GO 3.0
PACKAGE CONTENTS
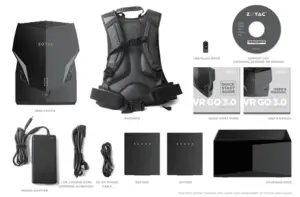
- 1 x ZOTAC VR GO 3.0 SYSTEM
- 1 x Backpack Strap Add-on
- 1 x AC Adapter
- 1 x Power Cord
- 1 x DC 12V Power Cable
- 2 x Batteries
- 1 x Battery Charging Dock
- 1 x User Manual & Quick Start Guide
- 1 x Support DVD (optional)
- 1 x OS Recovery USB Drive
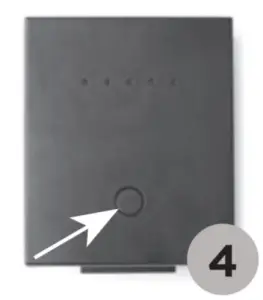
BATTERY CHARGING
Note: The VR GO 3.0 system does not support charging the batteries directly.
- Insert the batteries into the battery charging dock.

- Connect the AC adapter to the battery charging dock.
- All battery LEDs will be OFF when fully charged.
- Press the battery status button to check battery status if need.


TOP PANEL
- Power output (DC12V)
- HDMI port
- USB 3.0 ports

FRONT PANEL
- Power switch
- Battery lock

RIGHT PANEL
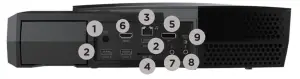
- Power input (DC19.5V)
- USB 3.0 ports
- LAN (RJ45) port
- Memory card slot
- DP port
- HDMI port
- Headphone/Audio Out jack
- Microphone jack
- Power output (DC12V)
SETTING UP YOUR ZOTAC VR GO 3.0 SYSTEM

- Connect USB 3.0 devices
- Connect to home network
- Connect DP display
- Connect HDMI display
- Connect headphone/audio out device
- Connect microphone device
- Connect VR head-mounted display (optional)
- Connect power cable
- Turn on the system
- Follow the on-screen instructions to complete the initial 9 setup of Windows. This process may take several minutes.
ATTACHING BACKPACK
- Lay the ZOTAC VR GO 3.0 on a flat surface with the backcover facing upwards.
- Lay the ZOTAC VR GO 3.0 on the backpack. Align the white line of backpack with the bottom of VR GO 3.0.
- Push the backpack. When you hear a click, it means the installation is in place.


[xyz-ips snippet=”download-snippet”]