
ZRAY DRIFT KAYAK Owner’s Manual

This manual contains important safety instructions. Please read it thoroughly to ensure your understanding before using the Kayak and retain it for future reference.

DO NOT RETURN THIS PRODUCT TO A STORE
For any questions, queries or problems please contact us at:Toll free: Monday – Friday 9am – 4pm PST – (866) 946-3002Or via email:
INTRODUCTION
Thank you for purchasing your ZRAY DRIFT Inflatable 2-person Kayak. Please follow these instructions for correct assembly. Failure to follow these instructions may result in drowning or serious injury.
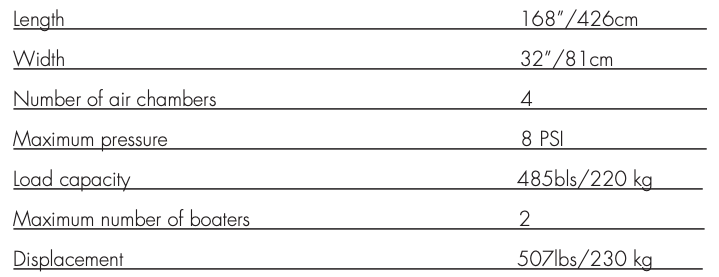
The ZRAY DRIFT inflatable kayak is designed for short trips over calm lakes, seas or rivers (less than 3 hours), and is suitable for 1 – 2 adults.
PRODUCT DESCRIPTION
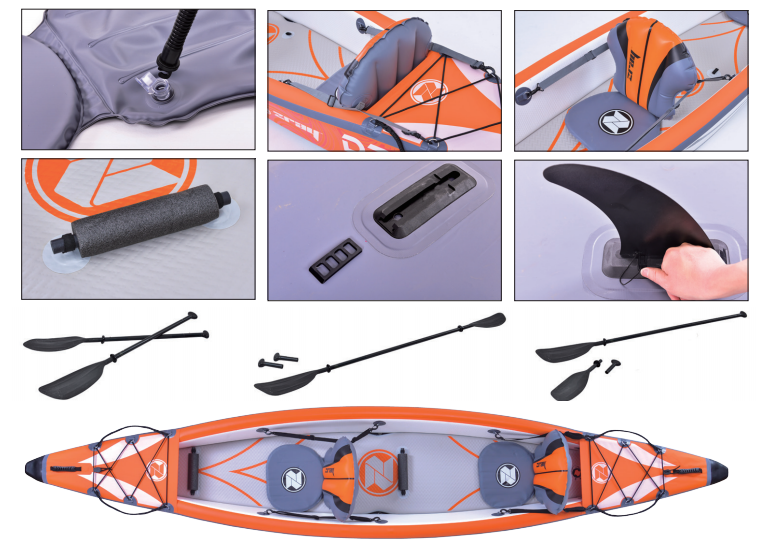
The ZRAY DRIFT inflatable kayak is equipped with two sets of paddles, two inflatable seats, double action high-pressure inflating pump, backpack, fin and a repair kit.
The ZRAY DRIFT kayak has 3 air chambers comprising two side air chambers and a bottom air chamber. The two seats are also inflatable.
![]() WARNING
WARNING
- This is not a life saving device. Use only under competent adult supervision. When not in use do not leave unattended near the water.
- Read the owner’s manual thoroughly, ensure your understanding and follow the instructions. Keep this manual for future reference.
- Review the Government’s Boating Safety Guidelines to ensure you have the relevant equipment and most up to date regulations. [PDF]
- Do not exceed the maximum load capacity. Overloading can be dangerous and voids the warranty.
- For use only in lakes, rivers and calm seas. Do not use for white water rafting.
- Distribute the weight of paddlers and accessories evenly through the boat.
- All persons must wear a PFD (Personal Floatation Jacket)
- Ensure all persons are aware of the regulations and safety instructions before use.
INSTALLATION
Hull inflation:
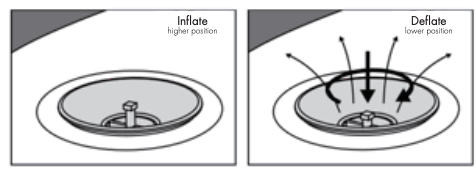
- Open and spread the kayak so it is flat. Check to make sure that the air valves and are in the ‘inflate’ position and the two automatic bottom drain plugs are closed.

- First, inflate air chamber ① and ② by 10% – 20% and be sure that both sides of the air chambers are evenly inflated. (Figure 1)
- Ensure the floor is smooth and flat at the bow before inflating the sides.
- Inflate air chambers ① and ② by 100% (8PSI), respectively. Make sure that both sides are inflated evenly.
- Inflate air chamber ③ by 100% (8PSI).
- If both sides of the hull are not even, adjust the air volume of air chamber ① and ②.
Hull installation:
- . Inflate seats until your hands feel that the seats have been inflated by 100%. Be sure they are not over-inflated or they could burst.
- Install seats. Note, the rear seat is attached to the D rings nearest the stern so that the seat is as far back as possible. The second set of straps will sit unsecured behind the seat. (See figure 2)
- Install footrests into the loops on the floor of the kayak.
- Install fin – remove the bar in the sleeve, slide the fin in and then secure it with the pin.
- Assemble paddles.
PREPARATION BEFORE DEPARTURE
- Ensure you know and understand the local laws, regulations and hazards associated with water sports and inflatable kayak operations.
- Please check local weather forecasts, local currents, tides and wind conditions before use and only paddle in calm conditions.
- Regardless of the weather conditions, you must wear PFDs in good condition and in line with local laws and regulations.
- Learn about the basic safety self-help methods: How to flip the kayak over. How to get on the kayak again.
- Tell someone when you plan to return.
- Ensure all passengers understand the basic operations of the inflatable kayak.
- Make sure at least one passenger can operate the inflatable kayak in an emergency.
- Wear suitable clothing (helmets, shoes, sunscreen). Take enough water and food and towing cables along with all items required by law.
IMPORTANT SAFETY INSTRUCTIONS
The following should be read and understood before use:
- Warning: Water sports are dangerous and require physical fitness. Users of this product must be aware that this sport may result in injury or drowning.
- Warning: Pay attention to offshore winds and underwater currents, which may cause the kayak to become unstable.
- Warning: Inflating the product should comply with the instructions. Do not over-inflate – over-inflation of the product may cause the air chamber to burst.
- Warning: Under all circumstances, keep the weight on the kayak balanced in case the kayak overturns. Do not overload, check the weight specified on the product label.
- Warning: Take extra care when boarding or disembarking the kayak. Falling between the kayak and dock can be dangerous and may result in serious injury or drowning.
- Warning: If you want to dry the kayak or expose it to sunlight for a long time, please deflate the kayak properly first. Heat causes the air to expand and may cause the kayak to burst.
MAINTENANCE
- After use, please clean your inflatable kayak to prevent it from being damaged by sand, salt water or sunlight.
- Clean the inflatable kayak with a soft detergent and water.
- Do not use solvents such as gasoline as they can corrode the surface materials or plastic parts of the kayak.
- Make sure that the hull is completely cleaned and dry before storing otherwise it may develop mold.
- Once deflated, fold the kayak, place in the backpack and store in a dry, ventilated place above 15°C.
REPAIR
Small holes or punctures can be repaired with the repair kit that is provided in conjunction with the kayak.
- Do not inflate the kayak
- Wipe the hull with soap and water to find holes in the kayak. The soap will bubble over the hole.
- Clean the area around the hole with water or alcohol.
- Use a pencil to sketch out the outline of the patch.
- Cut a patch of a suitable size.
- Apply glue evenly to the damaged area and patch and then press and hold the patch to the damaged area.
- Leave the kayak for at least 24 hours or more before inflating it.
Figure 1

Figure 2
Valve Replacement
If the valve is damaged, please follow the below instructions for replacing it.

Replacements are available by calling:Toll free: (866) 946-3002 Monday to Friday, 9am – 4pm PSTEmail: [email protected]
References
[xyz-ips snippet=”download-snippet”]