ZUMIMALL GX1C Battery Powered Camera User Guide
Warranty Service
Thanks for your shopping and trust.
We are keeping to optimize product, and improve our life time customer service to offer you a better shopping experience.If you have any problems, please feel free to send us an E-mail.We will solve your problems in 24 hours. Besides, Your advice or suggestions will be much appreciated and welcomed.
Register via link below to get 3 Years Warranty Extension. http://bit.ly/zuReg
Product ServiceEmail: [email protected]Distributor: [email protected]Cell/ iMessage/ SMS/ Whatsapp/ Wechat:+8618938687483
More About UsFacebook: www.facebook.com/zumimallofficeOfficial Web: www.zumimall.com
What’s in the Box
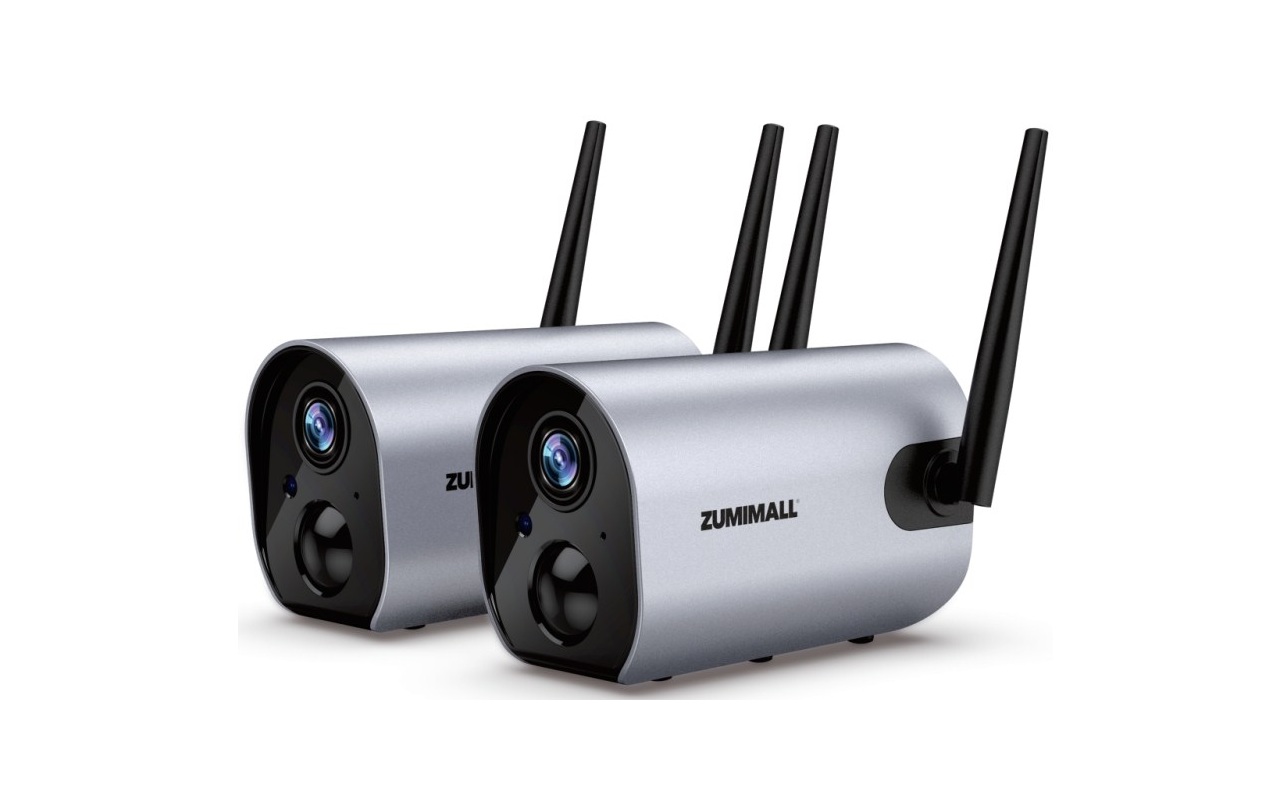
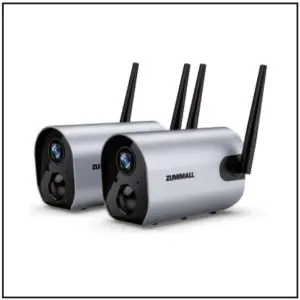
- ZUMIMALL Battery Camera *2

- Outdoor Metal Mount *2
- USB Cable *2
- Quick User Guide *1
- Screws Set *2


Product Diagram
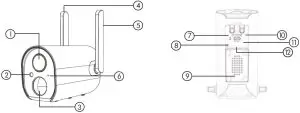
- Camera Lens
- IR
- PIR Sensor
- Antenna
- Antenna
- Microphone
- Reset Button
- LED Indicator
- Speaker
- Power button
- SD Card Slot
- USB Port
| Power Button | Keep Pressing for 5-10 seconds to power on/power off |
| Reset Button | Keep pressing for 5-10 seconds to reset and restart |
| Blinking slowly in Red | Awaiting Wi-Fi Connection, ready for adding devices |
| Blinking fast in Red | Wi-Fi Connecting |
| Red spot | Network Problem |
| Blue spot | Wi-Fi Connected, camera running normally |
| Blinking slowly in Blue | AP Mode |
Download & Install APP
Download CloudEdgeAPP from Google Play™ or APP Store™ . Or scan the QR codes as below,with your QR code scanner in your smart phone.
NOTE:
- Google Play is a trademark of Google Inc.
- APP Store is a service mark ofApple Inc.

iOSAndroid
*Tips: Please turn on both of the following permissions.
- Allow CloudEdge to access mobile cellular data and be failed to connect the camera.
- Allow CloudEdge to receive pushed messages, otherwise the phone will not receive alarms when motion is detected.


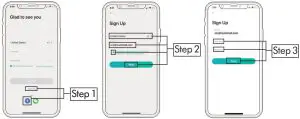
Account Registration
New users need to sign up by e-mail/Facebook. Click “Sign up”, and follow the steps to complete the registration, and then log in.
Camera Setup
Preparations for connection
- Insert Mirco SD card (NOT included)when the camera is off,for saving videos caused by motion detection automatically.(Supports up to128GB)
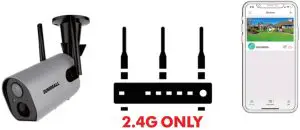
- Camera only works with 2.4G Wi-Fi,not support 5G.
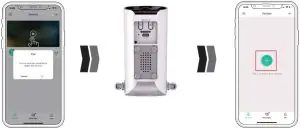
Connect Camera to APP

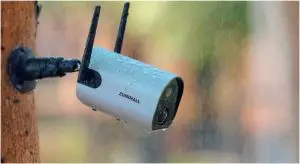
Camera Installation
- For a cement or ceramic tile wall, it’s recommended to drill holes in wall and fasten with explosion screws provided.
- Rotate the protrusion anticlockwise to loose or take off camera. Rotate clockwise to tighten the swivel.

Monitoring Area
It is suggested to make the angular between PIR and detected objects more than10 degrees.

Important Notes for Reducing False Alarms
To reduce false alarms, please note that:
- Do not install the camera in a position facing strong lights/mirror/window/Swimming Pool.
- Do not place the camera too close to any angel with busy traffic.
- Recommended distance between the camera and motion objects are within 10 M (32ft).
- Stay away from the outlets,including air conditioner vents, humidifier outlets, the heat transfer vents of the projectors, etc.
- Keep the camera at least 1 meter away from any wireless devices to avoid interference, such as microwave stove,Wi-Firouters and etc.
|
1 |
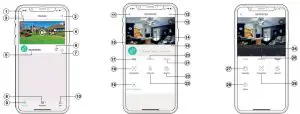
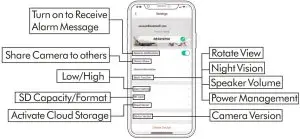
Device List | 15 |
Volume On/Off |
|
2 |
Add a Camera | 16 | Full Screen |
| 3 | Real Time | 17 |
Preview |
|
4 |
Live view button | 18 | Screenshot Button |
| 5 | Camera Name | 19 |
Body Detection On/Off |
|
6 |
History Playback | 20 | Recording in SD Card |
| 7 | Cloud Storage | 21 |
Cloud Storage |
| 8 | Messages | 22 | Record Video to Phone |
|
9 |
My Device List | 23 | Two-Way Talk |
| 10 | Personal Homepage | 24 |
Zoom |
|
11 |
Quit live viewing | 25 | Time Bar |
| 12 | Camera Setting | 26 |
History Screenshot |
|
13 |
Battery Status |
27 | Alarm record Album |
| 14 | HD/SD Switch | 28 |
Date of History Record |
Camera Settings
*Tips: The person to be shared must register his/her own account in APP.
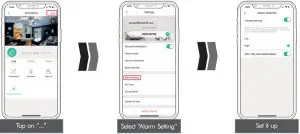
PIR Body Detection
Body Detection Alarm Setting
The default PIR sensitivity is “High”, but it is adjustable. Please refer to the pictures as below.
| Sensitivity | Detecting Distance (For moving and living objects) |
| Low | Up to 5 meters (16ft) |
| High | Up to 10 meters (32ft) |
*Tips: Higher sensitivity offers longer detecting distance, but it would lead to more false alarms. You are advised to adjust to “Low” level when you install the camera outside.
Alarm Notification
This camera is not designed for 7×24 all day recording.It is only triggered when body motion is detected. Here are system’s reactions:
- Alarm notifications with sounds from APP.
- Pictures/videos automatically storage in SD Card or Cloud.
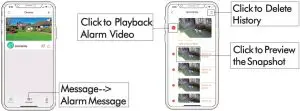
Records/Playback/Delete
- On “MESSAGES” page, click “Alarm Messages”, you can view all the records listed.
- Click the following buttons to playback or delete.
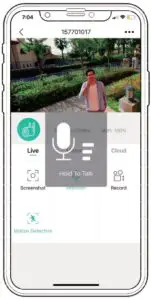
Two -Way Audio
- Step 1: Activate the audio option.
- Step 2: Press and hold the intercom button to speak.
- Step 3: Release the button to listen.
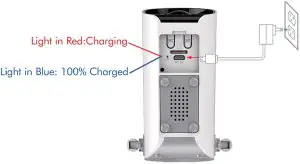
Battery Management
- The built-in 10400 mAh battery can last 3-6 months, assuming the camera has been triggered within 15 times/day.
- App will send you reminding message for charging when the battery level is less than 20%
- Charger Standard: DC 5V1/2A (not included).Camera will be fully charged after 8-16 hours.
Multi Device Management
- Multi Camera Management
- Multi-User Sharing

Notice: One App account (A) can’t be login on different device at the same time.Camera can be shared form A to B account.
- Step 1: Create another new APP account (B) and login on another phone
- Step 2: Click ‘share’ on the main phone (A account phone)
- Step 3: Scan QR code of B or Input ID
- Step 4: Accept sharing on B account and refresh page

Reset
- Step 1: Keep pressing to remove device
- Step 2: Press the reset button for 5-10s, until hear the “Boogu” sound
- Step 3: Reconnect as before…
Trouble Shooting
| No. | Description | Solution |
| 1 | Unable to Connect | Check your Wi-Fi name and password Ensure your Wi-Fi is 2.4G. Not support 5G Ensure your camera and phone close to router for set up |
| 2 | Reset | Keep pressing the reset button for 3~5 seconds Hear “Boogu” LED blink slowly in Red |
| 3 | Change to a New Network | Remove the camera in CloudEdge APP Press the reset button to factory setting Re-connection |
 report this ad report this ad4 |
Alarm Picture without Persons | It takes time for camera to wake up, or people move too fast Some objects around 36℃ move around |
| 5 | Frequent Alarm | Camera is trigger frequently. Suggest to adjust the installation angle Adjust the camera alarm sensitivity to “Low” |
| 6 | Why is someone Crossing without Alarm | Make sure motion detection is turned on Beyound the range of PIR monitoring area |
| 7 | No Alarm Push | Make sure Notification is turned on from CloudEdge and phone |
| 8 | No Alarm Video | Make sure Micro SD card inserted / Cloud Storage activated |
| 9 | Device Offline | Check the camera if power off Make sure network is normal |
| 10 | Video Delay | Make sure network is normal |
| 11 | Battery Durability | Reduce Motion detection triggered / Two-Way Talk / Live Feed |
| 12 | Unable to Charge | Charge at least 8-16 hours with a 5V 1A/2A phone charger correctly LED turns to be red means your camera is charging correctlyMake sure USB power cable and the phone charger both work well |
| 13 | CloudEdge APP Flashback | Phone system version is too low or too high |
| 14 | Unable to Register Account | Make sure to select correct country |
| 15 | Unable to Add Friend | Your account and friend’s account must be in the same country. For example, accounts in Europe and America cannot share with each other |
Please Email us for Better Solutioninstead of returning any unqualified product to Amazon[email protected]
THANK YOU
References
[xyz-ips snippet=”download-snippet”]