
zydz H.264/H.265 HD Encoder User Manual
Website: www.orivision.com.cnEmail: [email protected]
Foreword
Thanks for using our products, Please contact us if you have any questions .
Applicable Model
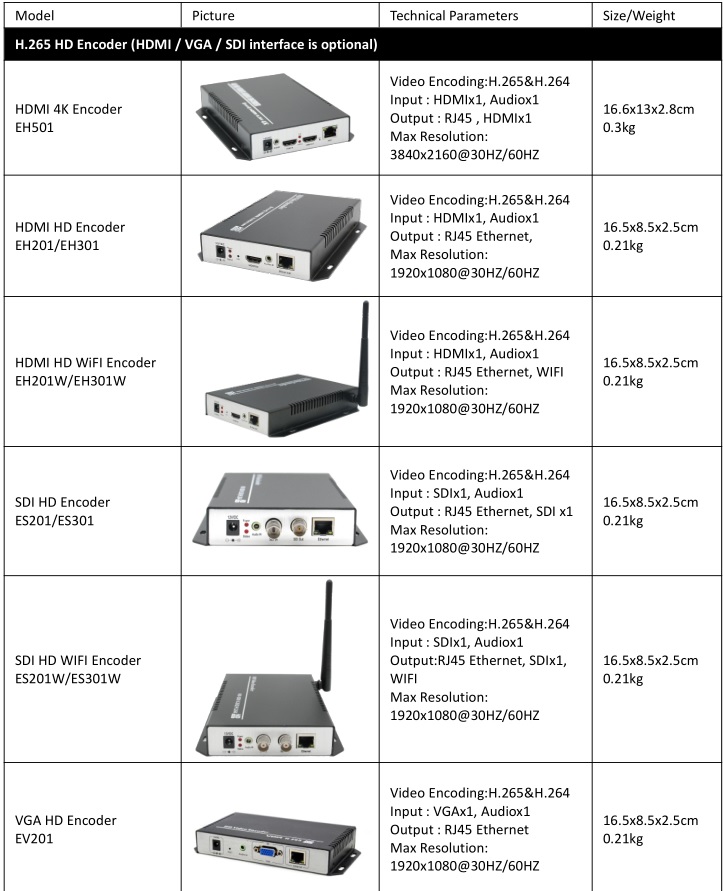
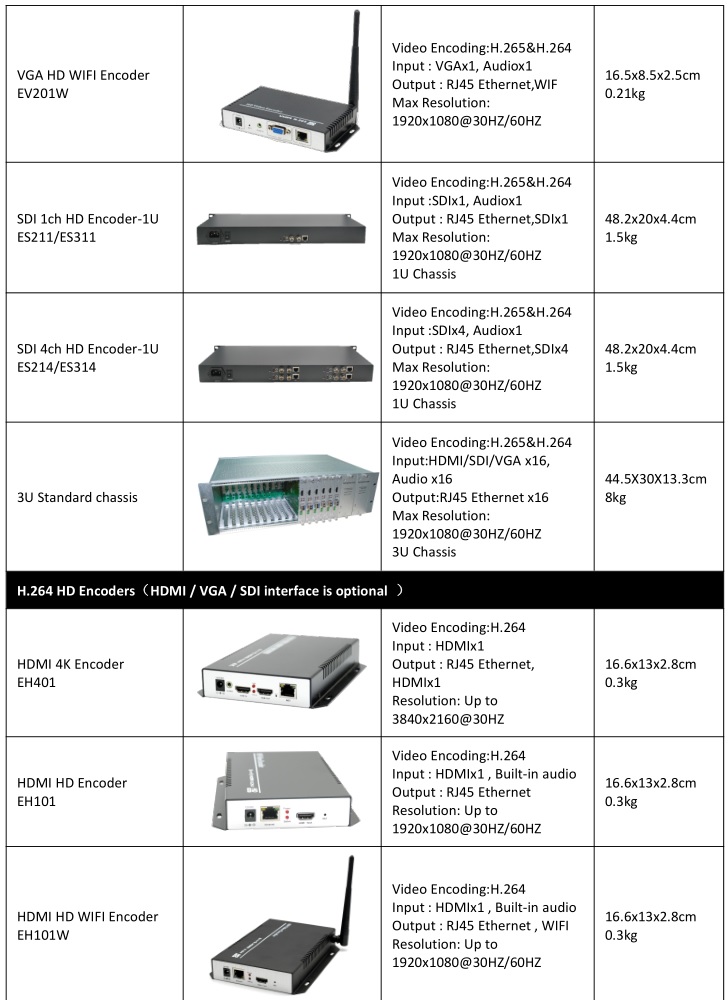
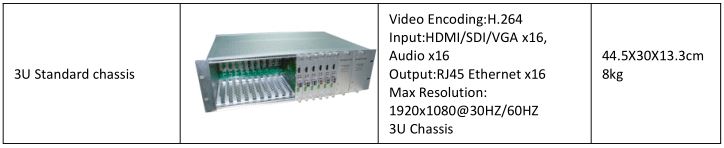
This manual applies to following models:

Statement:
We have tried best to ensure the integrity and accuracy of the contents of the manual, but the technical error, operation error and printing error cannot be fully avoided. if any doubt or dispute, please refer to our final interpretation. The user manual will be updated in real time without special notice. This user manual is provided only for reference guide for users, which cannot guarantee exact same as the real product. Please refer to the real product.
About Default
The factory default administrator account of the device: admin The factory-default user password of the device: admin The factory default IP address of the device: 192.168.0.31
Product Overview
The H.264/H.265 Encoder is a hardware device used for high-definition video signal (720P / 1080P, etc.) encoding and network transmission, using the latest and high-efficient HD digital video compression technology H.264/H.265, with the characteristics of reliable, high-definition, low bitrate and low latency. Input the HDMI/SDI/VGA high-definition video signal to conduct the encoding process, after compression processing of DSP chip, output the standard TS network stream, the launch of product fills the gap in this industry, which is a direct replacement for the traditional capture card or software coding method, using hard-coded, the system is more stable, and image quality is more perfect, which can be used in a wide variety of needs for high-definition video and high-resolution and high frame rate acquisition-based IP network transmission, its powerful scalability makes it more easier to respond to the needs of different industries and can be used as live video encoder. Industrial controlled, precision design, small size, easy installation, the power is less than 5W, which is more energy and more stable.
Product features
- High-performance hardware encoding
- support H.265 video coding efficiency
- support H.264 BP/MP/HP
- support AAC / G.711 Advanced Audio Coding format quality
- CBR / VBR rate: 16Kbps ~ 12Mbps
- 1000M network interface uses full duplex mode
- mainstream and secondary stream can be pushed to different server
- Supports up to 720P, 1080P @ 60HZ HD video input
- Support image parameter settings
- support HDCP protocol and Blu-ray
- support HTTP, UTP, RTSP, RTMP, RTP, ONVIF protocol
- the mainstream and side stream use the different network protocol for transmission
- WEB interface, English and Chinese is optional for configuration interface
- WEB interface management authority
- Support remote management in WAN(WEB)
- Support resolution customized settings
- Support one key to restore the factory configuration
- Support SDK , secondary development
Applications
1. 4G mobile broadcast HD front capturing2. The HD video broadcast server3. Video Server for video Conference System4. Digital Standard HD stream server5. The live video teaching system front-end capturing6. IPTV system front-end capturing7. The WeChat broadcast system front-end capturing8. The medical video broadcast and recording system9. Support access to DVR/NVR
Interface instruction
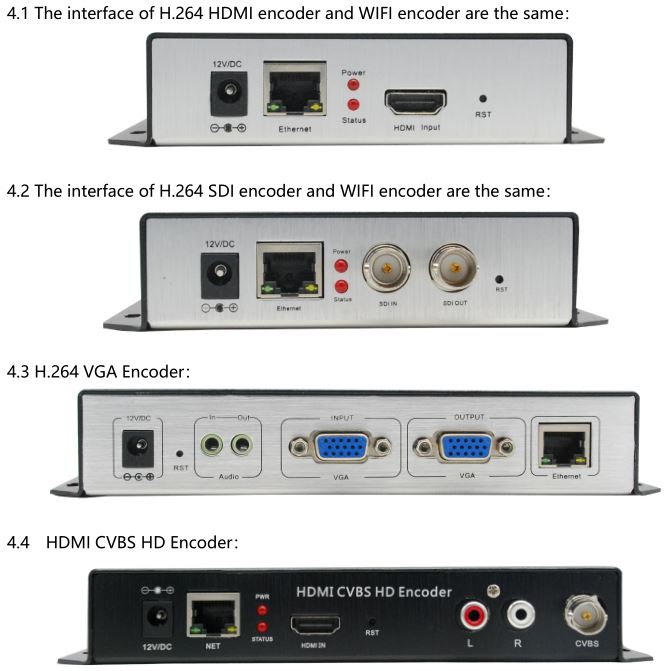

- A. Power input—– 12V/DC12V/1A5V/2A
- B. Initialization button —— It is used to reset the device . After power on , hold it on for about 15 seconds to reset the device to default IP 192.168.0.31
- C. Video input—— Input HD HDMI, SDI, VGA, Audio signals
- D. 1000M Ethernet port
- E. Status Indication
- It will flash while holding on the reset button. It means reset successfully when the lights off .
- Slow Flashing means the video input , image capturing and compression is normally working .
- If the indicator light keeps on, it means the image acquisition and compression is with some problem .
- If the indicator flashes slowly but the stream can not be played , it means maybe there’s problem with the streaming server
WEB SETTINGS
Step 1: Reset & initializationInput the power supply to turn on encoder and hold a pin to press RST on the encoder for 10 seconds, it will be restarted and initialized. The default Route IP of dash board is 192.168.0.31 after initialization.
Step 2: Change the administrator’s computer IP (in case of WIN 7)Set the administrator’s computer IP as : 192.168.0.* to avoid IP conflicting with dashboard IP 192.168.0.31. (mark “*” numbers range will be 0-254 except 31 )
Step 3: Login Dash board in IEEnter 192.168.0.31 in URL address,Default user Name: adminDefault password: admin

Status Display
When you access to the web-interface, you can choose the language on the right top : Chinese/English

Input status: when you input the HD signal source, it will show resolution of video input , if it’s blank here , it means there no video input.

Mainstream Status: it will show the resolution of the mainstream you set and multicast address . you can stream the multicast address by VLC or other streaming software.

Second stream Status: it will show the resolution of the second stream you set and multicast address . you can stream the multicast address by VLC or other streaming software.

Mainstream Live View: you can play the stream address by your computer if you installed the VLC2.2.1 .

Second stream Live View: you can play the stream address by your computer if you installed the VLC2.2.1 .

CVBS Live View: you can play the stream address by your computer if you installed the VLC2.2.1 .

Network Settings
You can set network with Ethernet or WIFI, only device with WIFI can set WIFI connecting .

- A. The Default IP of the device is 192.168.0.31. if IP setting is forgotten after changing. You can reset it to default IP follow step 1 above.
- B. If you don’t use a network cable , and when you reboot the device, it will access to WIFI status if it’s with WIFI . Please kindly note the features for wifi version.
The instructions of wifi network, three connections:
- A. Ethernet : only connected by Ethernet (default configuration)
- B. Wifi: only connect with wifi (If you entered the wrong password or SSID when you are in the wifi mode that will cause the system unable to connect wifi. Then you cannot open the web-pages. Please press the reset button to restore the default settings to solve the problem.)
- C. Auto: it will automatically detect if you have ethernet or wifi.
Mainstream encoding
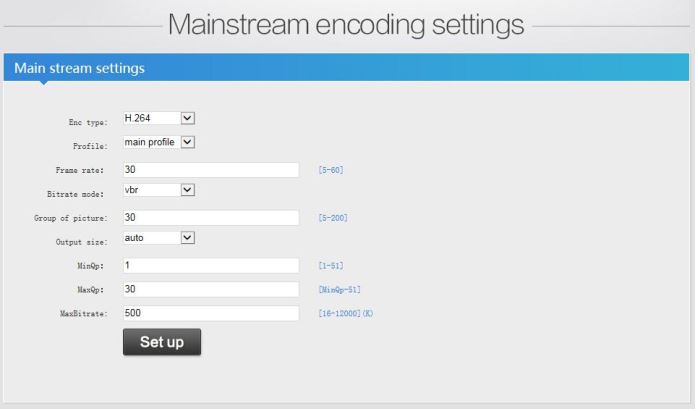
Main stream setting:
- Enc type: H.264 & H.265 is optional ( note: H.264 version can only choose H.264 )
- Profile: baseline profile / main profile / high profile ( note: H.265 version choose main profile)
- Frame rate: 5-60 (when the input resolution is 720i/50,1080i50, the frame rate will choose 25)
- Bitrate mode: VBR / CBR
- Group of picture: 5-200, it shows picture quality, default setting is advisable .
- Bitrate: 16-1200K (Network bandwidth setting)
Note: You can modify the above parameters without rebooting the encoder

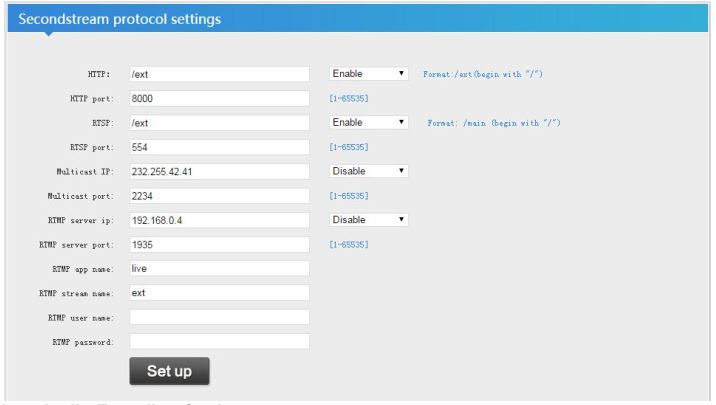
Mainstream protocol settings:HTTP: /main enable/disableHTTP port: 1-65535 optionalRTSP: /main enable/disable RTSP port: 1-65535 optionalMulticast IP : 232.255.42.42 disable/RTP/UDP optionalMulticast port: 1-65535 optionalRTMP server IP : can set by stream media server .RTMP server port: 1-65535 optionalRTMP app name: can set by yourselfRTMP stream name: can set by yourselfOnvif : enable/disable
OSD Settings
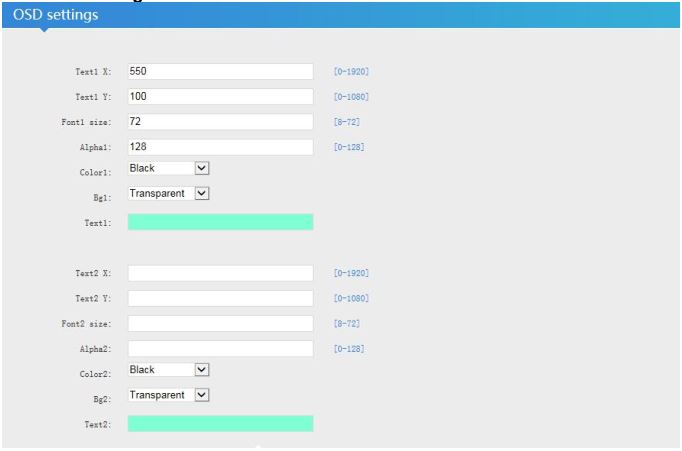
Note: You can insert two couples of words and three pictures simultaneously in mainstream
Tex1 X: 0-1920 is optional, display the left and right position of the textTex1 X: 0-1080 is optional, display the up and down position of the textFont1 size: 8-72 is optionalAlpha1: 0-128 is optional,Color1: choose the color you want to displayBg1: choose background color of the text on the videoTex1: input the content of the text you want
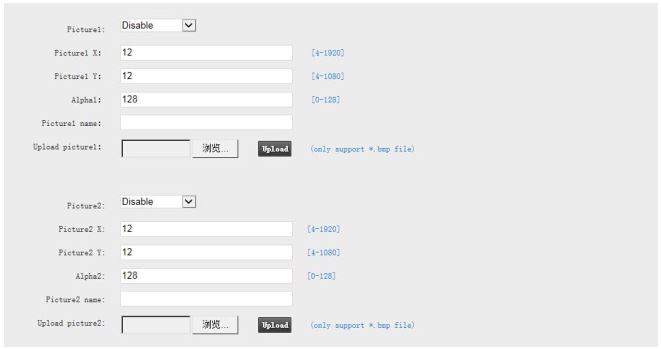
Pictures Setting
Picture1: disable/ enable ( disable: no images enable: display the images)Pictures X: 4-1920 is optional to set the left and right position of the picturePictures Y: 4-1080 is optional to set the up and down position of the pictureAlphal: 0-128 is optionalPicture1 name: display the name of the picture1Upload picture1: choose to upload the image, support *.bmp format of the picture less than 1M
Explanation
- The set of the three pictures that can be inserted are the same.
- Transparent background of the picture setting: R177G204B233
Image quality setting
Brightness: 0-100 is optional (to adjust the brightness of the image)Contrast: 0-100 is optional (to adjust the contrast of the image)Hue: 0-100 is optional (to adjust the hue of the image)Saturation: 0-100 is optional (to adjust the saturation of the image)

Second stream settings
Note: the way of the setting is same with mainstream code setting
CVBS encoding Settings

Audio Encoding Settings
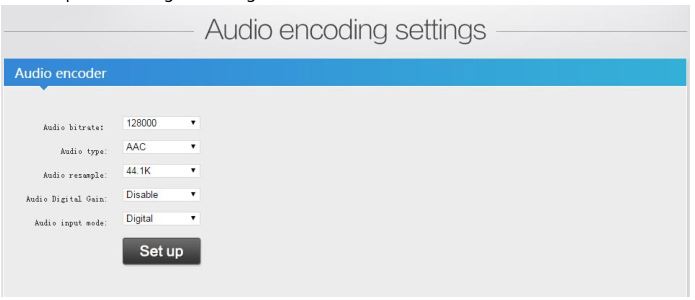
Audio bitrate: 48k, 64k, 128k, 160k, 192k, 256kAudio type: AAC Audio digital gain: 2x,4x,8x, used to adjust volumeAudio input mode: digital/analog
System Setting
Change password: You can modify the web password by this .

System information: it shows device SN and firmware version. ( the serial numbers of the device are set by factory, if you want to modify it , please contact the us )

Upgrade setting: Note: choose the zip rar file, no need to unzip the file . Do not refresh the webpage when you upgrade the system .

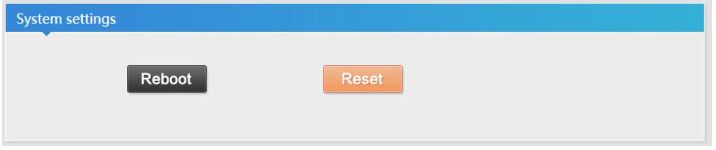
System setting: reboot the device and reset the device to default parameters .
WIFI Setting

Connection shown above, when you want to configure the HD encoder, you need set the fixed IP of the compute first
Wireless router settings
Set up the user name of the wireless routerSet up the password of the wireless router, pay attention to choose the encryption type: WPA-PSK

HD wireless Encoder settings
Connect the HD Encoders by the network cable, then open the IE to enter the network setting interface. Settings as shown below:

Note:
- Default IP of wifi is 192.168.0.32 . When wifi connected successfully, then you can access to the web control panel by 192.168.0.32 .
- Wifi Encryption : WPA/WPA2 (Note: Some wireless routers have different encryption mode, please select WPA/WPA2 of the encryption )
- Input the password of the wireless router .
References
[xyz-ips snippet=”download-snippet”]