![]()
Button User ManualUpdated September 7, 2020

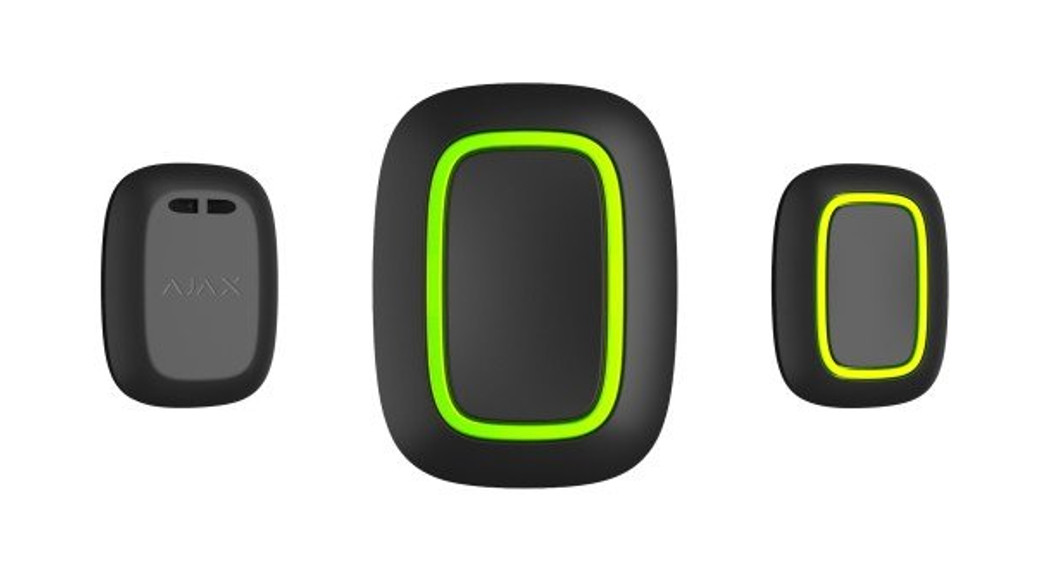
Button is a wireless panic button with protection against the accidental press and additional mode to control https://support.ajax.systems/en/automation/![]() Button only operates with Products – Ajax Systems. No provision is made for connection to the ocBridge Plus — Module for Ajax devices integration with third-party wired and hybrid security systems | Ajax Systems and uartBridge — Module for Ajax devices integration with third-party wireless alarms and smart home systems | Ajax Systems integration modules!
Button only operates with Products – Ajax Systems. No provision is made for connection to the ocBridge Plus — Module for Ajax devices integration with third-party wired and hybrid security systems | Ajax Systems and uartBridge — Module for Ajax devices integration with third-party wireless alarms and smart home systems | Ajax Systems integration modules!
Button is connected to the security system and coned via Software | Ajax Systems on iOS, Android, macOS, and Windows. The users are alerted of all alarms and events via push notifications,SMS, and phone calls (if enabled)Button — Wireless panic button with control mode | Ajax Systems
Functional elements
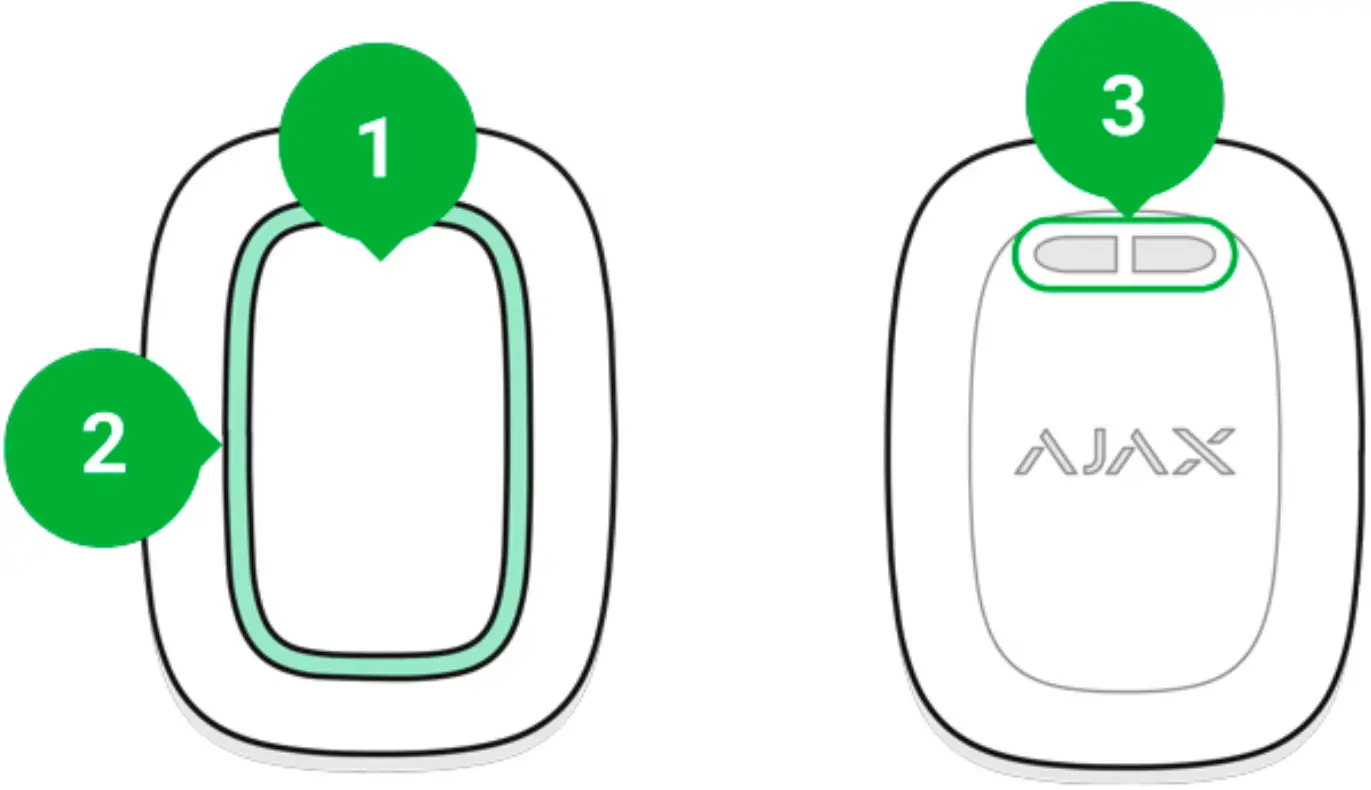
- Alarm button
- Indicator lights
- Button mounting hole
Operating principle
Button is a wireless panic button that, when pressed, transmits an alarm to users, as well as to the security company’s CMS. In Control mode, Button allows you to control Ajax automation devices with a short or long press of a button.In panic mode, the Button can act as a panic button and signal about a threat, or inform about an intrusion, as well as an e, gas, or medical alarm. You can choose the type of alarm in the button settings. The text of alarm notifications depends on the selected type, as well as the event codes transmitted to the central monitoring station of the security company (CMS).
![]() You can bind the action of an automation device (Relay — Wireless low-current dry contact | Ajax Systems , WallSwitch — Wireless power relay with energy monitor | Ajax Systems ,or Socket — Wireless smart plug with energy monitor | Ajax Systems,) to button press in the Button settings— Scenarios menu.
You can bind the action of an automation device (Relay — Wireless low-current dry contact | Ajax Systems , WallSwitch — Wireless power relay with energy monitor | Ajax Systems ,or Socket — Wireless smart plug with energy monitor | Ajax Systems,) to button press in the Button settings— Scenarios menu.
The Button is equipped with protection against the accidental press and transmits alarms at a distance of up to 1,300 m from the hub. Please be aware that the presence of any obstructions that impede the signal (for example, walls or educe this distance.
Button is easy to carry around. You can always keep it on a wrist or a neckless.The device is resistant to dust and splashes.
![]() When connecting Button via ReX — Intelligent radio signal range extender | Ajax Systems , note that Button does not automatically switch between the radio networks of the radio signal extender and the hub. You can assign Button to another hub or ReX manually in the app.
When connecting Button via ReX — Intelligent radio signal range extender | Ajax Systems , note that Button does not automatically switch between the radio networks of the radio signal extender and the hub. You can assign Button to another hub or ReX manually in the app.
Prior to initiating connection
- Follow the hub instructions to install the Software | Ajax Systems. Create an account, add a hub to the app, and create at least one room.
- Enter the Ajax app.
- Activate the hub and check your internet connection.
- Ensure that the hub is not in armed mode and is not being updated by checking its status in the app.
![]() Only users with administrative rights can add a device to the hub
Only users with administrative rights can add a device to the hub
In order to connect a Button
- Click on Add Device in the Ajax app.
- Name the device, scan its QR code (located on the package) or enter it manually, select a room and a group (if group mode is enabled).
- Click Add and the countdown will begin.
- Hold the button for 7 seconds. When the Button is added, the LEDs will green once.
For detection and pairing, the Button must be located within the hub radio communication zone (on the single protected object).The connected button will appear in the list of hub devices in the application.Updating the statuses of the device in the list does not depend on the polling time value in the hub settings. Data is updated only by pressing the Button.The Button only works with one hub. When connected to a new hub, the button Button stops transmitting commands to the old hub. Note that after being added to the new hub, the Button is not automatically removed from the device list of the old hub. This must be done manually through the Ajax application.
States
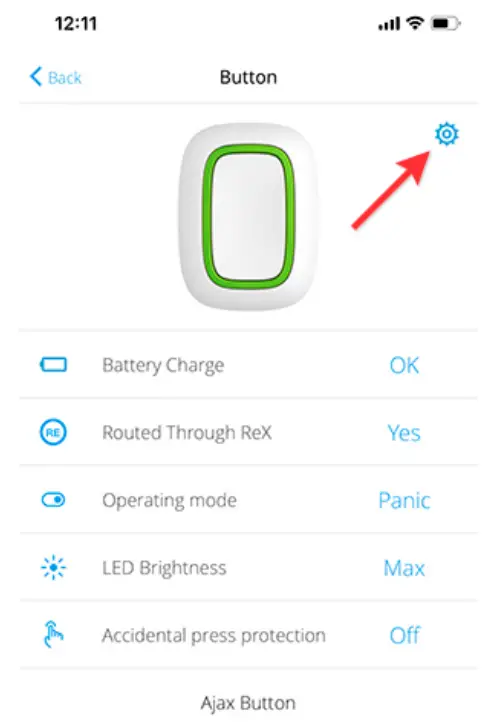
Button statuses can be viewed in the device menu:
- Ajax app>Devices
 >Button
|
Parameter |
Value |
| Battery charge | Button battery charge level. There are two statuses:
|
| Operating mode | Displays the operating mode of the button. Two modes are available:
|
| Indicator light brightness | Displays current brightness level of indicator light:
|
| Protection against accidental activation | Displays the selected type of protection against accidental activation:
|
| Routed Through ReX | Display the status of using the ReX range extender |
| Temporary Deactivation | Displays the status of the device: active or completely disabled by the user |
| Firmware | Button e version |
| ID | Device ID |
Configuration
You can adjust the device parameters in the settings section:
- Ajax app> Devices>Button>Settings
|
Parameter |
Value |
| First | Name of the device, can be changed |
| Room | The choice of the virtual room that the device is assigned to |
| Operating mode | Displays the operating mode of the button. Two modes are available:
|
| Alarm type(available only in panic mode) | Selection of the Button alarm type:
|
| Device user | Assigns a panic button user. After assignment,button presses will be displayed as events of the selected user |
| LED brightness | This displays the current brightness of the indicator lights:
|
| Accidental press protection(available only in panic mode) | Displays the selected type of protection against accidental activation:
|
| Alert with a siren if panic button is pressed | If active,HomeSiren — Wireless indoor siren | Ajax Systemsand StreetSiren — Wireless outdoor siren | Ajax Systems are HomeSiren StreetSiren activated after panic button pressing |
| Scenarios | Opens the menu for creating and con scenarios |
| User Guide | Opens the Button user guide |
| Temporary deactivation | Allows a user to deactivate the device without deleting it from the system.The device will not execute system commands and participate in automation scenarios. The panic button of a deactivated device is disabledHow to temporarily deactivate a device without removing it from the system | Ajax Systems Support |
| Unpair Device | Disconnects Button from the hub and deletes its settings |
Operating indication
Button status is indicated with red or green LED indicators.
|
Category |
Indication |
Event |
| Linking to security system | Green LEDs | The button is not registered in any security system |
| Lights up green for a few seconds | Adding a button to the security system | |
| Command delivery indication | Lights up green brie | The command is delivered to the security system |
| Lights up red brie | The command is not delivered to the security system | |
| Long press indication in Control mode | Blinks green brie | Button recognized the pressing as a long press and sent the corresponding command to the hub |
| Feedback Indication (follows the Command Delivery Indication) | Lights up green for about half a second after the command delivery indication | The security system has received and performed the command |
| Breed after the command delivery indication | The security system did not perform the command | |
| Battery status
(follows Feedback Indication) |
After the main indication, it lights up red and goes out smoothly | The button battery needs to be replaced. At the same time, button commands are delivered to the security system. |
Use cases
Panic Mode
As a panic button, the Button is used to call for a security company or help, as well as for emergency notiough the app or sirens. Button support 5 types of alarms: intrusion, e, medical, gas leak, and panic button. You can choose the type of alarm in the device settings. The text of alarm noti on the selected type, as well as the event codes transmitted to the central monitoring station of the security company (CMS).Consider, that in this mode, pressing the Button will raise an alarm regardless of the security mode of the system.
![]() An alarm if Button is pressed can also How to create and configure a scenario in the Ajax security system | Ajax Systems Support in the Ajax security system.
An alarm if Button is pressed can also How to create and configure a scenario in the Ajax security system | Ajax Systems Support in the Ajax security system.
Button can be installed on a face or carried around. To install on a surface (for example, under the table), secure the Button with double-sided adhesive tape. To carry the Button on the strap: attach the strap to the Button using the mounting hole in the main body of the Button.
Control Mode
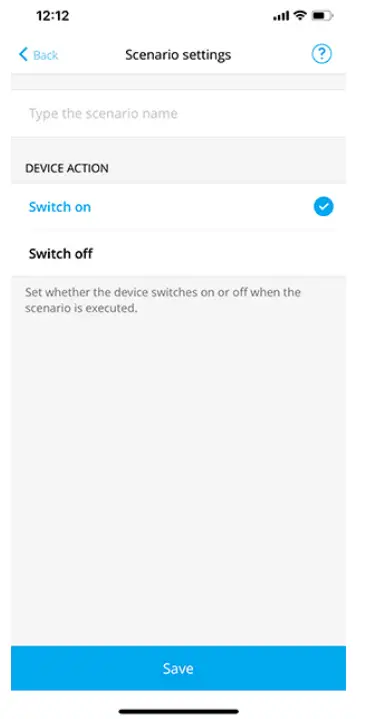
In the Control mode, the Button has two pressing options: short and long (the button is pressed for more than 3 seconds). These pressings can trigger the execution of an action by one or more automation devices: Relay, wall switch, or Socket.To bind an automation device action to a long or short press of a Button:
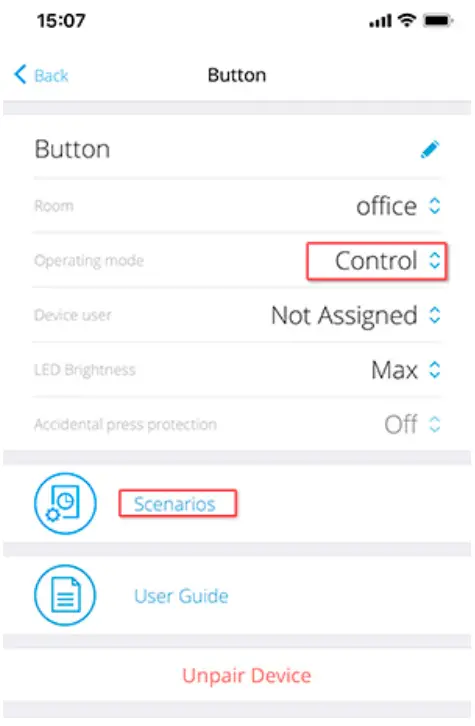
- Open the Software | Ajax Systems and go to the Devices tab.
- Select Button in the list of devices and go to settings by clicking the gear icon.
- Select the Control mode in the Button mode section.
- Click the Button to save the changes.
- Go to the Scenarios menu and click Create scenario if you are creating ascenario for the Add scenario if scenarios have already beencreated in the security system.
- Select a pressing option to run the scenario: Short press or Long press.
- Select the automation device to execute the action.
- Enter the Scenario Name and specify the Device Action to be executed by pressing the Button.When cony, which is in pulse mode, the Device Action setting is not available. During the scenario execution, this relay will close/open the contacts for a set time. The operating mode and pulse duration are set in the Relay User Manual | Ajax Systems Support .
- Click Save. The scenario will appear in the list of device scenarios.

Maintenance
When cleaning the key fob body, use cleaners that are suitable for technical maintenance.Never use substances containing alcohol, acetone, gasoline, and other active solvents to clean the Button.The pre-installed battery provides up to 5 years of key fob operation in normal use (one press per day). More frequent use may reduce battery life. You can check the battery level at any time in the Ajax app.The pre-installed battery is sensitive to low temperatures and if the key fob is a cooled sign, the battery level indicator in the app may show incorrect values until the key fob becomes warmer.
The battery level value is not updated on a regular basis, but only updates after pressing the button.When the battery has run down, the user will receive a notification app, and the LED will steadily light up red and go out each time the button is pressed.
Page not found | Ajax Systems Support
Technical Specifications
| Number of buttons | 1 |
| LED backlight indicating command delivery | Available |
| Protection against accidental activation | Available, in panic mode |
| Frequency band | 868.0 – 868.6 MHz or 868.7 – 869.2 MHz,depending on the sales region |
| Compatibility | Operates with all Ajax Products – Ajax Systems and Products – Ajax Systems featuring OS Malevich 2.7.102 and extenders later |
| Maximum radio signal power | Up to 20 mW |
| Radio signal modulation | GFSK |
| Radio signal range | Up to 1,300 m (without obstacles) |
| Power supply | 1 CR2032 battery, 3 V |
| Battery life | Up to 5 years (depending on frequency of use) |
| Protection class | IP55 |
| Operating temperature range | From -10°С to +40°С |
| Operating humidity | Up to 75% |
| Dimensions | 47 × 35 × 13 mm |
| Weight | 16 g |
Complete Set
- Button
- Pre-installed CR2032 battery
- Double-sided tape
- Quick Start Guide
Warranty
The warranty for the products manufactured by the AJAX SYSTEMS MANUFACTURING limited liability company is valid for 2 years after purchase and does not extend to the bundled battery.If the device does not function properly, we recommend that you the support service as technical issues can be resolved remotely in half of the cases!
End user agreement – Ajax Systems
Technical support: [email protected]
 report this ad
Need help?In this section, you’ll feature ofAjax. And in case you need the help of a technical specialist, we’re available 24/7.Support request (ajax.systems)
References
How to create and configure a scenario in the Ajax security system | Ajax Systems Support
uartBridge — Module for Ajax devices integration with third-party wireless alarms systems
Current product lines of the Ajax security system
Socket (type F) — Wireless smart plug with energy monitor
Warranty – Ajax Systems
Relay — Wireless low-current dry contact | Ajax Systems
Automation | Ajax Systems Support
Support request
Relay User Manual | Ajax Systems Support
Ajax WallSwitch — Wireless power relay with energy monitor
StreetSiren — Wireless outdoor siren | Ajax Systems
ReX — Intelligent radio signal range extender | Ajax Systems
Wireless panic button with control mode | Ajax Systems
How to temporarily deactivate a device without removing it from the system | Ajax Systems Support
End user agreement – Ajax Systems
ocBridge Plus — Module for Ajax devices integration with wired systems
HomeSiren — Wireless indoor siren | Ajax Systems
Software | Ajax Systems
Current product lines of the Ajax security system
[xyz-ips snippet=”download-snippet”]