AIR CONDITIONERREMOTE CONTROLLER ILLUSTRATIONCR188-RG15A(B)1611700000093420171011
Thank you very much for purchasing our air conditioner. Please read this owner’s manual carefully before using your air conditioner and keep it for future reference. WARNING:
- Chemical Burn Hazard. Keep batteries away from children.
- This product contains a lithium button/coin cell battery. If a new or used lithium button/coin cell battery is swallowed or enters the body, it can cause severe internal burns and can lead to death in as little as 2 hours. Always completely secure the battery compartment. If the battery compartment does not close securely, stop using the product, remove the batteries, and keep it away from children. If you think batteries might have been swallowed or placed inside any part of the body, seek immediate medical attention.
- The cells shall be disposed of properly, including keeping them away from children. Even used cells may cause injury.
Handling the remote controller
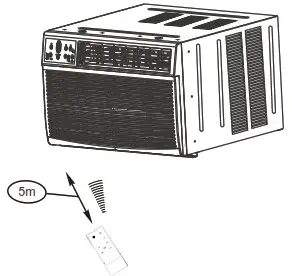
Location of the remote controller.Use the remote controller within a distance of 5 meters from the appliance, pointing it towards the receiver. Reception is confirmed by a beep.
CAUTIONS
- The air conditioner will not operate if curtains, doors or other materials block the signals from the remote controller to the unit.
- Prevent any liquid from falling into the remote controller. Do not expose the remote controller to direct sunlight or heat.
- If the infrared signal receiver on the indoor unit is exposed to direct sunlight, the air conditioner may not function properly. Use curtains to prevent the sunlight from falling on the receiver.
- If other electrical appliances react to the remote controller, either move these appliances or consult your local dealer.
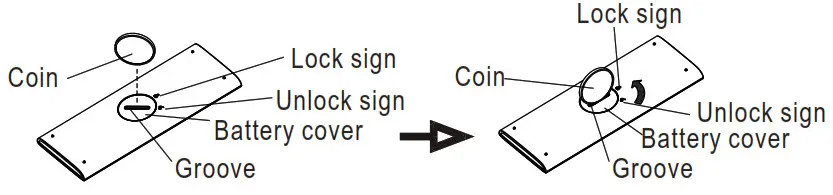
Installation instructions of battery
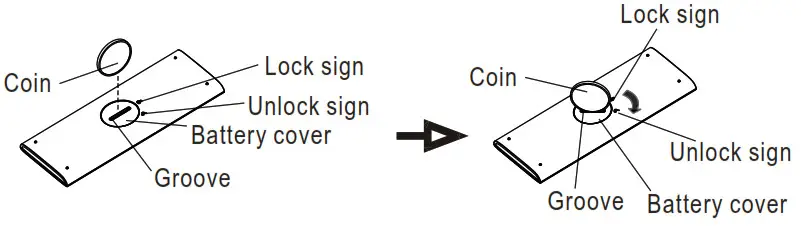
Step 1: Insert a coin vertically in the groove on the battery cover, clockwise rotation of 45 degrees, make sure that the groove is aligned with the “unlock” sign as shown below, and remove the battery cover.
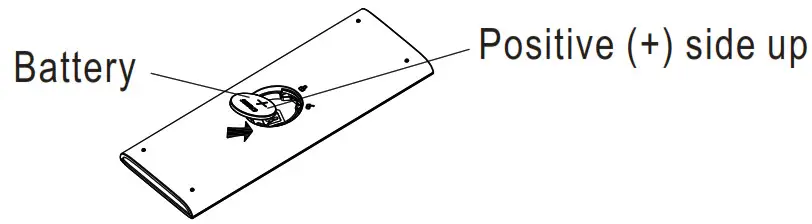
Step 2: Install battery inside the remote controller, the positive (+) side up.
Step 3: Install the battery cover, make sure the battery cover groove is aligned with the “unlock” sign. Insert a coin vertically in the groove and press itgently, then counterclockwise rotation of 45 degrees, make sure the groove is aligned with the “lock” sign as shown below.
WARNING
- The battery must be disposed of properly. Do not short circuit or dispose of in the fire.
- Keep batteries out of the reach of children.
- Caution for ingestion.
- Non-rechargeable batteries are not to be recharged.
- Exhausted batteries are to be removed from the product.
Remote Controller Specifications
| Model | RG15A(B)IE, RG15A3(13)/E RG15A4(B)IE, RG15A5(B)IE, |
| Rated Voltage | 3.0V( Lithium battery CR2025) |
| Lowest Voltage of CPU Emitting Signal | 2.4V |
| Signal Receiving Range | 5m |
| Environment | -5°C-60°C(23°F-140°F) |
NOTE:
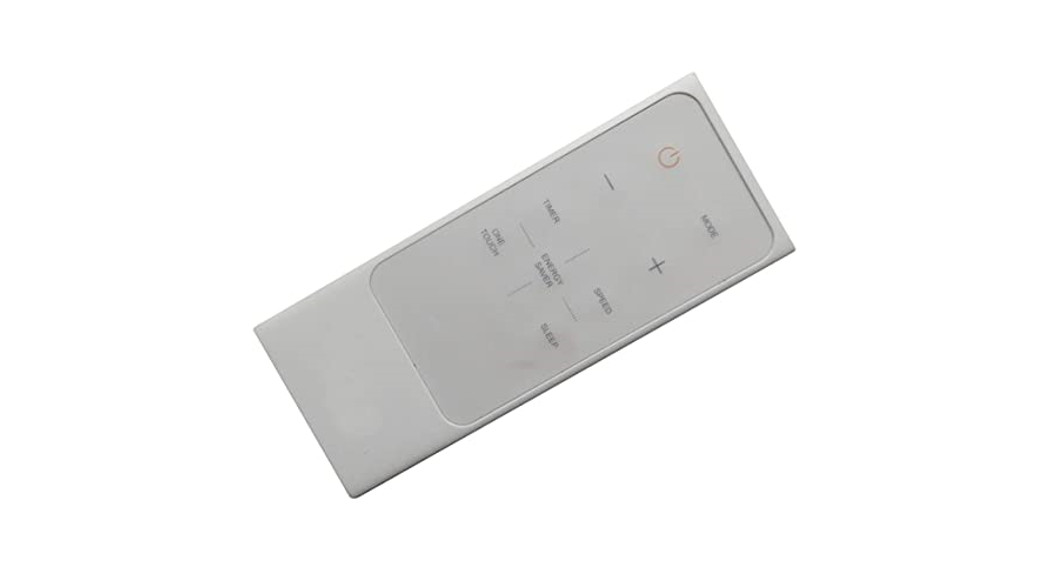
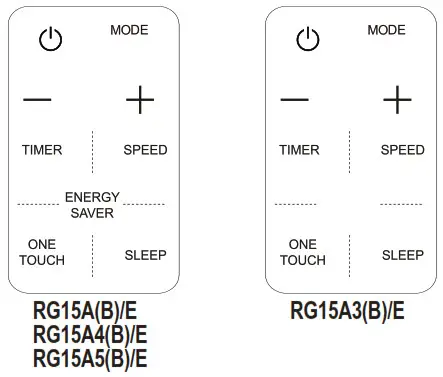
-Buttons design is based on a typical model and might be slightly different from the actual one you purchased, the actual shape shall prevail.-All the functions described are accomplished by the unit if the unit has no, this feature, there is no corresponding operation that happened when pressing the relative button on the remote controller.-When there are wide differences between Remote controller Illustration and USERS MANUAL on function description, the description on USERS MANUAL shall prevail.
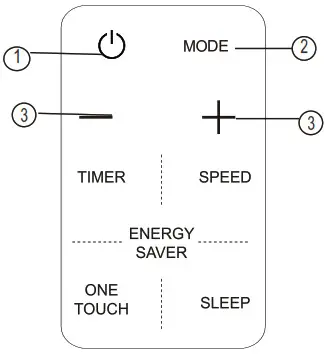
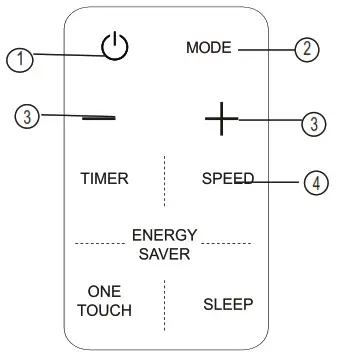
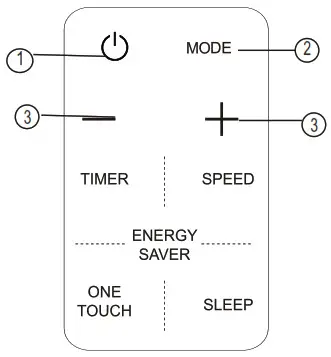
 Function buttons
 Function buttons
Auto operationEnsure the unit is plugged in and power is available.
- Press the ON/off button to start the air conditioner.
- Press the MODE button to select Auto.
- Press the TEMP UP/DOWN button to set the desired temperature.
NOTE
- In the Auto mode, the air conditioner can logically choose the mode of Cooling, Fan, Heating and by sensing the difference between the actual ambient room temperature and the set temperature on the remote controller.
- In the Auto mode, you can not switch the fan speed.It has already been automatically controlled.
- If the Auto mode is not comfortable for you, the desired mode can be selected manually.
Cooling /Heating/Fan operation Ensure the unit is plugged in and power is available.
- Press the ON/OFF button to start the air conditioner.
- Press the MODE button to select Cool, Heat(cooling&heating models only) or Fan mode.
- Press the TEMP UP/DOWN button to set the desired temperature.
- Press the FAN button to select the fan speed.
NOTEIn the Fan mode, you are not able to control the room temperature either. In this case, only steps 1, 2, and 4 may be performed.
Dehumidifying operationEnsure the unit is plugged in and power is available.
- Press the ON/off button to start the air conditioner.
- Press the MODE button to select Dry.
- Press the TEMP UP/DOWN button to set the desired temperature.
NOTEIn the Dehumidifying mode, you can not switch the fan speed. It has already been automatically controlled.
Timer operationPress the TIMER button can initiate the Auto-start and Auto-stop setting program of the unit.To set the Auto-start/stop time.
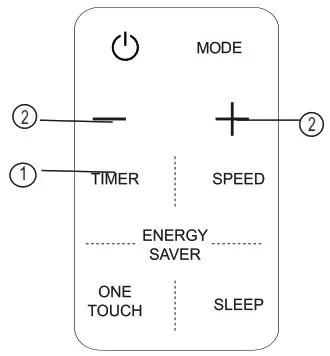
- Press the TIMER button, when the TIMER ON indicator is displayed on the LED window of the air conditioner, it indicates the Auto Start setting program is initiated. When the TIMER OFF indicator is displayed on the LED window of the air conditioner, it indicates the Auto Stop setting program is initiated.
- Press or hold the Up( ) or Down( ) to change the Auto time. The control will count down the time remaining until the start/stop.
- The selected time will register in 5 seconds and the air conditioner will automatically revert back to display the previous temper nature setting.
- Turning the unit ON or OFF at any time will cancel the Auto Start/stop function.
NOTE: To cancel the TIMER setting, push the TIMER button and press or hold the Up (![]() ) or Down(
) or Down( ![]() ) until 0 hours is displayed on the LCD window of the air conditioner.
) until 0 hours is displayed on the LCD window of the air conditioner.
COMBINED TIMER(Setting both ON and OFF timers simultaneously)AUTO STOP→ AUTOSTART(On →Stop→ Start operation)This feature is useful when you want to stop the air conditioner after you go to bed and start it again in the morning when you wake up or when you return home.
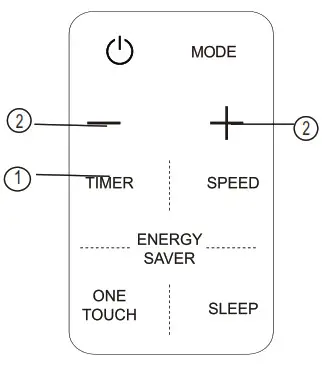 Example:To stop the air conditioner 2 hours after setting and start it again 10 hours after setting.
- Press the TIMER button until the TIMER OFF indicator is displayed on the LED display of the air conditioner.
- Use the UP/DOWN button to display “2.0” on the LED display of the air conditioner.
- Press the TIMER button again to display the TIMER ON on the LED display of the unit.
- Use the UP/DOWN button to display “10” on the LED display of the unit.
- Wait for 5 seconds until the previous display reverts back to the LED window.
AUTO START→ AUTO STOP(Off →Start →Stop→ operation)This feature is useful when you want to start the air conditioner before you wake up and stop it after you leave the house.Example:To start the air conditioner 5 hours after setting, and stop it 8 hours after setting.
- Press the TIMER button until the TIMER ON indicator is displayed on the LED display of the air conditioner.
- Use the UP/DOWN button to display “5.0” on the LED display of the air conditioner.
- Press the TIMER button again to display the TIMER OFF on the LED display of the unit.
- Use the UP/DOWN button to display “8.0” on the LED display of the unit.
- Wait for 5 seconds until the previous display reverts back to the LED window.
Energy saver operationIn this mode, the fan will continue to run for 3 minutes after the compressor shuts off. The fan then cycles on for 2 minutes at 10-minute intervals until the room temperature is above the set temperature, at which time the compressor turns back on and cool stars.
 report this ad
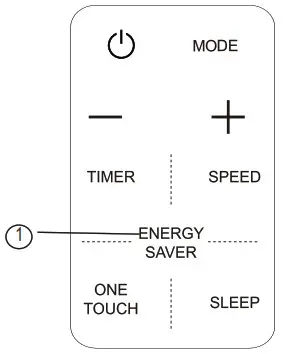
NOTE:-Buttons design is based on a typical model and might be slightly different from the actual one you purchased, the actual shape shall prevail.-All the functions described are accomplished by the unit, if the unit has no this feature, there is no corresponding operation happened when pressing the relative button on the remote controller.-When there are wide differences between Remote controller Illustration and USERS MANUAL on function description, the description on USERS MANUAL shall prevail.-The device could comply with the local national regulations. In Canada, it should comply with CAN ICES-3(B)/NMB-3(B). In the USA, this device complies with part 15 of the FCC Rules. Operation is subject to the following two conditions: (1) This device may not cause harmful interference, and (2) this device must accept any interference received, including interference that may cause undesired operation.-This equipment has been tested and found to comply with the limits for a Class B digital device, pursuant to part 15 of the FCC Rules. These limits are designed to provide reasonable protection against harmful interference in a residential installation. This equipment generates, uses, and can radiate radio frequency energy and, if not installed and used in accordance with the instructions, may cause harmful interference to radio communications. However, there is no guarantee that interference will not occur in a particular installation. If this equipment does cause harmful interference to radio or television reception, which can be determined by turning the equipment off and on, the user is encouraged to try to correct the interference by one or more of the following measures:•Reorient or relocate the receiving antenna.•Increase the separation between the equipment and receiver.•Connect the equipment into an outlet on a circuit different from that to which the receiver is connected.•Consult the dealer or an experienced radio/TV technician for help. Changes or modifications not approved by the party responsible for compliance could void suers’ authority to operate the equipment.The design and specifications are subject to change without prior notice for product improvement. Consult with the sales agency or manufacturer for details.
[xyz-ips snippet=”download-snippet”]