CHALLENGER SMART FORCE 1080P Outdoor Wireless IP Camera ASFCAM3
General Introduction
The IP Camera is compatible with the Smart Force system designed to monitor an outdoor area where it can send video images to the server. The recording function will be activated if an event is triggered under warning conditions.
Product Overview![]()
Description of Cables Connectors:
Binding with Smart Force Hub
- – Connect an Ethernet cable direct to the router than has internet access– Plug in 12V DC PSU to the DC power Connector
- Log into the Smart Force account from a web browser (not APP).
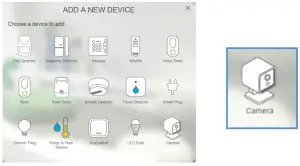
- Select “System”, then “Add a device”.
- Select “Camera”..

- Enter the Access Code on the label behind the camera and click “Next step
- The screen below will appear. Switch the power off to the camera for 10 secs and then turn power back on again. The binding is complete.
Operation
Live video
- To watch live video of the camera, go to LIVE, and click on any image.
- Click the snapshot image to view live view images.
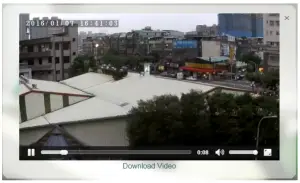
Playback Recorded Videos
- To display recorded videos, go to VIDEO page. All videos are displayed with recording date and video duration.
- Click on any image to play the video.
- During playback, it is possible to move forward and back the video by dragging the time bar, change volume level, and display in full screen.
- To download a copy of the video this can only be completed via a Web browser, click “Download Video”
Setting up The camera for Wi-Fi
The camera connects to Wi-Fi by scanning the QR on the App.
Preparing the QR Code
- On the Smart Force App, go to System page and tap the QR code icon on the top bar.
- Enter your home Wi-Fi network and your Wi-Fi password.
- The App will then generate a large size QR code image. Leave the App on that page.
- Unplug both the power and Ethernet cable from the camera.
- Plug back only the power connector, leaving the Ethernet cable disconnected.
- The camera will power on, followed by flashing red LED.
- After one minute the LED will flash blue rapidly, this means the camera is waiting to scan a QR code.
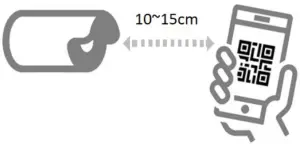
- Place the QR code created earlier by the App at about 10~15cm in front of the camera lens.
- If the scan is successful, the LED will flash blue slowly indicating QR scan is successful.Note: If the camera does not respond from scanning after 30 seconds, try moving the smartphone further away from the camera in gradual steps.
- The camera will attempt to connect to the Wi-Fi network. the status from the LED indicator on the camera:
Status LED Colour Connecting to Wi-Fi Flashing Blue LED slowly Wrong Wi-Fi password Flashing Purple LED Scanning QR code… Flashing Blue LED rapidly No network connection Flashing Red LED - Once the Wi-Fi connection is successful, the camera LED colour will indicate the Wi-Fi signal strength for one minute the LED will turn off:
Signal strength: LED Colour Strong Constant Blue LED Normal Constant Purple LED Weak Constant Red LED - The LED will turn off after one minute after connection to the Wi-Fi.
Mounting the Camera
The camera can be wall or ceiling mounted.
- Select an appropriate location for the camera:– Place the camera at least 1m away from surrounding metalwork which can affect the Wi-Fi transmission (it may be worth checking the Wi-Fi signal using a mobile phone prior to installing).– Do not install the device near fire or heat sources to avoid damage.– Do not install the device at humid places
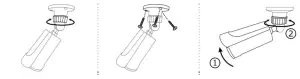
- Loosen the joint lock and use supplied screw and wall plugs to secure the camera in place.
- Adjust the viewing angle of the camera , then rotate to fasten the joint lock.
Troubleshooting
| Symptom | Possible Cause | Recommendation |
| The LED never turns ON | There is no power or not connected correctly. | Check the camera’s connection to the power adapter and ensure correct polarity. |
| Unable to connect to Wi-Fi network. |
|
|
| Cannot play the live video from the camera | Wi-Fi network is out of range | Change the mounting location of camera |
| Local internet upload speed not enough | Each camera requires at least 512kbit upload speed. | |
| Need to connect to another Wi-Fi network | N/A | Reset the camera. |
Reset cameraResetting the camera will delete its Wi-Fi settings, this may be required as an example, if you have moved home or changed your broadband router.
- Power on the camera.
- Connect the two wires labeled “RESET” and “GND” together (you may have to strip some of the wire insulation off).
- The LED will start flashing red-blue alternately. Disconnect the wires (ensure the wires are insulated so they cannot accidentally short together.
- The camera will restart.
- If you want to register the camera to a different SmartForce account, then please delete the camera from the SmartForce account via a web browser or APP before you reset the camera
LED indication summary
| LED Colour | Status |
| Flashing Red | No network connection |
| Flashing Blue & Red | Resetting camera |
| Flashing Blue slowly | Connecting to Wi-Fi |
| Flashing Purple | Wrong Wi-Fi password |
| Flashing Blue | Setting camera… |
Wi-Fi strength indicator:
| LED Colour | Signal strength |
| Blue light | Strong |
| Purple light | Normal |
| Red light | Weak |
Note: This is displayed only for one minute after successful connection to Wi-Fi.
Specifications
| Max. Image resolution | 1920 x 1080 (1080P) |
| Encryption | H.265 |
| View angle | 89°(H), 46°(V), f3.6mm |
| IR LED range | Up to 25m |
| Power supply | DC adaptor,12V 1A |
| Wi-Fi protocol | Wi-Fi 802.11 b/g/n 2.4GHz |
| Operating Humidity | <90% RH |
| Operating Temperature: | 0°C – +40°C |
| IP Rating: | IP66 |
| Dimensions: | 72×72×118mm |
Environment:Please do not dispose the packaging as unsorted waste, use the recycling facilities provided by your local authorities. When the camera comes to the end of its life or you choose to update or upgrade by replacing it, then do not dispose with your normal household waste. Please recycle where facilities exist. When you need to dispose of this fitting, check with your retailer or local authority for suitable options.
Due to our policy of continuous improvement we reserve the right to change specification without prior notice. Errors and omissions excepted. These instructions have been carefully checked prior to publication. However, no responsibility can be accepted by Challenger for any misinterpretation of these instructions.
 report this ad
![]() Challenger Security Products10 Sanderson’s Way, Matron, Blackpool, Lancashire, FY4 4NB, United Kingdom T 01253 791 888** Specifications are subject to change and improvement without notice.A501112802R Challenger_ASFCAM3_Instructions_Rev01
Challenger Security Products10 Sanderson’s Way, Matron, Blackpool, Lancashire, FY4 4NB, United Kingdom T 01253 791 888** Specifications are subject to change and improvement without notice.A501112802R Challenger_ASFCAM3_Instructions_Rev01
[xyz-ips snippet=”download-snippet”]