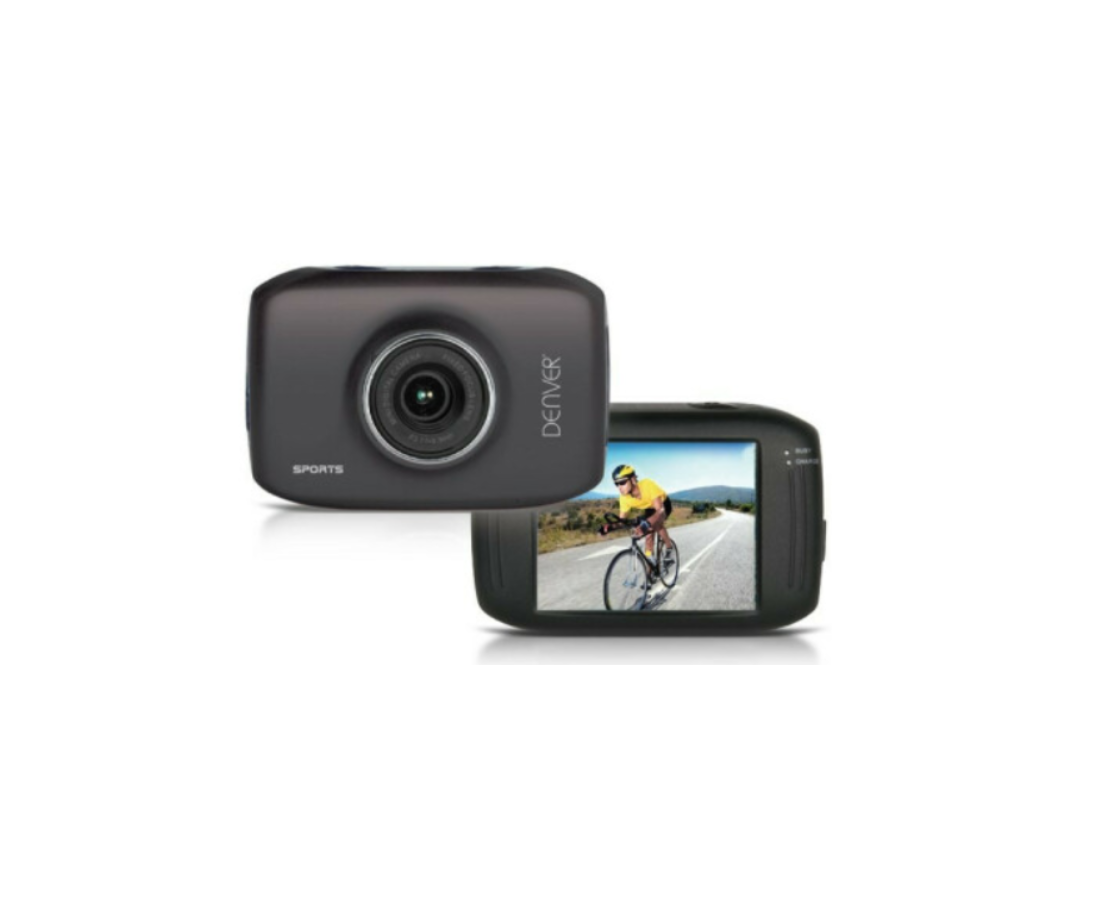
DENVER Appearance and Keypad ACT-1302T User Guide

Introduction to Appearance and Keypad
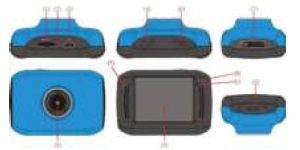
- Memory card slot
- Reset
- USB slot
- Power button
- MIC
- Shutter button
- Mode Switch
- Lens
- LCD Touch Screen
- Working Indicator Light
- Indicator Light for charging
- Wrist strap eyelet
Usage
- Charge built-in lithium battery
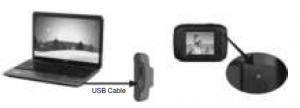
In power-off state, when the camera is connected with computer, charging begins. At this time, the charger indicator lights and it turns offwhen charged full. Generally, it costs 2-4 hours to charge full.
2. Use memory card
- Follow the instructions carved by slot of the memory card, it is to insert FT card into the card slot till entirely inserted.
- To take the FT card out, after gently pressing the end of the memory card inwards, the card will reject out.
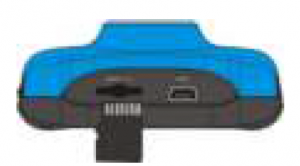
Note: The camera is not equipped with a built-in memory, and thus a memory card is required.
3. Power On/Off
3.1 Power-on: If to press and hold POWER key for 3 seconds, the screen starts up and the camera enters startup state.
3.2 Power-off: In idle state of the camera, if to click POWER key, the camera turns off.Automatic power-off: When idle time set for the camera reaches, it automatically turns off to save power. The default time of the system automatic power-off is 5 minutes;
3.3Power-off due to low battery: In case of extremely low battery, theicon “ ![]() ”appears on the LCD screen. Please timely charge the battery. When the icon turns red and flashes, the camera will automatically power off.
”appears on the LCD screen. Please timely charge the battery. When the icon turns red and flashes, the camera will automatically power off.
4. Functional mode switchover
The camera is equipped with three modes: capture, video and replay mode. After power-on, the modes can be switched over with MODEswitch.Capture mode: Take pictures. Video mode: Record video and driving (5min, 3min and 1min). Replay mode: Picture and video file playback.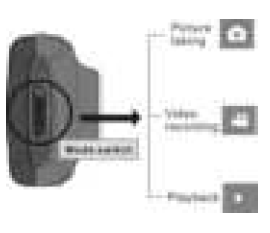
5. Indicators
Operation indicatorWhen the camera works (e.g. recording video, capturing or automatic screen turn-off), the operation indicator lights.
Charger indicator:Constant lighting is to remind user that the camera is being charged
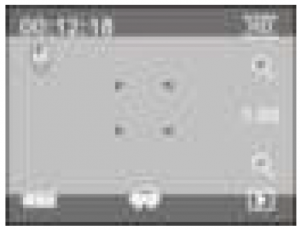
6. Video recording mode
(With maximum 29 minutes video recording and then stop. Must be started manually on the camera again.) When the mode switch is turned to video mode, press the shutterbutton once or click the LCD center once to begin videoing under previewing state; press the shutter button once again if you want to stop videoing, and the camera will also stop videoing automatically when you reach 29 minutes video records, the memory card is full or the power is insufficient during videoing period:
- :00:12:18: Timer means that videoing can still last for 12 minutes and 18 seconds.
- : mode icon represents that the camera is in videoing and recording mode at present.
- :videoing size clicks this icon and you can choose 720P/VGA.
- : means that the memory card is inserted at present.
- : digital zoom icon, click it and enlarge it.
- : digital zoom icon, click and minify it.
- : visual shutter, click this icon for taking photos or recording.
- : battery icon represents the present power of the battery.
- : represents digital zoom times.
- : click this icon to switch to the playback mode.

7.Photo mode
Switch the mode switch into the photo mode, press the shutter button or click the LCD center once under the previewing state to take a photo:
- 0/1234: Counter, indicating current number of photos taken
- : mode icon, indicating that the camera is in photo taking
- : video size, click this icon to select 1M/3M/5M.
- : means that the memory is been inserted at present.
- : digital zoom icon, click it
- : digital zoom icon, click it to minify.
- : visual shutter, click this icon for taking photos or videoing.
- : battery icon, indicates the power of the battery at present.
- : indicates digital zooming times.
- : click this icon to switch to the playback mode.
8. Vehicle-mounted mode
Turn the mode switch to vehicle-mounted mode, press the shutter button or click the LCD center once under the preview state to begin recording, save a segment for recording every 5 minutes, then start to record the next segment of video. When the storage card is full, the earliest segment of video will be deleted to release the corresponding space for continuous recording, and so the cycle.
- 00:12:18 timer, indicating that the camera can still record for 12 minutes and 18 seconds.
- : mode icon, representing that the camera is in vehicle-mounted mode at present.
- : video size, click this icon to select 1M/3M/5M.
- : represents that the memory card is been inserted at present.
- : digital zoom icon, click it to enlarge.
- : digital zoom icon, click it to minify.
- : visual shutter, click it for taking photos and recording.
- : battery icon, representing the current power of the battery.
- : indicates the digital zooming times.
- : click this icon to switch into the playback mode.
Note: the screen will be off automatically during recording process in order to save power; user can press the power button shortly to startthe screen and restore display.
9. Playback mode
9.1 After starting up and entering the previewing state, click theplayback icon ( ![]() ) at the lower right corner of the LCD to switch to the playback mode:
) at the lower right corner of the LCD to switch to the playback mode:
Click
- : represents that the current file is an AVI video file.
- : represents that there is one file in the current folder/one file in total.
- : current folder name (such as: I:\DCIM\100MEDIA, I: is the movable disk of the device).
- : Means that clicking can select files frontwards
- : Means that clicking can select files backwards.
- : Means that clicking can activate to confirm the deletion of the current file picture.
- : Means that clicking can play the current movie clips.
- : Means that clicking can switch back the previous photo mode (video mode).

9.2 Movie clips playing

Click ![]() to pause playing, click
to pause playing, click![]() to play quickly, and click to
to play quickly, and click to ![]() play slowly.
play slowly.
9.3 File deletion

Click YES to delete the current file immediately, or click NO to cancel the deletion operation.
Warning
 Warning
- Lithium battery inside!
- Do not try to open the product!
- Do not expose to heat, water, moisture, direct sunlight!
ALL RIGHTS RESERVED, COPYRIGHT DENVER ELECTRONICS A/S
 Electric and electronic equipment and included batteries contains materials, components and substances that can be hazardous to your health and the environment, if the waste material (discarded electric and electronic equipment and batteries) is not handled correctly. Electric and electronic equipment and batteries is marked with thecrossed out trash can symbol, seen below. This symbol signifies that electric and electronic equipment and batteries should not be disposed of with other household waste, but should be disposed of separately. As the end user it is important that you submit your used batteries to the approriate and designated facility. In this manner you make sure that the batteries are recycled in accordance with legislature and will not harm the environment. All cities have established collection points, where electric and electronicequipment and batteries can either be submitted free of charge at recycling stations and other collection sites, or be collected from the households. Additional information is available at the technical department of your city.
Imported by:DENVER ELECTRONICS A/S Stavneagervej 22DK-8250 EgaaDenmark www.facebook.com/denverelectronics
Read More About This Manual & Download PDF:
[xyz-ips snippet=”download-snippet”]