DENVER Electronics CRLB Bluetooth Instruction Manual CRLB-400
Before operating this product, please read this instruction manual completely for optimal usage.
Product Diagram
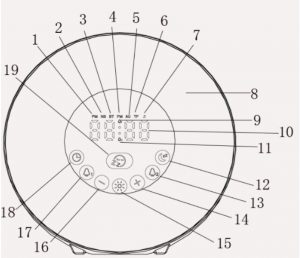
- PM icon :Show time of the afternoon
- NS icon :Nature Sound
- BT icon :Bluetooth mode
- FM icon :FM mode
- AU icon :Aux mode
- TF icon :TF/USB card mode
- Sleep icon :Sleep mode
- LED light :LED light
- Alarm clock 1 icon :alarm clock 1 (the icon display means the alarm 1 is enabled)
- Digital display :LED display
- Alarm clock 2 icon :Setting FM Radio as alarm. (the icon display means the alarm 2 is enabled)
- Sleep mode button :Short press this button to enter sunset sleep light mode, with timer options of 30mins/60mins/90 mins. The light is darkened as the set timer passes. When the set timer arrives, the light turns off, and radio or music is also turned off if radio or music is on. When powered off, clock can display 20 seconds by pressing any button on the front panel. To turn on the product, press and hold the power button.
- Alarm clock 2 button :
- Short press this button to enter FM radio alarm setting mode, then short press the “+/-” button to change hour digits when digits flash.
- Short press this button again to switch to minute setting, then press the “+/-” button to change minute digits.
- Short press this button again to complete hour and minute settings, and the display shows P 01/P 02/P 03/P 04/P 05/……/ for you to select a FM radio station, then press the “+/-” button to select a FM station as alarm source.
- Short press this button to confirm FM station selection. Alarm clock 2 is now activated.
- Brilliance control button :Press this button to increase LED brightness or adjust time
- Light button :
- Short press this button to enter light brightness setting mode, and press the “+/-” button to adjust brightness.
- Short press this button again to enter light color setting mode, press the “+/-” button to change color of light.
- hort press this button again to turn off light.The wake-up light starts operation 30 minutes before alarm rings.The light turns off automatically when switching to snooze mode. The light automatically turns on again when alarm rings.
- Brilliance control button :Press this button to decrease brightness or adjust time
- Alarm clock 1 button :Setting 7 kinds of natural sounds as alarm source.
- Short press this button to enter hour setting mode, then press the “+/-” button to change hour digits when digits flash.
- Short press this button to enter minute setting mode, then press the “+/-” button to change minute digits.
- Short press this button to complete hour and minute settings, and the display shows NS 01/ NS 02/ NS 03/ NS 04/ NS 05/ NS 06/ NS 07 for you to select a natural sound, then press the “+/-” button to select a natural sound.
- Short press this button to confirm the sound selection. Alarm clock 1 is now activated.Press and hold this button to activate or deactivate the alarm, Press this button to turn off the alarm sound when alarm rings.
- Clock button :Works only when the unit is switched on:
- Long press this button to toggle 12 or 24 hour format.
- Short press this button to enter hour setting mode.
- Short press this button to enter minute setting mode.
- Short press this button to complete clock setting.To change hour and minute digits, press the “+/-” button.
- Snooze button :Short press this button to enter snooze mode when alarm rings. The alarm rings again after 9 minutes.The unit enters snooze mode automatically if the alarm rings 3 minutes without any operation. This cycle repeats three times at most.

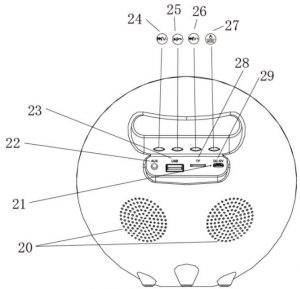
- Speakers :Speaker
- MIC :Microphone
- AUX connector :Connect to an external audio device.
- USB port :Connect a USB flash drive to play music.
- Button for previous track, or volume decreasing :Press this button to skip to the previous track; long press this button to decrease volume.
- Button to play/pause music, answer phone call :In Bluetooth mode, press this button to start/pause/resume play.In radio or music mode, short press this button to answer phone call.In radio mode, long press this button to auto search and store FM radio stations.Up to 15 FM radio stations can be stored.
- Button for next track, or volume increasing :Press this button to skip to the next track; long press this button to increase volume.
- Power/MODE button :Long press this button to power on or off.When powered on: Short press this button to toggle the modes in the following sequence: Natural sound music – Bluetooth – FM radio – AUX IN – TF card.When powered off, press any button on the front panel to display clock for 20 seconds, and feature operation is not available.
- TF card slot :Connect a Micro SD card to play music.
- DC 5V port :Connect to the power supply.
- Pairing with a Bluetooth device
- Press and hold the MODE button for 3 seconds until you hear tone, and the unit turns on. Then press the MODE button to switch to Bluetooth mode.
- On your Bluetooth-enabled device, turn on Bluetooth and search for Bluetooth devices, and select “Denver CRLB-400” from the list of devices. If prompted for a password, enter “0000”.
- When successfully paired, you will hear tone.
- Once you have paired this unit with the device, this unit will remember the device and connect automatically with the device when Bluetooth is activated and in range. You do not need to re-pair any previously connected devices.
- Listening to FM radio:Press the MODE button to switch to FM radio mode. Up to 15 FM stations can be stored after performing auto searching FM stations.
Playing music through AUXUsing 3.5mm audio cable, connect your device (smartphone or MP3 player) to the AUX connector on this unit Playing music through Micro SD card / USBAfter this unit is turned on, insert your Micro SD card to the card slot, the unit automatically switches to micro SD card mode and starts playing music. The Bluetooth mode is disabled.Use the controls on this unit to adjust volume and skip to the previous or next track.
Please notice – All products are subject to change without any notice. We take reservations for errors and omissions in the manual.
Electric and electronic equipment and included batteries contains materials, components and substances that can be hazardous to your health and the environment, if the waste material (discarded electric and electronic equipment and batteries) is not handled correctly.
Electric and electronic equipment and batteries is marked with the crossed out trash can symbol, seen above.
This symbol signifies that electric and electronic equipment and batteries should not be disposed of with other household waste, but should be disposed of separately.
As the end user it is important that you submit your used batteries to the appropriate and designated facility. In this manner you make sure that the batteries are recycled in accordance with legislature and will not harm the environment.
All cities have established collection points, where electric and electronic equipment and batteries can either be submitted free of charge at recycling stations and other collection sites, or be collected from the households. Additional information is available at the technical department of your city.
Hereby, Inter Sales A/S declares that the radio equipment type CRLB-400 is in compliance with Directive 2014/53/EU. The full text of the EU declaration of conformity is available at the following internet address: www.denver-electronics.com and then click the search ICON on topline of website.Write modelnumber: CRLB-400.Now enter product page, and red directive is found under downloads/other downloads
Operating Frequency Range: 18mhz-20khz
Max Output Power:2x3w
DENVER ELECTRONICS A/SOmega 5A, SoeftenDK-8382 HinnerupDenmarkwww.facebook.com/denverelectronics
Web: www.denver-electronics.com
References
[xyz-ips snippet=”download-snippet”]