
DENVER® MT-1084NB USER’S GUIDE
FUNCTIONS & CONTROLS
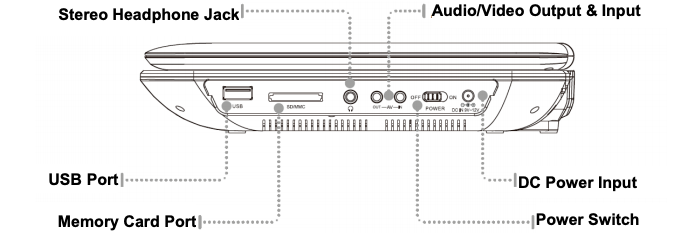
Side View
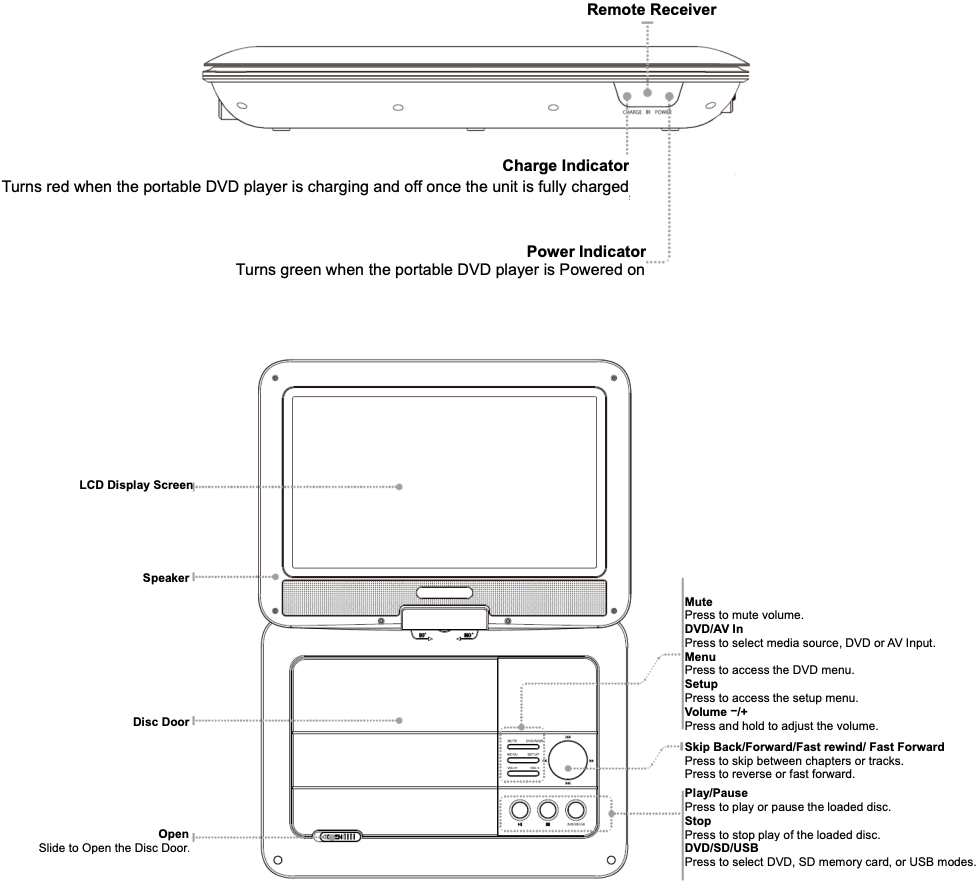
Front View
REMOTE
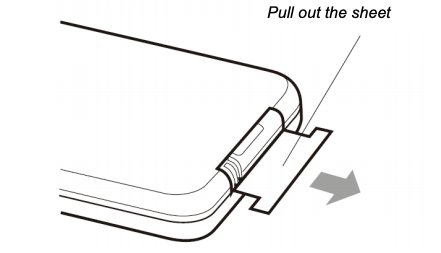
Remote Battery
The remote control needs to install battery. When using remote control at the first time, please pull out the insulation sheet from the button cell holder. The battery will be energized and ready to use.
Battery Installation/removal
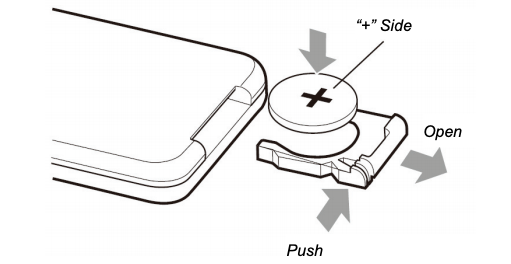
Please note: Battery type required is “Cr2025”
 TFTLCD On/Off
MUTEPress to mute the volume.
SETUPPress to access the setup menu.
ARROWS /OKOK is used for selecting; Up / Down / Left / Right directions buttons are used for moving Up / Down / Left / Right in disc menu or setup menu.
AUDIOPress to change the audio setting according to the disc.
OSDDisplay current title and time of playback.
PLAY /PAUSEBACKWARDPress to rewind. Press to change the speed mode of rewind.
FORWARDPress to fast forward. Press to change the speed mode of fast forward.
PREVPress to skip back between chapters or tracks.
NextPress to skip forward between chapters or tracks
MODEPress to switch between AV IN and DVD mode.
SD /USBPress to select between DVD, USB and SD/MMC card input.
REPEATPress to repeat the current chapter or track.
GO TOPress to select the time you want to start playing with the number keys.
SUBTITLEPress to switch caption and turn on or off.
PROGPress to play contents of disc in the order you want by programming the track to be played.
ANGLEOn supported DVDs, press and hold to view alternate angles.
ZOOMPress to zoom in or zoom out the image on the display when playing a loaded DVD.
VOLUME +/-Press to adjust the volume level.
WIDEPress to switch between different aspect ratio settings.
MENUPress to access DVD disc menu.
TITLEPress to access the title menu of a loaded DVD.
STOP
POWER
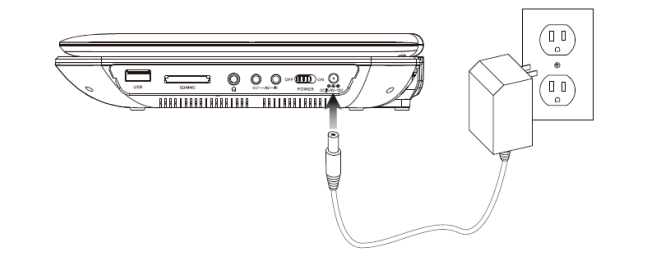
Power and Charging the Internal Battery
DC Power input: requires an AC/DC adapter, or 12V DC car adapter (included).
TO POWER THE UNIT, plug the included AC/DC adapter into the unit and a standard wall outlet.
If using in a car, plug the 12V DC car adapter into the unit and a standard 12V Power outlet in the car.
The Power Indicator will turn green whenever the portable DVD player is powered on.
The Charge Indicator will turn red whenever the battery is charging.
CONNECTING & PLAYING MEDIA
Loading and Playing a Disc
- Slide the Open latch to open the Disc Door.
- Load a disc into the DVD player, label side facing up. Close the Disc Door. After a disc is loaded, it will begin playing automatically.
- If the disc does not begin playing automatically, press the Play/Pause button.
Programming a Loaded Disc
- While the loaded disc is playing, press the PROG button on the remote control.
- Use the Arrow buttons to select a program slot.
- Use the Number Keypad to enter in the chapter and title, or track.
- Titles and chapters, or tracks will play in the order they are listed.
- Repeat step 3 until the desired titles and chapters, or tracks are programmed.
- Use the Arrow buttons to highlight the on-screen START button. Press the OK button to begin playing the programmed disc.
Connecting a USB Thumb Drive
AVI, VOB, MPEG 1, MPEG 2 and MPEG 4 video formats are supported.
- Connect a USB thumb drive to the USB Port.
- Press the DVD/SD/USB button to enter DVD/SD/USB mode.
- Use the Up/Down Arrow and Play buttons to select USB mode and play content from the connected USB thumb drive.
Connecting a Memory Card
AVI, VOB, MPEG 1, MPEG 2 and MPEG 4 video formats are supported. Note: Formats are not universally compatible. Playback may be dependent on recording conditions.
- Connect a SD or MMC memory card to the Memory Card Port.
- Press the DVD/SD/USB button to enter DVD/MCR/USB mode.
- Use the Up/Down Arrow and Play buttons to select MCR mode and play content from the connected memory card.
Accessing the Setup Menu
To access the Setup Menu, press the Setup button on the DVD player or the remote control.
Using the 3.5mm AV Output
Require a 3.5mm to 3x RCA audio/video cable (included).
- Connect the 3.5mm to 3x RCA audio/video cable to the AV Output on the unit’s display.
- Connect the 3.5mm to 3x RCA audio/video cable to the RCA stereo audio inputs and composite video input on a television.
- Audio and video played through the portable DVD player will now be seen and heard through the connected television.
Using the 3.5mm AV Input
Require a 3.5mm to 3 x RCA audio/video cable (included).
- Connect the 3.5mm to 3 x RCA audio/video cable to the 3.5mm AV Input on the portable DVD player and the composite video outputs on an audio/video source such, as a television.
- Press the DVD/AV In button to switch to AV In mode.
- Audio and video played from the connected source (a television) will now be output to the portable DVD player.
WARNING
a. Do not ingest battery, Chemical Burn Hazardb. The remote control contains a coin / button cell battery. If the coin / button cell battery is swallowed, it can cause severe internal burns in just 2 hours and can lead to deathc. Keep new and used batteries away from children.d. If the battery compartment does not close securely, stop using the product and keep it away from childrene. If you think batteries might have been swallowed or placed inside any part of the body, seek immediate medical attention
AC/DC adapter
Please notice – All products are subject to change without any notice. We take reservations for errors and omissions in the manual.
ALL RIGHTS RESERVED, COPYRIGHT DENVER ELECTRONICS A/S
![]()
Electric and electronic equipment contains materials, components and substances that can be hazardous to your health and the environment, if the waste material (discarded electric and electronic equipment) is not handled correctly.
Electric and electronic equipment is marked with the crossed out trash can symbol, seen above. This symbol signifies that electric and electronic equipment should not be disposed of with other household waste, but should be disposed of separately.
All cities have established collection points, where electric and electronic equipment can either be submitted free of charge at recycling stations and other collection sites, or be collected from the households. Additional information is available at the technical department of your city.
DENVER ELECTRONICS A/SOmega 5A, SoeftenDK-8382 Hinnerup
[xyz-ips snippet=”download-snippet”]