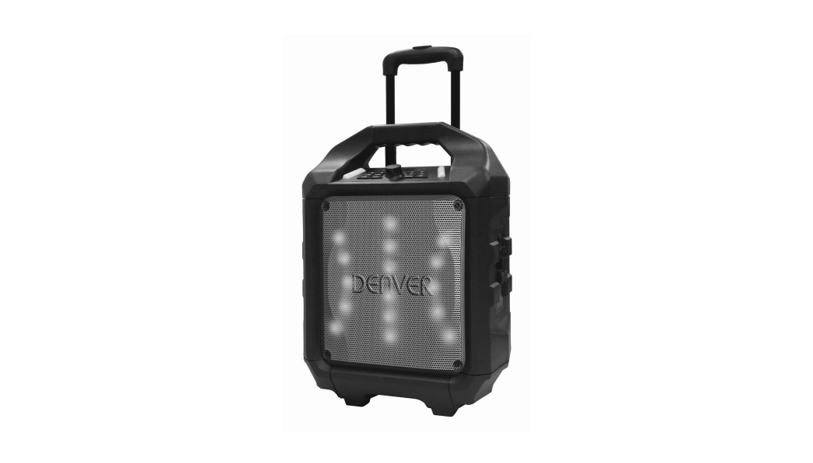
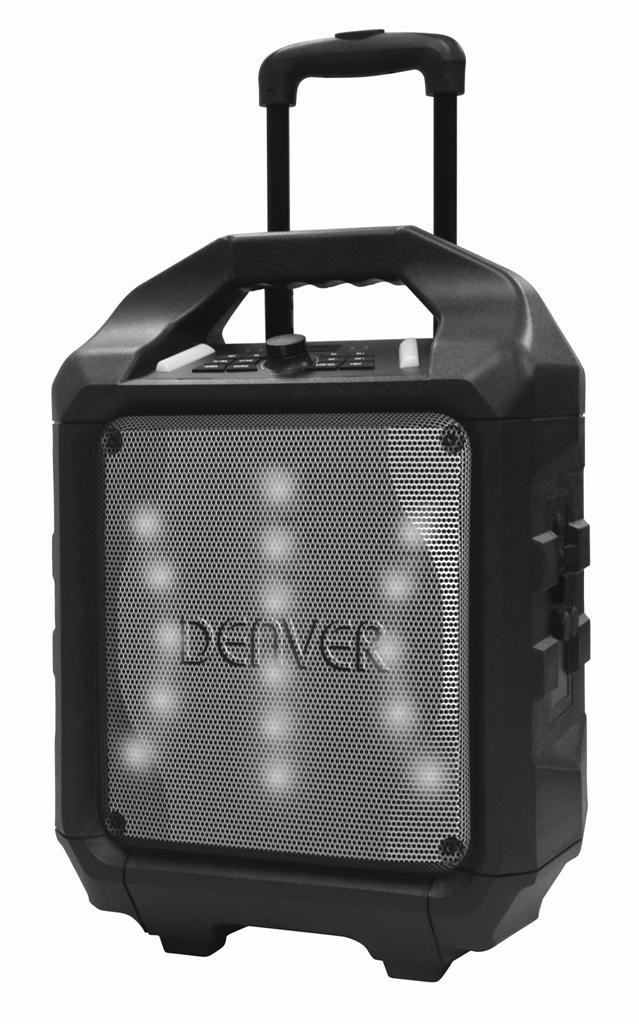
TSP-5050.TROLLEY BLUETOOTHSPEAKER
USER MANUAL
PART DESCRIPTIONS
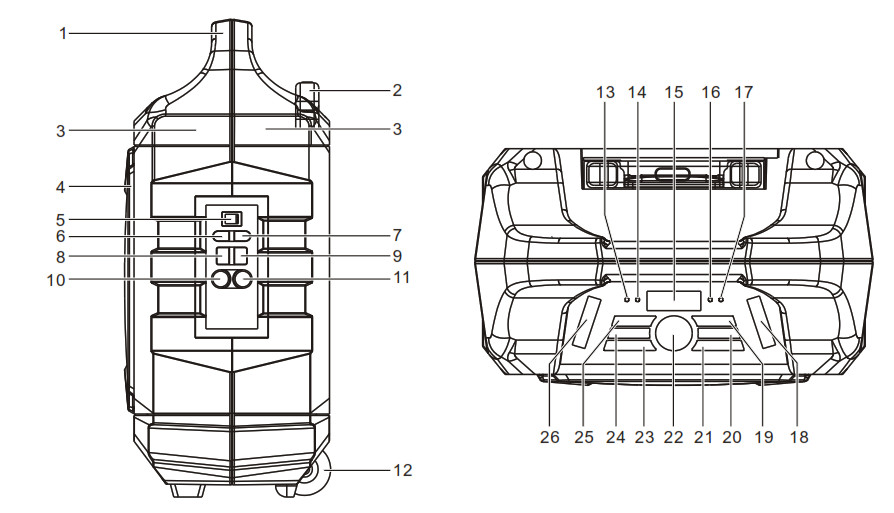
- HANDLE
- TROLLEY HANDLE
- RUGGED CASING
- METAL MESH GRILL
- POWER ON/OFF KEY
- LINE IN
- DC(15V,
 2A)INPUT
 - USB PORT
- 1A CHARGER (5V)
- MIC PORT1
- MIC PORT2
- WHEELS
- POWER INDICATOR
- BLUETOOTH INDICATOR
- LED DISPLAY
- BATTERY LOW INDICATOR
- BATTERY FULL INDICATOR
- LED LANTERN
- ECHO(DOWN/UP)
- MIC VOLUME(UP/DOWN)KEY
- PAUSE/PLAY/LIGHT(ON/OFF) BUTTON
- VOLUME (+/-)ROTATE
- SOURCE/BT PAIR
- TUNING DOWN/UP
- REPEAT KEY/EQ KEY
- LED LANTERN
SAFETY INSTRUCTIONS
To ensure proper operation of the products and prevent fire or shock hazard, please carefully read all information contained in these Safety instructions.
![]() The lightning flash with arrowhead symbol, within an equilateral triangle, is intended to alert the user to the presence of uninsulated” dangerous voltage” within theproduct’s enclosure that may be of sufficient magnitude to constitute a risk of electric shock to persons.
The lightning flash with arrowhead symbol, within an equilateral triangle, is intended to alert the user to the presence of uninsulated” dangerous voltage” within theproduct’s enclosure that may be of sufficient magnitude to constitute a risk of electric shock to persons.
![]() WARNING:TOREDUCE THE RISK OF ELECTRIC SHOCK, DONOT REMOVE COVER(ORBACK). NO USER-SERVICEABLE PART SINSIDE. REFER SERVICING TO QUALIFIED SERVICE PERSONNEL.
WARNING:TOREDUCE THE RISK OF ELECTRIC SHOCK, DONOT REMOVE COVER(ORBACK). NO USER-SERVICEABLE PART SINSIDE. REFER SERVICING TO QUALIFIED SERVICE PERSONNEL.
![]() The exclamation point within an equilateral triangle is intended to alert the user to the presence of important operating and maintenance (servicing) instructions in the literature accompanying the appliance.
The exclamation point within an equilateral triangle is intended to alert the user to the presence of important operating and maintenance (servicing) instructions in the literature accompanying the appliance.
UNPACKING:
Check that all the following items should be included in the box.– Main Unit– AC Power Adaptor– User Manual
IMPORTANTS INSTRUCTIONS:
- Ensure the plug is fully inserted into the wall outlet and the product is operated on an electric power source matched to its rated voltage.
- Never operate the product if the cord or adaptor is damaged or overly hot.
- Do not modify the cord or damage it in any way such as by bending, twisting or pulling on it unnecessarily.
- Do not attempt to modify, repair or in any way dismantle the product, other than when discarding it at the end of its useful life.
- Never unplug this product with wet hands.
- Unplug the product from the wall outlet before cleaning and maintenance. Do not use liquid cleaners or aerosol cleaners.
- The power cord should be unplugged from the wall outlet when unused for a long period of time.
- Keep and store this product in dry and moisture-free areas at all times.
- Do not use this product near water, or any other heat sources or other apparatus that produce heat.
- Battery shall not be directly exposed to sunshine and fire.
- Do not attempt to replace the battery. For repairing and servicing, please consult the store of purchase or customer service centre designated by the store. CAUTION: Danger of explosion if battery is incorrectly replaced.
- Do not use any other power supply other than the one specially designed for this product.
- Keep this operating instruction in a safe place.
- Contact an authorized service centre if you have any inquiry about this product.
POWER CONNECTION
– Unpack this product, ensure the power ON/OFF switch is on “OFF”.– Connect the supplied AC adaptor to this product, plug the AC adaptor to the wall outlet.– Battery RED LED indicator will turn to GREEN.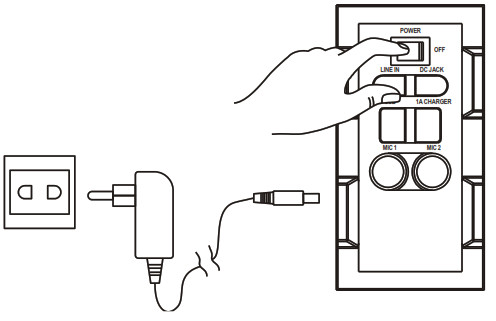
RECHARGING
– Unit comes with a battery indicator alert.– If Battery Low LED flash, it means the battery level is low and recharging is required.– By connecting the AC power, the Battery Full LED will turn red, it means the unit is under recharging.– The Battery Full LED become green, it means the level of battery is fully charged. It is recommended to charge the battery about 6 hours before you start using the unit for the first time.
Energy Saving: If this product is idle for about 20 minutes, it will go to standby mode automatically. It will auto power off.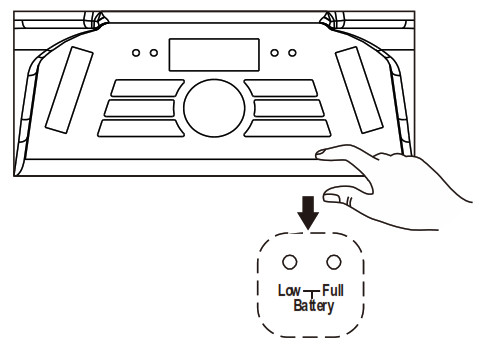 Caution: To keep and protect the rechargeable battery in good condition, users should check the unit and be sure to turn the Power On/Off switch on the side panel to “Off” every time after using and before storage, it is highly recommended that users should fully recharge the battery at least once in every two months.
BLUETOOTH CONNECTION
– Once the power switch is turned to “On”, Bluetooth “BT” mode is set as default– Blue LED indicator will flash in pairing mode. The RED LED display will show “bt”– Turn on the Bluetooth function on your device and search for “TSP-505MK2”– then press to connect.– Connected sound signal will be heard and the blue led connection indicator will stop blinking and stay steady.– Bluetooth connection is completed.– Select the music from your Bluetooth device and start playing.– Hold the BT DISCONNECT(BT PAIR) key to disconnect paired device and enter pairing mode.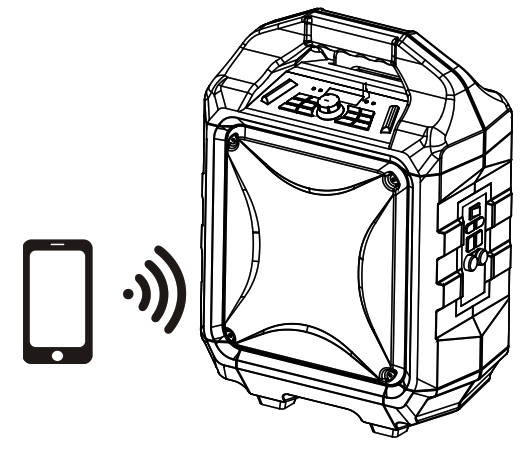
FM RADIO
– Press the “Source” Button and select Radio, the FM Radio Frequency will show on the RED LED display.– Hold play/pause key to auto search and store.– Press and hold the TU ![]() or
or ![]() TU buttons for choosing the next stored available station. Short press them to fine tune.
TU buttons for choosing the next stored available station. Short press them to fine tune.
USB PORT
– Press the “Source” Button and select USB, USB will show on the RED LED display.– Insert the USB stick.– Select your favorate music by pressing TU ![]() or
or ![]() TU.– Press “REP” to repeat once for the current song, Press again “REP” to repeat all songs.
TU.– Press “REP” to repeat once for the current song, Press again “REP” to repeat all songs. If unit is playing on Bluetooth mode “BT”, it will automatically switch to USB mode when the USB stick is inserted.
Important: The USB port is intended for data transfer only, Other devices cannot be used with this USB connection. The use of USB extension cords is not recommended
LINE IN
– Press the “Source” Button and select LINE,LINE will show on the RED LED display.– Plug in your 3.5mm cable into the LINE Input on the side panel and the unit will enter into LINE IN mode.– You can connect any audio device that has 3.5mm audio output jack and playback any audio from the connected device.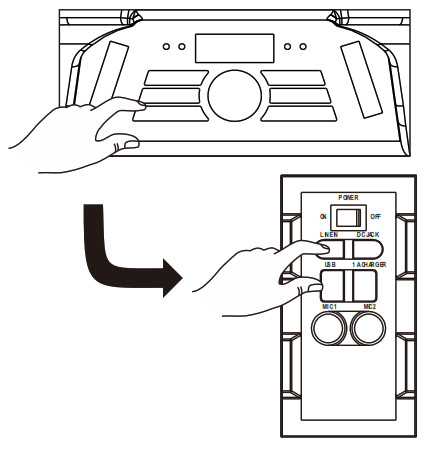
SMARTPHONES/TABLETS RECHARGING
– Smartphones recharging works on both AC power and DC power.
CAUTION: When the low battery red indicator lights up, that means product needs to be recharged and smartphones recharging can only be done by AC power adaptor.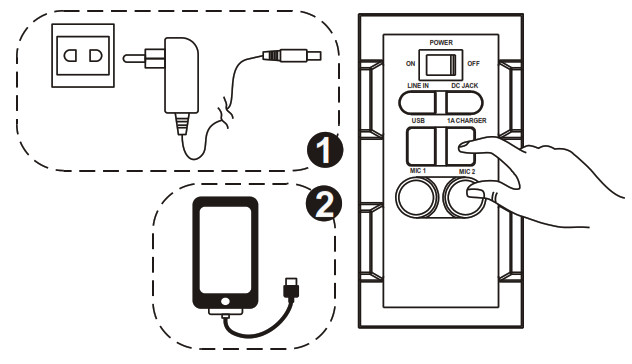 – Plugin the Power AC Adaptor to the wall outlet.– Plugin your smartphones/tablets USB recharging cable into the side panel marked “1A charger”.– Connect the recharging cable to your smartphones/tablets. Recharging starts.– Unplug your USB recharging cable when your smartphones/tablets are fully recharged.
This jack is only designed for charging devices requiring 5V and 1A. Otherwise, it may lead to damage.
SING-A-SONG
– This product allows you to sing a long with the songs are playing either on BT, USB or LINE IN mode and allow 2 microphones at the same time.– Plug in your Microphone cable into the side panel marked “MIC 1” and/or “MIC 2”.– Adjust the MIC Volume “MIC + / MIC ” or main volume on the top control panel.– Adjust the Echo level ” EH + /EH “.– Start to sing –
WARNING: – If the MIC Volume and ECHO level set too high or to the maximum, be caution with the high pitch reflection tone.Energy Saving: If this product is idle for about 20 minutes, it will go to standby mode automatically. It will auto power off.
SOUND EFFECTS– ” Customer’s model ” has a built in Equalizer– Press and select the preset sound effect for your music; FLAT, CLASSIC, POP,ROCK and JAZZ.
LIGHT EFFECTS– Short press to turn On / Off LED Lantern on Top panel. Long press to turn On/Off disco light.
TROUBLESHOOTING
GeneralNo power– Check that AC power cord is securely inserted in the unit and the electrical outlet.– Check the Power On/Off switch is turned to On position.– If battery is flat Plug in the AC Power cord to charge and operate.
Keys no response– Turn the Power On/Off switch to Off, and then On again to reset the unit.– Unplug the AC Power cord and plug it back again.
No sound heard– Make sure the LINE connected volume is turned to a reasonable level.– Make sure the Bluetooth connected device output the audio via BT out.– Make sure the Bluetooth connected device volume is turned to a reasonable level.Bluetooth OperationsAudio quality is poor– Bluetooth reception is poor. Move the Bluetooth device nearer to the Speaker.
Cannot pair to Bluetooth device– Make sure both Bluetooth device and Speaker is not connected to any other Bluetooth device.– Make sure the Bluetooth On/Off switch located below Speaker is slide to On position.– Make sure the Blue LED on the Speaker is fast flashing (Pairing mode).– Turn Power switch to Off, and then On again, Press and hold BT button for 2 seconds to enter into pairing mode.
CAUTION:– The AC/DC adaptor and main unit shall not be exposed to dripping or splashing and that no objects filled with liquids, such as vases, shall be placed on the apparatus and AC/DC adaptor. – Minimum distances 10 cm around the apparatus for sufficient ventilation.– The ventilation should not be impeded by covering the ventilation openings with items, such as newspapers, table-cloths, curtains, etc.– No naked flame sources, such as lighted candles, should be placed on the apparatus.– When the mains plug of AC/DC Adaptor is used as the disconnect device, the disconnect device shall remain readily operable. To be completely disconnected the power input, the AC/DC adaptor shall be disconnected from the mains completely.– The AC/DC adaptor should not be obstructed or should be easily accessed during intended use.– The use of apparatus in tropical climates.
About Sealed Lead-Acid Battery: This unit works either on the battery pack (Model no.: Tianchang TC12-5.012V5.0AH) or the AC power: unplug the AC Power adapter from the DC input jack to work on the battery pack (after fully charged); plugging the AC Power adapter while the battery pack is attached initiates the charging of this battery. The charged LED indicator lights red during charging, when the battery is fully charged the indicator is off. Fully charging a run-out battery pack may take 3hours, A fully charged battery pack can endure approximately 2 hours of continuous playback. This playing time may vary with the surrounding environment, the volume level of the speaker and the battery condition. It is advised that you wait 10-20 minutes before recharging the battery pack if it has turned flat during operation.
ALL RIGHTS RESERVED, COPYRIGHT DENVER ELECTRONICS A/S
Please notice All products are subject to change without any notice. We take reservation for errors and omissions in the manual.
Electric and electronic equipment and included batteries contains materials, components and substances that can be hazardous to your health and the environment if the waste material (discarded electric and electronic equipment and batteries) is not handled correctly.
Electric and electronic equipment and batteries is marked with the crossed-out trash can symbol, seen below. This symbol signifies that electric and electronic equipment and batteries should not be disposed of with other household waste, but should be disposed of separately.
As the end user it is important that you submit your used batteries to the approriate and designated facility. In this manner you make sure that the batteries are recycled in accordance with legislature and will not harm the environment.All cities have established collection points, where electric and electronic equipment and batteries can either be submitted free of charge at recycling stations and other collection sites, or be collected from the households. Additional information is available at the technical department of your city.
Operating Frequency Range:Radio: FM 87.5-108 MHzBT: 2.4 GHzAudio:20 Hz-20 KHzMax Output Power: 50 W
DENVER ELECTRONICS A/SOmega 5A, SoeftenDK-8382 HinnerupDenmarkfacebook.com/denverelectronics
Hereby, Inter Sales A/S declares that the radio equipment type TSP-505MK2 is in compliance with Directive 2014/53/EU. The full text of the EU declaration of conformity is available at the following internet address: www.denver-electronics.com and then click the search ICON on topline of website. Write modelnumber: TSP-505MK2.Now enter product page, and red directive is found under downloads/other downloads
References
[xyz-ips snippet=”download-snippet”]