EXTECH 45118 Mini Thermo-Anemometer

Operation
- Select the desired units for air velocity and temperature by momentarily pressing the UNITS/MODE key from a powered down condition. The LCD will show temperature units (oC or oF) and Air Velocity units. Press the UNITS/MODE key repeatedly until the desired units are displaying. When finished, press the ON/OFF/HOLD key momentarily to restart the meter with the desired units.
- Power the meter by pressing the ON/OFF/HOLD key momentarily. The Dual Display will illuminate. The top (larger) display indicates air speed and the lower display indicates temperature.
- Position the meter so that the measured airflow enters the meter vane from the rear of the meter (opposite side from the front panel logo, part number, etc.).
- Activate Data Hold (to freeze the most recent display), by pressing and holding the ON/OFF/HOLD key while taking measurements. To return to normal operation, release the key and restart the meter.
- Max operation: After a measurement session, press and hold the UNITS / MODE key until the MAX icon appears on the lower left-hand side of the LCD. Both the Air Velocity and Temperature indication will represent the highest readings measured since the meter was last powered.
- Average mode operation: Normally the meter averages readings every 2 seconds. To select 5, 10 or 13 second averaging, first press and hold the UNITS/MODE key until the MAX icon appears. Next, press the key again momentarily and the AVG icon will appear. The 13 second average mode is selected. Now press the key again and the number 5 will appear. Leave it there if an average of 5 seconds is desired. Press the key once more for a 10 second average mode. To return to normal operation press the UNITS/MODE key repeatedly until all lower left-hand icons disappear.
- Wind chill indicator: Press and hold the UNITS/MODE key until the MAX icon appears. Press the key repeatedly until the WCI icon appears. The temperature display will now factor in the wind chill. To return to normal operation, press the UNITS/MODE key again and the WCI icon will disappear.
- AUTO POWER OFF: After approx. 15 mins, if meter keys are not touched, the meter automatically shuts down to preserve battery life.
Meter Description
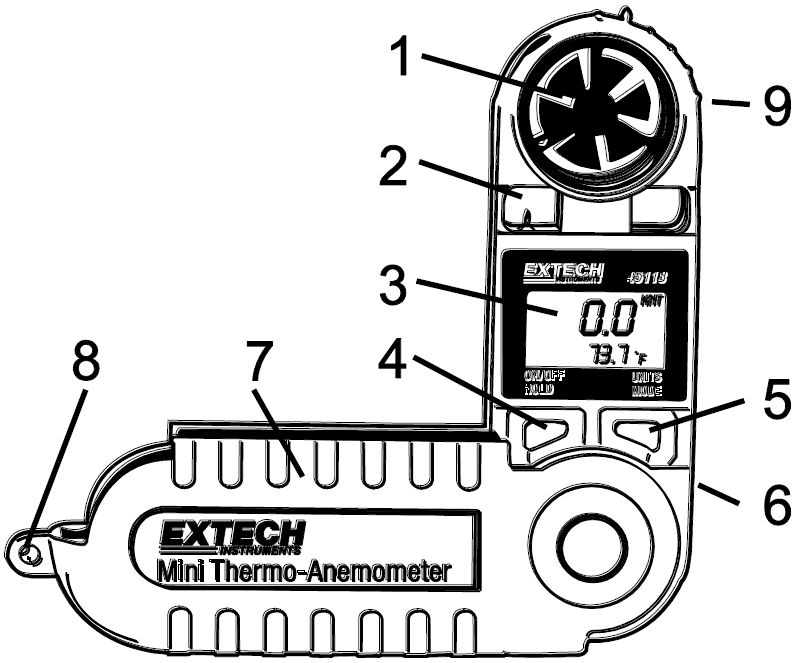
- Vane impeller
- Precision thermister
- LCD display
- POWER and HOLD key
- UNITS and MODE key
- Battery compartment (on rear)
- Swivel handle and storage case
- Lanyard holder
- Impeller set screw (on rear of meter)
Specifications
- Display – Dual LCD with multi function indicators
- Measurements – Knots, km/h, MPH, ft/min, m/sec, Beaufort force, windchill, and temperature (C/F)
- Wind-speed – Moving 2 second average with 2 second gust detect
- Sensor – Sapphire bearing, non-corrosive vane for air velocity and precision thermistor for temperature
- Average Mode – Choice of 5, 10, or 13 second average readings
- Max Display – Push button highest reading recall
- Data hold – Freeze most recent display
- Sample time – 1 reading per second
- Water-resistant – To 3′ (1 meter)
- Min/Max wind-speed – 1.1 to 62.5 MPH
- Operating temperature – 5 to 122oF (-15 to 50oC)
- Operating humidity – < 80% RH
- Power supply – Lithium battery type CR-2032 or equivalent
- Battery life – 400 hours approx.
- Weight – 3 oz (95 g)
- Dimensions – Instrument: 5.25 x 2.75 x 0.75”(133 x 70 x 19mm) Vane: 1’(24mm) diameter
|
Measurement |
Range |
Resolution |
Accuracy |
| MPH (Miles per hour) |
2.5 to 44.7 MPH |
0.2 MPH |
± (3%rdg +0.4MPH) |
| km/hr (kilometers per hour) |
4.0 to 72.0 km/h |
0.7 km/h |
± (3%rdg +1.4km/h) |
| Knots (nautical miles per hour) |
2.1 to 38.9 knots |
0.3 knots |
± (3%rdg +0.6knots) |
| m/sec (meters per second) |
1.1 to 20.0 m/s |
0.1 m/s |
± (3%rdg +0.2m/s) |
| ft/min (feet per minute) |
216 to 3936 ft/min |
20ft/min |
± (3%rdg +40ft/min) |
| Beaufort force |
1 to 8 BF |
1 BF |
± 1 |
| Temperature |
0 to 122oF |
0.1oF |
±1.8oF |
|
-18 to 50oC |
0.1oC |
±1oC |
Maintenance
Battery Replacement
If the meter will not power up as usual or the display contrast becomes weak and difficult to read, replace the lithium battery. To do so, turn the battery compartment cover in a CLOCKWISE direction to remove it. The battery will be visible in the battery compartment, observe the position of the battery and replace the new one in the same position. Affix the battery compartment cover by turning it in a COUNTER-CLOCKWISE direction. Dispose of the lithium battery in accordance with local, state, or national waste disposal codes.
Vane Impeller Replacement
NOTE: The anemometer is very accurate at low and mid-range air speeds. Constant use at very high speeds may damage the impeller’s bearing and reduce over-all accuracy.
- To replace the impeller, remove the set screw next to the impeller assembly (on the rear of the meter). Twist the impeller assembly counter-clockwise to the “O” (open) position and remove it.
- Install the new impeller by inserting and twisting the new impeller assembly clockwise then tighten the set screw.
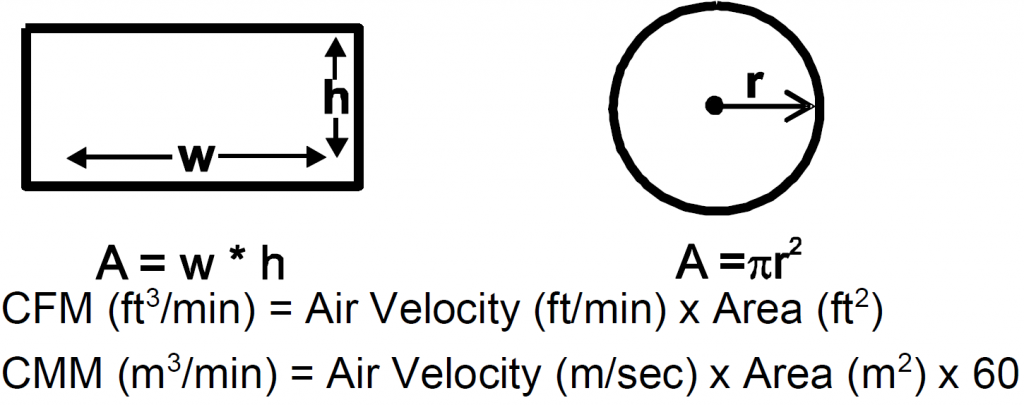
CFM Measurements
Measure the area of the duct using the diagrams below for rectangular and circular ducts (If the duct measurements are made in inches, divide the inches by 144 to get the area in square feet). Plug the area value (in square feet) in the cubic equations below. Note that the air velocity must be plugged into the cubic equations also.
Two-year WarrantyTeledyne FLIR LLC warrants this Extech brand instrument to be free of defects in parts and workmanship for two years from date of shipment (a six-month limited warranty applies to sensors and cables). To view the full warranty text please visit: http://www.extech.com/support/warranties.
Calibration and Repair ServicesTeledyne FLIR LLC offers calibration and repair services for the Extech brand products we sell. We offer NIST traceable calibration for most of our products. Contact us for information on calibration and repair availability, refer to the contact information below. Annual calibrations should be performed to verify meter performance and accuracy. Product specifications are subject to change without notice. Please visit our website for the most up-to-date product information: www.extech.com.
Contact Customer SupportCustomer Support Telephone List: https://support.flir.com/contactCalibration, Repair, and Returns: [email protected]Technical Support: https://support.flir.com
Copyright © 2021 Teledyne FLIR LLCAll rights reserved including the right of reproduction in whole or in part in any formwww.extech.com
![]()
References
[xyz-ips snippet=”download-snippet”]