
![]()
USER MANUAL
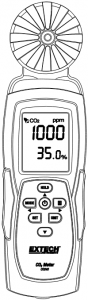
Carbon Dioxide Meter
Model CO240

Additional User Manual Translations available at www.extech.com
Introduction
Thank you for selecting the Extech Instruments Model CO240. The CO240 measures Carbon Dioxide (CO2), Air Temperature, and Relative Humidity. It also calculates Dew Point Temperature and Wet Bulb Temperature. The user-programmable high alarm feature alerts the user when CO2 level rises above the programmed limit and the data streaming feature allows readings to be captured in real time by PC (USB connection). This device is shipped fully tested and calibrated and, with proper use, will provide years of reliable service. Please visit our website (www.extech.com) to check for the latest version of this User Guide, Product Updates, and Customer Support.
Features
- Portable meter measures CO2, Air Temperature, and Relative humidity accurately
- Measures CO2 (0~9,999ppm) using NDIR (Non-dispersive Infrared Technology)
- Dual display indicates Relative Humidity/Air Temperature and CO2
- Calculates Dew Point and Wet Bulb Temperature
- Adjustable CO2 high alarm threshold with audible beeper
- Tripod mount
- USB cable for PC data streaming
- Battery or AC Adaptor Powered
2
Meter Description
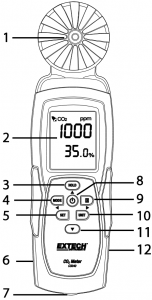
- Sensors
- LCD Screen
- HOLD / Up Arrow Button
- MODE /
 Left Arrow Button
 - SET Button
- AC Adaptor jack
- Tripod Mount
- POWER ( ) Button
- (Max/Min) / Right Arrow Button
- UNIT Button
- Down Arrow Button
- USB PC interface port
Battery compartment on rear of meter.
Operation
Powering the meterMomentarily press the POWER button to power on the meter. Hold the POWER button for 2 seconds to turn off the meter. During measurement, if the alarm is sounding (audible beeper) press the POWER button momentarily to turn off the beeper. Press again to activate the beeper function. The alarm beeper is set to ON by default. The meter can be powered by 6 AAA batteries or AC Adaptor.Recommendation: For datalogging, power the unit using an AC/DC adaptor in order to conserve battery power.
3
Auto Power OffThe CO240 will automatically turn off after 20 minutes of inactivity. To disable the auto power off function: With the meter OFF, press and hold the HOLD button and then press the POWER button. The LCD will show “n”, and will then return to normal measurement mode.
MeasurementsWhen the meter is turned on, a self-test is implemented. Due to the nature of the NDIR sensor, it typically requires approximately ten minutes to obtain stable, accurate readings. If the USB cable is connected to the CO240, the USB symbol will be shown on the LCD. The temperature and relative humidity readings will alternate on the lower LCD line along with the CO2 reading on the top display line. Use the MODE button to switch to DP (Dew Point Temperature) and WB (Wet Bulb Temperature) modes (lower display line).
Maximum and Minimum Readings MemoryMomentarily press the MAX/MIN button to review the maximum and minimum readings captured since the meter was powered on. Pressing the button once will show the maximum value. Pressing the button again will display the minimum value. Pressing the button a third time will return the meter to its normal mode of operation. While in MAX-MIN mode, press and hold the HOLD button for 2 seconds to reset (clear) the stored maximum and minimum values.
Selecting °C/°F units of measurePress the UNIT button to select the desired temperature unit of measure.
CalibrationPress and hold the SET + UNIT buttons for 2 seconds to enter the self-calibration mode. Ensure that there is as little CO2 present as possible. It is recommended that this be done in outside air.
The LCD will display “CAL” and will perform a 60-second countdown as it performs the calibration. A reading of “400” is displayed as a normal CO2 level reference value during the calibration. After the calibration has completed, the meter will return to its normal mode operation.
Automatic CO2 Baseline Calibration (ABC)The ABC algorithm continually tracks the sensor’s lowest reading over a fixed time interval and slowly corrects for any long-term drift (as compared to the expected fresh air value of 400ppm). The ABC period is 15 days, during which the ABC function default is always on.
4
CO2 Alarm SettingPress and hold the SET button for 2 seconds to enter the high CO2 alarm threshold. Press the HOLD button to increase the value, and the Down arrow button to decrease the value. Press the MODE button to select the digit to the left and press the MAX/MIN button to select the digit to the right. Once the desired value is set, press the SET button for 2 seconds to save the alarm setting. The LCD will return to its normal mode of operation. The meter alarm limit default is 1000ppm (OSHA). Momentarily press the POWER button to toggle the alarm on and off.
Data Streaming to PCThe CO240 features real-time data streaming to a PC using the CO240 software. When the meter is connected to a PC, the USB icon will be visible on the LCD display. Please install the USB driver and supplied software before attempting to stream data. Refer to the Help Utility within the software program for further details.The CO240 software is available from http://www.extech.com/software/downloads.
Maintenance and Troubleshooting
Battery ReplacementWhen the battery icon appears on the LCD, the batteries must be replaced.In a downward motion, slide the rear battery compartment cover off of the meter housing. Remove the old batteries and replace with new batteries (all of the same type) observing correct polarity. This meter uses six (6) 1.5V AAA batteries. Please replace the battery compartment cover before attempting to use the meter.
Battery Safety Reminders° Please dispose of batteries responsibly; observe all relevant regulations.° Never dispose of batteries in a fire; batteries may explode or leak.° Never mix battery types; install new batteries of the same type.
Troubleshooting / Error Message Displays
Erratic Readings Replace the batteries or use the AC/DC adaptor and check again.
ER1 Display CO2, Temperature or Humidity sensor failure or a sensor communication error. Send for service if display persists.
ER2 Display Out-of-range condition for CO2, Temperature or Relative Humidity. Detected reading exceeds CO2, Temperature or Humidity range specification. This error is normal when clearing the maximum and minimum readings in the MAX/MIN mode.
“9999” Display Reading exceeds the CO2 maximum measurement range or the battery power is weak.
5
Specifications
Display : Dual multifunction LCDCO2 measure range : 0 to 9,999ppmCO2 accuracy : ± (75ppm + 5% of reading) 0 to 2,000ppmOperating Temperature : 32 to 122°F (0 to 50°C); 0.1° resolutionTemperature Accuracy : ± 1.8°F (1.0 °C)Operating Relative Humidity : 0 to 95%RH (avoid condensation)Relative Humidity Accuracy : ± 5% of rdg at 77°F (25°C) otherwise ±7% RHDew Point Temperature range : -99.22 to 118°F (-72.9 to 47°C); 0.1° resolutionWet Bulb Temperature range : 12.2 to 118.8°F (-11 to 48.2°C); 0.1° resolutionStorage Temperature : -4 to 122°F (-20 to 50°C)Storage Humidity : 0 to 95%RH (avoid condensation)Power : AAA batteries x 6 pcs or AC adaptorDimensions : 8.3 x 2.4 x 1.6″ (211 x 60 x 40 mm)Weight : 6.4 oz. (181.4g)
6
Two-year Warranty
FLIR Systems, Inc. warrants this Extech brand instrument to be free of defects in parts and workmanship for two years from date of shipment (a six-month limited warranty applies to sensors and cables). To view the full warranty text please visit: http://www.extech.com/support/warranties.
Calibration and Repair Services
FLIR Systems, Inc. offers calibration and repair services for the Extech brand products we sell. We offer NIST traceable calibration for most of our products. Contact us for information on calibration and repair availability, refer to the contact information below. Annual calibrations should be performed to verify meter performance and accuracy. Product specifications are subject to change without notice. Please visit our website for the most up-to-date product information: www.extech.com.
Contact Customer Support
Customer Support Telephone List: https://support.flir.com/contactCalibration, Repair, and Returns: [email protected]Technical Support: https://support.flir.com
Copyright © 2014-2020 FLIR Systems, Inc.All rights reserved including the right of reproduction in whole or in part in any formwww.extech.com
7
References
[xyz-ips snippet=”download-snippet”]