EXTECHCO2 Monitor and Datalogger
Model: CO210
User Manual
Introduction
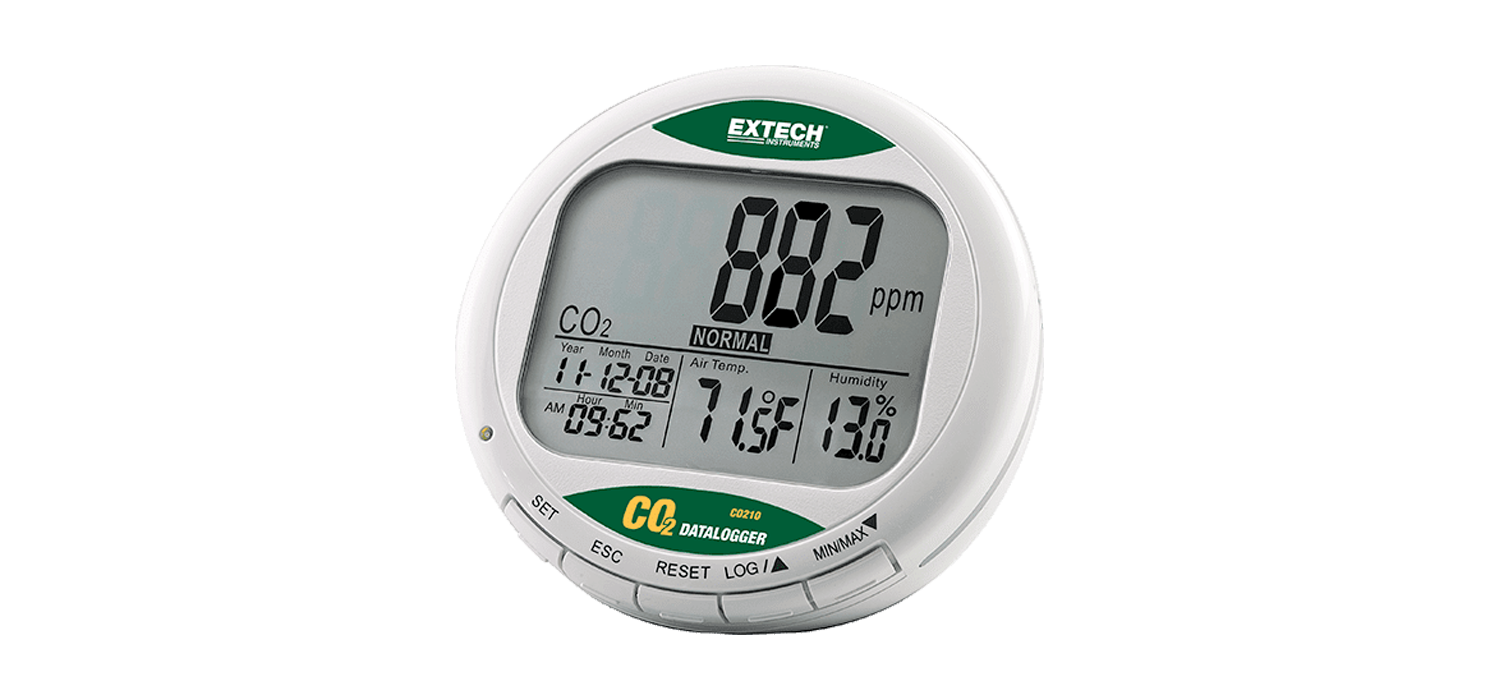
Congratulations on your purchase of the Model CO210 Carbon Dioxide Monitor and Datalogger.The CO210 measures, displays, and logs CO2 level, air temperature, relative humidity, date, and time. The included Windows-based software and USB cable allow you to set up the datalogger and transfer logged data to your PC. The CO210 is an ideal instrument for indoor air quality (IAQ) monitoring. The CO210 is shipped fully tested and calibrated and, with proper use, will provide years of reliable service.
Description
METER DESCRIPTION
- LCD Multifunction display
- Power LED indicator (blinks while datalogging)
- Control buttons
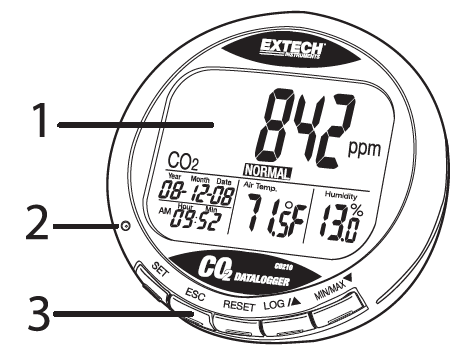
Power adaptor jack, USB port, and sensors on back of meter.
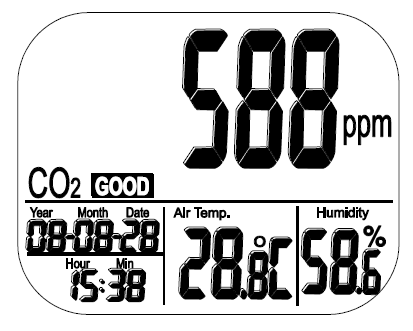
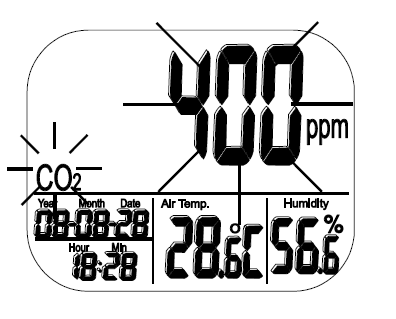
LCD DESCRIPTION
- CO2 concentration in ppm
- Date and Time
- Air Temperature
- % Relative Humidity
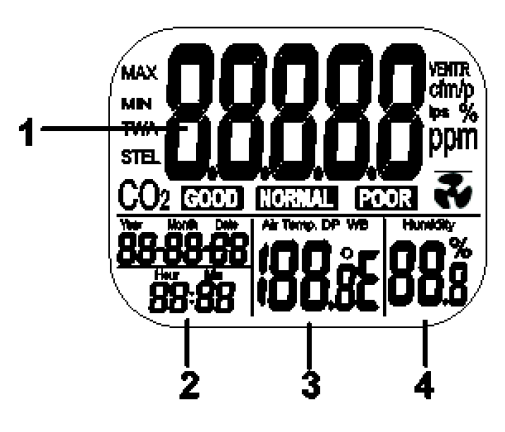
FUNCTION INDICATORS
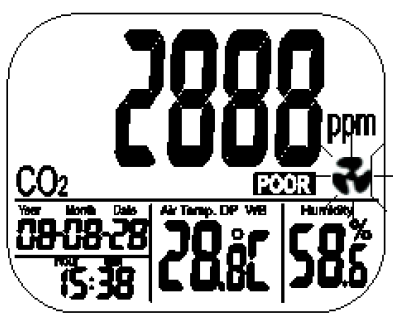
ppm: CO2 measurement unitsGOOD/NORMAL/POOR: CO2 air quality levelsAir Temp: Air TemperatureHumidity %: Relative Humidity°C or °F : Temperature unitsMIN/MAX: Minimum and Maximum readings![]() Fan icon flashes when the CO2 alarm triggers
Fan icon flashes when the CO2 alarm triggers
- SET: Long press to enter setup mode. Saves settings.
- ESC: Exits setup page/mode. Stops the datalogger. Aborts calibration.
- RESET: Long press to clear the MIN/MAX memories.
- LOG ▲: Start Datalogger. Select a mode or increase a value in the setup menu.
- MIN/MAX ▼: Access MIN/MAX function. Use as down-arrow in setup mode.Long press SET, ▼ and ▲ to enter the CO2 calibration.
Operation
Powering the CO210
Plug the supplied power adaptor (5V/0.5A) into the power jack on the back of the meter and to an AC power source, the meter will switch ON. The front panel LED power indicator will light, and the beeper will sound. If the power source voltage is incorrect, ‘bAt’ will display, and the LED indicator will flash. Do not use the CO210 with an incorrect power source.
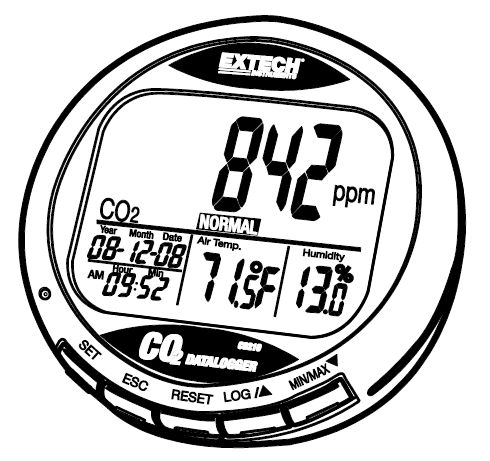
In normal operation the LCD will display CO2, temperature, humidity, date, and time. The air quality level is also displayed (GOOD, NORMAL, or POOR).
Measurements
The CO210 starts measuring as soon as it is powered and updates readings once per second. If the operating environment changes (from high to low temperature, for example), it will require 2 minutes for the CO2 sensor to respond and 10 minutes for the humidity sensor to respond. Do not hold the meter close to your mouth or any other source of CO2.
MIN/MAX Mode
In the normal mode, press the MIN/MAX button to see the minimum or the maximum CO2, Temperature, and Humidity values. Each press of the MIN/MAX button steps through the MIN, the MAX, and then the normal display mode. Long press the RESET button to clear the minimum and maximum values from memory.
Data Logging
The CO210 logs CO2, air temperature, and relative humidity readings (along with date and time). The memory capacity is 15999 points (5,333 CO2, temperature, and humidity records). The sample rate is adjustable (in the setup mode) from 1 second to 4 hours, 59 minutes, 59 seconds.
After setting the sampling rate, long press the LOG button to start logging. The green LED blinks while logging and the main display digits alternate between real time CO2 readings and the abbreviation ‘rEC’ (record). The lower displays show the real time temperature, humidity, date, and time.
To stop logging, long press the ESC button. The LED stops blinking, and the main display will alternate between real time CO2 readings and the word ‘End’. Long press the ESC button again to return to the normal operating mode. See the PC Datalogger Software section, next, for details on downloading logged readings to a PC.Note that the MIN/MAX memory is still operational during data logging and is cleared each time a logging session is started.
PC Datalogger Software
The supplied Windows-based PC software and USB cable allow you to set-up the datalogger, download logged data, and view the logged data graphically or in text format on a PC. The software and USB driver is also available from the Extech website.
Connect the CO210 to a PC using the supplied USB cable. The USB port is located on the back of the CO210. Install the software, open it, and refer to the program HELP utility for complete operational information. Contact Extech support if you have questions or problems.
Alarm Function
The CO210 features an audible (beeper) and visual (flashing fan icon) alarm that warn when the CO2 concentration exceeds the programmed threshold. There are two alarm thresholds, the ‘POOR’ air quality threshold (that triggers the alarm), and the ‘NORMAL’ air quality threshold (that cancels the alarm). See the Setup mode to set these threshold settings.
The audible alarm can be manually silenced by pressing any key, or it will automatically stop when the CO2 reading is no longer in the alarm region (the user can subsequently press and hold the RESET button to re-activate the alarm, if desired).
If the beeper is manually silenced, it will sound again when readings move out of, and then back into, the alarm region.
The fan icon continues to flash even when the beeper is manually silenced. It disappears only when readings are no longer in the alarm region.
Setup Mode
Long press the SET button to enter the setup mode.
P1.1: Threshold setting for the ‘GOOD’ air quality display icon
When entering the setup mode, P1.0 and ‘CO2’ are displayed. Press the SET button again to access P1.1 for setting the CO2 upper limit (threshold) for the ‘GOOD’ air quality display icon. The current set value will appear blinking on the display.
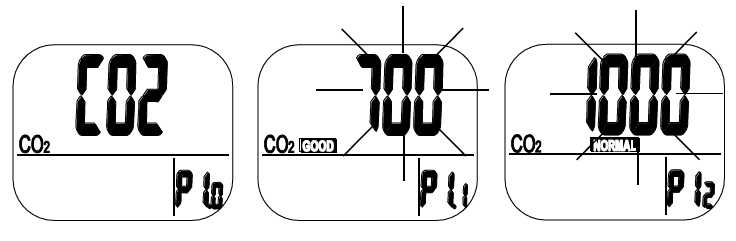
Press the ▲ or ▼ button to increase or decrease the value. Each press adjusts in 100 ppm increments. The range is 0 to 700 ppm (default is 700 ppm).
When the value has been set, press the SET button to confirm the ‘GOOD’ threshold and move to P1.2 for setting the ‘NORMAL’ display threshold. Press the ESC button to exit without saving.
P1.2: Threshold setting for the ‘NORMAL’ air quality icon and the CO2 Alarm
P1.2 is used for setting the CO2 high threshold for the ‘NORMAL’ air quality display icon. It is also the low threshold for the alarm beeper and the flashing fan alarm icon. The current set value will appear blinking on the display.
Press the ▲ or ▼ button to increase or decrease the value. Each press adjusts in 100 ppm increments. The range is 700 to 1000 ppm (default is 1000 ppm).When the value has been set, press the SET button to confirm the ‘NORMAL’ limit and move to P1.3 for setting the ‘POOR’ display threshold. Press the ESC button to exit without saving.
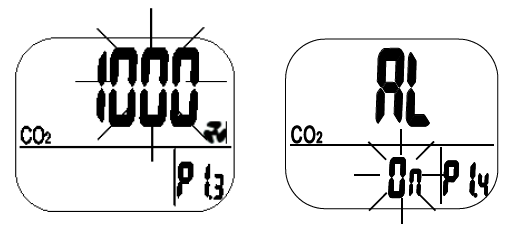
P1.3: Threshold setting for the ‘POOR’ air quality icon and CO2 Alarm
P1.3 is used for setting the high CO2 threshold for the ‘POOR’ air quality display icon, alarm beeper, and flashing fan icon. The current set value will appear blinking on the display.Press the ▲ or ▼ button to increase or decrease the threshold. Each press adjusts in 100 ppm increments. The range is 1000 to 5000 ppm (default is 1000 ppm).When the value has been set, press the SET button to confirm and move to P1.4. Press SET again to continue. Press ESC to exit without saving.
Caution: Set the alarm value within the specified range of the CO210 where accuracy is assured. Out of specification readings are for reference only.
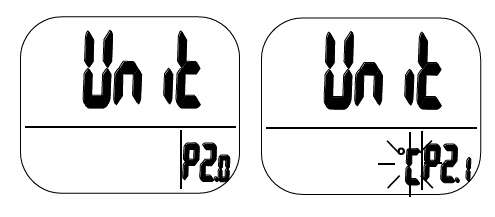
P2.0 Temperature Units
Press the ▲ button in P1.0 mode to access P2.0 for setting the temperature display units.Press the SET button to access the P2.1 setting mode. The °C or °F will blink (default is °C).Press the ▲ button to change the units. Press the SET button to confirm the setting or press the ESC button to exit without saving and return to P1.0.
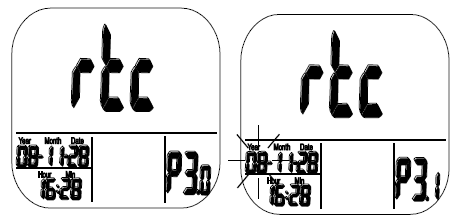
P3.0 Real-Time Calendar Clock
Press the ▲ button in P1.0 twice to access P3.0 for setting the real-time calendar clock. Press the SET button and the meter will access P3.1, showing the blinking YEAR on the lower left. To change the year, press the ▲ or ▼ button. Press the SET button to save the setting and move to P3.2 (or press the ESC button to return to P3.0 without saving).
Press the ▲ button from P3.1 to access P3.2. The current MONTH setting will blink. To change the month, press the ▲ or ▼ button. Press the SET button to save the setting and move to P3.3 (or press the ESC button to return to P3.0 without saving).
Press the ▲ button from P3.2 to access P3.3. The current DATE (day) setting will blink. To change the day, press the ▲ or ▼ button. Press the SET button to save the setting and move to P3.4 (or press the ESC button to return to P3.0 without saving).
Press the ▲ button from P3.3 to access P3.4. The current 12/24-hour clock setting will blink. To change it, press the ▲ or ▼ button. Press the SET button to save the setting and move to P3.5 (or press the ESC button to return to P3.0 without saving).
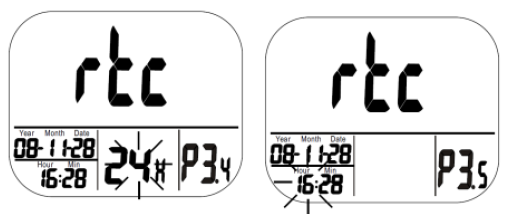
Repeat as above to finish setting P3.5 (HOURS) and P3.6 (MINUTES)
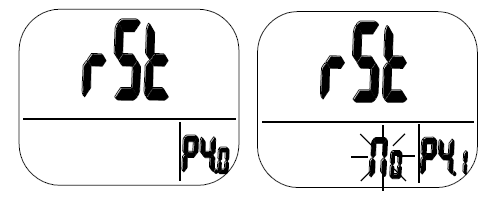
P4.0: Factory Default Reset
Press the ▲ button in P1.0 three times to access P4.0 where you can reset the meter to its default settings. Press SET and the meter will access P4.1 with a blinking “No”. Press the ▲ to switch the status to ‘Yes’ and then press either the SET button to confirm and continue or the ESC button to abort the process.
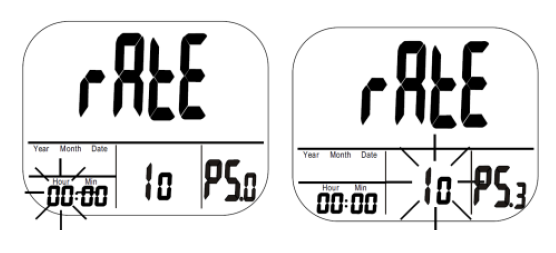
P5.0 Data Logger Sampling Rate
Press the ▲ button in P1.0 three times to access P5.0 to set the data logger sample rate. The available range is 1 second to 4 hours, 59 minutes, 59 seconds.
Press the SET button to access P5.1, the HOUR digits will blink. To change the hour, press the ▲ or ▼ button. Press the SET button to save the setting and then repeat this procedure for P5.2 MINUTES and P5.3 SECONDS (the SECONDS value is shown in the center display area). Press the ESC button return to P5.0 without saving the setting.
Calibration
The meter is calibrated to a 400ppm CO2 concentration at the factory. If the accuracy becomes a concern, or after one year of use, return the meter to Extech for calibration or continue below.
ABC (Automatic Baseline CO2 Calibration)
ABC (Automatic Baseline Calibration) establishes a baseline calibration to eliminate the zero drift of the infrared sensor. The ABC function is always “ON” when the meter is powered.
ABC is designed to calibrate the meter at the minimum CO2 reading detected over 7.5 days of continuous monitoring (power on). It assumes that the area being tested receives fresh air with a CO2 level of approximately 400ppm at some point during the monitoring period. Note that It is not suitable to use the CO210 in closed areas with consistently high CO2 levels 24 hours a day.
Manual CO2 Calibration
Manual calibration is suggested to be done outdoors on a clear day with good ventilation and fresh air where the CO2 level is approximately 400 ppm. Do not calibrate on a rainy day because high humidity will affect the CO2 level in air.
CAUTION: Do not calibrate the meter in an atmosphere of unknown CO2 concentration. Do not calibrate in places crowded with people, pets, plants, or where high CO2 concentrations may exist such as near ventilation ducts or fireplaces.
Place the meter in the calibration area and switch it on. Press and hold the SET, ▲, and ▼ buttons simultaneously for > 1 second to enter CO2 calibration mode. “400ppm” and “CO2” will blink while the calibration is in process.
The calibration will require approximately five (5) minutes. When the calibration is complete, the blinking stops and the meter returns to the normal operating mode. Press ESC to abort a calibration session (not recommended).
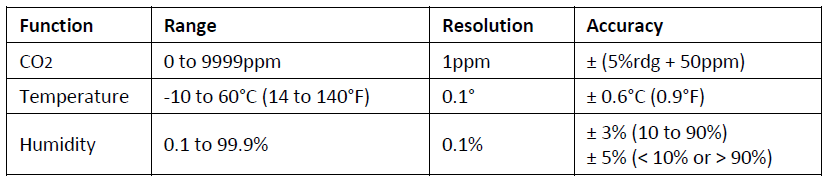
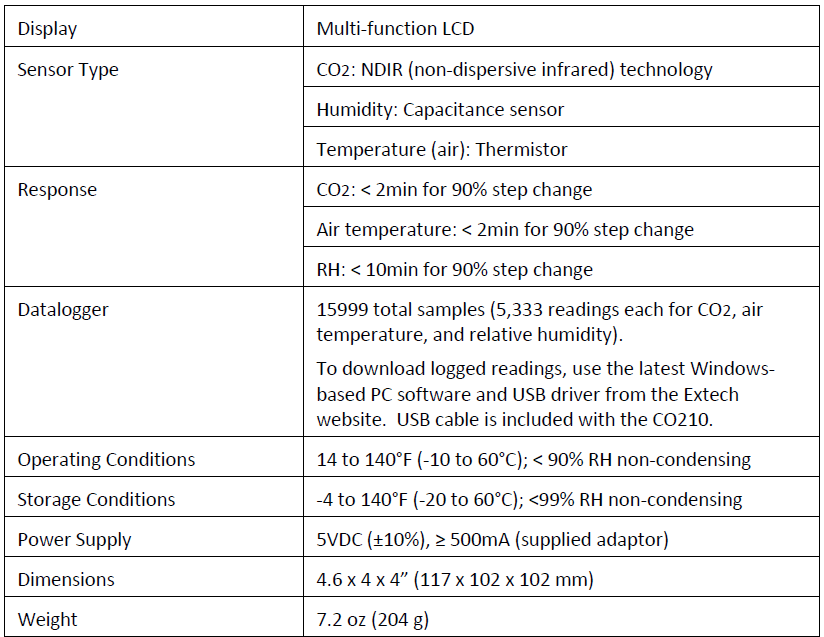
Specifications
Maintenance
Cleaning and storage
- The meter should be wiped with a damp cloth and mild detergent when necessary. Do not use solvents or abrasives.
- Store the meter in an area with moderate temperature and humidity.
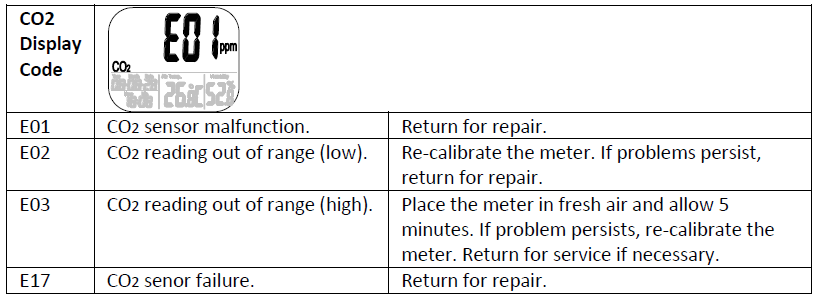
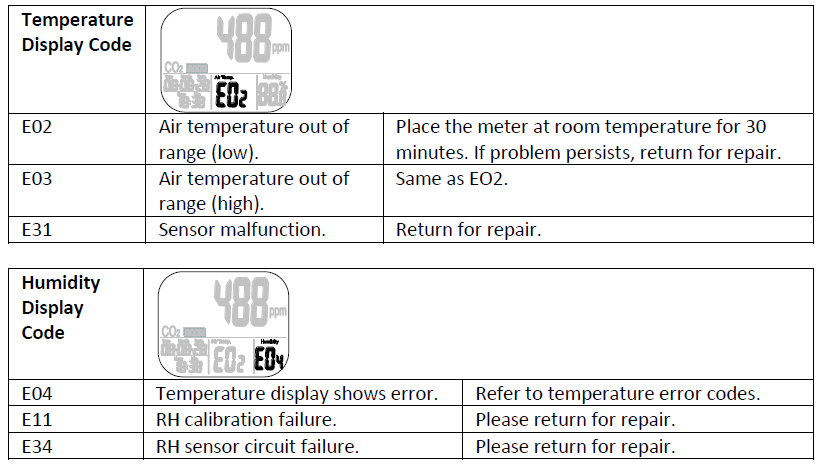
Troubleshooting

Error Display Codes
CO2 Level Guidelines
Important: The public information provided below is offered for reference only. FLIR Systems, Inc. is not liable for injury to persons or property through the use or misuse of this device. It is the responsibility of the user to ensure proper air quality in the residential or commercial spaces where this device is to be used.
Non-enforced reference levels:
- 250 – 350 ppm: Normal background outdoor levels.
- 350- 1,000 ppm: Typical level found in occupied spaces with good air exchange.
- 1,000 – 2,000 ppm: Level associated with complaints of drowsiness and poor air.
- 2,000 – 5,000 ppm: Level associated with headaches, sleepiness, and stagnant, stale, or stuffy air. Poor concentration, loss of attention, increased heart rate and slight nausea may also be present.
- >5,000 ppm: Exposure may lead to serious oxygen deprivation resulting in permanent brain damage, coma, and death.
Regulatory exposure limits:
- ASHRAE Standard 62-1989 (1000ppm): CO2 concentration in occupied building should not exceed 1000ppm.
- OSHA (5000ppm): Time weighted average over five 8-hour workdays should not exceed 5000ppm.
- Building bulletin 101 (Bb101) 1500ppm: UK standards for schools indicate that CO2, averaged over an entire day (i.e. 9am to 3:30 pm), should not exceed 1500ppm.
- Germany, Japan, Australia, UK (5000ppm): 8-hour weighted average occupational exposure limit is 5000ppm.
Two-year Warranty
FLIR Systems, Inc. warrants this Extech brand instrument to be free of defects in parts and workmanship for two years from date of shipment (a six-month limited warranty applies to sensors and cables). To view the full warranty text please visit: http://www.extech.com/support/warranties
Calibration and Repair Services
FLIR Systems, Inc. offers calibration and repair services for the Extech brand products we sell. We offer NIST traceable calibration for most of our products. Contact us for information on calibration and repair availability, refer to the contact information below. Annual calibrations should be performed to verify meter performance and accuracy. Product specifications are subject to change without notice. Please visit our website for the most up-to-date product information: www.extech.com
Contact Customer Support
Customer Support Telephone List: https://support.flir.com/contactCalibration, Repair, and Returns: Technical Support: https://support.flir.com
Copyright © 2021 FLIR Systems, Inc.All rights reserved including the right of reproduction in whole or in part in any formwww.extech.com
References
[xyz-ips snippet=”download-snippet”]