
Extech® Compact Borescope User Manual
MODEL BR90

INTRODUCTION
Thank you for selecting the Extech BR90 Compact Borescope. This device provides real-time video monitoring and is ideal for inspecting the interior of pipelines, conduits, and other narrow spaces. The BR90 is useful in the installation of appliances, electronic equipment, fixtures, and is handy for vehicle troubleshooting and maintenance.
We ship this device fully tested and calibrated and, with proper use, it will provide years of reliable service. Please visit our website (https://www.extech.com) for additional information including the latest version of this User Manual and Customer Support.
Features
- Waterproof (IP67) 0.3 in. (8 mm) diameter camera with 2.5 ft. (77 cm) flexible goose–neck cable
- 640 x 480 pixel resolution camera with four bright LED lamps and dimmer function
- Glare-free close-up field of view
- Large 4.3 in. (109 mm) color TFT monitor
- 180° image rotation and mirror (flip) features
- Adjustable display brightness and 2x digital Zoom
- Video output port for viewing images on an external monitor
- Low battery status indicator
PRODUCT DESCRIPTION
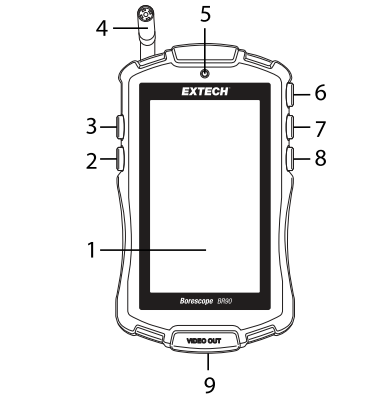
Figure 1 Product Description
- Video monitor
- 180° rotation and image mirror (flip) button
- Monitor brightness adjust button
- Camera
- Power ON/OFF indicator
- Power ON/OFF button
- Camera LED brightness adjust button
- Zoom button
- Video output port
Note: Accessories, battery compartment, and camera cable storage are not pictured in Figure 1. These items are pictured in later sections.
PACKING LIST
The BR90 package contains the following equipment:
- BR90 Borescope
- User Manual
- 4 x AA batteries
- Soft carry-case
- Magnet accessory

- Single hook accessory
- Mirror accessory
- Attachment fixture

OPERATION
Battery Installation
The BR90 is powered by four 1.5V AA batteries. To install the batteries, open the rear battery compartment using the latches as shown Figure 2 (item 1). Observe correct polarity when installing batteries. Ensure that the battery compartment is completely closed before use. The battery status indicator appears on the upper left corner of the video monitor for convenience.
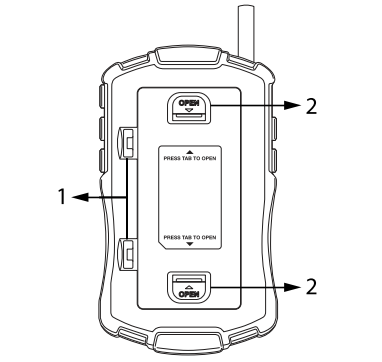
Figure 2 Opening tabs for battery compartment (1) and cable storage (2).
![]() Never dispose of used batteries or rechargeable batteries in household waste. As consumers, users are legally required to take used batteries to appropriate collection sites, the retail store where the batteries were purchased, or wherever batteries are sold.
Never dispose of used batteries or rechargeable batteries in household waste. As consumers, users are legally required to take used batteries to appropriate collection sites, the retail store where the batteries were purchased, or wherever batteries are sold.
Powering the BR90
To switch the BR90 ON, long press the Power ON/OFF button (top, right) until the power indicator lamp lights. Long press again to switch OFF.
Accessing the Camera Cable
The camera cable is stored in the BR90 housing. To access the cable, press the two compartment tabs, as shown in Figure 2 (item 2). Release a length of cable as required and snap the housing shut. To store the cable after use: open the housing, coil the cable inside the housing, and snap the housing closed.
Accessory Installation
Place the single hook (B) or mirror (A) into the hole on the camera lens as indicated by the arrow in the diagram below, and then push the attachment fixture (C), as shown below, to secure it.
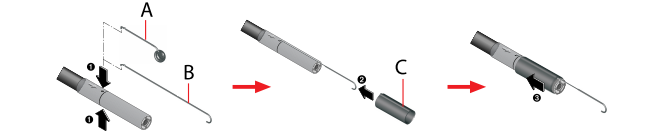 Figure 3 Accessory Installation
Insert the magnet (E) into the attachment fixture (D), with the pointed end placed in the hole on the lens as indicated by the arrow in the diagram below, and then tighten the attachment fixture, as shown, to secure it.

Figure 4 Accessory Installation continued
Camera LED Brightness Adjust
When lighting in the area under inspection is inadequate, use the LED Brightness Adjust button (middle, right) to adjust the level. Short presses will step through the available brightness levels.
Monitor Brightness Adjust
Use the LED Brightness Adjust button (top, left) to adjust the level. Short presses will step through the available brightness levels.
Zoom Function
To zoom the camera image, use the Zoom button (bottom, right). Press once to zoom 1.5x, press again to zoom 2x, and press again to return to normal view.
180° Image Rotation and Mirror Image Adjust
Press the Image Rotation/Mirror button (bottom, left) to rotate the image 180°. Press again to flip the image (mirror mode). Press again to return to normal view mode.
Video Output
You can view video on an external monitor using the video output port (NTSC). An `RCA’ male to 3.5 mm mono male cable (not supplied) is required.
SAFETY CONSIDERATIONS
- Do not forcibly bend the camera cable, the minimum bend radius is 1 in. (25 mm); damage to the instrument can result.
- The camera cable is waterproof (IP67) but the main instrument is not. Please protect the main instrument from liquid and moisture.
- Remove the batteries when the BR90 is to be stored for extended periods.
- Disposal: Do not dispose of this instrument in household waste. The user is obligated to take end-of-life devices to a designated collection point for the disposal of electrical and electronic equipment.
FCC COMPLIANCE
This equipment has been tested and found to comply with the limits for a Class B digital device, pursuant to part 15 of the FCC Rules. These limits are designed to provide reasonable protection against harmful interference in a residential installation. This equipment generates, uses, and can radiate radio frequency energy and, if not installed and used in accordance with the instructions, may cause harmful interference to radio communications. However, there is no guarantee that interference will not occur in a particular installation. If this equipment does cause harmful interference to radio or television reception, which can be determined by turning the equipment off and on, the user is encouraged to try to correct the interference by one or more of the following measures:
- Reorient or relocate the receiving antenna.
- Increase the separation between the equipment and receiver.
- Connect the equipment into an outlet on a circuit different from that to which the receiver is connected.
- Consult the dealer or an experienced radio/TV technician for help.
This device complies with part 15 of the FCC Rules. Operation is subject to the following two conditions:
- This device may not cause harmful interference.
- This device must accept any interference received, including interference that may cause undesired operation.
![]() WARNING
WARNING
Changes or modifications not expressly approved by the party responsible for compliance could void the user’s authority to operate the equipment.
SPECIFICATIONS
| Camera diameter | 0.3 in. (8 mm) |
| Image sensor | 1/9”, CMOS |
| Effective pixels | 640 x 480 resolution |
| Focus distance | 1.2 ~ 3.1 in. (3 ~ 8 cm) approximately |
| Horizontal viewing angle | 50° |
| Cable length | 2.5 ft. (77 cm) |
| Cable dimensions | 0.2 in. (4.4 mm) diameter; 2.5 ft. (77 cm) length |
| Cable bend radius | 1 in. (25 mm) minimum |
| IP rating | IP67 waterproof (cable only and excluding the cable connection to the main instrument) |
| Power supply | 4 x 1.5V AA batteries |
| Display type and dimensions | 4.3 in. (109 mm) Color TFT display |
| Image Zoom rati | 1.5x and 2x |
| Video format | NTSC |
| LED brightness | 200 lux (3.1 in. [8 cm] from camera head to object) and 1300 lux (2.1 in. [3 cm] from camera head to object) |
| Power consumption | 1.5 Watts, max. |
| Monitor dimensions | 7.1 x 3.5 x 1.4 in. (180 x 36 x 89 mm) |
| Operating temperature | 14 ~ 122℉ (-10 ~ 50℃) |
| Storage temperature | –4 ~ 140℉ (-20 ~ 60℃) |
| Operating humidity | 15% ~ 85% RH |
| Product weight | 11.5 oz. (325 g) |
TWO-YEAR WARRANTY
FLIR Systems, Inc. warrants this Extech brand instrument to be free of defects in parts and workmanship for two years from date of shipment (a six-month limited warranty applies to sensors and cables). To view the full warranty text please visit: https://www.extech.com/warranty.
CUSTOMER SUPPORT
Customer Support Telephone List:https://support.flir.com/contact
Calibration, Repair, Returns, and Technical Support:https://support.flir.com
Extech Website: https://www.extech.com
References
support.flir.com
High-performance drones for military, public safety and industrial operators | Teledyne FLIR Icon-ContactSales Shape Grid View Exported from Streamline App (https://app.streamlineicons.com) Model Selector Model Selector Logo Cart Search Cart Logo Search Se
High-performance drones for military, public safety and industrial operators | Teledyne FLIR Icon-ContactSales Shape Grid View Exported from Streamline App (https://app.streamlineicons.com) Model Selector Model Selector Logo Cart Search Cart Logo Search Se
support.flir.com
Thermal Imaging, Night Vision and Infrared Camera Systems | Teledyne FLIR
support.flir.com/contact
[xyz-ips snippet=”download-snippet”]