EXTECH Video Borescope Wireless Inspection Camera User Manual
Introduction
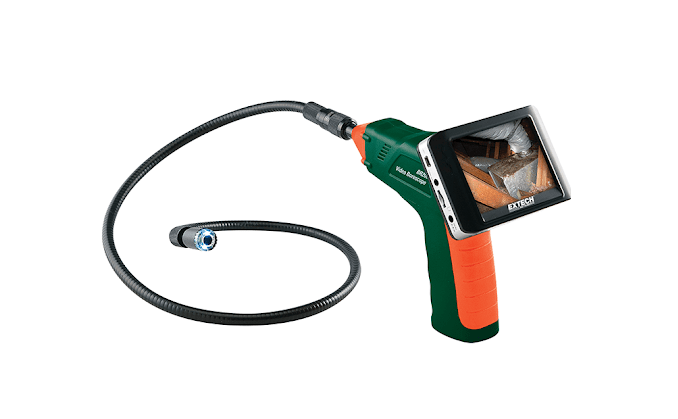
Thank you for selecting the Extech Video Borescope Model BR200 (17mm camera), BR250 (9mm camera), BR250-4 (4.5mm camera), or BR250-5 (5.2mm). Extech’s Video Borescope Inspection Cameras provide a glare-free close-up field of view. They include a 3.5″ color TFT LCD wireless monitor that can be detached from the base and viewed from a remote location up to 10m (33 ft.) from the measurement point. Capture images and videos (with date/time stamp) on the SD card and view them on the supplied Monitor, an alternate monitor (video out jack), or a PC (USB connection). This device is ideal for home inspections (mold, insect infestation,electrical wire or water pipe location), HVAC (inspect ducts, behind motors and compressors), and automotive applications (view inside and around engines and transmissions). We ship these devices fully tested and, with proper use, will provide years of reliable service.
Features
- 17mm (BR200), 9mm (BR250), 4.5mm (BR250-4), or 5.2mm (BR250-5) diameter water-proof (IP67) camera head with 1m (39″) flexible cable
- Bright LED lamps on camera head with dimmer to illuminate viewed object
- Glare-free close-up field of view
- Detachable color TFT monitor wirelessly displays video remotely from the camera, to a distance of 10m (33 ft.) maximum
- Micro SD memory card (included) stores images and video
- Captured video and still images with date/time stamp can be viewed on the supplied wireless monitor, an additional monitor (via video out jack), or a PC (USB connection)
- Video and images can also be transferred to your PC via the micro SD card (included SD adaptor)
- Menus in 10 languages: English, Chinese, German, French, Spanish, Portuguese, Italian, Japanese, Dutch, and Russian
- Includes four (4) AA batteries for camera controller, rechargeable battery for monitor, micro SD memory card with SD adaptor, USB cable, video connect cable, AC adaptor (100-240Vac, 50/60Hz, adapters for US, UK, EU, AUS), magnetic mount for monitor, and hard case. BR200 and BR250 also include hook, mirror, and magnet attachment accessories
Safety
- Do not expose instruments to moisture
- Turn power OFF when instruments are not in use
- Remove the batteries from the Camera controller when cleaning
- Replace all batteries at the same time
Supplied Equipment
- Camera controller

- Color TFT monitor
- AC adaptor for monitor’s rechargeable battery
- Video cable for connecting additional monitor
- Accessories (magnet, hook, mirror) BR200/BR250 only
- Magnetic mount for monitor
- Flexible cable and camera head
- Four (4) ‘AA’ batteries for Camera ControllerNote: Micro SD card and adaptor (not shown)


 Note: Micro SD card and adaptor (not shown)
Description
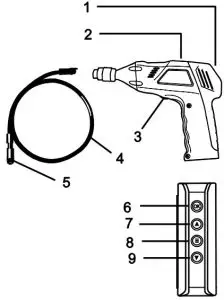
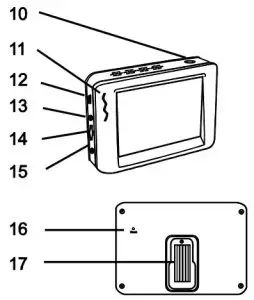
- Monitor mount (signal output)
- Camera controller power indicator
- Camera controller power ON/OFF switch and LED dimmer
- Flexible cable
- Camera head and LEDs
- OK button
- Up arrow and video/image button
- Menu button
- Down arrow button
- Monitor power ON/OFF button
- Monitor power indicator
- USB jack for PC connection
- Video output jack for alternate monitor
- SD card slot
- AC power adaptor jack
- Reset button
- Monitor mount (input signal)
Preparation for use
Camera controller power
Insert the four (4) ‘AA’ batteries (supplied) into the battery carrier located in the camera controller’s handle as illustrated in accompanying diagrams. Observe correct polarity when installing batteries

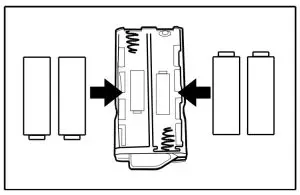
Never dispose of used batteries or rechargeable batteries in household waste. As consumers, users are legally required to take used batteries to appropriate collection sites, the retail store where the batteries were purchased, or wherever batteries are sold.
![]() Disposal: Do not dispose of this instrument in household waste. The user is obligated to take end-of-life devices to a designated collection point for the disposal of electrical and electronic equipment.
Disposal: Do not dispose of this instrument in household waste. The user is obligated to take end-of-life devices to a designated collection point for the disposal of electrical and electronic equipment.
Monitor power
The monitor uses a rechargeable battery. To charge the battery, plug the supplied AC adaptor into an AC power source and then connect the other end of the adaptor cable to the power jack on the monitor. The battery capacity icon on the monitor screen and the red LED power indicator on the side of the monitor will blink while the battery is charging.
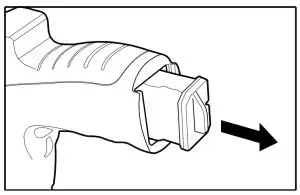
Connect the flexible cable to the camera controller
Align the flexible cable with the camera controller, noting the keyed pairing; and then tighten the knurled collar to hold the connection firmly in place.
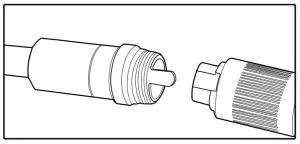
Warning: Damage to the flexible cable can occur if it is forcibly bent into too narrow a radius.
Inserting the micro SD card
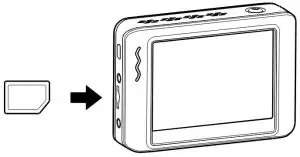
Insert card with arrow pointing toward slot. Gently apply pressure until the card locks into the spring loaded slot. To remove, gently push the card inward and then release to eject it from the card slot. Please use a Class 6 or better TF Flash memory card.
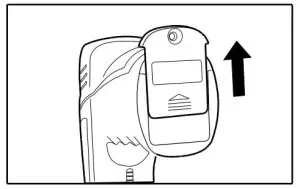
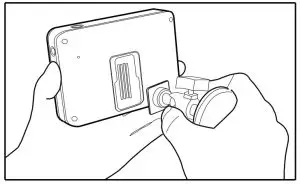
Attaching the monitor to the camera controller

Insert the monitor’s plug into the jack at the back of the camera controller and slide the monitor downward to lock it into position. See accompanying diagram.
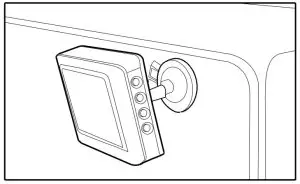
Remotely mounting the monitor
The supplied magnetic bracket slides onto the rear of the monitor. Mount the monitor on a magnetic surface for convenient remote viewing. See diagrams below. The wireless feature of this system allows you to place the monitor up to 10m (33 ft.) from the measurement location.
Operation
- Turn the ON/OFF dial switch on the cameral controller to power the camera. The power indicator on the controller will switch on. The ON/OFF switch then acts as a dimmer for the LEDs on the camera head.
- Press and hold the monitor power button for at least 2 seconds to power the monitor; the power indicator will illuminate and a Welcome screen will appear on the monitor.
- Remove the protective cap from the camera lens and store it safely in the carry case.
- The real-time image will then appear on the display LCD monitor.Note: If the picture does not properly synchronize or has poor color, check that the NTSC/PAL setting is correct. See the Settings Menu section.
- Use the up arrow button on the monitor to select video or still image mode.
- Turn the dimmer dial on the camera controller to adjust the LED light intensity.
- Bend the flexible cable into the desired position. The cable can be bent into the shape of most examination areas, but please do not bend the cable excessively as this can cause damage to the system.
- Use the supplied accessories to help locate and retrieve small items (BR200 and BR250 only). Refer to the separate section in this manual for connecting the attachment accessories.
Capturing still images
Use the up arrow button on the Monitor to select the Image ![]() mode, and then press OK to capture a still image. The image will automatically save to the SD card.
mode, and then press OK to capture a still image. The image will automatically save to the SD card.
Recording video
Use the up arrow button on the Monitor to select Video ![]() mode, and then press OK to begin recording; refer to the following diagram for display icon descriptions:
mode, and then press OK to begin recording; refer to the following diagram for display icon descriptions:

- Battery capacity
- Function icon (video/image)
- Recording in progress
- ZOOM level
- Date and Time
- Recording time remaining
- SD card status
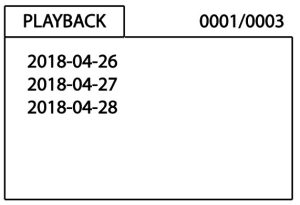
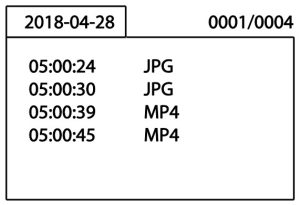
Playback: Viewing images and video on the monitor
- Press to display a list of playback folders sorted by date
- Use the buttons to select a folder
- Press OK to open the selected folder and view the list of images and/or video files contained in the folder
- Files are sorted by time of day; image files are in JPG format and video files are in MP4 format
- Use the buttons to select a file
- Press OK to display the selected image or video. For video files: Press OK to pause and resume Fast Forwards the video; Rewinds the video Press to stop video
- Press to return to menu
- Press again to exit
Note: Video automatically saves to a file on the SD card every 30 minutes. When the SD card is filled to capacity, the SD card icon changes to ‘F’. No images or video can be recorded if the SD card is not inserted in the slot or if the SD card has reached maximum capacity.
Delete a single video or image
- Press to display the list of available file folders
- Use the buttons to select a folder
- Press OK to open the selected folder to see the list of image and/or video files
- Use the buttons to select a file
- Long press the button and the display will show ‘DELETE CURRENT FILE?’
- Use the arrow buttons to select YES or NO
- Press OK to confirm
- Press twice to exit the Delete screen
Delete an empty file folder
To delete an empty folder, use the same instructions for deleting a single video or image. Folders that are not emptied cannot be deleted. Delete the contents of a folder before attempting to delete a folder. If you attempt to delete a folder that is not empty, the following message will appear: FOLDER NOT EMPTY.
Using SD card to view and transfer images and video
There are two ways to use the SD card:
- SD card adaptor: Insert the SD card into the SD adaptor and then insert the adaptor into the PC SD card slot (if available)
- USB adaptor: Insert the SD card into a USB adaptor and plug the adaptor into a USB port on the PC.
Once the PC recognizes the SD card, you can view the images and video that are stored on the card using a PC multimedia player. In addition, you can transfer image and video files from the SD card to the PC as you would with any external storage medium (memory stick, hard drive, etc.).
Using a PC (USB connection) to transfer video and images
Connect the monitor to a PC using the supplied USB cable. When the PC recognizes the connection, you can use the monitor as you would any external storage drive (moving images and videos to and from the drive). If the PC does not recognize the monitor, please contact our technical support staff.
Using an additional video monitor
If you wish to use an additional video monitor, connect the supplied video cable to the VIDEO OUT jack on the Extech monitor and then connect the other end of the cable to the VIDEO IN jack of the additional monitor. The Extech monitor will output a high quality video image to the additional monitor.
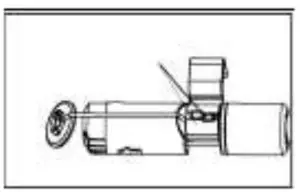
Hook, mirror, and magnet accessories for the BR200
The supplied BR200 accessories (mirror, hook and magnet) all attach to the camera in the same manner. Refer to the diagrams below. Note that these accessories are not compatible with the BR250-4.

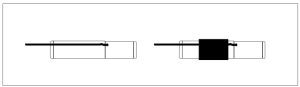
Hook, mirror, and magnet accessories for the BR250
The supplied BR250 accessories (mirror, hook and magnet) all attach to the camera in the same manner. Position an attachment into the hole in the camera head area and then slide the rubber sleeve over the attachment shaft as shown in diagram below.Note that these accessories are not compatible with the BR250-4.
RESET button on monitor
If the Monitor does not power ON, or if it powers OFF during use, observe the steps below:
- If connected, undock the monitor from the camera controller.
- Connect the AC adapter to the monitor and to an appropriate AC power source.
- Locate the Reset port on the rear of the monitor (labeled Reset).
- Using a non-metallic tool, press and hold the Reset button for 5 seconds and then release.
- Leaving the AC adapter connected to the monitor, power the monitor ON.
If the monitor powers ON, allow it to fully charge (up to 2 hours) before removing the AC adapter. If the monitor does not power ON, repeat the above steps. If, after two attempts to reset the monitor, the monitor still does not power ON, please contact Technical Support.
Long press this ![]() button to enter the Settings Menu. Four icons will appear. The System settings icon (green) is on the upper left, the Date/Time settings icon (yellow) is on the upper right, the Recorder settings icon (red) is on the lower left, and the Playback* icon (blue) is on the lower right. Use the arrow button
button to enter the Settings Menu. Four icons will appear. The System settings icon (green) is on the upper left, the Date/Time settings icon (yellow) is on the upper right, the Recorder settings icon (red) is on the lower left, and the Playback* icon (blue) is on the lower right. Use the arrow button ![]() to step through the icons and use the OK button to open one of the setting modes. Short press
to step through the icons and use the OK button to open one of the setting modes. Short press ![]() to back out of menus as needed. Refer to the instructions below for modifying the settings.
to back out of menus as needed. Refer to the instructions below for modifying the settings.
Language Settings
- In the Settings Menu, use buttons to select the System setting (green icon)
- Press OK to call up the System icon list
- Use the arrows to highlight the Language icon (globe)
- Press OK and the Language icon list will appear (flags)
- Use the arrows to highlight the desired language
- Press OK to select the highlighted language and exit
- Press the button to return to the main Settings Menu or use the arrows to move to another icon in the System settings menu.
Video System Settings
- In the Settings Menu, use buttons to select the System setting (green icon)
- Press OK to call up the System icon list
- Use the arrows to highlight the Video System icon (yellow)
- Press OK and the Video format selections will appear (NTSC, PAL)
- Use the arrows to highlight NTSC
- Press OK to select the highlighted format and exit
- Press the button to return to the main Settings Menu or use the arrows to move to another icon in the System settings menu
Format/Erase SD Card Media
- In the Settings Menu, use buttons to select the System setting (green icon)
- Press OK to call up the System icon list
- Use the arrows to highlight the FORMAT icon (blue)
- Press OK and the FORMAT selection screen will appear (YES, NO)
- Use the arrows to highlight YES (format/erase) or NO (leave unchanged)
- Press OK to accept the selection and exit
- Press the button to return to the main Settings Menu or use the arrows to move to another icon in the System settings menu
Restoring Factory Default Settings
- In the Settings Menu, use buttons to select the System setting (green icon)
- Press OK to call up the System icon list
- Use the arrows to highlight the DEFAULT icon (red)
- Press OK and the DEFAULT selection screen will appear (YES, NO)
- Use the arrows to highlight YES (factory default) or NO (leave unchanged)
- Press OK to accept the selection
- Press the button to return to the main Settings Menu or use the arrows to move to another icon in the System settings menu.
View Version
- In the Settings Menu, use buttons to select the System setting (green icon)
- Press OK to call up the System icon list
- Use the arrows to highlight the VERSION icon (green)
- Press OK to view the version
- Press OK again to exit
- Press the button to return to the main Settings Menu or use the arrows to move to another icon in the System settings menu.
Time Stamp ON/OFF Setting
- In the Settings Menu, use the buttons to select Recorder settings (red icon)
- Press OK to call up the Recorder options
- Use the arrows to highlight the Time Stamp icon (purple)
- Press OK to open the parameter
- Use the arrows to select ON or OFF
- Press OK to confirm
- Press the button to return to the main Settings Menu or use the arrows to move to another icon in the Recorder settings menu
Setting Still Image or Video as default Record mode
- In the Settings Menu, use the buttons to select Recorder settings (red icon)
- Press OK to call up the Recorder Mode options
- Use the arrows to select the Recording mode icon (blue)
- Press OK to open the parameter
- Use the arrows to highlight the Still image or Video icon
- Press OK to confirm
- Press the button to return to the main Settings Menu or use the arrows to move to another icon in the Recorder settings menu
Date/Time Setting
- In the Settings Menu, use the buttons to select Date/Time settings (yellow icon)
- Press OK to call up Date and Time settings window
- Use OK to step through the fields
- Use the arrows to change a setting
- Press the button to return to the main Settings Menu
Playback Icon
Please refer to the earlier section “Playback: Viewing Images and Video on the Monitor” for complete details. You can access the Playback mode from this Settings Menu; however, we have provided complete instructions for viewing and deleting images and video in earlier sections of this manual. Familiarize yourself with the process of viewing/deleting images and video and then you can conveniently access the playback functions using one of two options.
Specifications
| CAMERA and CAMERA CONTROLLER | |
| Imaging sensor | CMOS |
| Total pixels (NTSC) | BR200: 712 x 486; BR250, BR250-4, BR250-5: 640 x 480 |
| Horizontal view angle | BR200: 50 degrees; BR250: 45 degrees; BR250-4: 63 degrees; BR250-5: 48 degrees |
| Focal distance | BR200: 20cm (8”); BR250: 10cm (4”); BR250-4: 6cm (2.4”); BR250-5: 5cm (2” |
| Minimum illumination | 0 Lux |
| Wireless transmission frequency | 2.4 GHz |
| Wireless modulation type | Frequency Modulation (FM |
| Wireless bandwidth | 18MHz |
| Wireless range | 10m (33 ft.) maximum (unobstructed) |
| Waterproof capacity | P67 (imager head only) |
| Operating temperature | -10°C~+50°C (+14°F~+122°F) |
| Power supply | 4 x ‘AA’ batteries |
| Dimensions (controller) | 186 x 145 x 41mm (7.3 x 5.7 x 1.6”) excluding flex cable |
| Weight (controller) | BR200: 530g (1.2 lbs.); BR250: 450g (1.0 lbs.); BR250-4: 450g (1.0 lbs.); BR250-5 381g (13.4oz) |
| Camera-head diameter | BR200: 17mm (0.67”); BR250: 9mm (0.36”); BR250-4: 4.5mm (0.17”): BR250-5 5.2mm (0.20”) |
| MONITOR | |
| Screen type | 3.5” Color TFT |
| Effective pixels | 320 (R.G.B.) x 240 |
| Video system | PAL/NTSC |
| Transmission frequency | 2.4 GHz (Channel 4) |
| AC adapter | 5VDC, (100-240Vac), adapters for US, UK, EU, AUS |
| Consumption current (Max.) | 500mA |
| Charge time | 3 hours |
| Operation time | 2 hours |
| Video output level | Ώ |
| Receiving sensitivity | ≤-85dBm |
| Operating temperature | -10°C~+50°C (+14°F~+122°F) |
| Operating humidity (Max.) | 15~85%RH |
| Dimensions (W x D x H) | 100 x 70 x 25mm (4.0 x 2.7 x 1.0”) |
| Weight | 140g (5.0 oz.) |
FCC Information
FCC InformationThis device complies with part 15 of the FCC rules.BR200/BR250/BR250-4/BR250-5: FCC-ID TW5GB8802-GB8803Operation is subject to the following two conditions:
- This device may not cause harmful interference
- This device must accept any interference received, including interference that may cause undesired operation.
Copyright © 2014-2020 FLIR Systems, Inc.All rights reserved including the right of reproduction in whole or in part in any formwww.extech.com
References
[xyz-ips snippet=”download-snippet”]