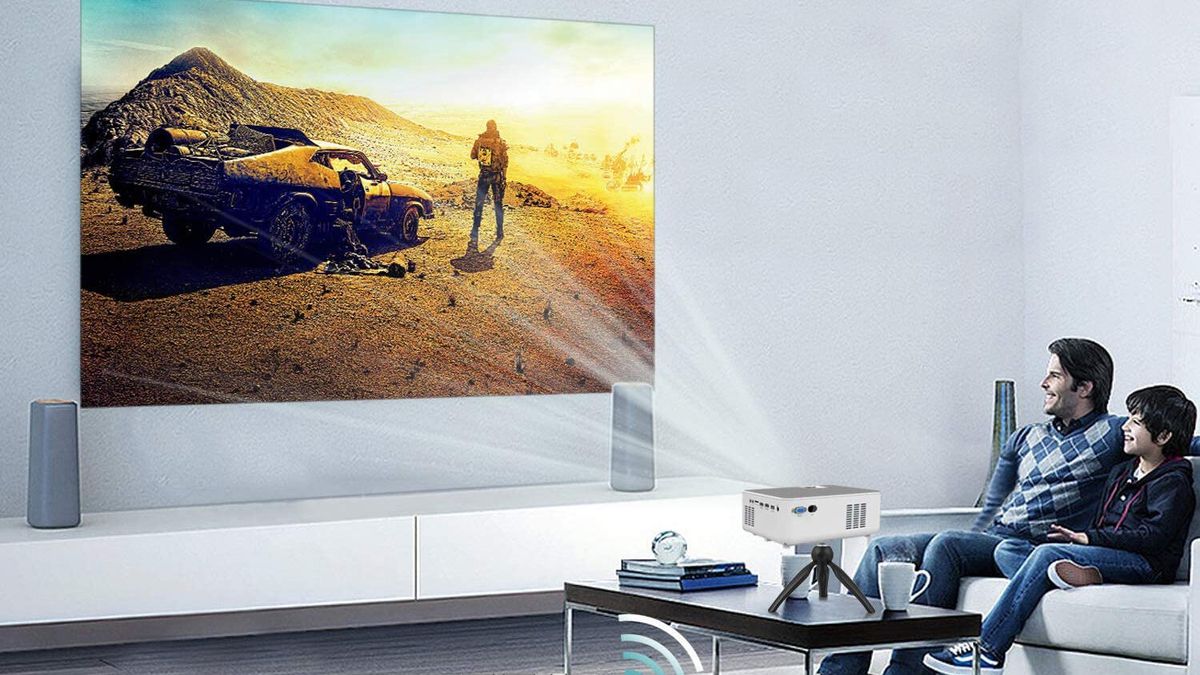
FANGOR Full HD Projector F-701
Package Listing

- Projector
- Carry Bag
- Lens Cover
- 3-in-1 AV Cable
- Disposable Lens Cleaning Cloth
- AC Adapter
- Remote Control
- HDMI Cable
- User Manual
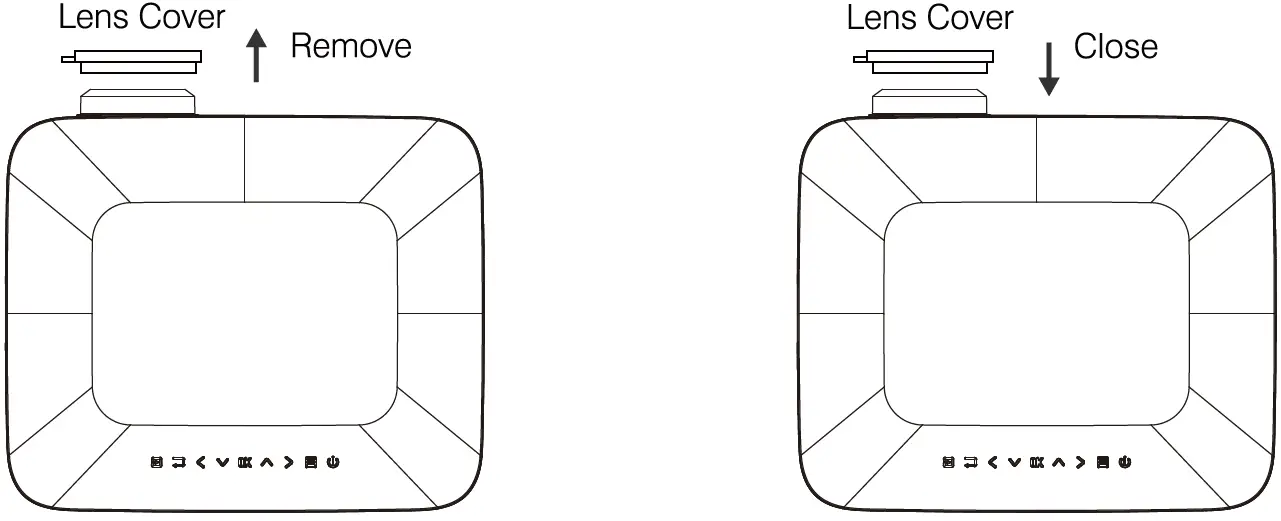
Remove & Close The Lens Cover
Remove the lens cover before using and Close the lens cover when unit not using
Boot Operation Guide
TURN ON
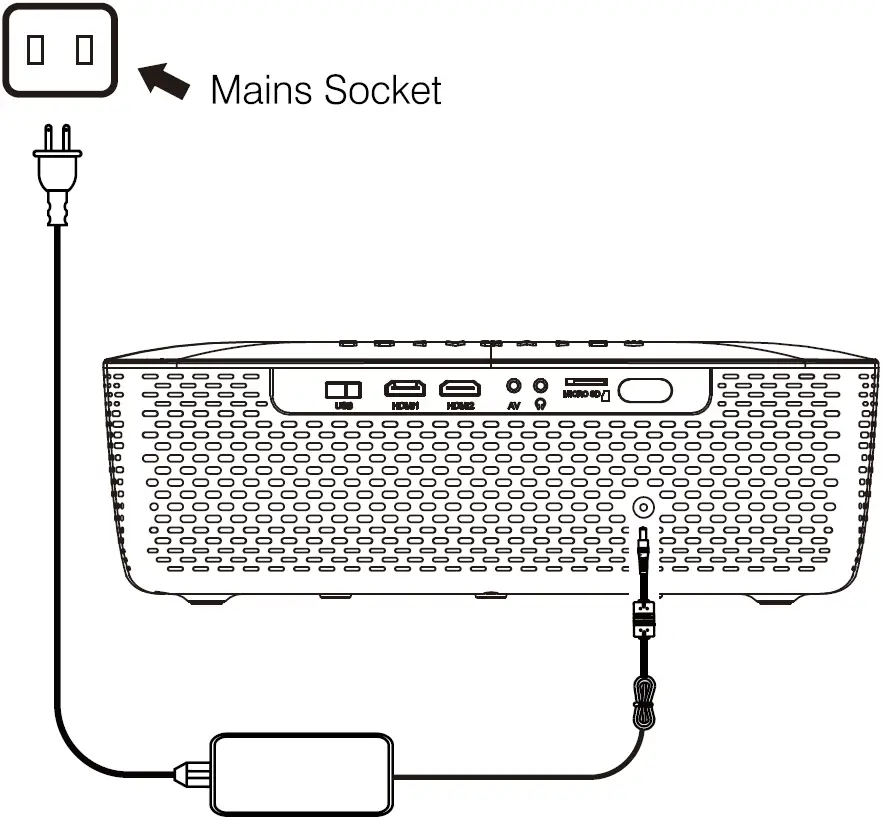
- Plug the projector F-701 into a power source. Indicator light: Red.
- Press the power button. Indicator light: Green
- The projector turned on after 5 seconds.
TURN OFF
- Turn off the power button
- Unplug the power adapter.
NotePlease turn off the projector before unplugging the power source, so as not to affect the life and operation of the projector.
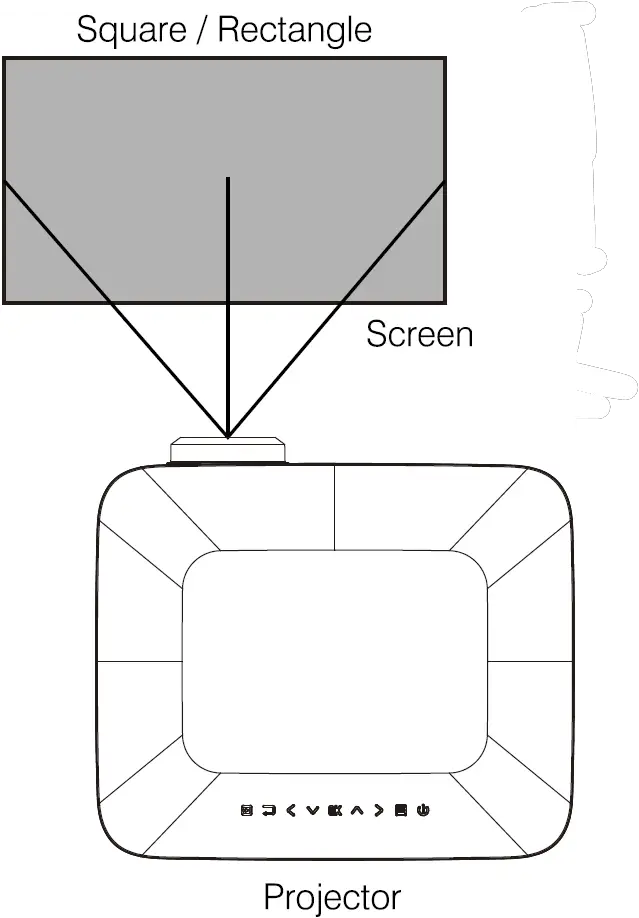
Distance Between The Projector And Screen
| Projection Distance |
1m |
2m | 3m | 4m |
7m |
| Projection Size |
35 inch |
65 inch | 100 inch | 150 inch |
300inch |
| Light, brightness, etc. will affect the projection distance, this data is for reference only. | |||||
| Projection Position | |||||
| It is recommended to place the projector in front of the center of the screen. |
Viewing Options
The projector can be used to project onto a wall or screen, mounted from the ceiling or on a table, When projecting from the rear position, a special screen will be needed (not included) to display the image. Be sure to aim the remote at the sensor on the front or rear of the projector.
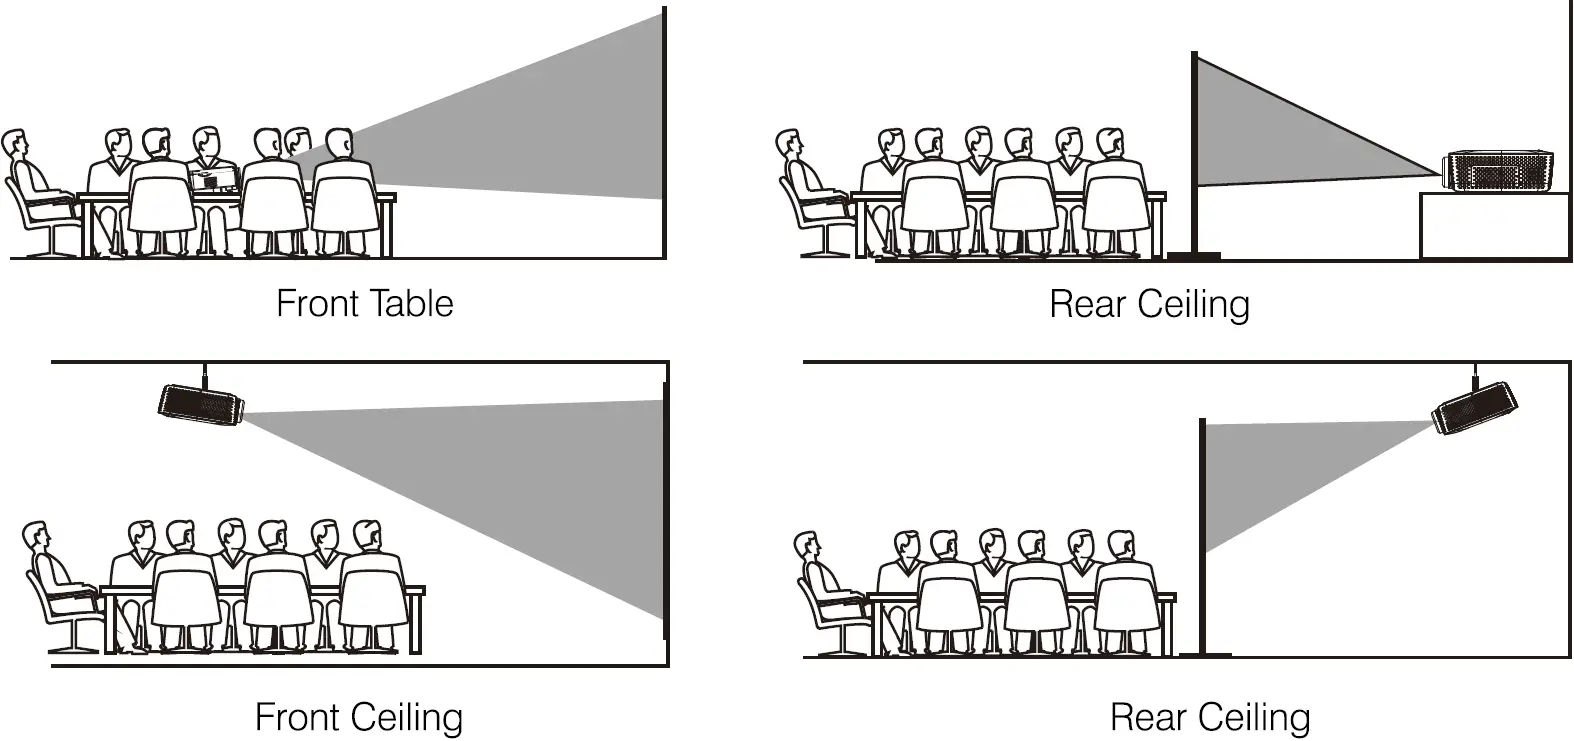
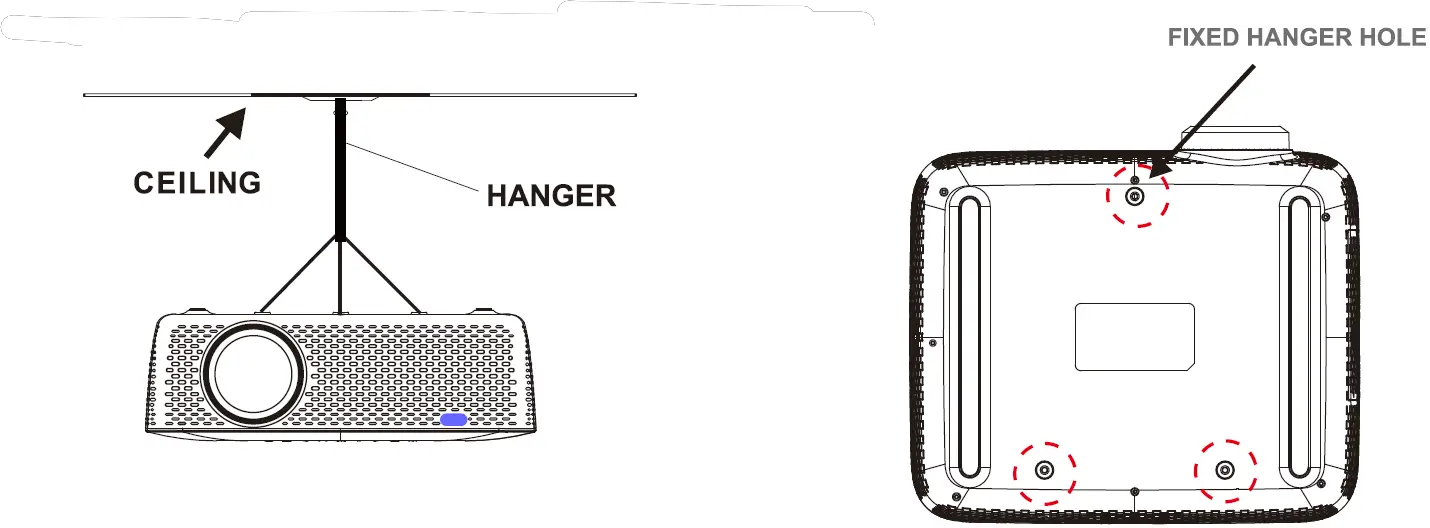
Placing Your Projector On Ceiling
When installing the projector in the ceiling, please purchase a projector mount recommended by an installation professional and follow the instructions that come with the mount.Before installing the projector in the ceiling, please check to make sure the ceiling structure can support the weight of the projector and the mount. If in doubt, please ask the advice from an installation professorial.NOTE: Projector mount and screw(s) not included
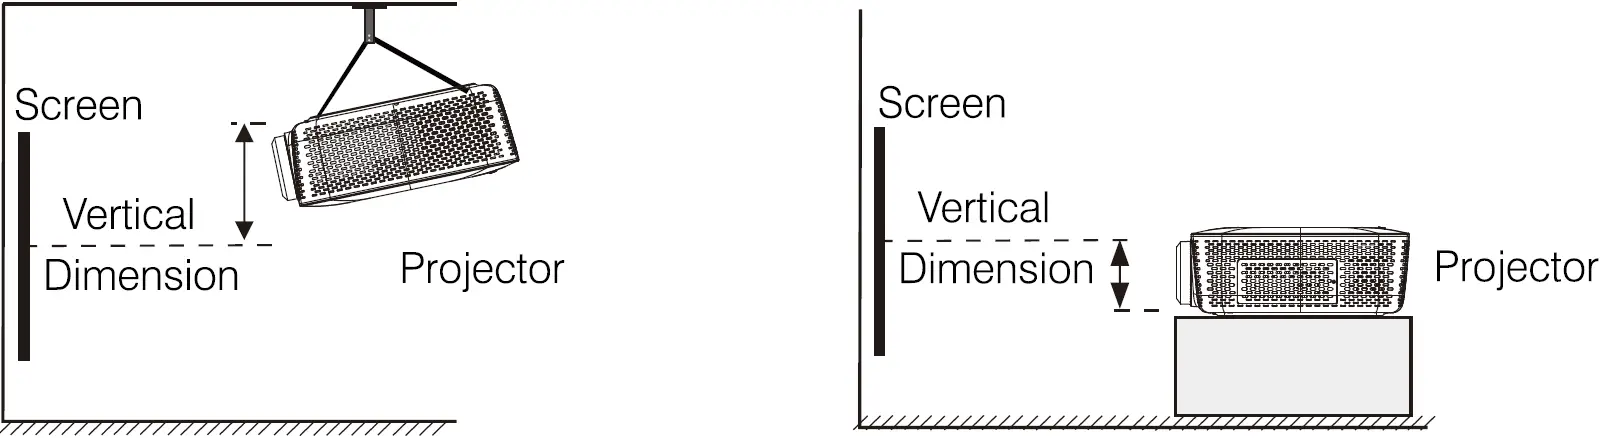
Adjust the Vertical Location
Follow below picture to adjust the vertical location
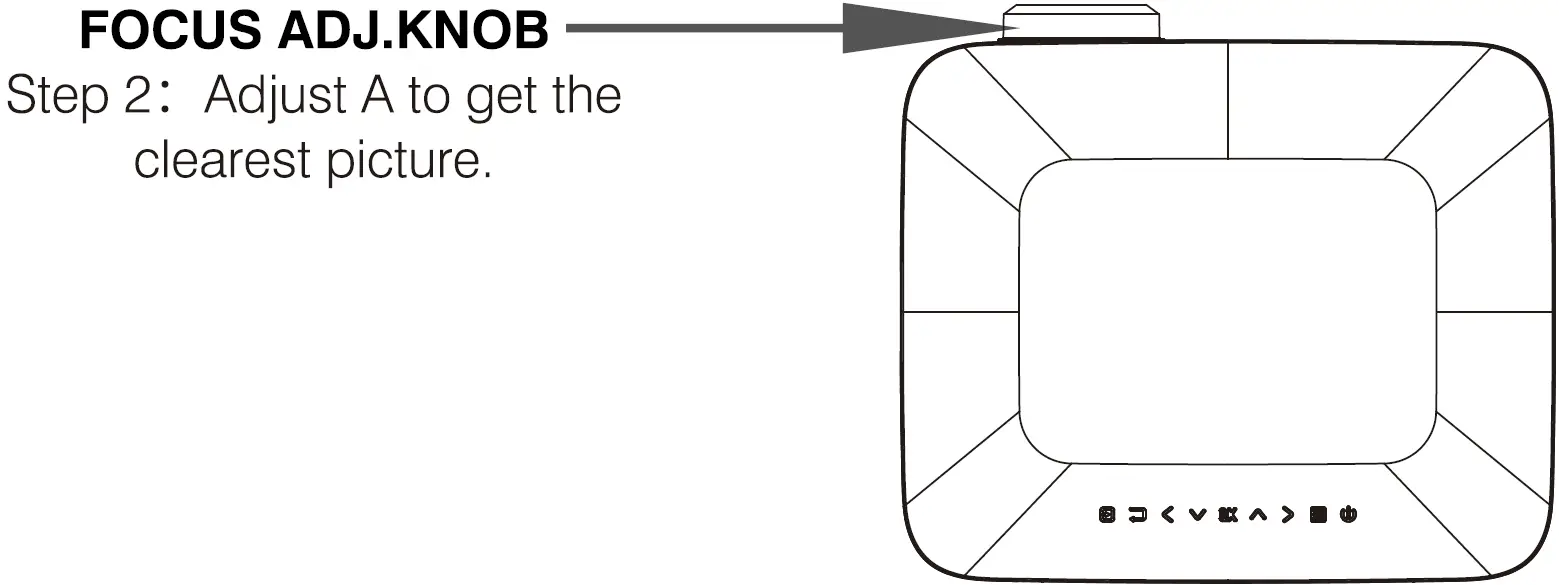
Adjust the Focus and Keystone
- As shown in Picture, Rotate the edge of the lens until you get a clear picture.
Note: Please avoid touching the lens.If you touch it accidentally. Please wipe with the cleaning cloth in the accessory bag.
- Keystone Correction on the remote controlPath1: On the remote control, press ■/◄ or ►/■ .Path2: Click “SETUP” -select “Option” -click “Keystone Correction” -Adjust by Up and down keys on remote control.
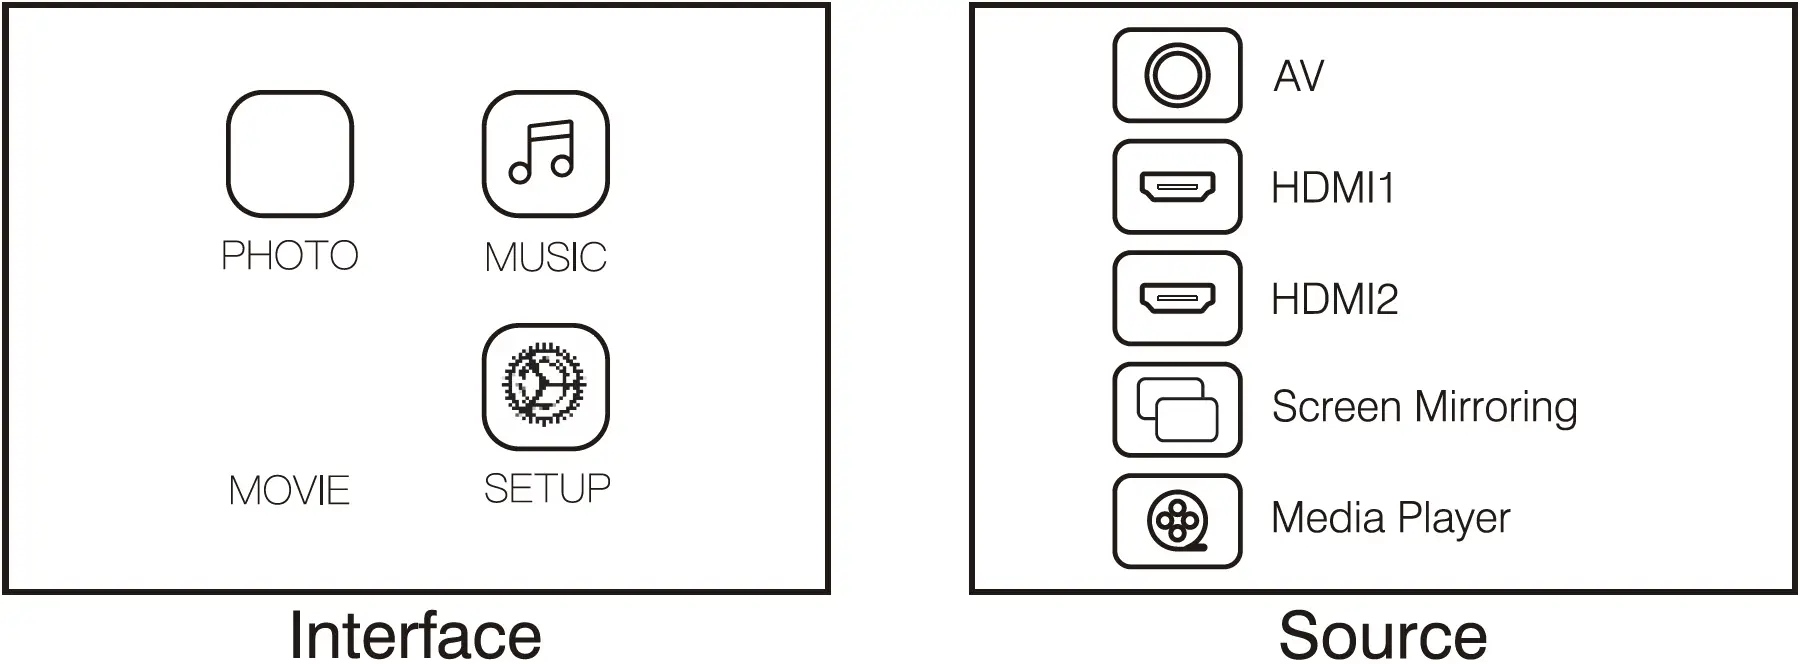
Functional Overview
- Source
- Return
- Left
- Down
- OK
- UP
- Right
- Menu
- Power On/Off
- IR Window
- Lens
- USB Port
- HDMI 1 Port
- HDMI 2 Port
- AV Port
- Audio Port
- Micro SD
- IR Window
- DC Port
Controls of Remote
|
POWER |
Press to power ON. Press and hold to power OFF. |
| Press for keystone correction. 0° to ± 22° | |
| Press for digital zoom. 0.1.2.3.4.5.6.7.8.9.10. | |
|
Play / Pause |
Press to play or pause an individual chapter or track |
|
Arrows/OK |
Press to navigate and confirm selections in Settings and other menus |
|
Menu |
Press to access projector Settings |
|
GoTo Number Keypad |
Press to enter specific chapter or track numbers.Use play button to begin playing |
|
MUTE |
Press to mute volume |
|
back/fwd |
Press to reverse or fast forward during playing video/music |
|
VOL+NOL |
Press to adjust audio level. |
|
SOURCE |
Press to select media source (AV, PC, HDMI, MEDIA). |
|
EXIT |
Press to exit menus. |
|
ZOOM |
Zoom with XJY axis; Scale: 0-10. |
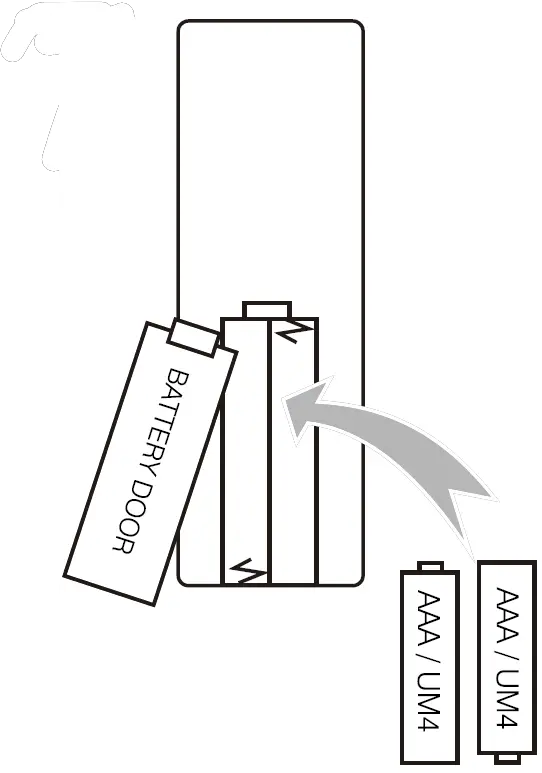
Install Remove Battery Of Remote
Remove the battery compartment cover on the back of your remote by carefully sliding to open. The battery cover can then be lifted away. Fit the correct batteries (2XAAA batteries not included), referring to the polarity markings. Finally, replace the cover.
NOTE:
- Batteries shall not be exposed to excessive heat such as sunshine, fire.
- Make sure that the batteries are installed polarity correctly.
- Only same or equivalent type batteries as recommend are to be used.
- Do not dispose of batteries in fire, battery may explode or leak. Do not try to recharge a battery.
- Do not mix old and new batteries.
- Do not mix alkaline, standard(carbon-zinc), or rechargeable (ni-cad,ni-mh,etc) batteries.
Connection Instructions
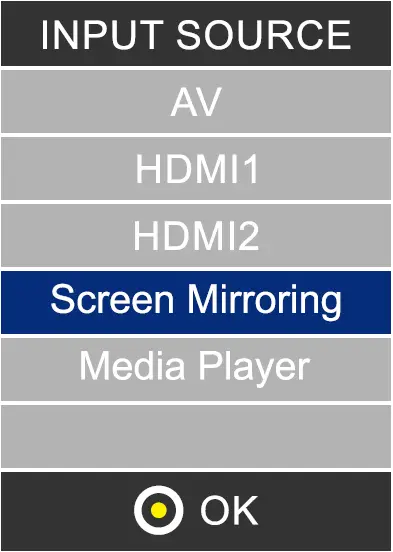
Select an Input Source
- You will see the picture below when the projector is turned on.
- You can choose between the different input sources (AV / HDMl1 / HDMl2 / Screen Mirroring / Media Player) by pressing the ” Source ” button at the projector touch panel, or remote controller.
- You can connect different devices with the projector, according to the following connection instructions.
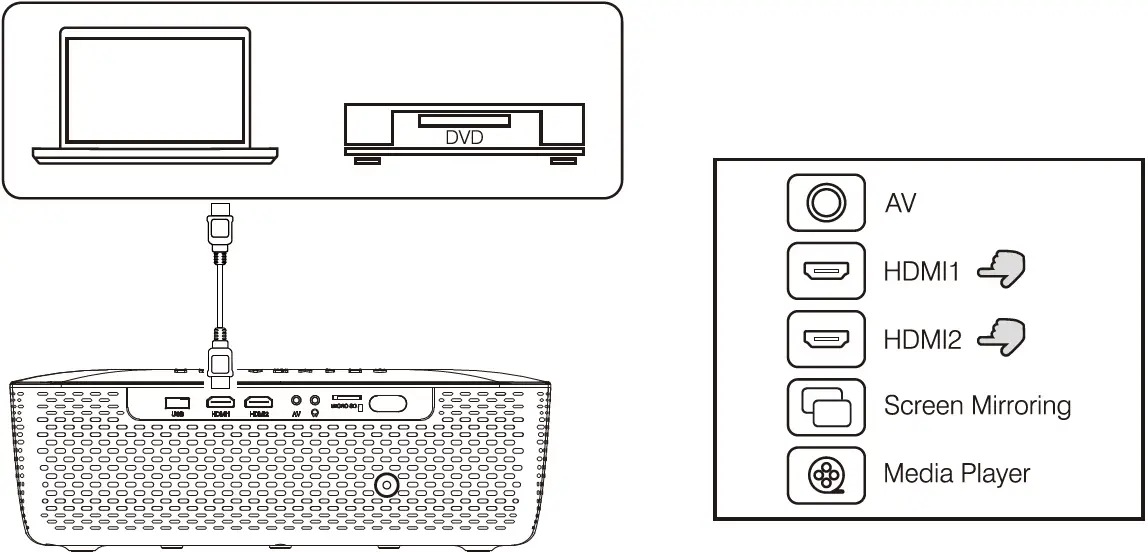
HDMI Device Connection
The projector can connect to devices with HDMI input function. It is compatible with laptops, DVD players, Blu-ray players, Chromecast, TV Stick, etc. An HDMI cable is included.
- The F-701 projector is equipped with 2 HDMI input ports, CDII you connect your devices to the projector via “HOM 1” port, please choose “HDMI 1” input source.
- If you connect via the” HDMI 2″ port, please choose the” HDMI 2″ input source.
Multimedia Connection
Insert USB / Micro SD card ( TF card ) into the corresponding slots (as shown in the picture). Choose Media source, Select” Video”,” Music”,” Picture” to enter the content you want to play.
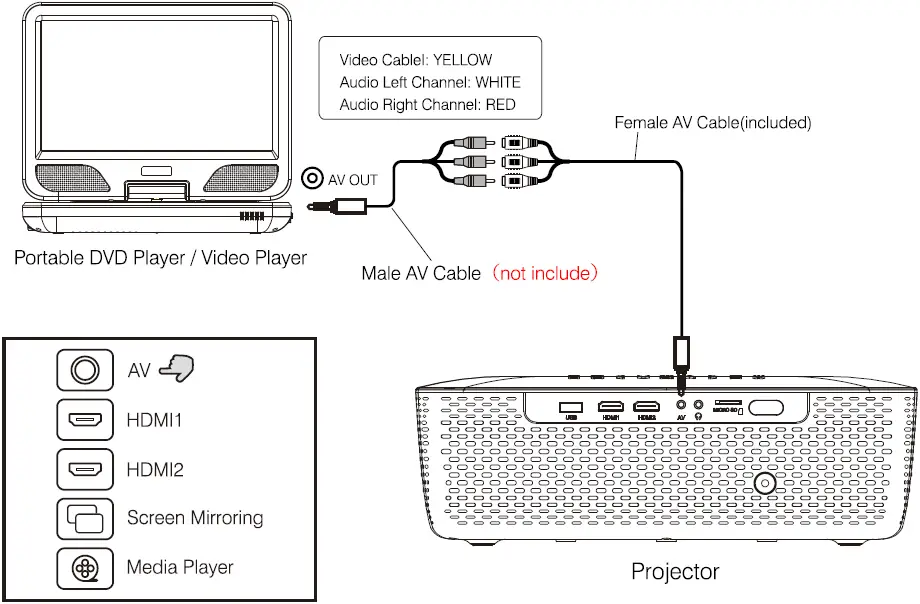
AV Video Device Connection
Connect the projector AV interface with the AV cable , as is shown in the pictures.
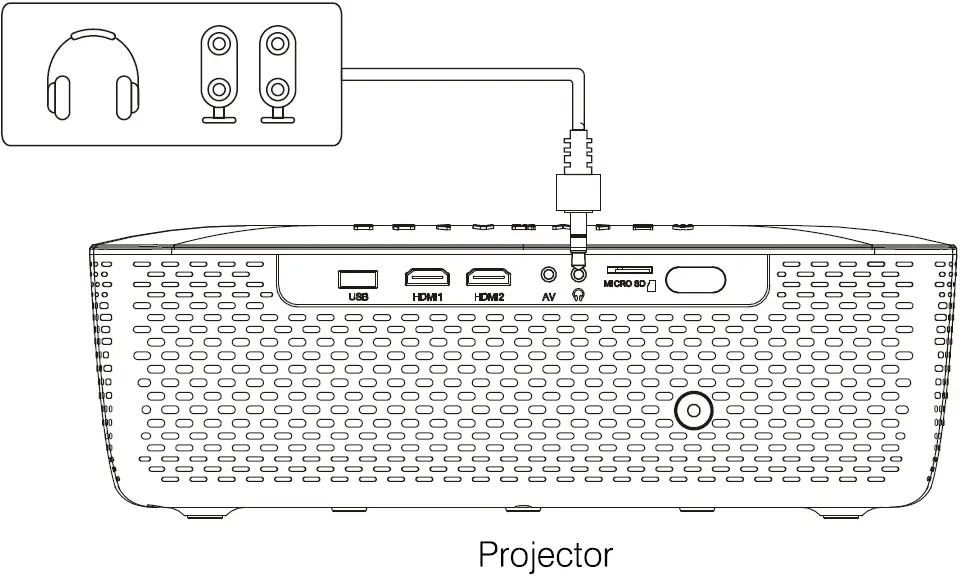
Audio Devices Connection
The projector can connect to a headphone and to a wired audio system using a 3.5mm jack (not include)
Using Bluetooth Playback

| Bluetooth On/Off | Bluetooth is OFF by default when the projector first powers ON |
| Pairing to Bluetooth Wireless Speaker | Turn on Bluetooth. The projector will begin searching for a nearby Bluetooth device, choose one and connect successfully. |
| When successfully connected, the projector will display the Bluetooth name on the top right portion of the Main Menu screen, and ou will be heard through the Bluetooth receiver | |
| Attention | |
| The Bluetooth function only supports audio devices.Smart phone, tablet, or computers can not connect to the projector! | |
| About automatically connect.After the initial pairing, The device will keep the pairing status all the time when Bluetooth functions for both devices are opened.To ensure that you can hear from the projector next time, we suggest that turn off the Bluetooth function before the turn off the projector. | |
| When you try to connect a new blue tooth speakerplease turn off the previous speaker /headphone and re-search your new Bluetooth device for connecting. |
Connect to Smartphone/Pad
| Connection guide |
Wireless Connection |
iOS (Two Methods) | WithWiFi |
| Without WiFi | |||
| Android (Two Methods) | WithWiFi | ||
| Without WiFi | |||
| Wired Connection | iOS(One Method) | USB to Lightning Cable | |
| Android(One Method) | Usb to Micro USB/Type C Cable(Need to Download the APP) | ||
| Please check your wireless environment first and then connect your device with the correct way by below introduction | |||
| NOTE: Depend of WLAN environment, it is normal that the process to loading the IP address or Scan QR code may take some seconds, please be patient! |
Wireless Connection to Smartphone/Pad
Wireless Connection to iPhone/iPad. (iOS)
For IOS device, considering there are two different operating environments:
- With WiFi environment.
- Without WiFi environment.

- 10S device with WIFI Environment. (Recommended)
- Step1: Turn on the projector and press the “source” button on the remote control or projector’s button. Click to enter the “Screen Mirroring” on the projector. (Loading time 5-10 seconds)
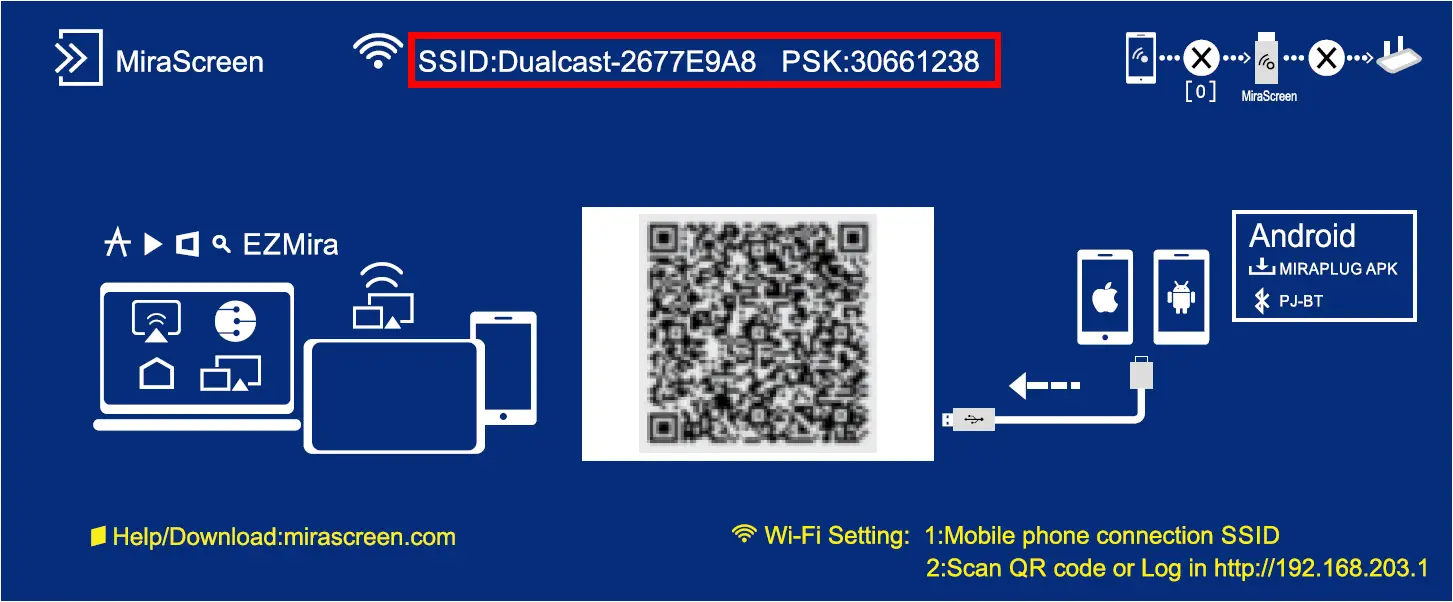
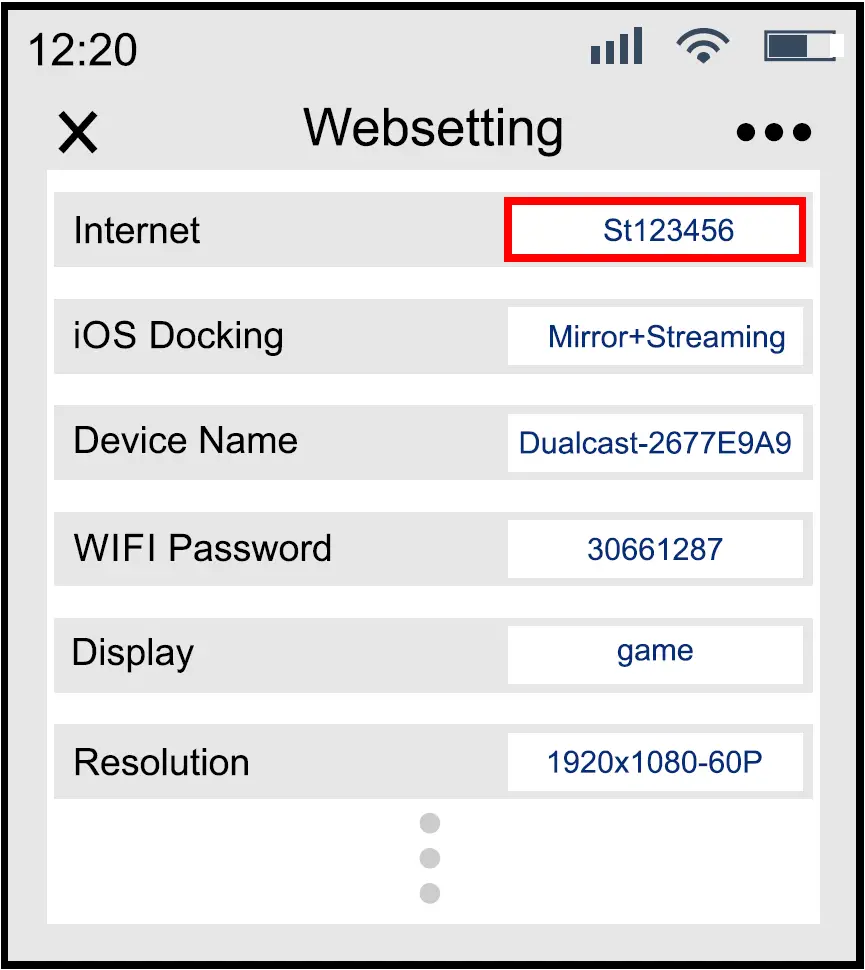
- Step2: Open the WiFi function on your smartphone/pad, and connect to the projector’s SSID (name and password showed on the screen)

- Step3: Enter the URL: http://192.168.203.1 on the browser (or scan the QR code)
- Step4: Connect your Home WiFi on the browser page.
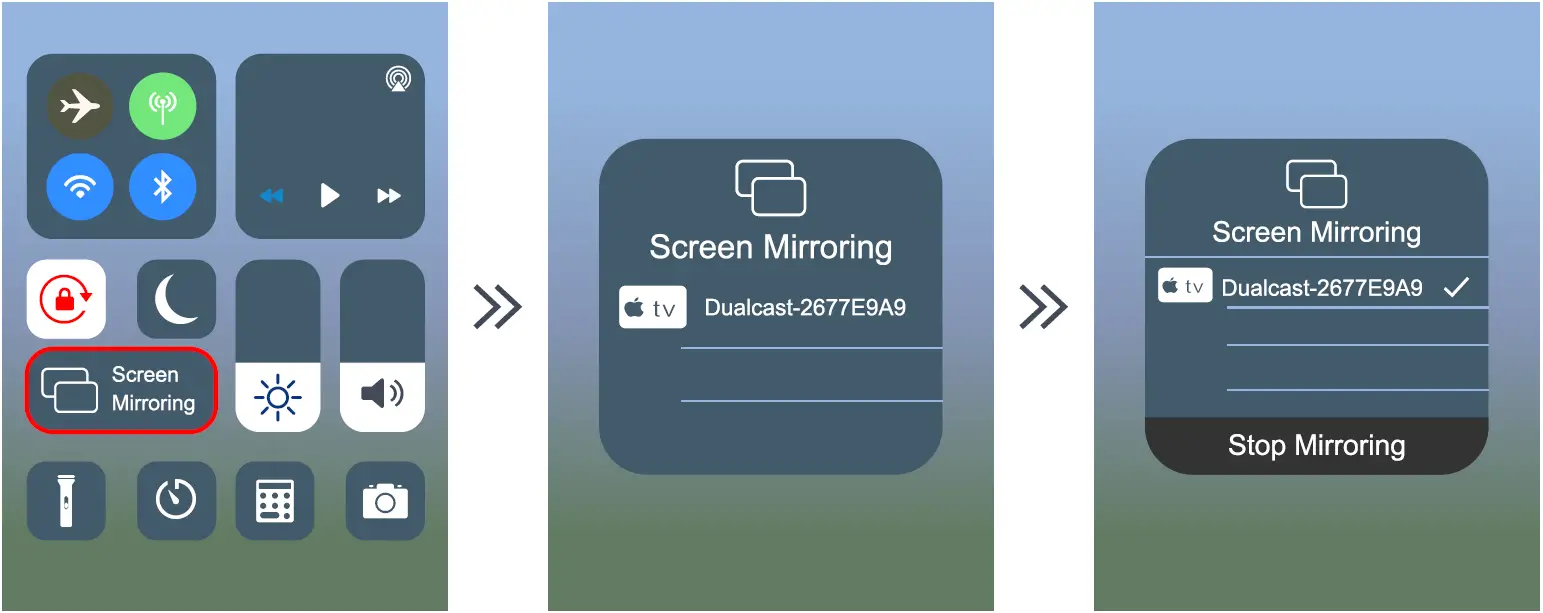
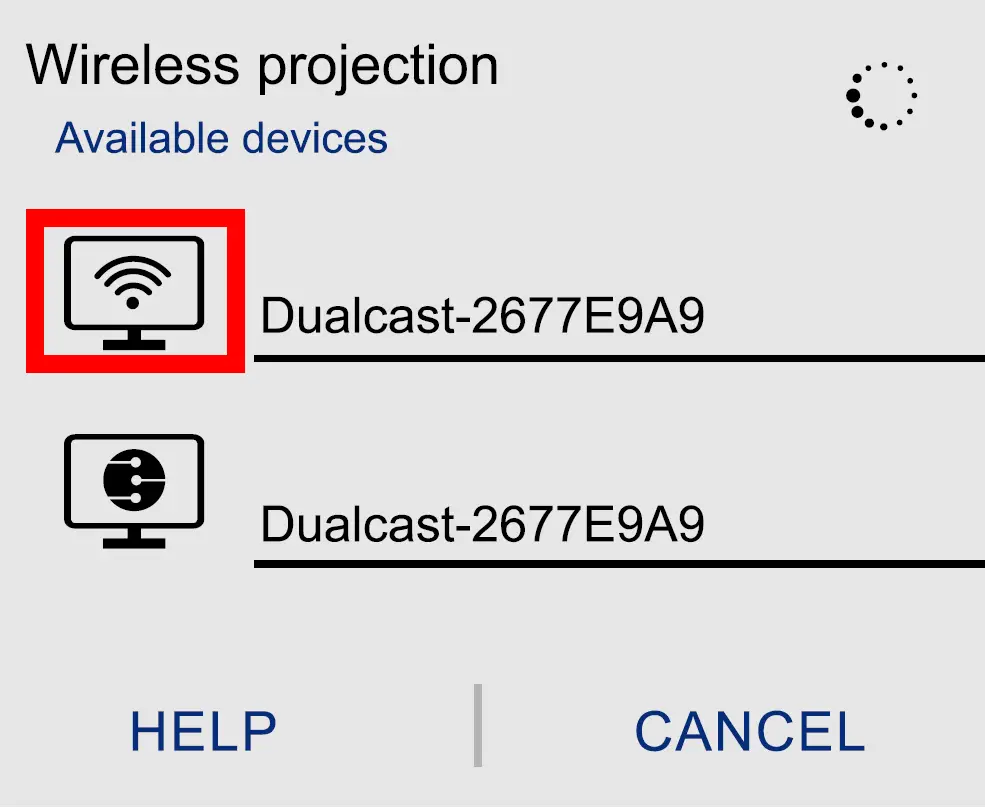
- Step5: Open the Screen Mirroring on you phone , and choose the correct SSID name. Then the connection is succeeded.Tips: When you connect for the second time, Please make sure the phone is connected to the SSID;Switch the projector to the “screen mirroring” page, and click the “screen mirroring” on your phone, the connection is successful.
- iOS device without WiFi environment. (Use the phone’s network data)
- Step1: Turn on the projector and press the “source” button on the remote control or projector’s button. Click to enter the “Screen Mirroring” on the projector. (Loading time 5-10 seconds)
- Step2: Open the WiFi function on your smartphone/pad, and connect to the projector’s SSID (name and password showed on the screen)
- Step3: Choose “Cellular Data” and turn on it.
- Step4: Open the Screen Mirroring , and choose the correct SSID name. Then the connection is succeeded.
- Step1: Turn on the projector and press the “source” button on the remote control or projector’s button. Click to enter the “Screen Mirroring” on the projector. (Loading time 5-10 seconds)
 Tips: When you connect for the second time, Please make sure the phone is connected to the SSID;Switch the projector to the “screen mirroring” page, and click the “screen mirroring” on your phone, the connection is successful.
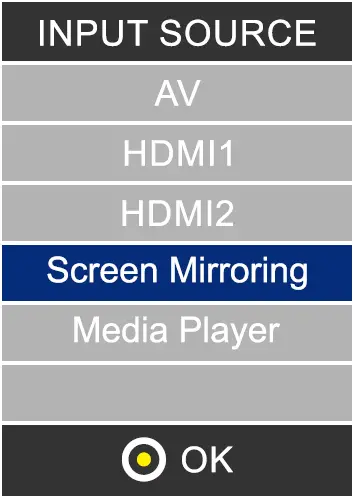

Wireless Connection to Android Phone
For Android device, considering there are two different operating environments
- With WiFi environment.
- Without WiFi environment.
- Android device with WiFi Environment.
- Step1: Turn on the projector and press the “source” button on the remote control or projector’s button. Click to enter the “Screen Mirroring” on the projector. (Loading time 5-10 seconds)
- Step2: Open the WiFi function on your smartphone/pad, and connect to the projector’s SSID (name and password showed on the screen)
- Step3: Enter the URL: http://192.168.203.1 on the browser(or scan the QR code)
- Step4: Connect your home WiFi on the browser page.
- Step5: Open the Multi-screen/ Miracast” function on the Android device.
- Step 6: Choose the correct SSID name, then the connection is succeeded. Due to the diversification of Android Phone, when you open the Multi-screen function, there may appear two WiFi names.How to choose?
- Choose the one with the WiFi logo.
- If there is no WiFi icon , the first one is selected by default.Tips: When you connect for the second time, Switch the projector to the “Screen Mirroring” page, and click the “Screen Mirroring” on your phone, the connection is successful. (No need to perform the Step 1-4)
- Step1: Turn on the projector and press the “source” button on the remote control or projector’s button. Click to enter the “Screen Mirroring” on the projector. (Loading time 5-10 seconds)
- Android device Without WiFi environment.(Use the phone’s network data)
- Step1: Turn on the projector and Open the “source” with the remote control or projector’s button. Click to enter the “Screen Mirroring” on the projector. (Loading time 5-10 seconds)
- Step2: Click “WLAN” on your Android device, turn on the “WiFi-Scan” function, But do not connect any WiFi.
- Step3: Choose “Phone Network Data” and turn on it.
- Step4: Open the Multi-screen/Miracast on your Android device , choose the correct SSID name. Then the connection is succeeded.
- Step1: Turn on the projector and Open the “source” with the remote control or projector’s button. Click to enter the “Screen Mirroring” on the projector. (Loading time 5-10 seconds)

 Tips: When you connect for the second time, Switch the projector to the “Screen Mirroring” page, and click the “Screen Mirroring” on your phone, the connection is successful. (No need to perform the Step 1-4)
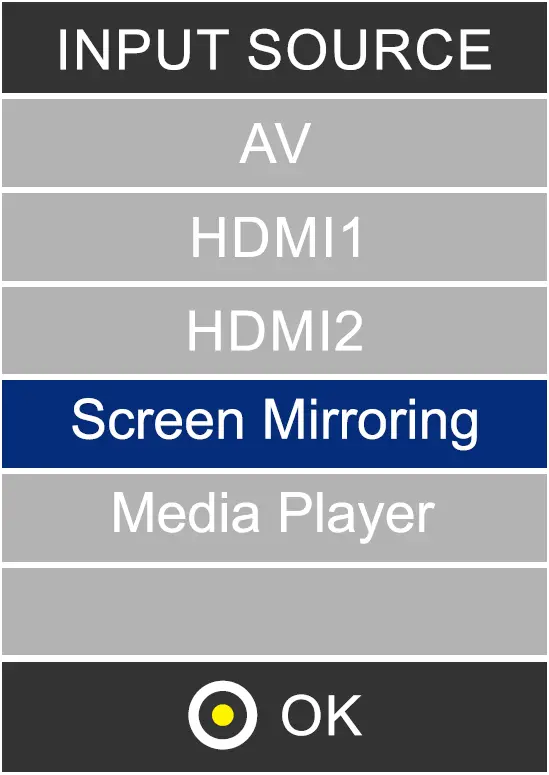
|
Note |
|
| Conditions for WiFi connection | Please make sure the home network environment in well conditions |
| The Name about “Screen Mirroring” | Different android devices have different names for the Wireless sync display, such as Screen mirroring , Screen sharing, Multi-Screen etc. If you cannot find it, please consult your mobile phone supplier. |
| Wireless connect without WiFi | Please turn on the WiFi in your smartphone, but do not Connect ANY WiFil Otherwise it will affect the projector’s WiFi Signal |

|
Set up when you scan the QR code(or enter the URL in the browser)
|
| About turning on the projector | The projector has a memory function, when you turn it back on, it will display the page before shutdown by default e.g. If you were using HDMI before shutdown, it will automatically enter HDMI model in the next time restart. |
Wired Connection to Smartphone/Pad
- Wired Connection to iOS. (iPhone/iPad)
- Step1: Turn on the projector and press the “source” with the remote control or projector’s button. Click to enter the “Screen Mirroring” on the projector. (Loading time 5-10 seconds)
- Step2: Connect your IOS device with the projector’s USB port via USB to Lightning Cable.
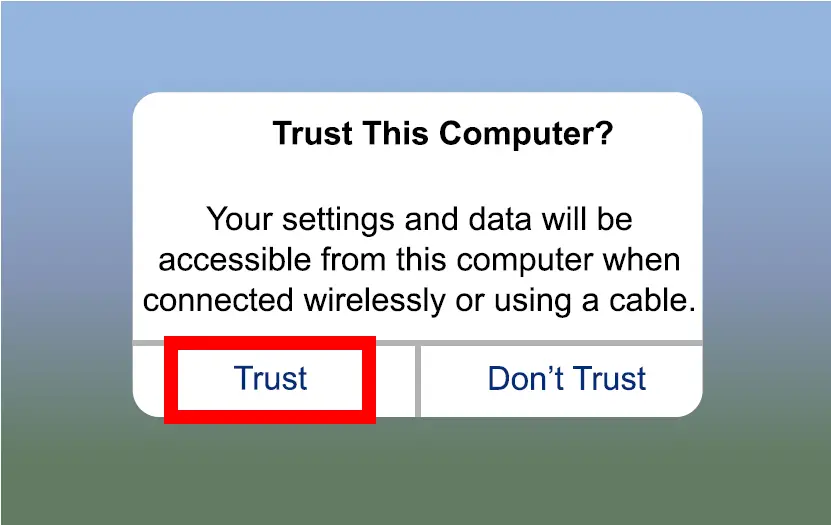
- Step3: Click “Trust” and input your screen lock password. If no password, ignore it.
- Step4: Then the connection is succeeded.
- Step1: Turn on the projector and press the “source” with the remote control or projector’s button. Click to enter the “Screen Mirroring” on the projector. (Loading time 5-10 seconds)
- Wired Connection to Android Phone. (Need to download the APP: MiraPlug)
- Step1: Turn on the projector and Open the “source” with the remote control or projector’s button. Click to enter the “Screen Mirroring” on the projector.
- Step2: Connect your Android device with the projector’s USB port via USB to Micro/Type C Cable.
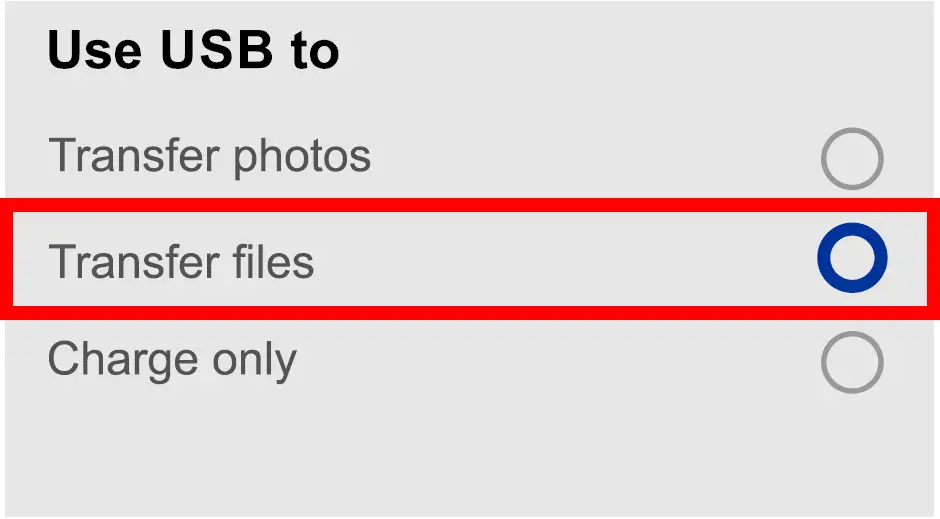
- Step3: Choose USB Transfer Method(Transfer files)and open USB debugging.
- Step4:Follow the prompts of the APP.
- Download MiraPlug;
- Re-plug the USB Cable to activate the APP;
- Click ,Connect Bluetooth according to the prompt tone (Bluetooth name : PJ-BT);
- Back to UI interface. Then the connection is succeeded.
- Step1: Turn on the projector and Open the “source” with the remote control or projector’s button. Click to enter the “Screen Mirroring” on the projector.

|
Note |
|
| When download the app | The Android phone may prompt that the app not safe, Please ignore this prompt, and continue to download. |
| About turning on the projector | The projector has a memory function, when you turn it back on, it will display the page before shutdown by default e.g. HDMI is displayed before shutdown, and HDMI is automatically displayed on the next time. |
| Tips for wired connection | After entering the screen Mirroring, we suggest to plug the USB into the projector first, and then connect the phone to the USS cable. |
| If the connection is accidentally disconnected and the phone does not reconnect successfully, please restart the projector. |
 report this ad
[xyz-ips snippet=”download-snippet”]