
![]()
DS-KV8X13-MVideo Intercom Villa Door StationUD16093B-B
Diagram References
Appearance
- Microphone
- Indicator
- Camera
- Loudspeaker
- Button
- Card Reader Area
- IR Light
- Micro SD Card Slot & Debugging Port
- LAN
- Terminals
Note: Debugging port is used for debugging only.
Indicator DescriptionUnlock: GreenCall: OrangeCommunicate: White
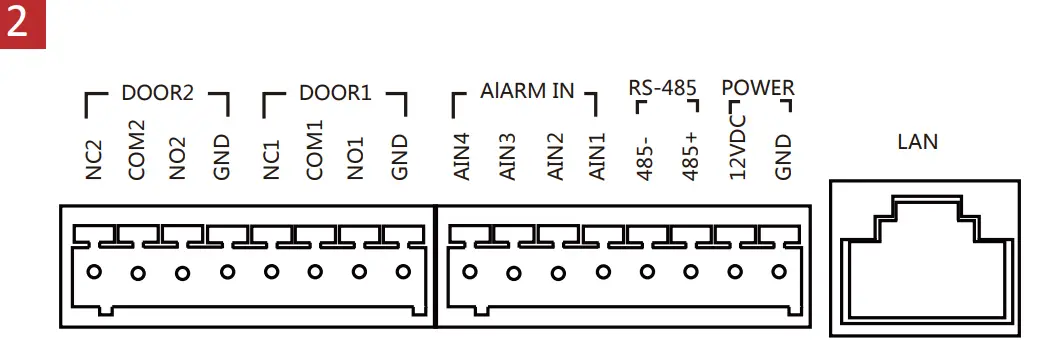
Terminal and Wiring
NC: Door Lock Relay Output (NC)AIN1: For access to Door ContactAIN2 & AIN4: Reserved485-: RS-485 Interface (Reserved)12 VDC IN: Power Supply InputLAN: Network InterfaceNO: Door Lock Relay Output (NO) COM: Common InterfaceAIN3: For the access of Exit Button485+: RS-485 Interface (Reserved)GND: Grounding
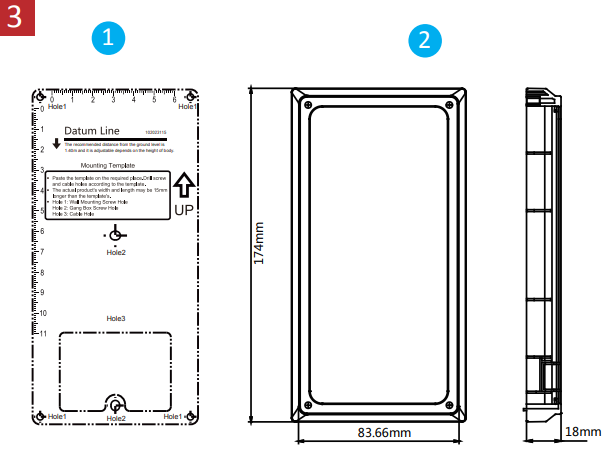
Installation Accessory
- Mounting Template
- Mounting Plate
Note: The dimension of the mounting plate is 174 mm × 83.66 mm × 18 mm.
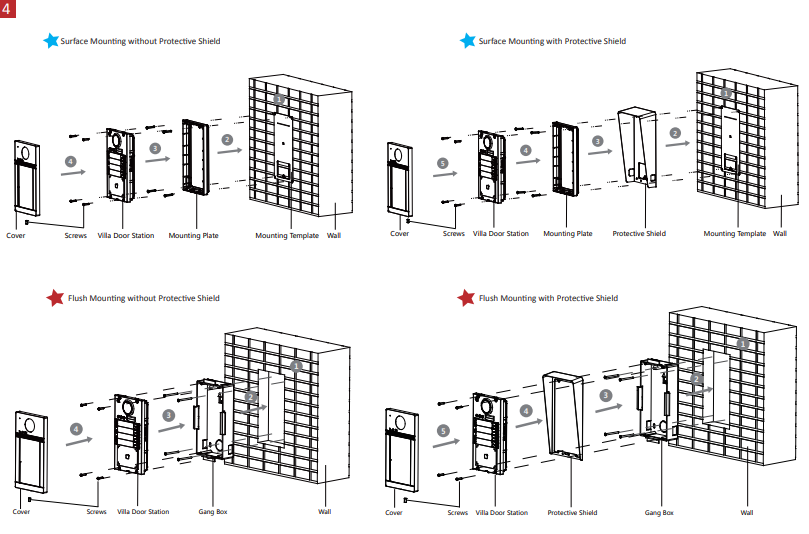
Installation
Note: Video intercom villa door station supports flush mounting and surface mounting.Before you begin:
- Make sure all related equipment is power-off during the installation.
- Tools that you need to prepare for installation: Drill (ø2.846) and gradienter.
- Purchase the protective shield before installation.
Surface Mounting without Protective Shield
- Stick the mounting template on the wall. Drill screw holes according to the mounting template.Remove the template from the wall.
- Secure the mounting plate on the wall with 4 supplied screws according to the screw holes.
- Secure the device on the mounting plate with 4 supplied set screws.
- Fix the cover onto the device with the screw.
Surface Mounting with Protective Shield
- Stick the mounting template on the wall. Drill screw holes according to the mounting template.Remove the template from the wall.
- Align the protective shield with the mounting template.
- Secure the mounting plate on the wall with 4 supplied screws according to the screw holes.
- Secure the device on the mounting plate with 4 supplied set screws.
- Fix the cover onto the device with the screw.
Flush Mounting without Protective Shield
- Stick the mounting template on the wall. Drill the hole according to the mounting template.Remove the template from the wall.Note: The suggested size of the hole is 175 mm × 84 mm × 19 mm.
- Install the gang box into the hole with 4 screws.
- Insert the device into the gang box. Secure the device with 4 supplied screws.
- Fix the cover onto the device with the screw.
Flush Mounting with Protective Shield
- Stick the mounting template on the wall. Drill the hole according to the mounting template.Remove the template from the wall.Note: The suggested size of the hole is 175 mm × 84 mm × 19 mm.
- Install the gang box into the hole with 4 screws.
- Align the protective shield with the gang box.
- Insert the device into the gang box. Secure the device with 4 supplied screws.
- Fix the cover onto the device with the screw.
Configuration via Web
Activate Device via WebYou are required to activate the device first by setting a strong password for it before you can use the device.Default parameters of door station are as follows:• Default IP Address: 192.0.0.65.• Default Port No.: 8000.• Default User Name: admin.
- Power on the device, and connect the device to the network.
- Enter the IP address into the address bar of the web browser, and click Enter to enter the activation page.Note: The computer and the device should belong to the same subnet.
- Create and enter a password into the password field.
- Confirm the password.
- Click OK to activate the device.Note: When the device is not activated, the basic operation and remote configuration of the device cannot be performed.Access to the Device by Web Browsers
- In the browser address bar, enter the IP address of the device, and press the Enter key to enter the login page.
- Enter the user name and password and click Login.
Communicate with Indoor Station
Note Configure room No. of the indoor station which is linked to the villa door station. Refer to Video Intercom Indoor Station User Manual for details.
- Click Settings → Intercom → Press Button to Call to enter the settings page.
- Set the parameters.-Edit call No. for every button.-Check Call Management Center to set the button calling center.Note: If you check Call Management Center and set the call No. as well, the call management center has a higher privilege than calling No.
- Press the button to call the indoor station.
Issue Card
- Click Settings → Access Control and Elevator Control to enter the corresponding settings page.
- Click Issue Card. Present the card in the card reading area.
- When issuing finished, the windows pop up on the settings page.• Only Mifare card supported, and Mifare card with non-standard shape is recommended.• Up to 10000 cards can be issued and managed by the V series door station. A voice prompt (No more cards can be issued.) can be heard when the issued card amount exceeds the upper limit.
Unlock Door
After issuing cards, you can unlock the door by presenting the issued card.Refer to Video Intercom Villa Door Station User Manual (scan the QR code) for details.
 report this ad
 http://enpinfodata.hikvision.com/analysisQR/showQR/019f0fbc
Product Information
©2019 Hangzhou Hikvision Digital Technology Co., Ltd.It includes instructions on how to use the Product. The software embodied in the Product is governed by the user license agreement covering that Product.About this ManualThis Manual is subject to domestic and international copyright protection. Hangzhou Hikvision Digital Technology Co., Ltd. (“Hikvision”) reserves all rights to this manual. This manual cannot be reproduced, changed, translated, or distributed, partially or wholly, by any means, without the prior written permission of Hikvision.Trademarksand other Hikvision marks are the property of Hikvision and are registered trademarks or the subject of applications for the same by Hikvision and/or its affiliates. Other trademarks mentioned in this manual are the properties of their respective owners. No right or license is given to use such trademarks without express permission.Legal DisclaimerTO THE MAXIMUM EXTENT PERMITTED BY APPLICABLE LAW, THE PRODUCT DESCRIBED, WITH ITS HARDWARE, SOFTWARE AND FIRMWARE, IS PROVIDED “AS IS”, WITH ALL FAULTS AND ERRORS, AND HIKVISION MAKES NO WARRANTIES, EXPRESS OR IMPLIED, INCLUDING WITHOUT LIMITATION, MERCHANTABILITY, SATISFACTORY QUALITY, FITNESS FOR A PARTICULAR PURPOSE, AND NON-INFRINGEMENT OF THIRD PARTY. IN NO EVENT WILL HIKVISION, ITS DIRECTORS, OFFICERS, EMPLOYEES, OR AGENTS BE LIABLE TO YOU FOR ANY SPECIAL, CONSEQUENTIAL, INCIDENTAL, OR INDIRECT DAMAGES, INCLUDING, AMONG OTHERS, DAMAGES FOR LOSS OF BUSINESS PROFITS, BUSINESS INTERRUPTION, OR LOSS OF DATA OR DOCUMENTATION, IN CONNECTION WITH THE USE OF THIS PRODUCT, EVEN IF HIKVISION HAS BEEN ADVISED OF THE POSSIBILITY OF SUCH DAMAGES.REGARDING THE PRODUCT WITH INTERNET ACCESS, THE USE OF THE PRODUCT SHALL BE WHOLLY AT YOUR OWN RISK. HIKVISION SHALL NOT TAKE ANY RESPONSIBILITY FOR ABNORMAL OPERATION, PRIVACY LEAKAGE, OR OTHER DAMAGES RESULTING FROM CYBER ATTACKS, HACKER ATTACKS, VIRUS INSPECTIONS, OR OTHER INTERNET SECURITY RISKS; HOWEVER, HIKVISION WILL PROVIDE TIMELY TECHNICAL SUPPORT IF REQUIRED.SURVEILLANCE LAWS VARY BY JURISDICTION. PLEASE CHECK ALL RELEVANT LAWS IN YOUR JURISDICTION BEFORE USING THIS PRODUCT IN ORDER TO ENSURE THAT YOUR USE CONFORMS TO THE APPLICABLE LAW. HIKVISION SHALL NOT BE LIABLE IN THE EVENT THAT THIS PRODUCT IS USED FOR ILLEGITIMATE PURPOSES.IN THE EVENT OF ANY CONFLICTS BETWEEN THIS MANUAL AND THE APPLICABLE LAW, THE LATTER PREVAILS.Data ProtectionDuring the use of the device, personal data will be collected, stored, and processed. To protect data, the development of Hikvision devices incorporates privacy by design principles. For example, for a device with facial recognition features, biometrics data is stored in your device with encryption method; for fingerprint device, only fingerprint template will be saved, which is impossible to reconstruct a fingerprint image.As a data controller, you are advised to collect, store, process, and transfer data in accordance with the applicable data protection laws and regulations, including without limitation, conducting security controls to safeguard personal data, such as, implementing reasonable administrative and physical security controls, conduct periodic reviews and assessments of the effectiveness of your security controls.
FCC InformationPlease take attention that changes or modification not expressly approved by the party responsible for compliance could void the user’s authority to operate the equipment.FCC compliance: This equipment has been tested and found to comply with the limits for a Class B digital device, pursuant to part 15 of the FCC Rules. These limits are designed to provide reasonable protection against harmful interference in a residential installation. This equipment generates, uses, and can radiate radio frequency energy and, if not installed and used in accordance with the instructions, may cause harmful interference to radio communications. However, there is no guarantee that interference will not occur in a particular installation. If this equipment does cause harmful interference to radio or television reception, which can be determined by turning the equipment off and on, the user is encouraged to try to correct the interference by one or more of the following measures:—Reorient or relocate the receiving antenna.—Increase the separation between the equipment and receiver.—Connect the equipment into an outlet on a circuit different from that to which the receiver is connected.—Consult the dealer or an experienced radio/TV technician for help.This equipment should be installed and operated with a minimum distance 20cm between the radiator and your body.FCC ConditionsThis device complies with part 15 of the FCC Rules. Operation is subject to the following two conditions:
- This device may not cause harmful interference.
- This device must accept any interference received, including interference that may cause undesired operation.EU Conformity Statement
 This product and – if applicable – the supplied accessories too are marked with “CE” and comply therefore with the applicable harmonized European standards listed under the RE Directive 2014/53/EU, the EMC Directive 2014/30/EU, the RoHS Directive 2011/65/EU.
 2006/66/EC (battery directive): This product contains a battery that cannot be disposed of as unsorted municipal waste in the European Union. See the product documentation for specific battery information. The battery is marked with this symbol, which may include lettering to indicate cadmium (Cd), lead (Pb), or mercury (Hg). For proper recycling, return the battery to your supplier or to a designated collection point. For more information see: www.recyclethis.info
 2012/19/EU (WEEE directive): Products marked with this symbol cannot be disposed of as unsorted municipal waste in the European Union. For proper recycling, return this product to your local supplier upon the purchase of equivalent newequipment, or dispose of it at designated collection points. For more information see: www.recyclethis.info
IC statementThis device complies with Industry Canada licence-exempt RSS standard(s). Operation is subject to the following two conditions:
- this device may not cause interference, and
- this device must accept any interference, including interference that may cause undesired operation of the device.
Under Industry Canada regulations, this radio transmitter may only operate using an antenna of a type and maximum (or lesser) gain approved for the transmitter by Industry Canada. To reduce potential radio interference to other users, the antenna type and its gain should be so chosen that the equivalent isotropically radiated power (e.i.r.p.) is not more than that necessary for successful communication.
This equipment complies with IC RSS-102 radiation exposure limits set forth for an uncontrolled environment. This equipment should be installed and operated with a minimum distance of 20cm between the radiator & your body.
References
[xyz-ips snippet=”download-snippet”]