
HIKVISION Network Indoor Station DS-KH6320-(W)TE1 User Guide
Network Indoor Station
Diagram References
1 Appearance
- Screen 5 Loudspeaker
- Microphone 6 TF Card Slot
- Debugging Port 7 Alarm Terminal
- Network Interface 8 Reserved
- Power Terminal
Note:
The appearance of the device varies according to different models. Refers to the actual device for detailed information.The debugging port is used for debugging only.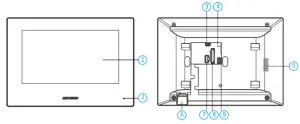
2 Terminal and Wiring
There are 20 pins in the terminal on the rear panel of the indoor station: 2 RS-485 pins, 5 reserved pins, 4 relay output pins, 8 alarm input pins, and 1 GND pin.Note: There are 20 pins in the terminal on the rear panel of the DS-KH6320-TE1: 11 reserved pins, 8 alarm input pins, and 1 GND pin. Please refer to the specific model.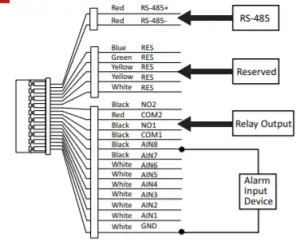
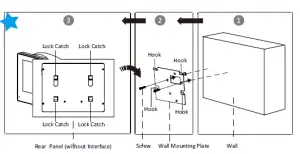
3 Installation
Installation Accessory DescriptionThe wall mountiing plate and junction box are required to install the indoor station onto the wall.The dimension of junction box should be 75 mm (width) × 75 mm (length) × 50 mm (depth). The dimension of wall mounting plate is shown.
Before You Start
- Make sure the device in the package is in good condition and all the assembly parts are included.
- The power supply the indoor station supports is 12 VDC. Please make sure your power supply matches your indoor station.
- Make sure all related equipments are power-off during the installation.
- Check the product specification for the installation environment.
Wall Mounting with junction Box
- Chisel a hole in the wall. The size of the hole should be 76 mm (width) × 76 mm (length) × 50 mm (depth).
- Insert the junction box to the hole chiseled on the wall.
- Fix the wall mounting plate to the junction box with 2 screws.
- Hook the indoor station to the wall mounting plate tightly by inserting the plate hooks into the slots on the rear panel of the indoor station, during which the lock catch will be locked automatically.

Wall Mounting without junction Box
- Insert 2 expansion tubes into the wall.
- Fix the wall mounting plate to the junction box with 2 screws.
- Hook the indoor station to the wall mounting plate tightly by inserting the plate hooks into the slots on the rear panel of the indoor station, during which the lock catch will be locked automatically.
4 Geting Started
1 Activate Indoor Station
You are required to activate the device first by setings a strong password before you can use the device.
- Power on the device. It will enter the activation page automatically.
- Create a password and confirm it.
- Tap OK to activate the indoor station.
2Quick Configuration
- Choose Language and tap Next.
- Set network parameters and tap Next.– Edit Local IP, Subnet Mask and Gateway parameters.– Enable DHCP, the device will get network parameters automatically.
- Configure the indoor station parameters.– .Select Indoor Station and tap Next to link main door station.a. Edit Floor and Room No.b. Create and confirm SIP register password.Note: If you want to add the indoor station to the door station, the SIP password of the indoor stationshould be the same as the registration password of the door station.c. Tap Advanced Settings to edit Community No, Building No. and Unit No.d. Optional: Enable Indoor Station Settings and select the indoor station to link.– . Select Indoor Extension and tap Next to link indoor station.a. Edit No., Room Name.b. Create and confirm SIP register password.
- Linked related devices and tap Next. If the device and the indoor station are in thesame LAN, the device will be displayed in the list. Tap the device or enter the serial No.to link.a. Tap the settings icon to pop up the Network Settings page.b. Edit the network parameters of the door station manually or enable DHCP to get the network parameters automatically.e. Tap OK to save the settings.
- Tap Finish to save the settings.
 report this ad
Refers to Video Intercom Network Indoor Station Configuration Guide (Scan the QR code) for details.Refers to Video Intercom Network Indoor Station Operation Guide (Scan the QR code) for details.
Read More About This Manual & Download PDF:
References
[xyz-ips snippet=”download-snippet”]