![]()
DS-HD1 Wi-Fi Video DoorbellQuick Start Guidehttps://us.hikvision.com/en
Copyright © 2018–2019 Hikvision USA Inc. and Hikvision Canada Inc.
About this Manual
The Manual includes instructions for using and managing the product. Pictures, charts, images, and all other information hereinafter are for description and explanation only. The information contained in the Manual is subject to change, without notice, due to firmware updates or other reasons. Please find the latest version on the Hikvision Website (https://us.hikvision.com/en).Any and all information, including, among others, wordings, pictures, graphs are the properties of Hangzhou Hikvision Digital Technology Co., Ltd. or its subsidiaries (hereinafter referred to be “Hikvision”). This user manual (hereinafter referred to be “the Manual”) cannot be reproduced, changed, translated, or distributed, partially or wholly, by any means, without the prior written permission of Hikvision. Unless otherwise stipulated, Hikvision does not make any warranties, guarantees, or representations, express or implied, regarding the Manual.Trademarks Acknowledgement ![]() and other Hikvision trademarks and logos are the properties of Hikvision in various jurisdictions. Other trademarks and logos mentioned below are the properties of their respective owners.
and other Hikvision trademarks and logos are the properties of Hikvision in various jurisdictions. Other trademarks and logos mentioned below are the properties of their respective owners.
Legal Disclaimer
TO THE MAXIMUM EXTENT PERMITTED BY APPLICABLE LAW, THE PRODUCT DESCRIBED, WITH ITS HARDWARE, SOFTWARE, AND FIRMWARE, IS PROVIDED “AS IS,” WITH ALL FAULTS AND ERRORS, AND HIKVISION MAKES NO WARRANTIES, EXPRESS OR IMPLIED, INCLUDING WITHOUT LIMITATION, MERCHANTABILITY, SATISFACTORY QUALITY, FITNESS FOR A PARTICULAR PURPOSE, AND NON-INFRINGEMENT OF THIRD PARTY. IN NO EVENT WILL HIKVISION, ITS DIRECTORS, OFFICERS, EMPLOYEES, OR AGENTS BE LIABLE TO YOU FOR ANY SPECIAL, CONSEQUENTIAL, INCIDENTAL, OR INDIRECT DAMAGES, INCLUDING, AMONG OTHERS, DAMAGES FOR LOSS OF BUSINESS PROFITS, BUSINESS INTERRUPTION, OR LOSS OF DATA OR DOCUMENTATION, IN CONNECTION WITH THE USE OF THIS PRODUCT, EVEN IF HIKVISION HAS BEEN ADVISED OF THE POSSIBILITY OF SUCH DAMAGES.
TO THE MAXIMUM EXTENT PERMITTED BY APPLICABLE LAW, IN NO EVENT SHALL HIKVISION’S TOTAL LIABILITY FOR ALL DAMAGES EXCEED THE PURCHASE PRICE OF THE PRODUCT.
HIKVISION DOES NOT UNDERTAKE ANY LIABILITY FOR PERSONAL INJURY OR PROPERTY DAMAGE, AS THE RESULT OF PRODUCT INTERRUPTION OR SERVICE TERMINATION CAUSED BY: A) IMPROPER INSTALLATION OR USAGE OTHER THAN AS REQUESTED; B) THE PROTECTION OF NATIONAL OR PUBLIC INTERESTS; C) FORCE MAJEURE; D) YOURSELF OR THE THIRD PARTY, INCLUDING NOT LIMITATION, USING ANY THIRD PARTY’S PRODUCTS, SOFTWARE, APPLICATIONS, AND AMONG OTHERS.
REGARDING THE PRODUCT WITH INTERNET ACCESS, THE USE OF THE PRODUCT SHALL BE WHOLLY AT YOUR OWN RISK. HIKVISION SHALL NOT TAKE ANY RESPONSIBILITY FOR ABNORMAL OPERATION, PRIVACY LEAKAGE, OR OTHER DAMAGES RESULTING FROM CYBER ATTACKS, HACKER ATTACKS, VIRUS INSPECTIONS, OR OTHER INTERNET SECURITY RISKS; HOWEVER, HIKVISION WILL PROVIDE TIMELY TECHNICAL SUPPORT IF REQUIRED.
THE PURPOSE OF THE PRODUCTS IS TO PROVIDE AN ADEQUATE WARNING IN THE EVENT OF ILLEGAL ENCROACHMENT IN CERTAIN AREAS; HOWEVER, THE PROPER INSTALLATION OF THE PRODUCTS WILL NOT ELIMINATE, BUT ONLY REDUCE, THE POSSIBILITY THAT ACCIDENTS MIGHT OCCUR WITH PERSONAL INJURY OR PROPERTY LOSS AS A RESULT. YOU ARE HIGHLY RECOMMENDED TO RAISE YOUR VIGILANCE AND STRENGTHEN THE SAFETY AWARENESS IN THE DAILY LIFE.
SURVEILLANCE LAWS VARY BY JURISDICTION. PLEASE CHECK ALL RELEVANT LAWS IN YOUR JURISDICTION BEFORE USING THIS PRODUCT IN ORDER TO ENSURE THAT YOUR USE CONFORMS TO THE APPLICABLE LAW. YOU FURTHER AGREE THAT THIS PRODUCT IS ONLY FOR CIVIL USE, AND HIKVISION SHALL NOT BE LIABLE IN THE EVENT THAT THIS PRODUCT IS USED WITH ILLEGITIMATE PURPOSES SUCH AS THIRD-PARTY RIGHTS INFRINGEMENT, MEDICAL TREATMENT, SAFETY EQUIPMENT, OR OTHER SITUATIONS WHERE THE PRODUCT FAILURE COULD LEAD TO DEATH OR PERSONAL INJURY, OR WEAPON OF MASS DESTRUCTION, CHEMICAL AND BIOLOGICAL WEAPON, NUCLEAR EXPLOSION, AND ANY UNSAFE NUCLEAR ENERGY USES OR ANTI-HUMANITY USAGES. YOU SHOULD UNDERTAKE ALL RESPONSIBILITIES FOR LOSSES OR DAMAGES RESULTING FROM THE ABOVE USAGES WHATSOEVER.IN THE EVENT OF ANY CONFLICTS BETWEEN THE ABOVE AND THE APPLICABLE LAW, THE LATTER PREVAILS.
Regulatory Information
FCC Information![]() The electromagnetic interference from the device is under limits approved by the Federal Communications Commission.This device complies with Part 15 of the FCC Rules. Operation is subject to the following two conditions:
The electromagnetic interference from the device is under limits approved by the Federal Communications Commission.This device complies with Part 15 of the FCC Rules. Operation is subject to the following two conditions:
- This device may not cause harmful interference, and
- This device must accept any interference received, including interference that may cause undesired operation.Note: This product has been tested and found to comply with the limits for a Class B digital device, pursuant to Part 15 of the FCC Rules. These limits are designed to provide reasonable protection against harmful interference in a residential installation. This product generates, uses, and can radiate radio frequency energy and, if not installed and used in accordance with the instructions, may cause harmful interference to radio communications. However, there is no guarantee that interference will not occur in a particular installation. If this product does cause harmful interference to radio or television reception, which can be determined by turning the equipment off and on, the user is encouraged to try to correct the interference by one or more of the following measures:– Reorient or relocate the receiving antenna.– Increase the separation between the equipment and receiver.– Connect the equipment into an outlet on a circuit different from that to which the receiver is connected.– Consult the dealer or an experienced radio/TV technician for help.Please take attention that changes or modifications not expressly approved by the party responsible for compliance could void the user’s authority to operate the equipment.This equipment should be installed and operated with a minimum distance of 20 cm between the radiator and your body.
IC This product meets the applicable Industry Canada technical specifications.This device complies with Industry Canada licence-exempt RSS standard(s). Operation is subject to the following two conditions:(1) this device may not cause interference, and(2) this device must accept any interference, including interference that may cause undesired operation of the device.Under Industry Canada regulations, this radio transmitter may operate only using an antenna of a type and maximum (or lesser) gain approved for the transmitter by Industry Canada. To reduce potential radio interference to other users, the antenna type and its gain should be so chosen that the equivalent isotropically radiated power (e.i.r.p.) is not more than that necessary for successful communication.This equipment complies with IC RSS-102 radiation exposure limits set forth for an uncontrolled environment. This equipment should be installed and operated with a minimum distance of 20 cm between the radiator and your body.The user manual for local area network devices shall contain instructions related to the restrictions mentioned in the above sections, namely that:(i) the device for operation in the band 5150-5250 MHz is only for indoor use to reduce the potential for harmful interference to co-channel mobile satellite systems;(ii) the maximum antenna gain permitted for devices in the bands 5250-5350 MHz and 5470-5725 MHz shall comply with the e.i.r.p. limit; and(iii) the maximum antenna gain permitted for devices in the band 5725-5825 MHz shall comply with the e.i.r.p. limits specified for point-to-point and non-point-to-point operation as appropriate.Users should also be advised that high-power radars are allocated as primary users (i.e., priority users) of the bands 5250-5350 MHz and 5650-5850 MHz and that these radars could cause interference and/or damage to LE-LAN devices.
 Product tested by UL to meet U.S. and Canadian Standards.
|
The power supply must conform to LPS. The recommended adaptor models and manufacturers are shown on the right. Use the attached adapter, and do not change the adaptor randomly. |
Model | Manufacturer |
| MKAC-57-242500M, MKAC-57-242200M, MKAC-57-241500M | MACABLE |
Safety Instruction
CAUTION: Risk of explosion if the battery is replaced by an incorrect type. Dispose of used batteries according to the instruction.For more information, please visit https://us.hikvision.com/en.Need help? Please visit “https://us.hikvision.com/en” for our local contact details.
SAVE THIS MANUAL FOR FUTURE REFERENCE
Quick SetupPower Kit InstallationDoorbell InstallationDoorbell Setup
What’s in the Box
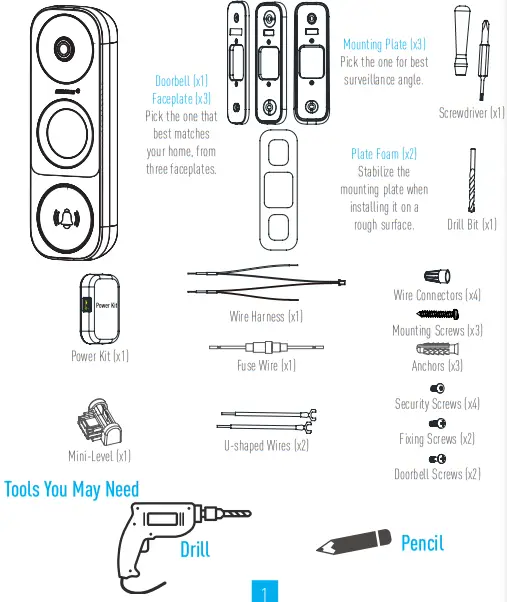
- If you have a mechanical chime installed in your home, install the power kit and doorbell.
- If you have an electronic chime installed in your home, refer to its manual to install the power kit, and install the doorbell.
- If no chime is installed, skip power kit installation, install the doorbell, and follow Option B on page 5
Power Kit Installation
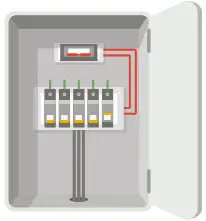
- Shut off the electricity at the breaker that controls the Shut off the electricity at the breaker that controls the doorbell’s circuit.

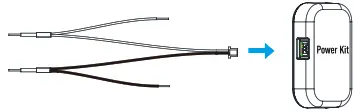
- Insert one end of the wire harness into the power kit. doorbell’s circuit.
- Remove the cover from your mechanical chime.
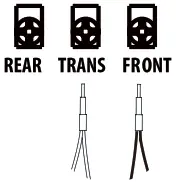
- Remove the existing chime wires from the terminals named TRANS and FRONT.
- Connect the wire harness to the chime’s terminals named TRANS and FRONT.named TRANS and FRONT.
- Insert the existing chime wire and the other end of Insert the existing chime wire and the other end of the wire harness into the wire connector, and twist it the wire harness into the wire connector, and twist it tightly. Repeat this step with the other chime wire. tightly. Repeat this step with the other chime wire.
Wiring Overview
- Mount the power kit to the side of the chime.
- Replace the chime cover.


Doorbell Installation
¡ Recommended Installation Height: 1.2 m (4 ft) above the ground.
- Shut off the electricity at the breaker that controls the shut off the electricity at the breaker that controls the doorbell’s circuit. doorbell’s circuit.
- (Optional) If the wall is uneven, paste the plate foam to the (Optional) If the wall is uneven, paste the plate foam to the mounting plate. mounting plate.
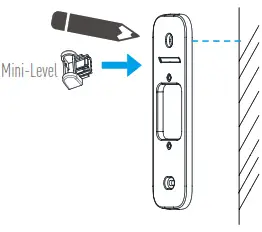
- Insert the mini-level into the mounting plate, and Insert the mini-level into the mounting plate, and mark the drill points when its bubble stays centered. mark the drill points when its bubble stays centered.
- Drill holes according to the drill points, and insert anchors. Drill holes according to the drill points, and insert anchors.¡ Remove the mini-level when drill points are marked.¡ Recommended Hole Depth: 25 to 30 mm (1 inch to 1.2 inches).
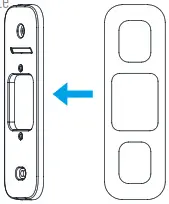
- Affix the mounting plate to the wall.
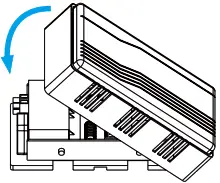
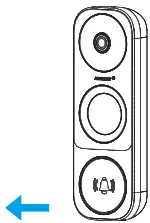
- Remove the faceplate on your doorbell from bottom to top.
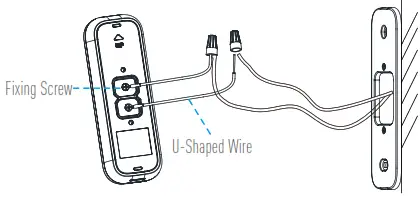
- If you have a chime installed, follow Option A; if not, follow Option B. Option A Connect doorbell to your existing doorbell wires.Option B Connect the fuse wire to your existing doorbell wire.Power Supply: 16 to 24 VAC
- Fix the doorbell to the mounting plate by inserting the doorbell screws.
- Restore the electricity at the breaker.
 ¡ Remove the mini-level when drill points are marked.¡ Recommended Hole Depth: 25 to 30 mm (1 inch to 1.2 inches).
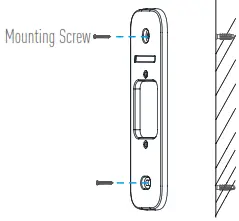
 Option B Connect the fuse wire to your existing doorbell wire.
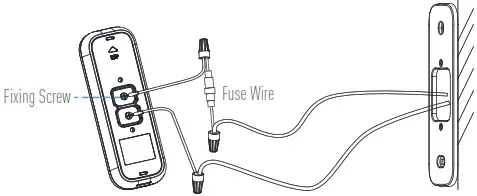 Power Supply: 16 to 24 VAC
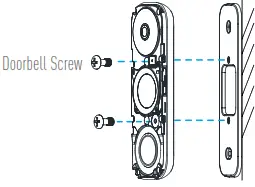
- Doorbell is powered on when its indicator flashes blue quickly. If not, make sure your electricity is off and check the wiring. If yes, proceed to doorbell setup.
- For the first time use, please power on the doorbell and wait for 3 hours before using it, or the chime in your home may not work.
Doorbell Setup
- Add to the Hik-Connect app (v3.12.0+).– – Connect your mobile phone to Wi-Fi.– – Download and install the Hik-Connect app by scanning the QR Code below.– – Open the Hik-Connect app and register a Hik-Connect user account following the start-up wizard, and log in.– – On the Home screen, tap “+” on the upper-right corner to go to the Scan QR Code page.Scan QR Code for Hik-Connect Apphttps://www.hik-connect.com/views/qrcode/hc/index.html
Hik-Connect App– – Scan the QR code on the device or the cover of this manual when the indicator flashes blue.– – Follow the app wizard to finish the Wi-Fi configuration.¡ If you want to change your doorbell’s Wi-Fi, press and hold the reset button for 5s and repeat this step.
- If you want to change your doorbell’s Wi-Fi, press and hold the reset button for 5s and repeat this step.Appendix Basics
 Scan QR Code for Hik-Connect App
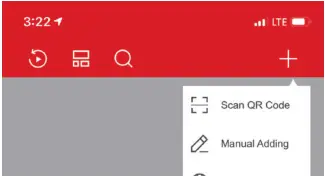 Hik-Connect App– – Scan the QR code on the device or the cover of this manual when the indicator flashes blue.– – Follow the app wizard to finish the Wi-Fi configuration.¡ If you want to change your doorbell’s Wi-Fi, press and hold the reset button for 5s and repeat this step.
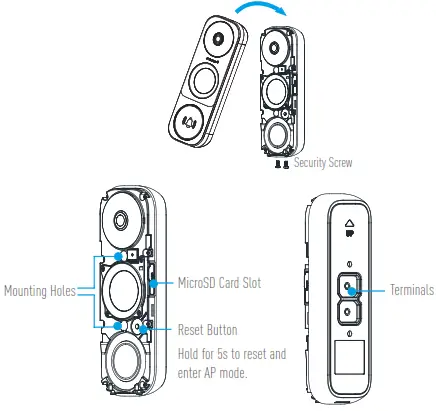
LED Indicator
| Blue Light | FlashingSteady On | Doorbell is ready for Wi-Fi configurationDoorbell is working |
| Red Light | Flashing FastSteady On | Device exceptionDoorbell is powering on |
Use AP Mode for Wi-Fi Configuration-For AP hotspot configuration, press the Reset button for 5 seconds, and then you will hear a voice prompt.-Wait for a few seconds, until you see the LED indicator flashing blue.-Follow the voice prompt to connect to Wi-Fi.
|
Wi-Fi Name: softap_XXXXXXXXX (9-digit Serial No.)Default Password: softap_XXXXXX (Verification Code)eg. Default Password: softap_ABCDEF |
Serial No. and verification code are listed on the cover of this manual.
Serial No. and verification code are listed on the cover of this manual.-Go back to the Hik-Connect app after a successful connection. Tap Next.-Search out the Wi-Fi you want the device to connect to, and enter a password.SD Card Management
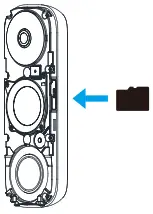
- In the Hik-Connect app, tap In the Hik-Connect app, tap the Storage Status in the Device Settings interface to check the SD card status. in the Device Settings interface to check the SD card status.
- If the card status displays as Uninitialized, tap to initialize it.The status will then change to Normal, and it can store videos and/or pictures., and it can store videos and/or pictures.

Connecting the Doorbell to an NVRThe DS-HD1 Doorbell can be connected to a Hikvision NVR for viewing and recording.
- Open the NVR interface (i.e., Web, local, or iVMS-4200 client).
- Go to Camera ManagementManagement.NOTE:The Camera Management interface location varies by NVR model.
- Click the Custom Add tab on the title bar to enter the Add IP Camera (Custom) interface.
- Enter the following information (use the Hikvision SADP tool (available at www.hikvision.com) to find the doorbell’s IP address):):· IP Camera Address: [doorbell’s IP address]· Protocol: HIKVISION· Management Port: 8000· Transfer Protocol: TCP· User Name: admin· Password: [verification code on doorbell label]
- Click Add to finish adding the doorbell.

 report this ad
![]()
References
[xyz-ips snippet=”download-snippet”]