
HIKVISION Wireless Glass Break Detector DS-PDBG12-EG2-WB/WE

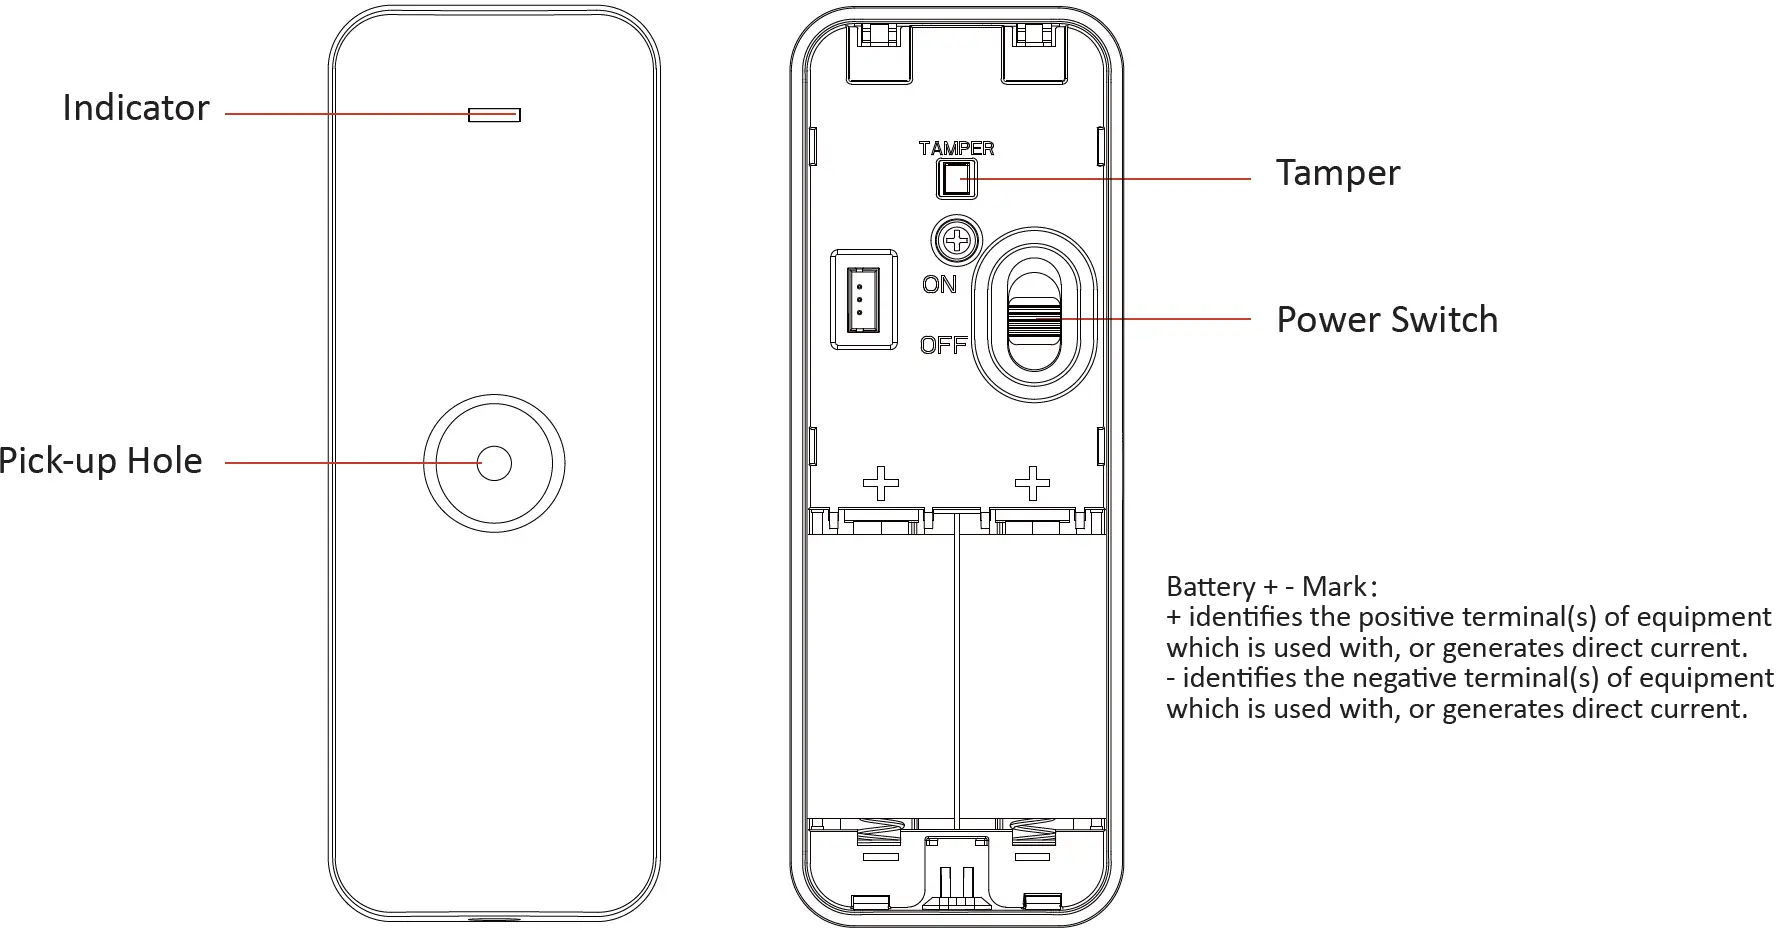
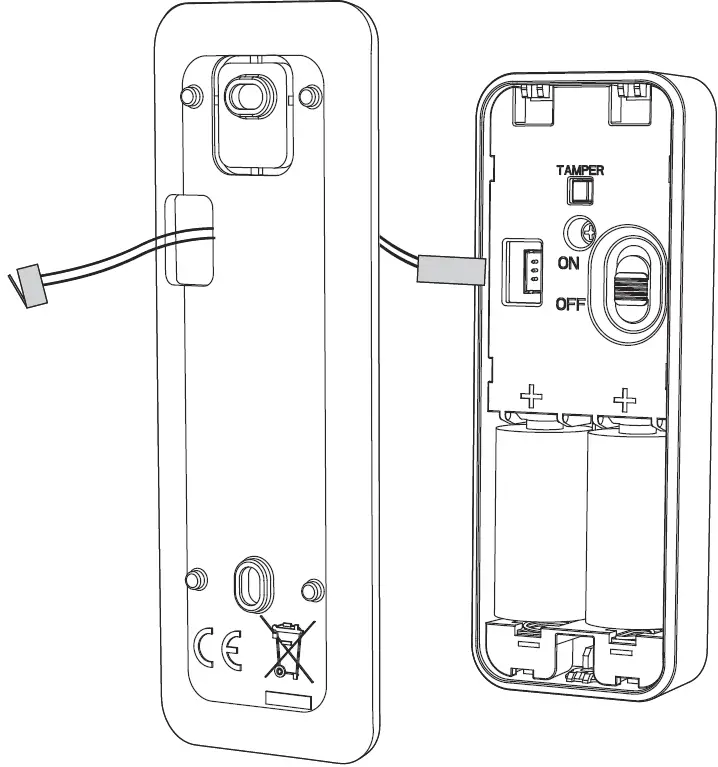
Appearance
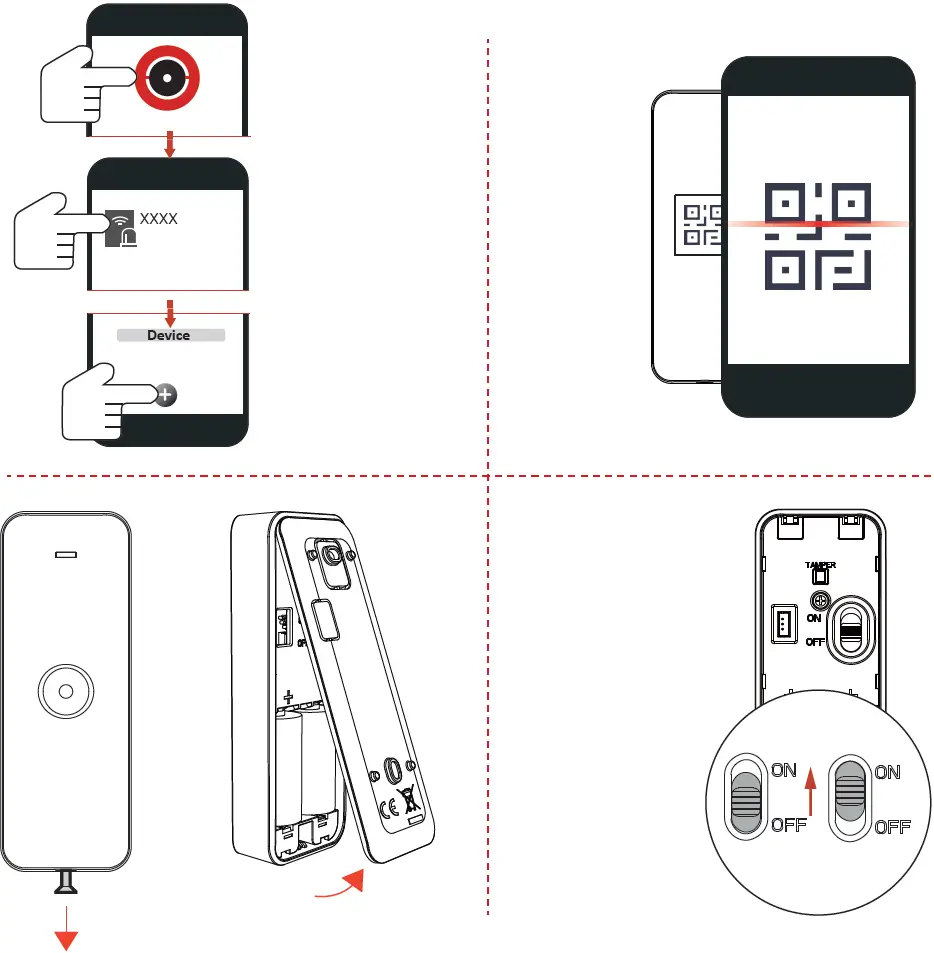
Enrollment
- Log in to the APP Store, download and install the App.
- Power on the security control panel.
- Log in the APP and tap the icon “+” . Scan the QR code or input the control panel serial No. to add the control panel.
Enroll the Peripheral Locally
- In the APP, tap the “Enrollment Mode” button on the control panel page to make the control panel enter the enrollment status.
- Loosen the screw and remove rear panel.
- Power on the peripheral, and it will be automatically enrolled to the control panel.
Enroll the Peripheral with QR and Serial No.
- In the APP, tap the icon “+” and scan the QR code or serial No. on the peripheral.
- Loosen the screw and remove rear panel.
- Power on the peripheral, and it will be automatically enrolled to the control panel.
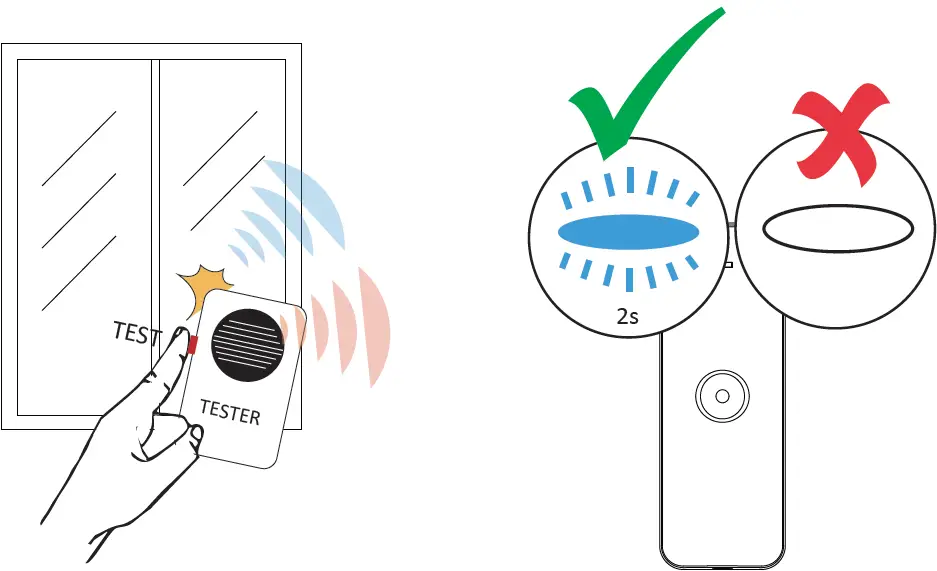
Test
BG (Break Glass) TestUse a tester to simulate the sound of glass-break at the required place.If the blue LED flashes 2 s, the installation position for BG detection is properly. If the LED indicator is still off, adjust the position of the detector.
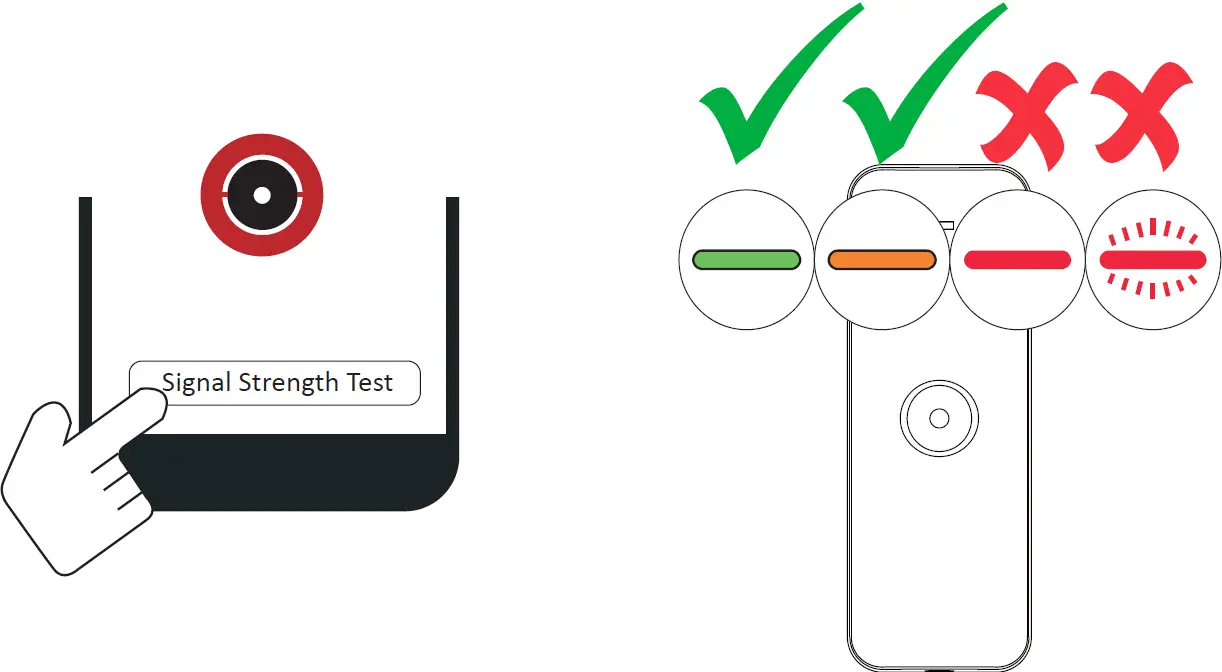
Installation
- Check Signal StrengthEnter the signal checking mode by operating on the control panel. Trigger the detector.Solid Green for 3s – Strong SignalSolid Orange for 3s – Medium SignalSolid Red for 3s – Weak SignalRed light flashes for 3s – Lost Signal

- Install the DetectorDig the groove to disassemble the device.Method 1: Secure the rear panel to the wall with two screws.Method 2: Paste rear panel on the wall with the sponge tape.Note: To make the TAMPER work properly, the thickness of the sponge tape should be no more than 1mm.Installing with sponge tape is non EN compliant.Close the front and the rear panel.Note: You should install the sensor and the magnetic stick at the door or window’s edge. Make sure they are aligned with the door or window’s edge.(optional)route the cable through cable hole if external inputs required.
 (optional)route the cable through cable hole if external inputs required.
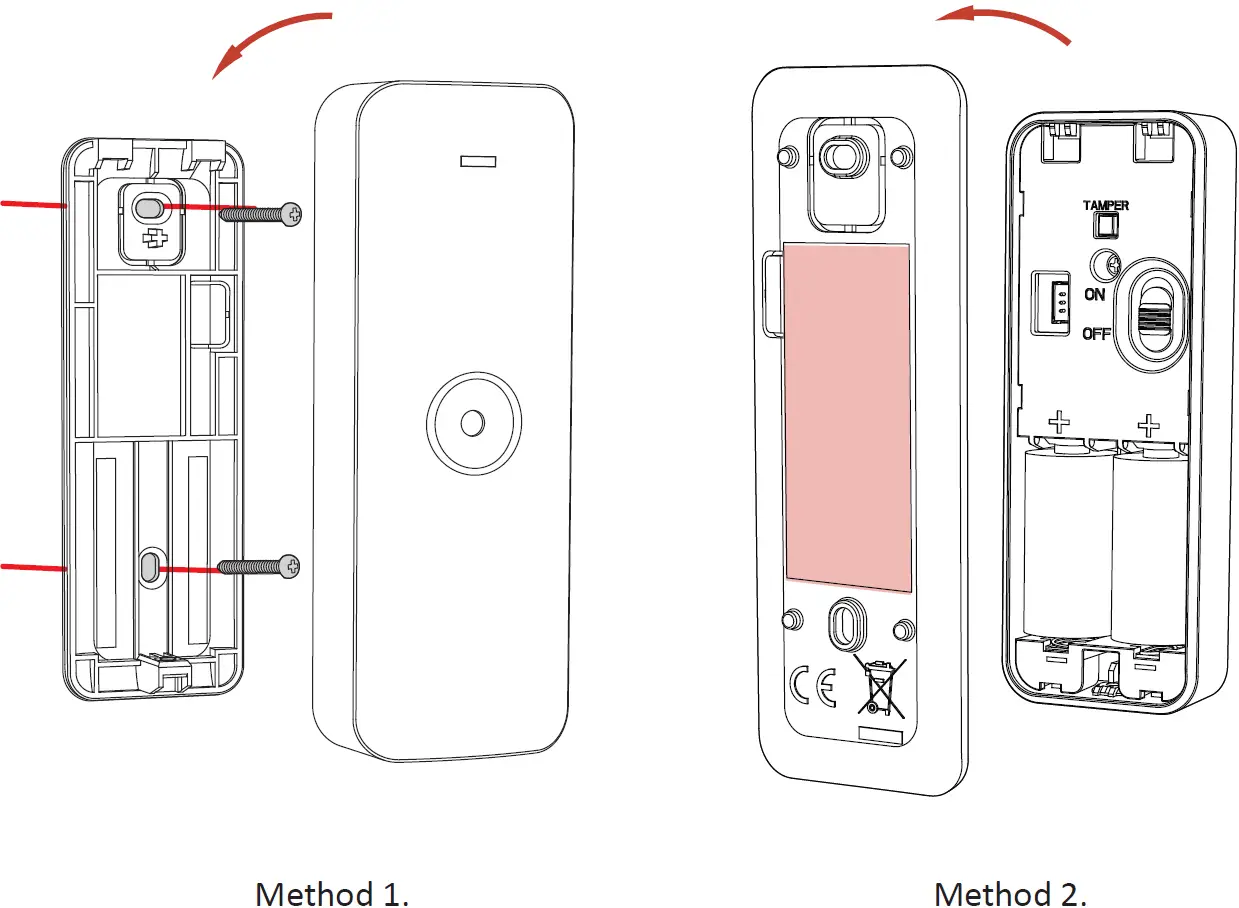
Functions
You can add two external inputs (each input can be set as NO\NC\TAMPER\Pulse) via the AX PRO client.While Any of the two inputs generates an alarm event, the detector reports the alarm to the AX PRO. The LED keeps blue for 2s.
Formatting
- Remove the battery.
- Hold the TAMPER button and power the detector on at the same time.
The red LED flashes 3 time when the formatting is completed.
Set Up with App
You can view the device status including temperature, signal intensity, battery level, lid, external input, etc., on the device page.Tap the button to enter the settings page.Disallowed field adjustable settings: None
Operation Caution and Device Maintenance
- All the electronic operation should be strictly compliance with the electrical safety regulations, fire prevention regulations and other related regulations in your local region.
- Do not drop the device or subject it to physical shock, and do not expose it to high electromagnetism radiation. Avoid the equipment installation on vibrations surface or places subject to shock (ignorance can cause equipment damage).
- Please make sure that the power has been disconnected before you wire, install or dismantle the device.
- If smoke, odors or noise rise from the device, turn off the power at once and unplug the power cable, and then please contact the service center.
- Do not drop the device or subject it to physical shock, and do not expose it to high electromagnetism radiation. Avoid the equipment installation on vibrations surface or places subject to shock (ignorance can cause equipment damage).
- Do not place the device in extremely hot (refer to the specification of the device for the detailed operation temperature), cold, dusty or damp locations, and do not expose it to high electromagnetic radiation.
- The device for indoor use shall be kept from rain and moisture.Exposing the equipment to direct sun light, low ventilation or heat source such as heater or radiator is forbidden (ignorance can cause fire danger).
- Do not aim the device at the sun or extra bright places. A blooming or smear may occur otherwise (which is not a malfunction however), and affecting the endurance of sensor at the same time.
- Improper use or replacement of the battery may result in hazard of explosion. Replace with the same or equivalent type only. Dispose of used batteries according to the instructions provided by the battery manufacturer.
- Do not expose the device to the corrosive gas. Otherwise the equipment damage may occur.
- Do not expose the device to the explosive situation.
Specification
|
Model |
DS-PDBG8-EG2-WB/WE |
|
| Detection Performance |
Detection Method |
Acoustic Sensor |
| Detection Range |
8m |
|
|
Detection Angle |
120° | |
| Sensitivity |
2m,4m,6m,8m |
|
|
Glass Type |
Float, Plate, Tampered, Wired, Laminated Leaded, Double Glazing |
|
|
Glass Thickness |
2.4mm to 6.4mm |
|
|
Glass Size |
0.3m x 0.3m to 3m x 3m |
|
| Feature |
Digital Processing |
Support |
|
Tamper Protection |
Front, Rear |
|
| Environment Temperature Indicator |
Support |
|
|
Signal Strength Indicator |
Support |
|
| Interface |
Alarm Input |
Normally Closed, Normally Open, Impulse Count |
|
Power Switch |
Power Up Enrolling |
|
|
LED Indicator |
Blue(Alarm) |
|
| Transmission |
Transmission Technology |
Tri-X Wireless |
|
Transmission Method |
Two-Way RF Wireless |
|
|
Transmission Frequency |
433MHz/868MHz |
|
|
Transmission Security |
AES-128 Encryption |
|
|
Transmission Range(Free Space) |
1Km(433MHz)/1.6Km(868MHz) | |
| Frequency Hopping |
Support |
|
|
Enrolling Method |
Power up,Remote ID,QR Code | |
|
Electrical Characteristics |
Power Supply |
Battery Powered |
|
Battery Type |
CR123A × 2 | |
| Typical Voltage |
3V |
|
|
Standard Battery Life |
5 Years |
|
| General |
Operation Temperature |
-10 °C to 55 °C (14 °F to 131 °F) |
| Storage Temperature |
-20 °C to 60 °C -(4 °F to 140 °F) |
|
|
Operation Humidity |
10% to 90% | |
| Dimension(WxHxD) |
38.8mm × 107.0mm × 24.5mm |
|
|
Weight |
83g | |
| Mounting Method |
Wall,Ceiling |
|
|
Application Scenario |
Indoor |
![]()
References
[xyz-ips snippet=”download-snippet”]