![]()
 ADMIRALPREMIUM WIRELESS BT CONTROLERFOR N64®QUICK USER GUIDE
Before You Begin
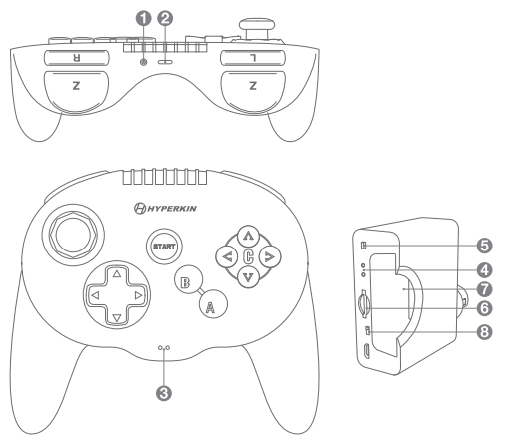
- The CONTROLLER SYNC BUTTON (1) is located on the very top of the Admiral near the MICRO CHARGE PORT (2).
- The CONTROLLER LED INDICATORS (3) are located on the face of the Admiral near the bottom of the controller. The RIGHT LED INDICATOR displays the Admiral’s syncing status. The LEFT LED INDICATOR displays the Admiral’s charging and battery life status.
- The DONGLE LED INDICATORS (4) are located on the front of the DONGLE. The TOP LED INDICATOR displays the dongle’s syncing status. The BOTTOM LED INDICATOR indicates when Transfer Mode is enabled.
- The DONGLE SYNC BUTTON (5) is located on the front of the DONGLE.
- The DONGLE STORAGE MEMORY CARD SLOT (6) is located on the front of the DONGLE.
- The EXPANSION PORT (7) is located on the front of the DONGLE. • The MODE SWITCH is located (8) on the front of the DONGLE.
Syncing the Admiral
- With your console turned OFF, plug the DONGLE into one of the controller ports. Make sure the MODE SWITCH on the DONGLE is in the DOWN position indicating it is in Controller mode.
- Power your console ON and then press the DONGLE SYNC BUTTON to enter pairing mode. Once pressed, the TOP LED INDICATOR on the DONGLE will start to quickly flash BLUE.
- Hold the CONTROLLER SYNC BUTTON on your Admiral for 5 seconds to begin syncing your controller. Once pressed, the RIGHT LED INDICATOR on the Admiral will start to quickly flash BLUE. Both the TOP LED INDICATOR on the DONGLE and the RIGHT LED INDICATOR on the Admiral will light up solid BLUE when fully synced. Pairing may take a few moments.
Note: Consoles require controllers to be connected before use. Make sure your dongle is plugged in and connected before powering on your console. If your dongle and controller are synced, and you are not experiencing any input detection from your Admiral, reset your console.Connected to a BT Device (No Dongle Required)
- Hold the CONTROLLER SYNC BUTTON on your Admiral for 5 seconds to begin syncing your controller to your BT-compatible device. Once pressed, the RIGHT LED INDICATOR on your controller will start to quickly flash BLUE.
- When connecting to a BT-compatible device such as a computer, the controller will show up as “Hyperkin Pad”. When fully synced, the RIGHT LED INDICATOR will light up solid BLUE.
Note: Setup and functionality may vary depending on your device.
Once You’ve Synced
- Pressing the CONTROLLER SYNC BUTTON once will turn ON the Admiral.
- Pressing ANY BUTTON will WAKE UP the Admiral if it has gone to sleep.
- Pressing the CONTROLLER SYNC BUTTON once will turn OFF your Admiral.
- After the initial syncing, the Admiral will automatically connect to the last synced device when you press the CONTROLLER SYNC BUTTON. If you want to change the device that you are synced to, you will need to resync the controller.
Using the Mode SwitchThe Mode switch on the dongle allows you to toggle between Controller mode and Transfer Mode. Moving the Mode switch into the DOWN position enables Controller mode. Controller mode allows for traditional usage of your controller. Moving the Mode switch to the UP position allows for Transfer Mode. This enables you to transfer your saved data from your storage memory card (not included) to your game memory card (not included) and vice versa. It is important to make sure your dongle is set to the correct mode before use.Note: Not all games allow you to save your data on the game memory card Please refer to your games manually to see if it is compatible. The Admiral is compatible with standard storage memory cards.Inserting a Storage Memory Card
- Make sure the DONGLE plug is facing left and the Hyperkin logo is facing you. Insert your storage memory card (not included) – with the side of the contact facing you – into the DONGLE STORAGE MEMORY CARD SLOT. Once it is completely inserted, you will hear a click. Note: If the storage memory card is not fitting correctly in the slot, do not force it.
- To remove the storage memory card, push down on the inserted storage memory card in the slot. You will hear a click indicating that it is ejected from the slot. You can now safely take out your storage memory card.
Transferring Save Data from Game Memory Card to Storage Memory Card
- Plug the DONGLE into a controller port. Make sure that your compatible storage memory card and your game memory card are inserted into their corresponding slots on the DONGLE.
- Power ON your console and move the MODE SWITCH into the UP position. Once it’s in the UP position, the BOTTOM LED INDICATOR will quickly flash YELLOW indicating that Transfer Mode is enabled. The BOTTOM LED INDICATOR will continuously flash for as long as it is in Transfer Mode.
- Press the DONGLE SYNC BUTTON once to transfer the saved data from your game memory card to the storage memory card. Both the top and bottom DONGLE LED INDICATORS will illuminate a solid BLUE and YELLOW light for a few seconds to indicate a successful transfer.
- Remove the storage memory card from the dongle and insert it into your computer directly or into a device that is compatible with your computer. Once inserted, you can open the file. It will be listed as “R.MPK°. You can save the file onto your computer to securely store the saved data.
Note: If your game memory card or storage memory card are not inserted, and you press the DONGLE SYNC BUTTON, the TOP DONGLE LED INDICATOR will flicker BLUE once to indicate an unsuccessful transfer.Transferring Save Data from Storage Memory Card to Game Memory Card
- To be able to play your transferred save files, you will need to rename the file from “R.MPK” to “W.MPK” on your computer. After you change the file name, remove your storage memory card from your computer and place it back inside the DONGLE STORAGE MEMORY CARD SLOT. Make sure that your game memory card is inserted in the EXPANSION PORT on the DONGLE.
- With your console powered OFF, plug the DONGLE into one of the controller ports. Make sure the MODE SWITCH is in the UP position enabling Transfer Mode.
- Press the CONTROLLER SYNC BUTTON twice and the W.MPK file will transfer to your game memory card. After pressing the CONTROLLER SYNC BUTTON, the bottom DONGLE LED INDICATOR will illuminate a solid YELLOW light for a few seconds to indicate a successful transfer. Once done, move the MODE SWITCH into the DOWN position to enable the CONTROLLER MODE. You are now ready to play your transferred save.
Note: Make sure that the game memory card you are using has enough memory to hold the transferred save file. If your save file is not in the right format, your game memory card will not be able to play ft. An unsuccessful transfer will be indicated by the TOP DONGLE LED INDICATOR flickering BLUE once.Charging Your Admiral
- Plug the provided MICRO CHARGE CABLE into your Admiral’s MICRO PORT. Connect the other end to a USB 5V 1A power source (not included).
- A solid RED light illuminating from the LEFT LED INDICATOR indicates the Admiral is charging.
- The RED light will turn off when the Admiral is fully charged.Note: You can use the Admiral even while it is charging.
- A slowly flashing RED light means the Admiral is low on battery.
- If the Admiral is low on battery and not synced, both the left and right CONTROLLER LED INDICATORS will flash a BLUE and RED light.
Helpful Hints
- The Admiral can operate up to about 30 feet from your N64 console.
- If you are using multiple Admiral controllers, make sure to sync them one at a time.
- If the Admiral is ON and not synced, the RIGHT LED INDICATOR on the controller will quickly flash BLUE for 10 seconds, then go to SLEEP.
- Using original or third-party force feedback accessories with the Admiral’s dongle will cause your console to shake. We do not recommend using it and are not responsible for any damages.
Instructions for Nintendo Switch®
The Admiral is compatible with the Nintendo Switch®. Please follow the instructions below in order to pair your controller. You will need a Windows 10 PC to update the firmware. If at any time you need help with these steps, please contact [email protected].Downloading the Software and Updating Firmware Please visit “https://www.hyperkin.com/admiralupdate” for instructions on downloading and updating the Admiral firmware.Setting Up the Controller for the Nintendo Switch®
- After turning on your console, go to Controllers. Select Change Grip/Order.
- Press and hold down the CONTROLLER SYNC Button. As you’re holding it down, press and hold down any face button on the Admiral. The CONTROLLER LED INDICATORS will begin to flash RED and BLUE.
- There are four different mapping profiles to choose from: Controller Profile 1 (Default), Controller Profile 2, Controller Profile 3, Controller Profile 4.
You can switch controller profiles on the fly simply by turning your controller OFF by pressing the CONTROLLER SYNC BUTTON. The button you use to wake up the controller will determine what profile it switches to.
Controller Profile 1: AController Profile 2: BController Profile 3: StartController Profile 4: Any other button on the controller (including D-pad).
| ADMIRAL CONTROLLER | Controller Profile 1: A | Controller Profile 2: B | Controller Profile 3: Start | Controller Profile 4: Start Other Button |
| DPAD UP | DPAD UP | DPAD UP | Right Analog Stick | X |
| DPAD DOWN | DPAD DOWN | DPAD DOWN | Right Analog Stick | Minus – |
| DPAD LEFT | DPAD LEFT | DPAD LEFT | Right Analog Stick | Y |
| DPAD RIGHT | DPAD RIGHT | DPAD RIGHT | Right Analog Stick | Home |
| B | Y | Home | B | B |
| A | B | Minus – | A | A |
| CUP | Home | X | Home | Right Analog Stick |
| C DOWN | A | B | Y | Right Analog Stick |
| CLEFT | X | Y | X | Right Analog Stick |
| C RIGHT | Minus – | A | Minus – | Right Analog Stick |
| L | L | LR | L | L |
| R | R | ZL | R | R |
| ZL | ZL | ZR | ZL | ZL |
| ZR | ZR | Plus + | ZR | ZR |
| Start | Plus + | Stick | Plus + | Plus + |
| Analog | Left Analog Stick | Left Analog | Left Analog Stick | Left Analog Stick |
![]() FCC Notice:This equipment has been tested and found to comply with the limits for Class B digital devices, pursuant to Part 15 of the FCC Rules. These limits are designed in a residential installation. This equipment generates, uses, and can radiate radio frequency energy and, if not installed and used in accordance with the instructions, may cause harmful interference to radio communications. However, there is no guarantee that interference will not occur in a particular installation. If this equipment does cause harmful interference to radio or television reception, which can be determined by turning the equipment off and on, the user is encouraged to try to correct the interference by one or more of the following measures:
FCC Notice:This equipment has been tested and found to comply with the limits for Class B digital devices, pursuant to Part 15 of the FCC Rules. These limits are designed in a residential installation. This equipment generates, uses, and can radiate radio frequency energy and, if not installed and used in accordance with the instructions, may cause harmful interference to radio communications. However, there is no guarantee that interference will not occur in a particular installation. If this equipment does cause harmful interference to radio or television reception, which can be determined by turning the equipment off and on, the user is encouraged to try to correct the interference by one or more of the following measures:
- Reorient or relocate the receiving antenna.
- Increase the separation between the equipment and receiver.
- Connect the equipment into an outlet on a circuit different from that to which the receiver is connected.
- Consult the dealer or an experienced radio N technician or email [email protected] for assistance. Shielded cables must be used with this unit to ensure compliance with the Class B FCC limits.
Changes or modifications to this unit not expressly approved by the party responsible for compliance could void the user’s authority to operate this equipment.
![]() Statement of Compliance with EU DirectiveHyperkin Inc., located at 1939 West Mission Blvd, Pomona, CA 91766, declares under our sole responsibility that the product, Admiral Wireless BT Controller for N64 ®, is in compliance with the essential requirements and other relevant provisions of the Low Voltage Directive (LVD) 2014/35/EU, EMC Directive 2014/30/EU, and RoHS Directive 2011/65/EU and carries the CE marking. The full Declaration of Conformity can be requested by emailing:Email: [email protected]Company Name: Hyperkin Inc.Address: 1939 West Mission Blvd, Pomona, CA 91766
Statement of Compliance with EU DirectiveHyperkin Inc., located at 1939 West Mission Blvd, Pomona, CA 91766, declares under our sole responsibility that the product, Admiral Wireless BT Controller for N64 ®, is in compliance with the essential requirements and other relevant provisions of the Low Voltage Directive (LVD) 2014/35/EU, EMC Directive 2014/30/EU, and RoHS Directive 2011/65/EU and carries the CE marking. The full Declaration of Conformity can be requested by emailing:Email: [email protected]Company Name: Hyperkin Inc.Address: 1939 West Mission Blvd, Pomona, CA 91766
![]() Waste Electrical and Electronic Equipment DirectiveThis symbol on the product or on its packaging indicates that this product must not be disposed of with your other household waste. Instead, it is your responsibility to dispose of your waste equipment by handing it over to a designated collection point for the recycling of waste electrical and electronic equipment. The separate collection and recycling of your waste equipment at the time of disposal will help to conserve natural resources and ensure that it is recycled in a manner that protects human health and the environment. For more information about where you can drop off your waste equipment for recycling, please contact your local city office, your household waste disposal service, or the shop where you purchased the product.
Waste Electrical and Electronic Equipment DirectiveThis symbol on the product or on its packaging indicates that this product must not be disposed of with your other household waste. Instead, it is your responsibility to dispose of your waste equipment by handing it over to a designated collection point for the recycling of waste electrical and electronic equipment. The separate collection and recycling of your waste equipment at the time of disposal will help to conserve natural resources and ensure that it is recycled in a manner that protects human health and the environment. For more information about where you can drop off your waste equipment for recycling, please contact your local city office, your household waste disposal service, or the shop where you purchased the product.
![]()
LIMITED WARRANTY To register this product, go towww.Hyperkin.con/warranty© 2020 Hyperkin Inc.Hyperkin® is a registered trademark of Hyperkin Inc.Nintendo Switch® and N64® is a registered trademark of Nintendo® of America Inc.This product is not designed, manufactured, sponsored, endorsed, or licensed byNintendo® of America Inc. in the United States and/or other countries.All rights reserved.Made in China.
[xyz-ips snippet=”download-snippet”]