![]()
![]()

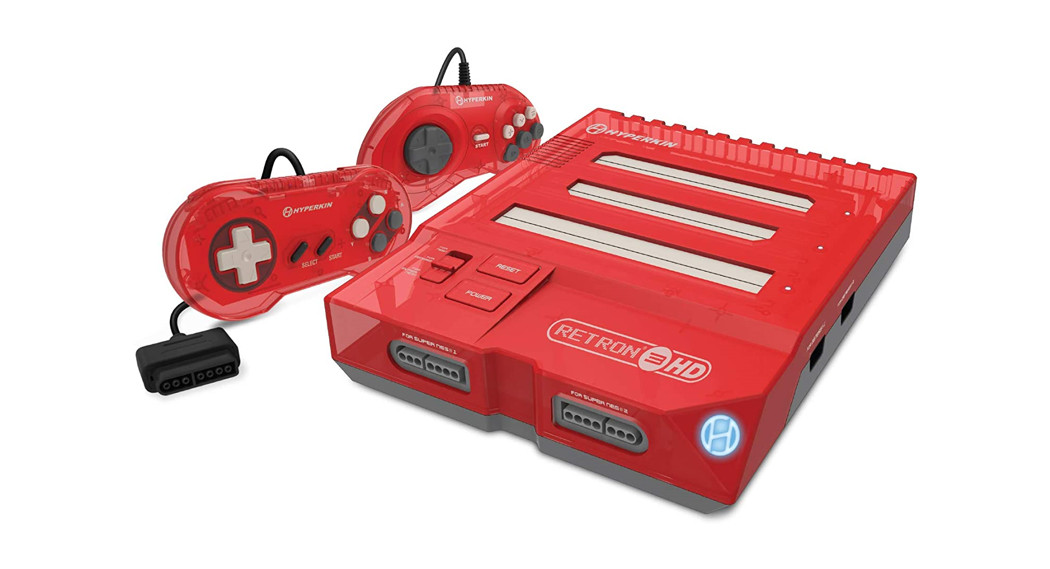
3-in-1 Retro Gaming Consolefor NES®, Super NES® / Super Famicom™, and Genesis® / Mega DriveINSTRUCTION MANUAL
Thank you for purchasing the RetroN® 3 HD Gaming System.For your safety and the safety of others, please carefully read the instruction manual before using this product.
Package Contents
- RetroN® 3 HD
- Micro Cable
- AV Cable
- HD Cable
- “Scout” Premium Controller for Super NES®
- “Squire” Premium Controller for Genesis®
- AC Adapter**If AC Adapter is not included, we strongly recommend that you use a USB wall AC Adapter that has a minimum output of 5V 1A.
Setting Up the RetroN® 3 HD
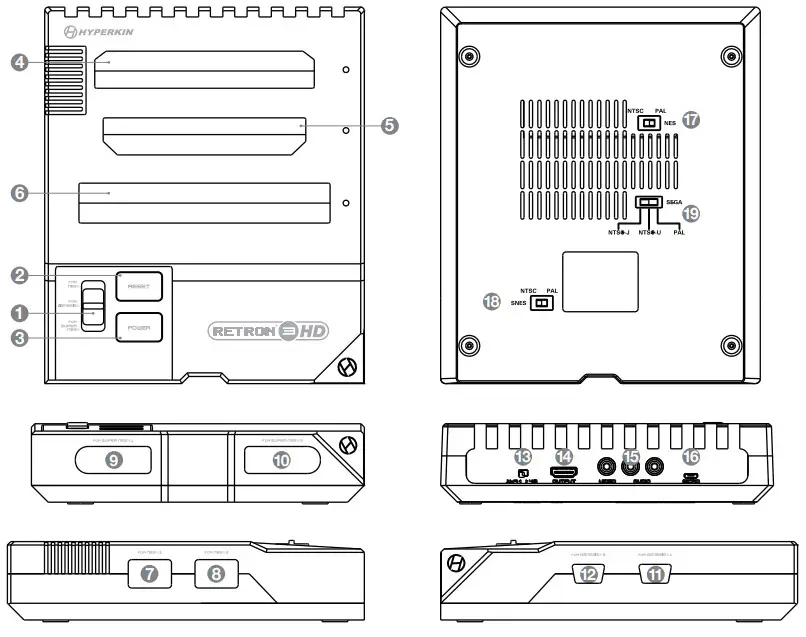
| 1. SYSTEM SELECTOR SWITCH2. RESET BUTTON3. POWER BUTTON4. CARTRIDGE SLOT FOR NES®5. CARTRIDGE SLOT FOR GENESIS®/MEGA DRIVE6. CARTRIDGE SLOT FOR SUPER NES®/SUPER FAMICOM™7. PORT FOR NES® CONTROLLER 18. PORT FOR NES® CONTROLLER 29. PORT FOR SUPER NES® CONTROLLER 110. PORT FOR SUPER NES® CONTROLLER | 11. PORT FOR GENESIS® CONTROLLER 112. PORT FOR GENESIS® CONTROLLER 213. ASPECT RATIO SWITCH14. OUTPUT PORT15. AV PORT16. MICRO PORT17. NTSC/PAL SWITCH FOR NES®18. NTSC/PAL SWITCH FOR SUPER NES®/SUPER FAMICOM™19. NTSC/PAL SWITCH FOR GENESIS®/MEGA DRIVE |
Setting Up the RetroN® 3 HD via HD Cable
- Insert the HD Cable into the OUTPUT PORT on the RetroN® 3 HD.
- Insert the other end of the HD Cable into the HD input on your HDTV.
- Insert the MICRO CABLE into the MICRO PORT on the RetroN® 3 HD.
- Insert the other end of the MICRO CABLE into a power source.*If AC Adapter is not included, we strongly recommend that you use a USB wall AC Adapter that has a minimum output of 5V 1A.
- Plug the AC Adapter into a power outlet.
Setting Up the RetroN® 3 HD via AV Cable
- Insert the AV Cable into the AV PORT on the RetroN® 3 HD.
- Insert the other end of the AV Cable into the AV input on the TV.
- Insert the MICRO CABLE into the MICRO PORT on the RetroN® 3 HD.
- Insert the other end of the MICRO CABLE into a power source.*If AC Adapter is not included, we strongly recommend that you use a USB wall AC Adapter that has a minimum output of 5V 1A.
- Plug the AC Adapter into a power outlet.Note: Simultaneous video output using both the HD Cable and the AV Cable is not supported.
Aspect Ratio and the Region Switches
BEFORE powering on your RetroN® 3 HD, make sure your aspect ratio (via HD Cable only) and region is configured. Using the incorrect region setting will cause inaccuracies in the in-game speed.
- Located in the BACK of the RetroN® 3 HD is the ASPECT RATIO SWITCH.Moving the switch to the LEFT position indicates a 16:9 ratio. Moving the switch to the RIGHT position indicates a 4:3 ratio. The aspect ratio can only be toggled when using an HD Cable.Note: Toggling between the 4:3 and 16:9 aspect ratios during gameplay might lead to graphical glitches. We recommend powering off your console and then adjusting your preferred aspect ratio.
- Located on the BOTTOM of the RetroN® 3 HD are the region switches. With the front of the console oriented downwards and the bottom facing you, moving either the switch for NES® or Super NES® to the LEFT position will indicate you are using a PAL cartridge. Moving the switch for NES® or Super NES® to the RIGHT position will indicate you are using an NTSC cartridge. Moving the switch for Genesis®/Mega Drive to the LEFT position will indicate you are using a PAL cartridge. Moving the switch for Genesis®/Mega Drive to the MIDDLE position will indicate you are using an NTSC-U cartridge. Moving the switch for Genesis®/Mega Drive to the RIGHT position will indicate you are using an NTSC-J cartridge.
Playing Games
- Insert the cartridge into its appropriate slot. You can have all console-compatible cartridges inserted at the same time.
- With the RetroN 3, HD turned OFF, use the SYSTEM SELECTOR SWITCH to choose which system you will be playing, then press the POWER BUTTON. Moving the switch into the UP position selects FOR NES®. Moving the switch into the MIDDLE position selects FOR GENESIS®/MEGA DRIVE. Moving it into the DOWN position to selects FOR SUPER NES®.
- If you would like to reset your game, press the RESET BUTTON located on the front of the console.
- When you’re done playing, press the POWER BUTTON to turn OFF your console.
- Lastly, to remove your cartridge safely, place one hand firmly on the console and use your free hand to gently lift the cartridge out of the slot.
Using Controllers
With the RetroN® 3, HD turned OFF, insert the controller(s) into their corresponding ports.The RetroN® 3 HD comes with a “Scout” and a “Squire” premium classic-style controller. The RetroN® 3 HD also supports original and 3rd party controllers.Cartridges for NES® are only compatible with original and compatible controllers for NES® OR using the included adapter. Connect the adapter to one of the controller ports for NES®. Connect your Scout to the adapter.
 FCC Warning Statement
This equipment has been tested and found to comply with the limits for Class B digital devices, pursuant to Part 15 of the FCC Rules. These limits are designed in a residential installation. This equipment generates, uses, and can radiate radio frequency energy and, if not installed and used in accordance with the instructions, may cause harmful interference to radio communications. However, there is no guarantee that interference will not occur in a particular installation. If this equipment does cause harmful interference to radio or television reception, which can be determined by turning the equipment off and on, the user is encouraged to try to correct the interference by one or more of the following measures:– Reorient or relocate the receiving antenna.– Increase the separation between the equipment and receiver.– Connect the equipment into an outlet on a circuit different from that to which the receiver is connected.– Consult the dealer or an experienced radio TV technician or email [email protected] for assistance.Shielded cables must be used with this unit to ensure compliance with the Class B FCC limits.Changes or modifications to this unit not expressly approved by the party responsible for compliance could void the user’s authority to operate this equipment.
Statement of Compliance with EU DirectiveHyperkin Inc., located at 1939 West Mission Blvd, Pomona, CA 91766, declares under our sole responsibility that the product, RetroN 3 HD Gaming Console, is in compliance with the essential requirements and other relevant provisions of the Low Voltage Directive (LVD) 2014/35/EU, EMC Directive 2014/30/EU, and RoHS Directive 2011/65/EU and carries the CE marking.The full Declaration of Conformity can be requested by emailing:Email: [email protected]Company Name: Hyperkin Inc.Address: 1939 West Mission Blvd, Pomona, CA 91766
© 2020 Hyperkin Inc. Hyperkin®, RetroN®, and Perfect Pin™ are registered trademarks and trademarks, respectively of Hyperkin Inc. Super NES®, NES®, and Super Famicom™ are registered trademarks and trademarks, respectively, of Nintendo® of America Inc. Genesis® is a registered trademark of Sega Games Co., Ltd. This product is not designed, manufactured, sponsored, endorsed, or licensed by Nintendo® of America Inc. nor Sega Games Co., Ltd. in the United States and/or other countries. All rights reserved. Patent Pending. Made in China.
Please visit www.Hyperkin.com/warranty to register your official Hyperkin product for Hyperkin’s Warranty.For troubleshooting, contact us at [email protected].
[xyz-ips snippet=”download-snippet”]