
KyOCERa Duraforce Ultra 5g Uw User Manual
You can get around on your phone in different ways. Learn how to choose an option, then use that option to move between apps and other items.
Select how you prefer to get around:Open your phone’s Settings app.Go to System > Gestures > System navigation.
Select your preference:• Gesture navigation: No buttons.• 3-button navigation (Default): Three buttons for Home, Back, and Recent.
3-button navigation: You will find a row of three buttons that let you perform specific functions as below.
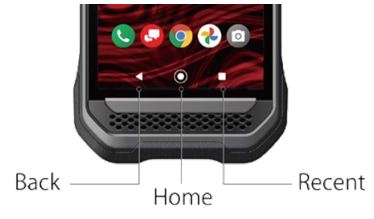
- Back – Tap to return to the previous screen, or close a dialog box, options menu, the Notifications panel, or onscreen keyboard.
- Home – Tap to open the Home screen.
- Touch and hold to launch the Google Assistant.
- Recent – Tap to open a list of thumbnail images of screens you have worked with recently. To open one, tap it. To remove a screen from the list, swipe it up. To close all screens, tap CLEAR ALL.
Gesture navigation: No buttons.
- Back – Swipe from the left or right edge of the screen.
- Home – Swipe up from the bottom of the screen.
- Recent – Swipe up from the bottom, hold, then let go.
- Close apps: Swipe up on the app image.
- Open an app: Tap its image.
- Switch between apps – At the very bottom of the screen, swipe left to right.
Biometric Security
The device security options allow you to lock your phone’s screen and enhance the security through various options. Setting up your Security options can be done during the Initial Setup Wizard or at any time through the Security Settings menu.
IMPORTANT: The highest security level protection (password protection) and frequent change of password are recommended to protect your phone and data from unauthorized access.
- From the Apps launcher, tap Settings > Security – Select your preference:
Screen lock:Options include None, Swipe, Pattern, Pin and Password.
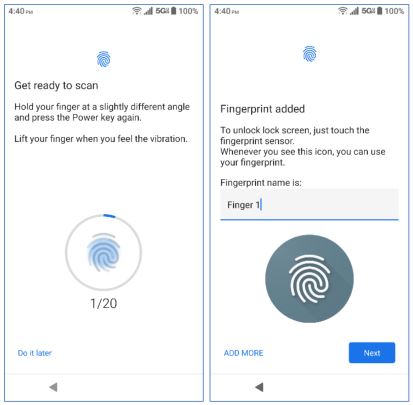
NOTE: A PIN must be setup to allow use of Biometric security options.
Fingerprint:Enabling this option allows you to touch the fingerprint sensor (Power key) to unlock the screen. Follow the onscreen instructions to setup one or more fingerprints.
Face unlock:You can use your face to unlock your phone. To set up face unlock, follow the onscreen instructions. When you wake-up the display, simply look at the screen to unlock the phone

NOTES:
- Face unlock may not work properly in a dark environment.
- Make sure your face is fully visible and not covered by any object, such as a mask, hat, or sunglasses.
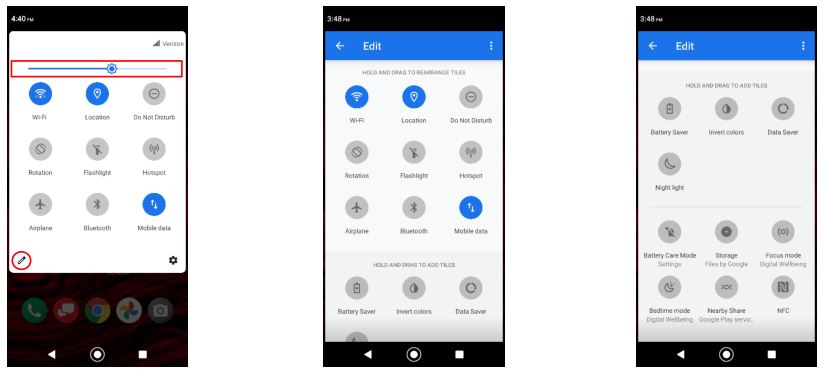
Quick Settings
The quick settings screen allows you to quickly access useful menu items.
- Slide the status bar down to the bottom of the touchscreen. To show more entries, slide the Quick Settings panel down to the bottom.
- Tap on a quick setting panel icon to enable or disable the feature.
- To change the positions of items, tap
 . Touch and hold the item you want to move, and then drag it to a different location and release your finger.
 - To adjust the screen brightness, drag the knob on the brightness slider left or right.
- To change the positions of items, tap
Quick Shortcuts
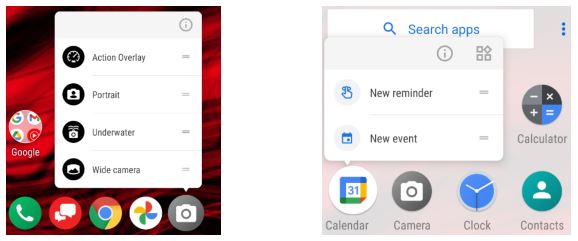
Touch and hold an application icon to display available Quick Shortcuts on the screen.
- Touch and hold any application icon to display available Quick Shortcuts options.
- Tap the desired shortcut on the menu to go directly to the selected option.TIP: You can create a Home screen shortcut from the Quick Shortcuts by touching and holding, then touch, hold and drag the shortcut and place it where you want.
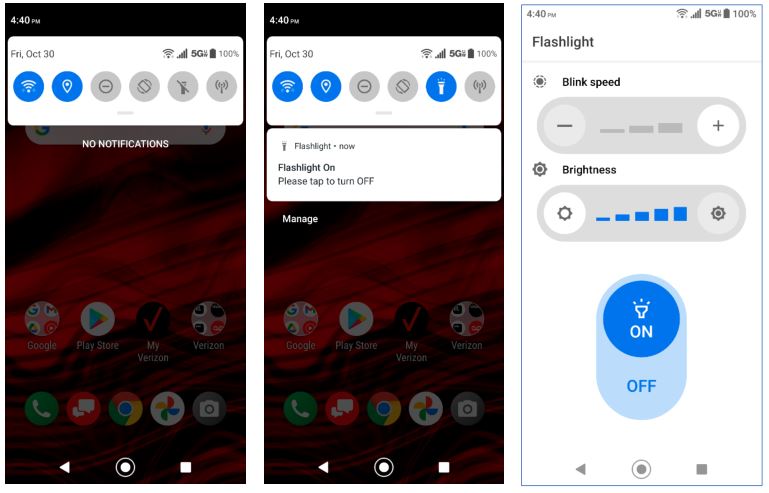
Flashlight
Your phone’s camera flash can work as a flashlight.
WARNING: Do not shine the flashlight into anyone’s eyes, doing so may compromise their vision and cause an accident.
- Slide the status bar down towards the bottom of the touchscreen. Then, slide down the Quick Settings panel to show the Flashlight button.
- Tap to turn the light on.
- Tap to turn it off.
- Touch and hold the Flashlight button to open the Flashlight settings screen and you can set a Blink speed and adjust the Brightness.
Programmable Keys
You can select what the PTT, camera, and SOS keys do for a long press. To assign a function to Programmable keys:
- From the Apps launcher, tap Settings > Programmable keys.
- Select PTT key, Camera key, or SOS key.NOTE: The camera key is assigned to camera operation by default. PTT & SOS keys when assigned to 3rd party apps such as Push to Talk may require a subscription.
- Select an application you want to assign to the key. The assigned application launches when you press and hold the key.– Tap Do nothing if you do not want to assign any function to the key.NOTE: You can set the Programmable keys to wake up your phone by tapping the on/off icon next to Wake up device. This function is not available when you select Do nothing.
Wake up device
If you turn this on and the screen is off, a long press on any of the Programmable keys will turn on the phone’s screen. To open apps other than the camera requires the user to unlock the device.
Underwater Mode
You can take a picture or record video in the water. Your phone is immersible in water for up to 30 minutes at a depth not exceeding two meters (about 6.56 ft.). The Camera menu bar provides various modes, slide to More to access Underwater.
WARNING: Avoid using the phone in saltwater. It is highly corrosive and can damage internal components and degrade the audio performance over time.
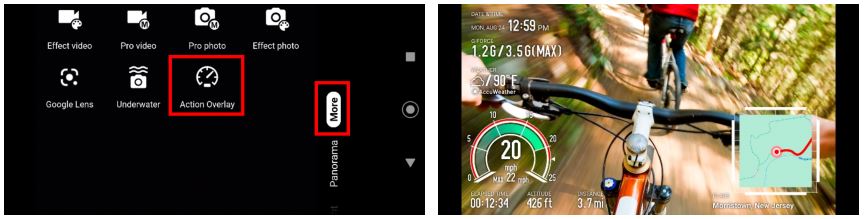
TIP: You can change the modes on the menu bar from the Edit modes menu. Underwater and Action Overlay are only available under More.
- From the Home screen, tap > More > Underwater .
- In Underwater mode, the physical keys below are used instead of the touchscreen.

NOTE: The touchscreen is unavailable except the thumbnail area.
- For Viewfinder screen:
- Camera key (pressing once) to take photos or record videos.
- Camera key (pressing twice) to switch between Camera and Camcorder.
- Volume keys to zoom.
- PTT key to open menu. (Long press to exit Underwater mode.)
- For Menu screen:
- Camera key to switch or select value.
- Volume keys to choose item.
- PTT key to close menu. (Long press to exit Underwater mode.)
WARNING: Before immersing your phone in the water, make sure all ports and covers are properly seated, with no foreign objects obstructing the seals, to maintain the waterproof capability. The phone should never be used under water if the SIM/microSD card tray cover, USB/Charger port cover or headset jack cover is broken or open.
NOTE: After using your phone in the Underwater Mode, immediately rinse the phone gently in clean fresh water. The phone should be dried using a very specific procedure. See Drying Your Phone.
Action Overlay Mode
You can take a photo or record a video with additional information such as elapsed time, travel distance, speed, G-force, altitude, map, or weather.
WARNING: Do not operate the app while driving or riding a bicycle or motorcycle. If necessary, stop moving first and operate the app with careful attention to your safety.
- From the Home screen, tap > More > Action Overlay.
NOTE: Action Overlay mode uses location information. You will be prompted to enable the Location settings if they are disabled.
Action Overlay Mode Settings
You can configure the Action Overlay mode settings by tapping ![]() . The following options are available:
. The following options are available:
Screen settings:
- Screen rotation: Switch Screen rotation On and Off.
- Screen lock: Switch Screen lock On and Off.
Display settings:
- Altitude setting: Select Automatic acquisition or Direct input.
- Map display format: Select Around map, Route, Map (2D) + route, or Map (3D) + route.Note: Map is not displayed until recording is started.
- Speedometer: maximum speed Select 25 mph, 50 mph, 100 mph, or 150 mph.
Select display data:
- Basic: Check or uncheck the checkbox for Speedometer, Elapsed time, Altitude, G force, Distance, Place, Map, Date & time, Weather, and Logo.
Units:
- Altitude: Select Feet (ft) or Meter (m).
- Distance: Select Mile (mi), Kilometer (km), or Nautical mile (nm).
- Temperature: Select Celsius (°C) or Fahrenheit (°F).
NOTE: Screen will lock after recording begins to avoid accidental operations.
Augmented Reality
Google ARCore certification opens a world of possibilities for AR applications that can be installed via the Google Playstore. Whether your interest is in AR gaming, enhanced shopping experiences or professional use cases such as Building Information Modeling (BIM), a host of opportunities awaits you.
NOTE: To access the Google Play store, you must first connect to the Internet using data services or Wi-Fi data connection and sign-in to your Google Account.
WARNING: When you install apps from the Google Play store app and use them on your phone, they may require access to your personal information (such as your location, contact data, and more) or access to certain functions or settings of your phone. Download and install only apps that you trust.
Examples: (for reference only)
AR Games
- Brickscape – fiveminlab.brickscape APK [android]
- Jurassic World Alive – https://play.google.com/store/apps/details?id=com.ludia.jw2
- Pokémon GO – https://play.google.com/store/apps/details?id=com.nianticlabs.pokemongo

AR Shopping
- Project Color – https://play.google.com/store/apps/details?id=com.thehomedepot.coloryourworld
- Target – https://play.google.com/store/apps/details?id=com.target.ui&hl=en_US
- Wayfair – https://play.google.com/store/apps/details?id=com.wayfair.wayfair&hl=en

BIM/CAD Apps
- A360-View CAD files – https://play.google.com/store/apps/details?id=com.autodesk.a360&hl=en
- BIM 360 – https://play.google.com/store/apps/details?id=com.autodesk.bim360.docs&hl=en_US&gl=US
- CAD Assistant – https://play.google.com/store/apps/details?id=org.opencascade.cadassistant&hl=en_US&gl=US

Disinfecting your phone
- Gently wipe the phone with a lint-free cloth moistened with alcohol (70% solution) * or a cleaning wipe. *Note: Use only ethanol or isopropyl alcohol (70% solution).
- Remove any excess liquid with a dry lint-free cloth until it is completely dry.
 *Note: Use only ethanol or isopropyl alcohol (70% solution).
Drying Your Phone
CAUTION! If your phone has been submerged in water, for example to use the camera in Underwater Mode, rinse all surfaces of the phone thoroughly with clean, fresh water before drying.
- Wipe down all outside surfaces of your phone with a clean lint-free cloth.
- Pat with a clean dry cloth to remove moisture from speakers, microphones and earpiece. Repeat patting each area about 20 times.
- After removing all the water, let the phone dry completely at room temperature.
CAUTION! Excessive heat may damage your phone; never use a hair dryer, an oven or any other appliance to dry out your phone.
NOTE: If your phone still retains some moisture, audio quality and speaker performance may be affected. Dry your phone completely before using it again.
Focus Mode (Digital Wellbeing)
Focus mode is one of the features of Digital Wellbeing that lets you pause distracting apps so you can better focus your time. You can also set a schedule to turn on Focus mode automatically and reduce distractions while you’re at work, school, or home.
- From the Apps launcher, tap Settings > Digital Wellbeing & parental controls.
- Select Show your data and scroll down to Focus mode.
- Select applications you want to pause and set a schedule or Turn on now.TIP: You can add Focus Mode to Quick Settings to turn on and off with a single tap.

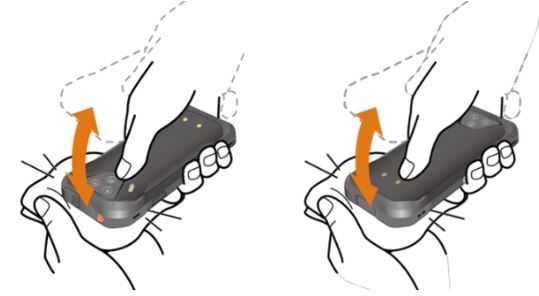
Covert Mode
Covert mode makes your phone effectively unnoticeable even in silent and dark environments by disabling all touch operation, display, lights, device audio and vibrations. Audio through the headset jack and Bluetooth can optionally be enabled.
NOTE: Sound and LEDs that originate from Bluetooth devices connected to the phone may not be disabled even when Covert mode is on.
To enable Covert mode:
- From the Apps launcher, tap Settings > Security > Covert mode.
- Set Allow Covert mode to On. Go back and select audio options as needed.
- Press and hold the power key to display the option menu and tap Covert mode.
- Long press the power key to exit Covert mode.
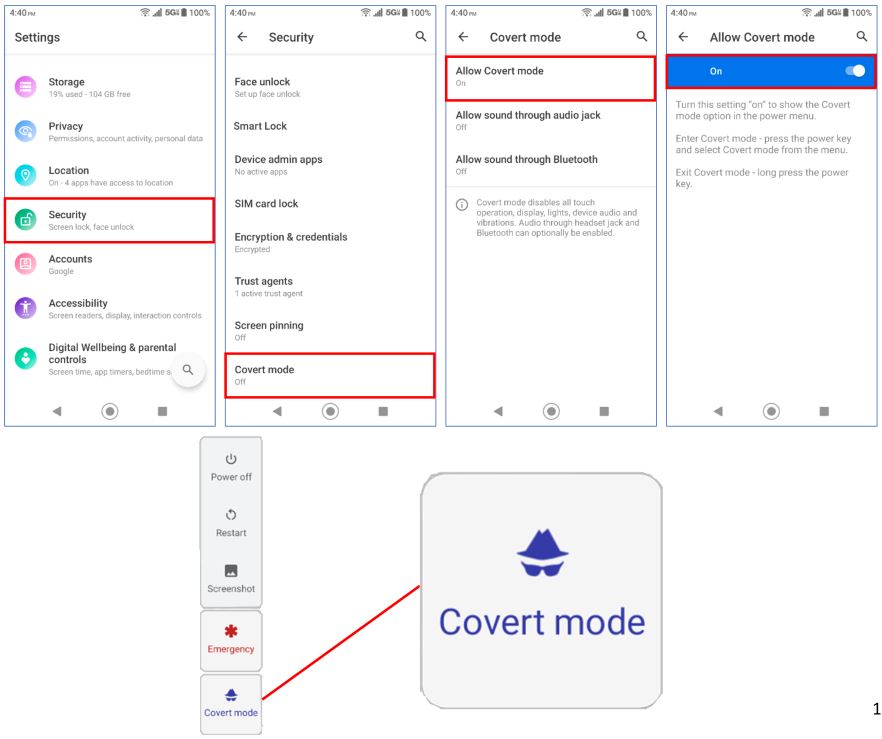
Mobile Hotspot
Mobile Hotspot allows you to turn your phone into a Wi-Fi hotspot. The feature works best when used in conjunction with 4G LTE or 5G data services.
Turn Wi-Fi Hotspot On or Off
Use the settings menu to enable or disable your phone’s Mobile Hotspot capabilities.
IMPORTANT: There may be charges for using Mobile hotspot depending on your contract or plan. Contact your service provider for details.
- From the Apps launcher, tap Settings > Network & internet > Mobile Hotspot & tethering.
- Tap Mobile Hotspot.
- Tap the on/off icon to turn Mobile Hotspot on or off.
- Follow screen prompts to connect other devices.
- If necessary, change the name, password, or security.
The number of connected devices can be seen in the Mobile Hotspot menu and is also visible on the status bar hotspot icon. ![]()
NOTE: A maximum of 10 devices can be connected simultaneously.
TIP: Hotspot is also available in Quick Settings to turn on and off with a single tap.
Outdoor
The Outdoor apps provide important and interesting information for your outdoor activities. It also has shortcut buttons to access handy tools, such as compass, barometer, altimeter and weather.
- From the Home screen, swipe left and tap Outdoor.
- The following apps are available:
- Barometer: Displays detailed Barometer information.
- Altimeter: Displays Altitude based on Barometric pressure.
- Weather: Displays detailed Barometer weather information.Note: Measurement history can be tracked over time.
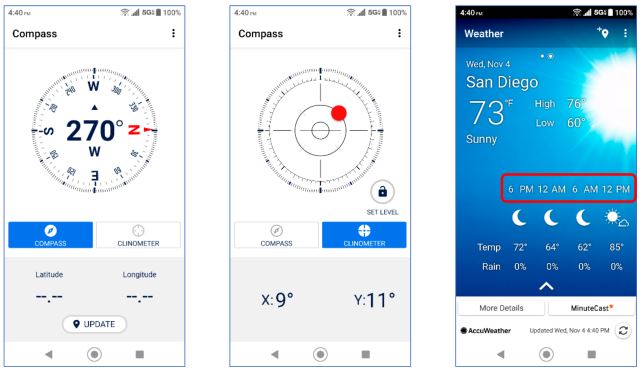
- Compass: Displays detailed Compass information.
- Clinometer: Displays the angle in degrees on an X-Y axis.
- Weather: Displays the weather information in 6-hour increments.
- Barometer: Displays detailed Barometer information.
Barometer:

Compass/Weather:
Location Google Maps / Find My Device
The location services settings menu lets you decide whether you allow your phone to collect and use the location information. Some apps may require location services be turned on for full functionality.
From the Apps launcher, tap Settings > Location. Location features:
Use location, Recent location requests, App permission, Wi-Fi and Bluetooth scanning, Emergency Location Service.
– You can also access other Google Location menus such as Google Location Accuracy, Google Location History, and Google Location Sharing.
Use the Google Maps app to determine your location, find directions, browse local businesses and attractions, rate and review places, and more.
NOTE: Before using any location-based services, you must enable your phone’s GPS location feature.
Open Google Maps1. From the Home screen, tap Google > Maps.2. Tap Menu on the top left of the screen to display the option menu.
For more information, please visit https://support.google.com/maps
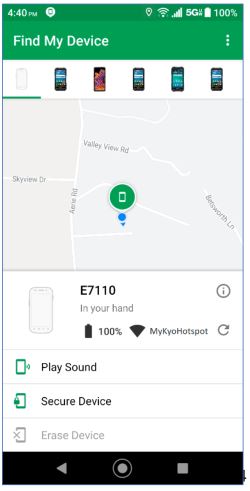
Find My Device
Helps you locate your lost Android and lock it until you get it back. Features:
See your phone, tablet or watch on a map. If current location isn’t available, you’ll see the last known location. Use indoor maps to help you to find your device in airports, malls, or other large buildings.
Navigate to your device with Google Maps by tapping the device location and then the Maps icon.
Play a sound at full volume, even if your device is on silent
Erase the device or lock it with a custom message and contact number on lock screen
See network and battery statusSee hardware details
Carkit Power On or Off
This feature is useful for those who use PTT functions with a compatible hands-free Carkit while driving, such as bus and truck drivers.
- From the Apps launcher, tap Settings.
- Tap .
- Type “carkit” on the Search… field and then tap Carkit power on/off.
- The following options are available:
- Power on only: The phone will be powered on automatically when you turn on your vehicle’s ignition. The phone must be powered off manually.
- Power on and off: The phone will be powered on and off automatically when you turn on or off your vehicle’s ignition.
- Off: The phone must be powered on and off manually.
Note: The hands-free carkit is sold separately

References
Project Color – The Home Depot – Apps on Google Play
Pokémon GO – Apps on Google Play
Wayfair – Shop All Things Home – Apps on Google Play
Jurassic World Alive – Apps on Google Play
A360 – View CAD files – Apps on Google Play
CAD Assistant – Apps on Google Play
Target – Apps on Google Play
BIM 360 – Apps on Google Play
[xyz-ips snippet=”download-snippet”]