![]()
 WirelessQuick Start Guide
0301947a03/2020
Motion Sensor
Please Read Before InstallingWelcome—and thank you for purchasing a Caséta motion sensor.The sensor provides hands-free operation by automatically turning on and turning off the lights simply by entering and exiting the room.
Extend Your WarrantyLove Caséta motion sensors? Have ideas for making them better? Tell us what you think and we’ll extend your warranty by 1 year.www.casetawireless.com/register
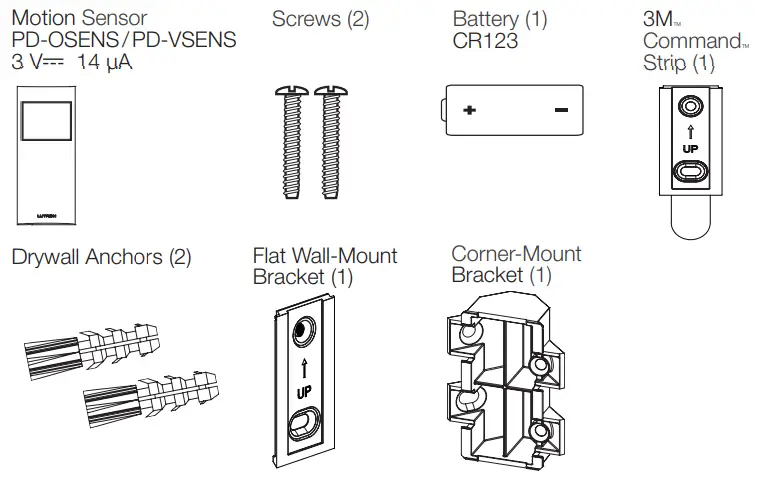
Contents supplied
Tools you’ll need
Important notes:
- The sensor is intended for indoor use only. Operate between 32 °F and 104 °F (0 °C and 40 °C).
- Use only high-quality lithium batteries, size CR123, 3 V- (ANSI-5018LC, IEC-CR17345). DO NOT use rechargeable batteries. Using improperly rated batteries could damage the sensor.NOTICE: DO NOT disassemble, crush, puncture, drop on a hard surface, subject to high heat, place in water, paint, incinerate, or alter batteries in any way. Please dispose of batteries in compliance with all applicable legal requirements. Your waste disposal provider may have information regarding any state or local restrictions on battery disposal.
The battery in this device contains Perchlorate material, special handling may apply.For more information visit www.dtsc.ca.gov/hazardouswaste/perchlorate
 WARNING: Entrapment hazard. To avoid the risk of entrapment, serious injury, or death, these controls must not be used to control equipment that is not visible from every control location or which could create hazardous situations such as entrapment if operated accidentally. Examples of such equipment which must not be operated by these controls include (but are not limited to) motorized gates, garage doors, industrial doors, microwave ovens, heating pads, etc. It is the installer’s responsibility to ensure that the equipment being controlled is visible from every control location and that only suitable equipment is connected to these controls. Failure to do so could result in serious injury or death.
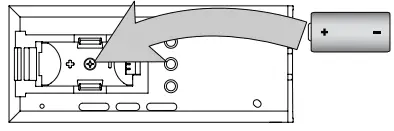
Insert Battery
Insert the battery as shown.
2a Motion Sensor Setup Using a Smartphone or Tablet (Bridge required, sold separately)
If you are using the load control (dimmers/switches/fan controls) and sensor with the Lutron Smart Bridge follow the instructions below.
- Download and launch the Lutron app

- Click the settings icon and choose Add Device.Use the Lutron app to complete all the remaining steps.

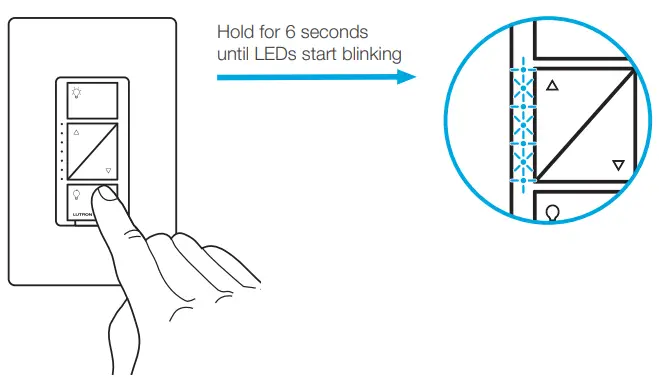
2b Motion Sensor Pairing without Using a Smartphone or Tablet (Bridge not required)Pairing the sensor to a Caséta load control device (dimmer / switches/fan control).
- Press and hold the “OFF” button on the load control
- Press and hold the button on the sensor
Sensor Placement and Coverage
Before mounting the sensor, please note the following:
- If you cannot see the sensor, it cannot see you. The sensor cannot see through glass.
- The sensor should be mounted at eye level. Recommended placement 6 to 8 ft (1.8 to 2.4 m).
- DO NOT place the sensor within 4 ft (1.2 m) of moving air currents (ie: HVAC vents), heat sources (ie: light bulbs, or microwave / standard ovens), or within 6 in (15 cm) of other RF devices.
- If there is a line of sight from the sensor to the paired devices (no obstructions) sensor can be located within 60 ft (18.3 m). Otherwise, the sensor must be within 30 ft (9.1 m).
- Whenever possible, avoid placing the sensor in a location where it has a broad view outside the intended space.For additional tips and recommendations for sensor placement and coverage visit: www.casetawireless.com/sensorcoverage
Sensor Coverage
 Minor Motion Coverage- (small movement, i.e., turning a page) 15 X 2 X 35 = 1050 ft 2 (97.5 m 2 )
 Major Motion Coverage- (large movement, i.e., walking) 20 X 2 X 45 = 1800 ft 2 (167.2 m 2 )
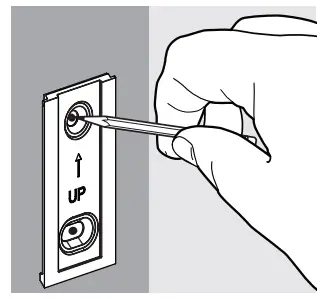
Temporary Mounting
To test sensor coverage, a 3MT CommandT adhesive strip is provided for temporarily mounting the sensor. The strip is not reusable and should not be used for permanently mounting the sensor.
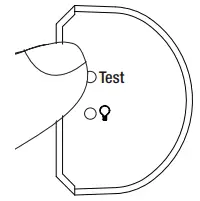
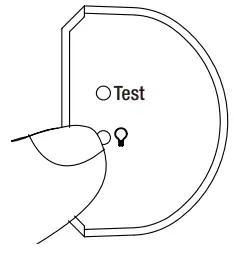
Testing Sensor Coverage
- Press and release the “Test” button on the top of the sensor. The lens will glow briefly, indicating the test mode has been entered.
- With the sensor temporarily mounted in the intended location, walk around the space while observing the lens. If the lens glows, motion is detected. If you are not satisfied with the sensor’s performance, relocate the sensor and repeat the test.Press and release the “Test” button again to exit test mode.
Testing Wireless Communication
Press and release the ![]() button to toggle the lights on and off, while the sensor is in its intended mounting location.If the lights do not respond properly, refer to the Troubleshooting section.
button to toggle the lights on and off, while the sensor is in its intended mounting location.If the lights do not respond properly, refer to the Troubleshooting section.
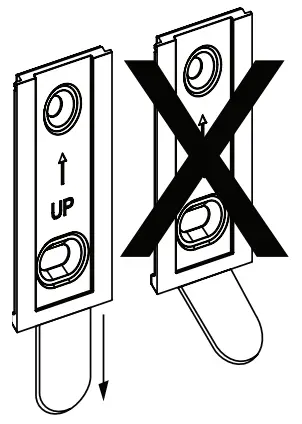
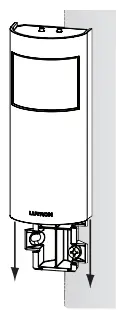
Removing Temporary Mounting Strip
Pull down very slowly. DO NOT pull at an angle.
Permanent Mounting
The sensor is designed to be free-standing or for installation on drywall or plaster surfaces.
Flat Wall-MountThe flat wall-mount bracket is designed to mount flat against a wall.Use the provided screws and drywall anchors.
- Mark wall
- Drill holes
- Push anchors into wall and mount bracket
Corner-MountThe corner-mount bracket can be used to mount in a corner or angled on a wall away from a corner.
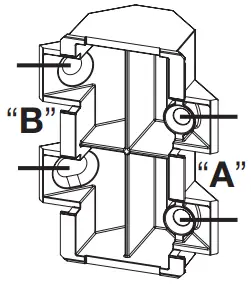
- Mounting directly in a corner
Use the mounting bracket side “A” and the provided screws.
- Mounting angled on a wall away from corner Use the mounting bracket side “B”. Use provided screws and drywall anchors.
Advanced Sensor Features
The sensor has three adjustable advanced set-up modes. For most installations, the default settings will provide the best performance. If you determine the default settings require adjustment, refer to the back of the sensor. For additional information, visit www.casetawireless.com/sensorfeaturesTimeout: The sensor will turn off if no motion occurs for the duration of the timeout period. The available timeout settings are: 1, 5, 15, and 30 minutes.(Default: 15 minutes)Activity: The sensitivity of the sensor can be adjusted based on the expected level of activity within the room. There are three available activity settings: Low Activity, Medium Activity, and High Activity. (Default: Low Activity)Auto-On: (PD-OSENS model only) When Enabled, lights will turn on automatically when the room is entered and turn off when vacant. When Disabled, lights will need to be manually turned on but will turn off automatically when the room becomes vacant. (Default: Enabled) Recommendation: For applications in bedrooms or when pets are in the space, it’s suggested to change Auto-on setting to Disabled.
Troubleshooting:
| Symptom | Solution |
| Lights do not turn ON when pressing the |
Verify that the load control device is installed properly AND turned ON at the breaker. |
| Verify that the sensor was successfully paired with the correct load control. | |
| Ensure that the sensor is within range.30 ft (9.1 m) with obstructions, 60 ft (18.3 m) without. | |
| Make sure that the battery has been installed correctly (Refer to Step 1). | |
| Check if the light bulb is blown out. | |
| Lights do not turn ON when space is occupied. | While in the final mounted position, ensure that the wireless communication is working properly by pressing the |
| If the lights were turned off manually, verify that the room has been unoccupied for the durationof the sensor timeout period. (Press the |
|
| Change the activity setting of the sensor to Medium or Low Activity.Refer to the back of the sensor or visit www.casetawireless.com/sensorfeatures | |
| Ensure that the intended motion is occurring within the coverage area (Refer to Step 3). | |
| (Occupancy Versions Only) Verify that the Auto-On setting of the sensor is set to “Enabled”.Refer to the back of the sensor or visit www.casetawireless.com/sensorfeatures | |
| Lights turn OFF while space is occupied. | Change the timeout setting to a longer timeout. Refer to the back of the sensor or visit www.casetawireless.com/sensorfeatures |
| Check that the view of the sensor is not obstructed (Refer to Step 3). | |
| Change the activity setting of the sensor to Medium or Low Activity.Refer to the back of the sensor or visit www.casetawireless.com/sensorfeatures | |
| Lights stay ON after space is vacated. | Verify that the room has been unoccupied for the duration of the sensor’s timeout period. |
| Check that the sensor is not mounted within 4 ft (1.2 m) of moving air currents (i.e.: HVAC vents), heat sources (i.e.: light bulbs, or microwave/standard ovens), or within 6 in (15 cm) of other RF devices. | |
| Change the activity setting of the sensor to Medium or High Activity.Refer to the back of the sensor or visit www.casetawireless.com/sensorfeatures | |
| Pet movement may be detected by the sensor and signal that the space is occupied. | |
| Make sure that the battery has been installed correctly (Refer to Step 1). | |
| Lights won’t turn ONautomatically after I manually turn them OFF. | The room must be vacant for the duration of the sensor’s timeout period. After this time, if the room becomes occupied, the sensor will turn ON the lights. |
| The behavior of lights does not match sensor settings. | Check sensor settings.Refer to the back of the sensor or visit www.casetawireless.com/sensorfeatures |
| Check that all of the sensors paired to the same load control device are using the same settings.Refer to the back of the sensor or visit www.casetawireless.com/sensorfeatures | |
| The sensor lens does not glow in response to motion during sensor coverage testing. | Ensure all items in Step 3 have been followed. For additional details, visit www.casetawireless.com/sensorcoverage |
| Make sure that the battery has been installed correctly (Refer to Step 1). | |
| The lens does not stop glowing during sensor coverage testing even when there is no motion. | Check that the sensor is not mounted within4 ft (1.2 m) of moving air currents (i.e.: HVAC vents), heat sources (.e.: light bulbs, or microwave/standard ovens), or within 6 in (15 cm) of other RF devices. |
| Sensor lens flashes and lights do not turn ON when space is occupied. | Verify that the sensor is not in test mode (Refer to Step 5). Visit www.casetawireless/sensorfeatures |
| Replace the battery (Refer to Step 1). |
For additional help with sensor features visit:www.casetawireless.com/sensorfeaturesFor additional tips and recommendations for sensor placement andcoverage visit: www.casetawireless.com/sensorcoverage
Customer Assistancewww.lutron.com/supportU.S.A / Canada: 1.844.LUTRON1Others: +1.610.282.3800
Limited WarrantyFor warranty information, please seewww.lutron.com/warrantyFCC / IC InformationFor FCC /IC information: Please visit:www.lutron.com/fcc-ic
App Store is a trademark of Apple Inc., registered in the U.S. and other countries.All other product names, logos, and brands are the property of their respective owners.© 2018-2020 Lutron Electronics Co., Inc.
 report this ad
![]()
Lutron Electronics Co., Inc.7200 Suter RoadCoopersburg, PA 18036-1299, U.S.A.
References
[xyz-ips snippet=”download-snippet”]