MA-2500DSP3-WAY MIC FEEDBACK KARAOKE AMPLIFIER Operation ManualAutomatic Pairing with Bluetooth ” BT-AMPLIFIER”
REMOTE CONTROL INISTRUCTION
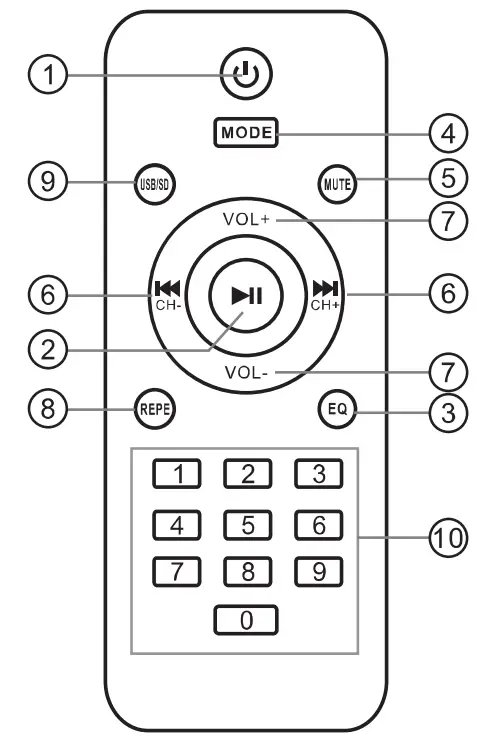
- POWER: Press it to turn on the unit, press it again to turn off.
- PLAY/PAUSE: Press to play, press again to pause.
- EQ: Sound field-effect button.
- MODE: Work mode selects USB/SD/DVD/AUX.
- MUTE: Press it to mute down sound.
 : Pressto skip the next track.Pressto skip prey. track.
- VOL+/VOL-:Press it to adjust the volume level. 8.REPEAT: Switch the repeat mode.
- SD/USB: Press it to turn the
- SD card and USB
- 0-9:Numeric buttons
SPECIFICATION
Output power (40)…………………….. 750W+750WOutput power (80)…………………………. 500W+500WMic input sensitivity…………………………… 10mVExternal devices sensitivity…………………… 200mVSignal/Noise ratio (with IHF A Filter)….. >80dBT.H.D (1KHz,10W)…………………………………. 0.1%Frequency band……………………………. 25Hz — 20KHzMic tone adjustment: LOW……………….. 80Hz ± 15dBMic tone adjustment: MID……………….. 3.5KHz ± 12dBMic tone adjustment HI…………………….. 12KHz ± 15dBEcho tone adjustment: LOW………………. 80Hz ± 15dBEcho tone adjustment: HI………………. 12KHz ± 15dBMusic tone adjustment: LOW……………. 100Hz ± 15dBMusic tone adjustment: MID……………. 1KHz ± 12dBMusic tone adjustment HI…………………10KHz ± 15dBPower source…………………………………. AC 220V-240V 50Hzor AC110V-120V 50Hz
INTRODUCTION
Thank you for purchasing the power amplifier, To take full advantage of the amplifier functions, and to enjoy long and trouble-free use, please read this user’s manual carefully.![]() IMPORTANT SAFETY INISTRACTION
IMPORTANT SAFETY INISTRACTION
- Make sure that line voltage is AC 220-240V/50Hz If you are not sure, Kindly consult your appliance dealer or local power service company
- Please put the unit in a ventilated place. Do not operate in a sealed Box.
- Protect voltage lineAvoid high pressure and stamp on, do not pull, push excessively.
- Avoid any objects inserted into the unit. It may cause a short circuit and unit defect
- Avoid water, dust, and moisture. Do not put a Flower vase and another water container on the top of the unit.
- Avoid cleaning with a volatile solutionDo not spray insecticide. Do not clean with alcohol, painting, gasoline, etc.
- Avoid covering ventsBlock up the vents will make the temperature in the unit become higher and will damage the unit.
- Avoid opening the cover. Do not open, fix, or touch the inner parts, refer to qualified service personnel for help.


FEATURES
- Support Wireless Steaming/USB/SD
- 4 Microphone Input
- 32-bit digital key controller
- DSP effect digital processor
- Mp3 player compatible with lossless format songs play
- Automatic Pairing with Bluetooth BT-AMPLIFIER’
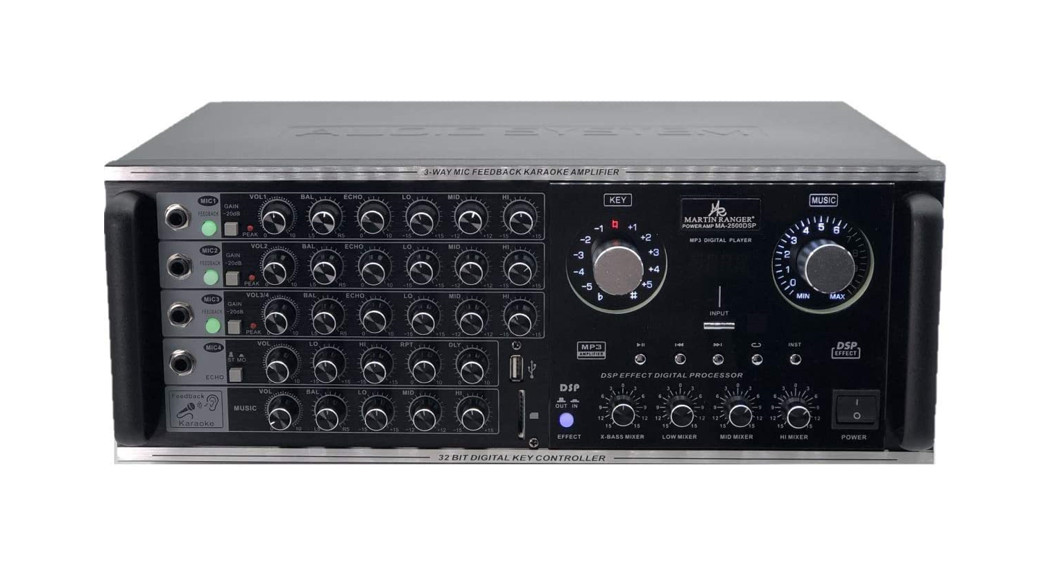
FRONT PANEL INSTRUCTION
| 1. Mic 1 2 3 4 Jack2. Switch button for Mic. Feedback3. Mic -20dB Switch4. Mic Overload LED5. Mic 1 2 3 4 Volume Adjust6. Mic Balance Adjust7. Mic Echo Adjust8. Mic Low Tone Adjust9. Mic Middle Tone Adjust10. Mic High Tone Adjust11. Mono/stereo Switch12. Echo Volume Adjust13. Echo Low Tone Adjust14. Echo High Tone Adjust15. Echo Repeat Adjust16. Echo Delay Adjust17. SD Data Input Interface18. USB Data Input Interface19. MP3 Play/pause Switch20. MP3 Prey Switch21. MP3 Next Switch | 22. Mp3 Repeat Switch23. Instrumental without the vocal or original sound24. MP3 Input Mode Switch (Blue/AUX/DVD)25. Display Screen26. To transpose the key of the played music, rotate this control. The key can be changed in halftone steps in 5 steps; either higher or lower. To reset the key to the natural key, press this control. If over 5 seconds of silence occurs, the unit assumes the played song has finished and reset the key to natural.7. Music Master Volume Adjust28. Music Volume Adjust29. Music Balance Adjust30. Music Low Tone Adjust31. Music Middle Tone Adjust32. Music High Tone Adjust33. DSP Effect Switch34. DSP X-bass Tone Adjust35. DSP Low Tone Adjust36. DSP Middle Tone Adjust37. DSP High Tone Adjust38. Power Switch |
REAR PANEL INSTRUCTION
|
|
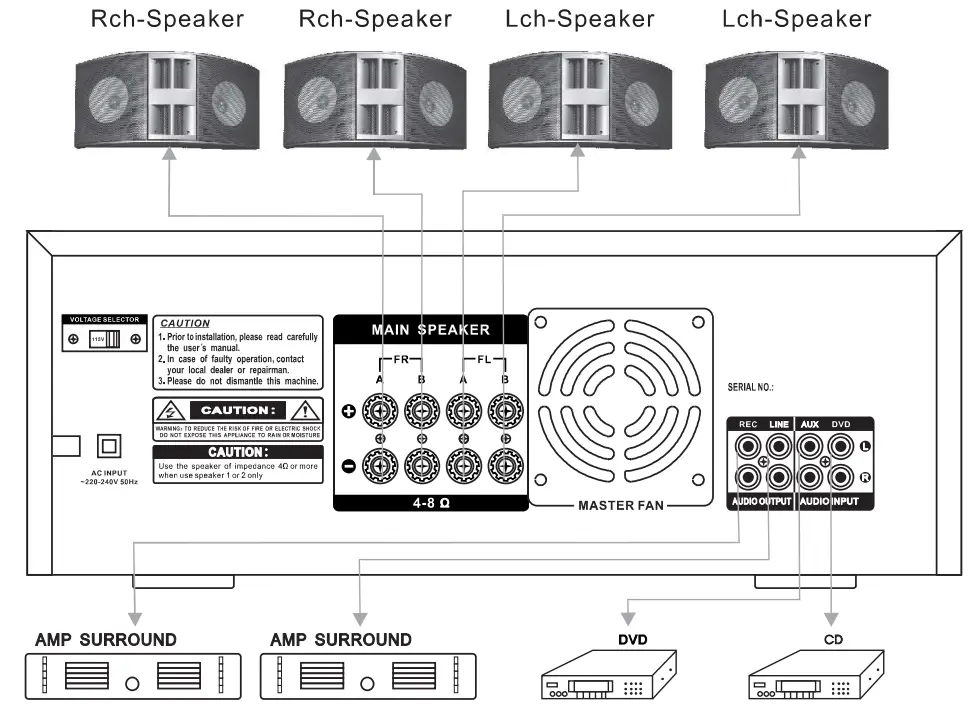
DIAGRAM OF SYSTEM CONNECTION
Use the speaker of impedance 8 ohm, when using speaker terminal a or b
report this ad
Operation Manual
[xyz-ips snippet=”download-snippet”]