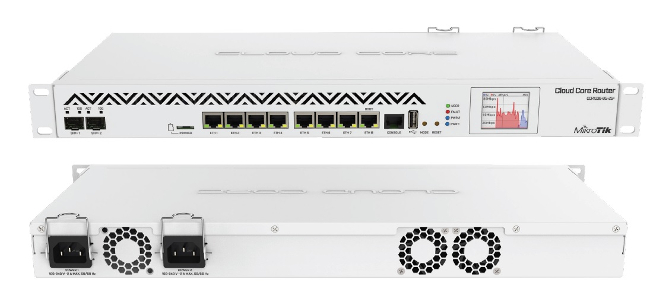
MikroTik Cloud Core Router 1036-8G-2S+
Safety Warnings
- Before you work on any equipment, be aware of the hazards involved with electrical circuitry and be familiar with standard practices for preventing accidents.
- Ultimate disposal of this product should be handled according to all national laws and regulations.
- The Installation of the equipment must comply with local and national electrical codes.
- Failure to use the correct hardware or to follow the correct procedures could result in a hazardous situation to people and damage to the system.
- Read the installation instructions before connecting the system to the power source.
Quick start
The Ethernet port 1 has a default IP address for connecting: 192.168.88.1. Username is admin and there is no password. The device doesn’t have any other configuration applied by default, please set up WAN IP addresses, user password, and update the device.Connecting the device to the internet:
- Connect your ISP Ethernet cable to the Ethernet port1;
- Connect with your PC to the Ethernet port3;
- Open WinBox on your computer and check Neighbors tab for CCR;
- Choose the device and connect;
- Choose Quick Set on the left side of the screen;
- Set address Acquisition to automatic, or enter your Network details manually;
- Set your local Network IP Address 192.168.88.1;
- Type a secure password in the Password field and confirm again;
- Click Apply;
- The device will receive an IP if your Network has DHCP server enabled, or if you have entered Network details correct and internet connection will be available.
- Click on the Check for updates and on newly opened window choose Download&Install if new version if available.
- You are ready to use your device. RouterOS includes many configuration options in addition to what is described in this document. We suggest starting here to get yourself accustomed to the possibilities: http://mt.lv/help. In case the IP connection is not available, the Winbox tool (http://mt.lv/winbox) can be used to connect to the MAC address of the device from the LAN side.
PoweringThe device has dual removable (hot-swap compatible) power supply units AC ⏦ 110-240V with standard IEC compatible sockets. Maximum power consumption of 73 W.
Reset buttonThe reset button has two functions:
- Hold this button during boot time until LED light starts flashing, release the button to reset RouterOS configuration.
- Or Keep holding the button for 5 more seconds until LED turns off, then release it to make the RouterBOARD look for Netinstall servers. Regardless of the above option used, the system will load the backup RouterBOOT loader if the button is pressed before power is applied to the device. Useful for RouterBOOT debugging and recovery.
Mounting
The device is designed to use indoors and it can be mounted in a rackmount enclosure using provided rack mounts, or it can be placed on the desktop. Use a Phillips screwdriver to attach rackmount ears on both sides of the device if designated use is for rackmount enclosure:
- Attach rack ears to both sides of the device and tighten four screws to secure them in place, as shown on the picture to the right;
- Place the device in rackmount enclosure and align with the holes so that the device fits conveniently;
- Tighten screws to secure it in place.The IP rating scale for this device is IPX0. The device has no protection from water contamination, please ensure the placement of the device in a dry and ventilated environment. We recommend Cat6 cables for our devices.
LEDsThe device has four LED lights. PWR1/2 indicates which power supply is being used. FAULT indicates a problem with the cooling fans. USER can be configured in software.Operating System SupportThe device supports RouterOS software with the version number v6.46 at or above what is indicated in the RouterOS menu /system resource. Other operating systems have not been tested.
PCIe usageM.2 Slot PCIe 4x, to install SSD please follow instructions:
- Turn off device (unplug power cords);
- Unscrew 6 screws which hold CCR upper lid;
- Open lid;
- Unscrew screw which will hold SSD;
- Insert SSD in m.2 slot;
- Attach power cords and check does SSD properly initializing;
- Screw back 6 lid screws.Also please note, that by default you should use m.2 2280 form factor SSD.
CE Declaration of Conformity
Manufacturer: Mikrotikls SIA, Brivibas gatve 214i Riga, Latvia, LV1039.
Hereby, Mikrotīkls SIA declares that the radio equipment type RouterBOARD is in compliance with Directive 2014/53/EU. The full text of the EU declaration of conformity is available at the following internet address: https://mikrotik.com/products
Note. Information contained here is subject to change. Please visit the product page on www.mikrotik.com for the most up to date version of this document.
Instruction manual: Connect the power adapter to turn on the device. Open 192.168.88.1 in your web browser, to configure it. More information on https://mt.lv/help
References
[xyz-ips snippet=”download-snippet”]