
MOOER Hornet Series 15 Watt Combo Owner’s Manual
MOOER HORNET
Congratulations on your purchase of the MOOER HORNET 15 watt digital modeling combo amplifier. We recommend reading this manual in full to see all of the features that your new Hornet has to offer. We hope you enjoy playing with your new HORNET from MOOER.

Precautions
PLEASE READ CAREFULLY BEFORE PROCEEDING
Power Supply
Please connect the DC POWER Supply to an AC outlet of the correct voltage. Please be sure to use only an AC adapter which supplies 18V DC, ![]() , center negative. Unplug the AC power adapter when not in use or during electrical storms.
, center negative. Unplug the AC power adapter when not in use or during electrical storms.
Connections
Always turn off the power of this and all other equipment before connecting or disconnecting, this will help prevent malfunction and / or damage to other devices. Also make sure to disconnect all connection cables and the power cord before moving this unit.
Cleaning
Clean only with a soft, dry cloth. If necessary, slightly moisten the cloth. Do not use abrasive cleanser, cleaning alcohol, paint thinners, wax, solvents, cleaning fluids, or chemical-impregnated wiping cloths.
Interference with other electrical devices
Radios and televisions placed nearby may experience reception interference.
Operate this unit at a suitable distance from radios and televisions.
Location
To avoid deformation, discoloration, or other serious damage, do not expose this unit to the following conditions:
- Direct sunlight
- Magnetic fields
- Excessive dusty or dirty location
- Strong vibrations or shocks
- Heat sources
- Extreme temperature or humidity
- High humidity or moisture
FCC certification
This device complies with Part 15 of the FCC Rules. Operation is subject to the following two conditions:
- This device may not cause harmful interference.
- This device must accept any interference received, including interference that may cause undesired operation.
Main Features
- 9 high quality digital amp models based on popular guitar amplifiers
- Built in Modulation, Delay and Reverb effects with independent tap tempo for each 2 modes of operation (Live/Preset)
- Store and recall up to 9 presets
- Highly sensitive precision tuner
- Wireless BT connectivity and AUX IN for media playback
- Dedicated headphones output
- 6.5-inch custom speaker, 15W RMS
- DC18V 2000mA centre pin negative
Top Panel Layout
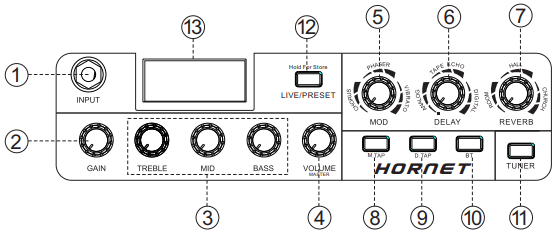
- INPUTConnect instrument using a 1/4″ jack cable
- GAINAdjusts the input gain of the amplifier
- TONE STACKSTACK TREBLE MID BASS three band EQ
- VOLUMEAdjusts the output volume of the guitar amplifier and preset volume
- MODRotate to select and adjust the modulation effects (CHORUS, PHASER, FLANGER).The DEPTH value of those effects could be adjusted.
- DELAYRotate to select and adjust the delay effect type (ANALOG, TAPE ECHO, DIGITAL).The LEVEL and FEEDBACK of effects could be adjust simultaneously.
- REVERBRotate to select and adjust the reverb effect type (ROOM, HALL, CHURCH). When this control is fully counter clockwise the reverb effects are not active
- M.TAPTap tempo control for MOD effects. Simply tap the button 2 or more times and the effect will synchronize to your tempo
- D.TAPD.TAP Tap tempo control for DELAY effects. Simply tap the button 2 or more times and the effect will synchronize to your tempo
- BTPress to toggle the BT wireless receiver on/off. (PAIRING CODE:0000)
- TUNERPress once to toggle the guitar tuner on/off. Hold to edit the global volume output of HORNET.(Page6)
- LIVE/PRESETPress once to toggle between Live mode and Preset mode.The button will illuminate when the amplifier is in Preset mode.Hold to store current settings in the Amp model for preset mode.(Page5)
- LED SCREENDisplays various information such as amp model, tuning functions, etc.FACTORY RESET Power on Hornet, press and hold the BT button, Hornet will be booted to RESET mode as the LED button and screen blinks. Press LIVE/PRESET button to confirm reset. Press any other button to exit reset.
Back Panel Layout
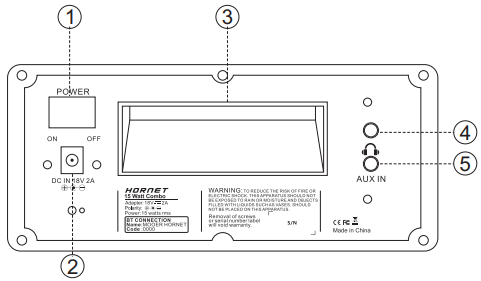
- POWERUsed to switch the Hornet on/off
- DC INConnect the included power supply.DC 18V 2A centre pin negative
- Built-in carry handle: Suitable for transportation.
- Headphone outputStandard 1/8″ headphone jack socket for silent practice
- AUX INConnect an external device for audio playback using a standard 1/8″ stereo jack cable
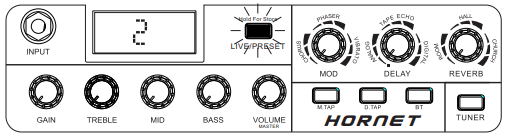
Modes and Saving
There are two modes of operation for the HORNET. Press the LIVE/PRESET button to toggle between these two modes. In both modes rotate the AMP MODEL control on the front of the HORNET to select a different amp model.
LIVE MODE
In live mode all parameters are depicted directly by their respective controls, like a traditional amplifier.
The LED SCREEN will display “L” and the LIVE/PRESET button will not be illuminated

PRESET MODE
In Preset mode you can store your settings for each amp model. Each of the amp models will recall all parameter values which were previously stored when selected, regardless of the parameter controls physical positions. The LED SCREEN will display a number from 1-9 to indicate which amp model is currently selected and the LIVE/PRESET button will be illuminated.
SAVING AMP SETTINGS
To save settings for the currently selected amp model, hold the LIVE/PRESET button for a couple of seconds after creating the tone you want. The LED SCREEN and the LIVE/PRESET button will flash 4 times to confirm the settings have been saved. Next time you select that amp model whilst in “PRESET MODE” the settings will be recalled. You can store settings for the amp models preset whilst in either of the operation modes.
GLOBAL VOLUME CONTROL
Hornet has the added feature of a Global volume control. This will adjust the overall output of Hornet and will affect the guitar, presets and audio playback from external devices.
Hold the TUNER button for several seconds until it begins to flash. The LED SCREEN will display a number between 1 and 9. Rotate the VOLUME control to adjust this parameter.
By default this will be set at full volume (9) from the factory
Wireless BT Connection
- Press the space BT button to switch on BT connectivity
- Ensure that the BT is active on the device you wish to pair with the Hornet and that your device is discoverable
- Search in available devices for “MOOER HORNET” select connect on your device to pair it with your Hornet amplifier. If it requests a password, enter “0000”
- Once paired you can now playback music wirelessly via you Hornet amplifier
The HORNET 15 is available in 5 different colors. Each version has a different set of 9 amp models which are accessible via the AMP MODEL control on the front of the amplifier. Here’s a breakdown of the amp models in each version of the HORNET

*the mentioned manufacturer and product names are trademarks or registered trademarks of their respective owners, the trademarks were used merely to identify the sound character of this product.

*the mentioned manufacturer and product names are trademarks or registered trademarks of their respective owners, the trademarks were used merely to identify the sound character of this product.
Technical Parameters
Inputs: 3.5MM AUX IN audio interface (impedance 10K)Output: 3.5MM headphone stereo audio interface (impedance 47 ohms)Sampling rate: 48KSampling accuracy: 32bitPower supply: DC 18V ≥ 2000mA Power adapter (internal negative external)Size: 290mm (D) x 173 (W) x 255mm (H)Speaker: 6.5″ impedance of 4 ohmsRated power: 15WPeak power: 20WWeight: 2.9kgAccessories: User Manual、Power supply
MOOER Hornet Series 15 Watt Combo Owner’s Manual – MOOER Hornet Series 15 Watt Combo Owner’s Manual –
[xyz-ips snippet=”download-snippet”]