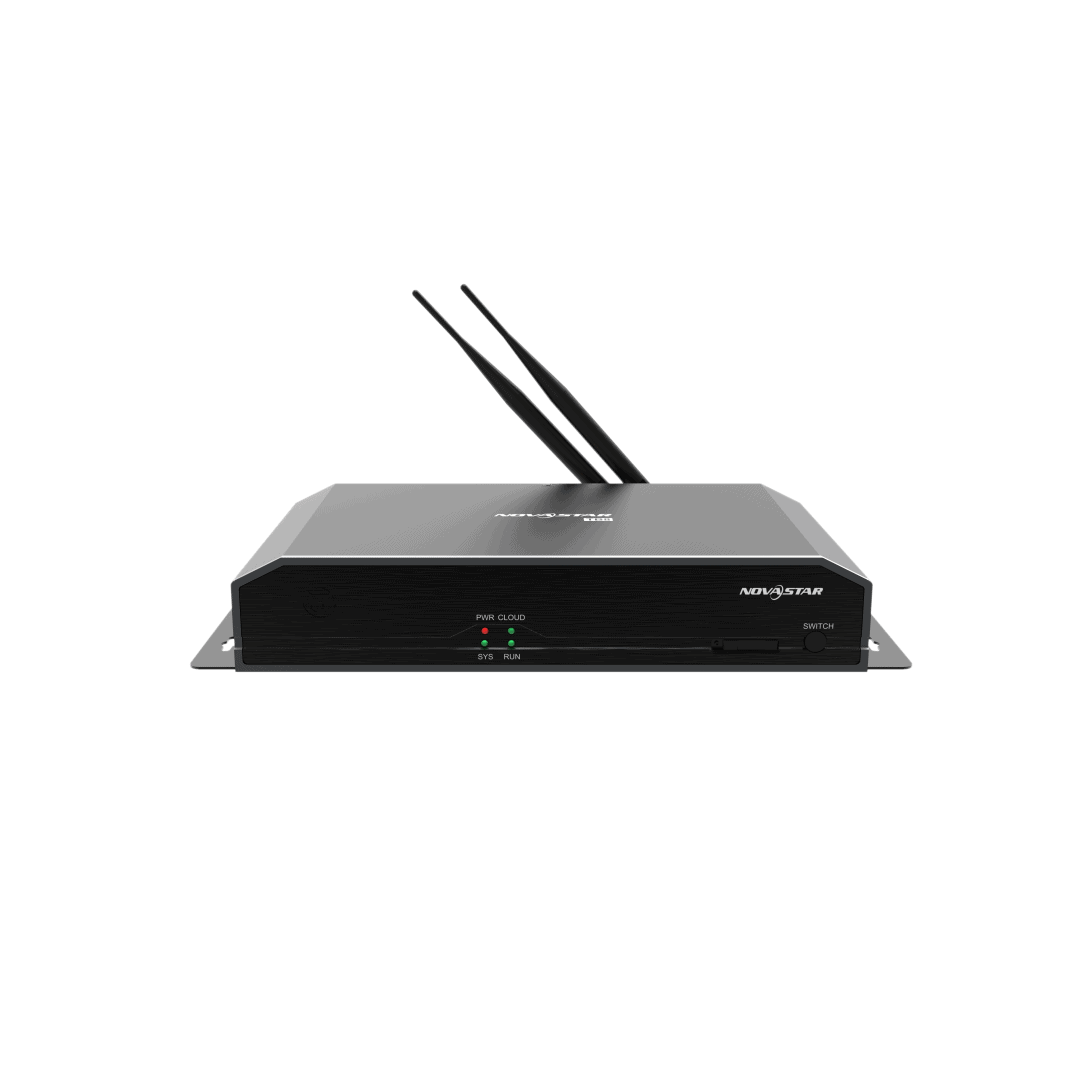
NOVASTAR Taurus Series Multimedia Players V1.6.4 User Guide
![]()

Overview
Scenario
This document introduces a quick way to use Taurus series multimedia players and provides instructions for the first-timer.
Procedure
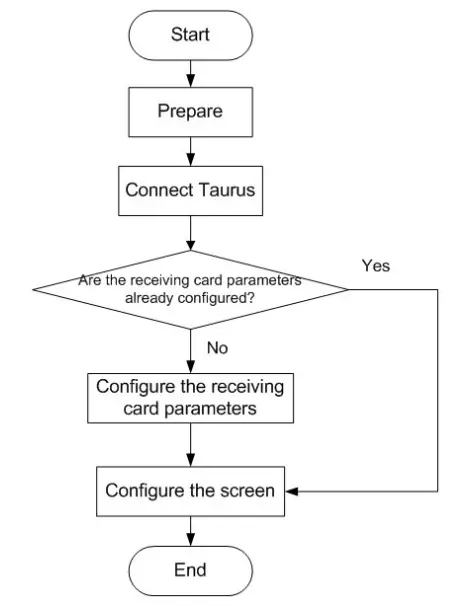
Preparation
Installing Software
Get and install the software in Table 2-1. The installation is the same as the installation of common software.
Table 2-1 Required software
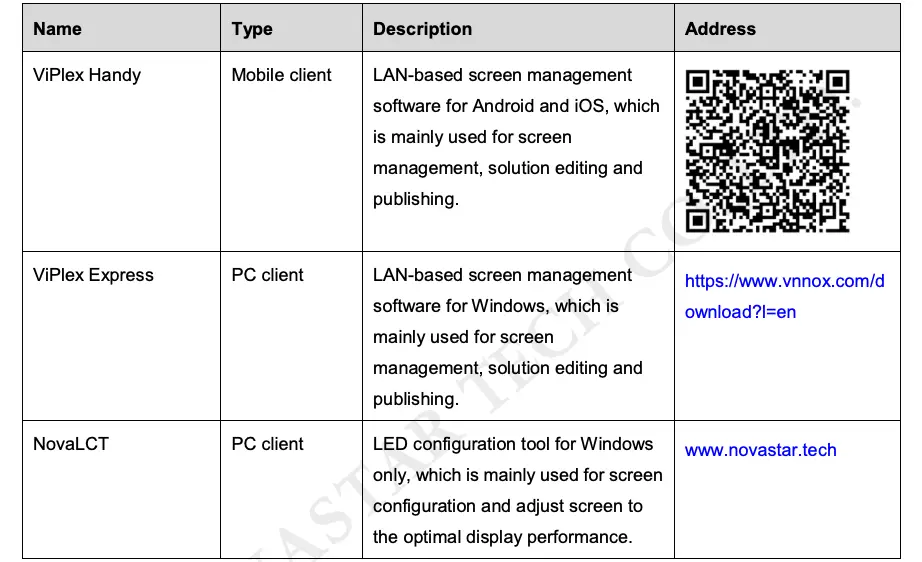
Getting Accounts
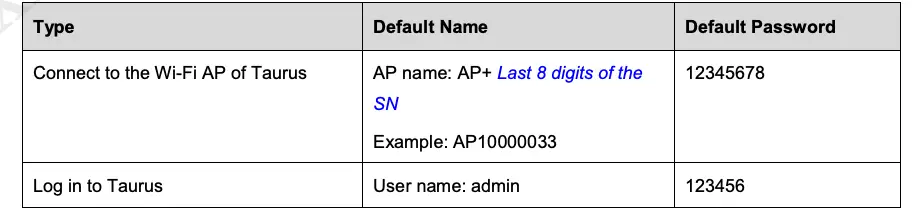
Please obtain the actual values of the information shown in Table 2-2. You are advised to change the default password to improve information security.
Table 2-2 Required information
Taurus Connections
Ethernet Cable

Required configuration: In ViPlex Express, enable DHCP service.
LAN
No configuration required.
Wi-Fi AP
Taurus series products are designed with Wi-Fi AP. The Wi-Fi working frequency range is 2400 MHz to 2483.5MHz.

No configuration required.
Wireless LAN
T3/T6/TB3/TB6/TB8 support Wi-Fi Sta and can use this connection method.

Required configuration: Use ViPlex software to log in to the terminal and connect it to the Wi-Fi AP of the router.
Receiving Card Parameter Configuration
If receiving card parameters are already configured, please skip this chapter and perform the operations in 5 Screen Configuration.
Loading Configuration File or Configuring the Parameters Manually with NovaLCT
Step 1 Open NovaLCT.
Step 2 On the menu bar, choose User > Media Player Login.
Step 3 In the Terminal List dialog box, click Refresh.
Figure 4-1 Terminal list

Step 4 Select a multimedia player from the list and click Connect System.
If the terminal and NovaLCT are not on the same network segment but they can be pinged, click ![]() next to Refresh, select Specify IP, enter an IP address and click Search.
next to Refresh, select Specify IP, enter an IP address and click Search.
Step 5 Enter the user name and password, and then click OK.
The default user name and password are “admin” and “123456”, respectively.
Step 6 Click  or choose Settings > Screen Configuration on the menu bar to open the dialog box shown in Figure 4-2.
Figure 4-2 Screen configuration method
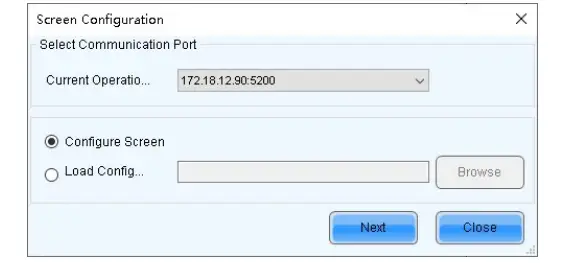
Step 7 Select Configure Screen and click Next.
Step 8 On the Screen Configuration page, select the Receiving Card tab.
Figure 4-3 Screen configuration
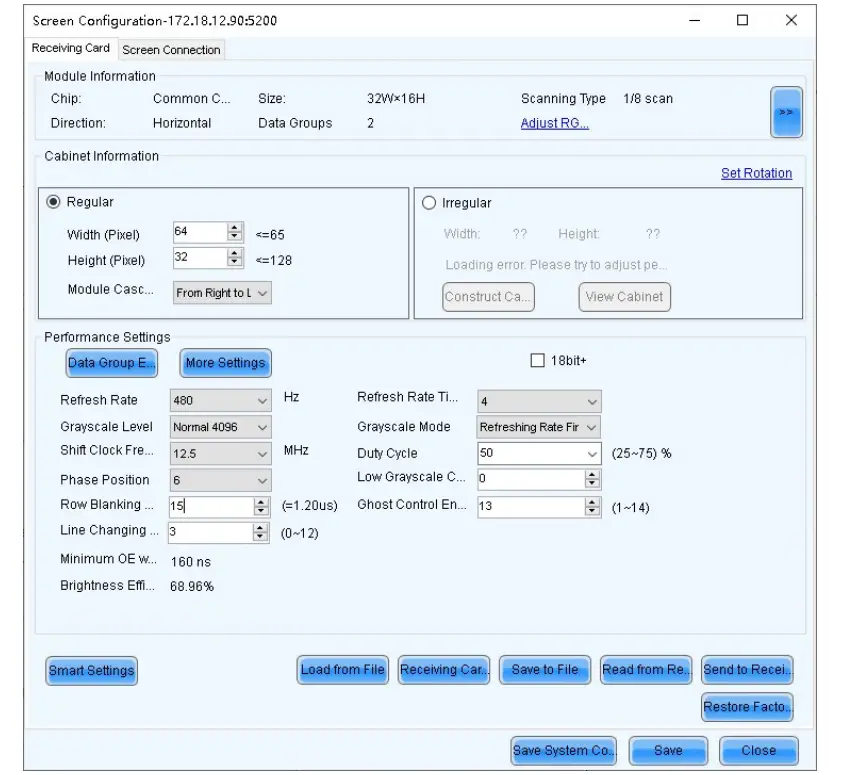
Step 9 Perform any of the following operations as required to configure receiving card parameters.
- Load a receiving card configuration fileClick Load Configuration File to choose a configuration file from your PC.
- Configure receiving card parameters manuallyConfigure receiving card parameters as required.
Step 10 After the configuration is done, click Send to Receiving Card.
Step 11 Adjust the parameters until the display is normal and then click Save.
Step 12 (Optional) Click Save to File to back up the receiving card configuration file to your PC.
Loading the Configuration File with ViPlex Handy
Step 1 Save the receiving card configuration file to mobile phone.
Step 2 Refer to 6.1 Taurus Login with ViPlex Handy (Android and iOS) to log in to the Taurus.
Step 3 Click screen name to enter the Screens page.
Step 4 Choose Screen Settings > RV Card Configuration to enter the RV Card Configuration page.
Step 5 Select the receiving card configuration file and click Send.
Screen Configuration
Step 1 Refer to 6.1 Taurus Login with ViPlex Handy (Android and iOS) to log in to the Taurus.
Step 2 Choose Settings > Select Mode.
Step 3 Select Screen Configuration Mode and then click OK.
Step 4 Select Screens.
Step 5 Click screen name to enter the Screens page.
Step 6 Select Screen Configuration.
Step 7 Click ![]() to configure screen information according to the actual conditions and then click OK.
to configure screen information according to the actual conditions and then click OK.
General Operations
The Taurus series products are designed with permanent Wi-Fi AP. This chapter takes Wi-Fi AP as an example to introduce how to log in to the Taurus.
Taurus Login with ViPlex Handy (Android and iOS)
Before You Begin
- Get the SSID and password of WiFi AP of the Taurus. The default SSID is “AP+the last 8 digits”. The default password is “12345678”.
- Get the password of the user “admin”. The default password of the user “admin” is “123456“.
Operating Steps
Step 1 Connect the WiFi AP of the Taurus products.
Step 2 Start ViPlex Handy.
ViPlex Handy automatically detects the Taurus and refreshes the screen list. Users can also swipe down to manually refresh the screen list.
 : Denotes that the Taurus is online and you can log in to it. Go to Step 3.
- : Denotes that Taurus is offline and you cannot log into it.
Step 3 Tap Connect next the screen name.
Step 4 Enter the password for the “admin” user and then tap Log In.
After successful login, ![]() is displayed. ViPlex Handy saves the account information automatically.
is displayed. ViPlex Handy saves the account information automatically.
Taurus Login with ViPlex Express (Windows)
Before You Begin
- Get the SSID and password of WiFi AP of the Taurus. The default SSID is “AP+the last 8 digits”. The default password is “12345678”.
- Get the password of the user “admin”. The default password of the user “admin” is “123456”.
Operating Steps
Step 1 Connect the WiFi AP of the Taurus products.
Step 2 Start ViPlex Express.
Step 3 Click Refresh to refresh the screen list.
After detecting the Taurus, ViPlex Express will try to log in to the Taurus with the default account or the account used for last login.
- : Denotes that the Taurus is online and you can log in to it. Go to Step 4.
- : Denotes the Taurus is offline and you cannot log in to it.
- : Denotes logging into the Taurus is successful.
Step 4 Click Connect next the screen information.
Step 5 Enter the password for the “admin” user and then click OK.
After successful login, ViPlex Express saves the account information automatically.
Caution
FCC Caution
Any changes or modifications not expressly approved by the party responsible for compliance could void the user’s authority to operate the equipment.
This device complies with part 15 of the FCC Rules. Operation is subject to the following two conditions: (1) This device may not cause harmful interference, and (2) this device must accept any interference received, including interference that may cause undesired operation.
Note: This equipment has been tested and found to comply with the limits for a Class A digital device, pursuant to part 15 of the FCC Rules. These limits are designed to provide reasonable protection against harmful interference when the equipment is operated in a commercial environment. This equipment generates, uses, and can radiate radio frequency energy and, if not installed and used in accordance with the instruction manual, may cause harmful interference to radio communications. Operation of this equipment in a residential area is likely to cause harmful interference in which case the user will be required to correct the interference at his own expense.
This equipment complies with FCC radiation exposure limits set forth for an uncontrolled environment .This equipment should be installed and operated with minimum distance 20cm between the radiator & your body.
This transmitter must not be co-located or operating in conjunction with any other antenna or transmitter.
CE Caution
This equipment should be installed and operated with minimum distance 20cm between the radiator & your body.
IC Warning
RSS-Gen Issue 3 December 2010″&”CNR-Gen 3e edition Decembre 2010:
This device complies with Industry Canada licence-exempt RSS standard(s).
Operation is subject to the following two conditions: (1) This device may not cause interference, and (2) This device must accept any interference, including interference that may cause undesired operation of the device.
Replaceable Batteries
 report this ad
CAUTION: Risk of Explosion if Battery is replaced by an Incorrect Type. Dispose of Used Batteries According to the Instructions.
References
[xyz-ips snippet=”download-snippet”]