NOVASTAR VPlayer V3.8.3 User Manual
Introduction
VPlayer is an application from NovaStar. It works as a terminal player which can be used for devices installed with Windows.On public networks, VPlayer can work with the cloud-based publishing system of VNNOX. After bindingVPlayer and a synchronous player in the cloud-based publishing system, users can remotely manage content and control terminals via VPlayer.On LANs, VPlayer can work with ViPlex Express LAN-Based Screen Management Software. ViPlex Express can search for and connect to VPlayer automatically. After logging in to VPlayer in ViPlex Express, users can publish solutions to VPlayer and upgrade the version of VPlayer.After VPlayer downloads solutions to the specified location, the solutions will be played according to the playback plan set by users
Installation
Preparation
- Visit www.en.vnnox.com/#downloadSyn to download the VPlayer installer.
- Make sure your antivirus software is stopped.
- Make sure your operating system is 64-bit Windows 7 SP1 or later.
- Make sure Microsoft .NET Framework 4.6.1 is installed.
- Make sure Microsoft Visual C++ 2017 Redistributable is installed.
RequirementsTo ensure normal communication between ViPlex Express and VPlayer, install these two applications on:
- The same PC.
- Different PCs on the same LAN.
- PCs on different network segments which can be pinged successfully.The cloud-based publishing system of VNNOX has no specific requirements for VPlayer.
InstallationDouble click the installer and complete the installation according to the wizard.
Player Binding
When working with the cloud-based publishing system of VNNOX, VPlayer must be bound to a synchronous player and then can communicate with the cloud-based publishing system.Only one synchronous player can be bound to VPlayer.
Checking Authentication Information
Step 1 Visit www.en.vnnox.com and click Login at the top right of the page.Step 2 Select a server node and click OK.Step 3 Enter the account name and password, and click Log In.If email verification or SMS verification is enabled, email verification or SMS verification will be required when you log in to VNNOX. If you have not bound an email or phone, you will be required to bind an email or phone when you log in to VNNOX.Step 4 On the homepage of the cloud platform, choose > Player Authentication.Step 5 In the VNNOX Standard/AD Authentication Information area, view Server Address, Authentication User Name, and Authentication Password.
Binding PlayersStep 1 Open VPlayer, as shown in Figure 3-1.Figure 3-1 The Config page
Note: The string at the bottom right of the page is the unique ID of VPlayer. The ID consists of “VPlayer_hard disk serial number” which is used to distinguish VPlayer in the terminal list of ViPlex Express. If the hard disk serial number is longer than 8 characters, the ID will use the last 8 characters.
Step 2 On the Config tab page, select a server from the drop-down options, or click New to add a server.When you add a server, make sure that the server address must be the same as the address in VNNOX.
Step 3 Enter the authentication user name and password which must be the same as those in VNNOX.Figure 3-2 Authentication information
Step 4 Click OK.Step 5 In the prompt box which says the player was bound successfully, click OK.After the player is bound successfully, the page shown in Figure 3-3 is displayed.Figure 3-3 Binding successful
Related OperationsIf you want to reset parameters, click Reset.If you want to remove binding, log in to VNNOX and perform the following operations according to the actual situation
- VNNOX Standard: On the Players page, click
 .
. - VNNOX AD: Choose > Players Management > Players, select the player and click Delete.
Configuration Options Checking
To ensure stable playback of VPlayer, please check the Windows configuration options shown in Table 4-1. If a configuration option does not conform to the target status, please change it. This chapter takes Windows 10 as an example.
Table 4-1 Configuration options
|
Configuration Options |
Target Status |
|
Windows automatic update |
Off |
| Firewall |
Off Allow program connection Conforms to any of the above statuses. When VPlayer works with the cloud-based publishing system of VNNOX. Users do not need to check the firewall. |
|
Turn off screen |
Never |
| Sleep |
Never |
|
Scaling size |
100% |
| Multiple displays |
Duplicate these displays |
|
UAC |
Never notify |
| Antimalware Service Executable |
Disabled |
|
Superfetch |
Manual |
Windows Automatic Update
Step 1 Click ![]() in the Windows Start menu.Step 2 Choose Update & Security.Step 3 On the Windows Update page, click Advanced options.Step 4 Check whether Windows automatic update is turned off.
in the Windows Start menu.Step 2 Choose Update & Security.Step 3 On the Windows Update page, click Advanced options.Step 4 Check whether Windows automatic update is turned off.

Firewall
When VPlayer and ViPlex Express work together, users are advised to turn off the Windows firewall or allow program connection to ensure normal communication. When VPlayer works with the cloud-based publishing system of VNNOX, users do not need to check the Windows firewall.
Step 1 Click ![]() in the Windows Start menu.Step 2 Choose Update & Security.Step 3 Windows Security.Step 4 Click Open Windows Defender Security Center.Step 5 Check whether the firewall is turned off. If the firewall needs to be turned on, check whether the connection is allowed. For the method to allow program connection, see 6.2 How to set the inbound firewall rules?
in the Windows Start menu.Step 2 Choose Update & Security.Step 3 Windows Security.Step 4 Click Open Windows Defender Security Center.Step 5 Check whether the firewall is turned off. If the firewall needs to be turned on, check whether the connection is allowed. For the method to allow program connection, see 6.2 How to set the inbound firewall rules?
Figure 4-3 Firewall
Screen off and Sleep
Step 1 Click ![]() in the Windows Start menu.Step 2 Choose System.Step 3 Choose Power & sleep.Step 4 Check whether all the four configuration options are set to XI’AN Never.
in the Windows Start menu.Step 2 Choose System.Step 3 Choose Power & sleep.Step 4 Check whether all the four configuration options are set to XI’AN Never.
Figure 4-4 Screen off and sleep
Scaling Size and Multiple DisplaysStep 1 Click in the Windows Start menu.Step 2 Choose System.Step 3 Check whether the scaling size is 100% and the option of multiple displays is set to Duplicate these displays.Note: When multiple monitors are connected, the configuration option for multiple displays will appear.
Figure 4-5 and multiple displays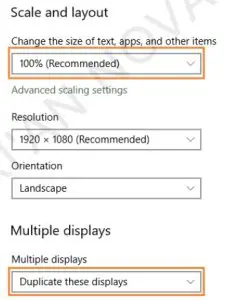
UAC
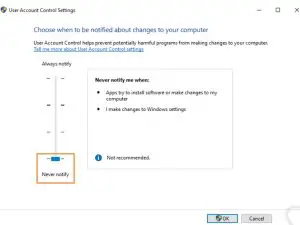
Step 1 Click ![]() in the Windows Start menu.Step 2 Type “User Accounts” in the search box and select Change User Account Control Settings.Step 3 Check whether UAC is set to Never notify.Figure 4-6 UAC
in the Windows Start menu.Step 2 Type “User Accounts” in the search box and select Change User Account Control Settings.Step 3 Check whether UAC is set to Never notify.Figure 4-6 UAC
Antimalware Service ExecutableStep 1 Press Win + R buttons to open the Run window.Step 2 Type gpedit.msc command and press Enter to open the Local Grou Policy Editor dialog box.Step 3 Expand Computer Configuration > Administrative Templates > Windows Components > Windows Defender Antivirus.Step 4 Click Real-time Protection.Step 5 Check whether the status of Turn on process scanning whenever real time protection is enabled is Disabled.Figure 4-7 Antimalware service executable
SuperfetchStep 1 Press Win + R buttons to open the Run window.Step 2 Type services.msc command and press Enter to open the Services dialog box.Step 3 Check whether the startup type of Superfetch is Manual.
Figure 4-8 Superfetch
General Functions
Setting Display WindowStep 1 Open VPlayer.Step 2 Choose Display.Figure 5-1 The Display page
Step 3 Set the position and size of the display window and select an option of keeping the window on top.If Same as Desktop is enabled, the size of the display window will be the same as the size of the desktop.The default shortcut to show or hide display window is Ctrl+H.
Locking Screen
You can use the locking function to make the screen stay in the current status.Step 1 Open VPlayer.Step 2 In the top right corner of the page, click and select Lock.
- If you have not set an unlocking password, the password setting page will appear.
- If you have set an unlocking password, go to Step 3.
Step 3 Click OK.To unlock the screen, press Esc, enter the password and press Enter. If you forgot the unlocking password, please send the random code in the dialog box to the technical engineer staff to deal with.
Setting System InformationStep 1 Open VPlayer.Step 2 In the top right corner of the page, click ![]() and select Settings.Table 5-1 System information
and select Settings.Table 5-1 System information
|
Item |
Description |
| General | Change the language of VPlayer, sync time, configure VPlayer to start up automatically, choose to exit or minimize the program when clicking the close button, set video volume and Video Decoder. l Select Enable network time, and the PC will sync time based on the network time. l Select Turn off video volume, and the next video and subsequent videos will be muted. |
| Download | Set the directory to save files received by VPlayer. |
| Hot Keys | Set keyboard shortcuts to show/hide the display window. |
| Lock | Set a password to unlock the screen. The screen can be locked when the password is set successfully. |
Step 3 Click OK after the configuration is done.
Using VPlayer Helper
Step 1 Open VPlayer.Step 2 At the top right, click ![]() and select Helper.Figure 5-2 VPlayer Helper
and select Helper.Figure 5-2 VPlayer Helper

Step 3 Use the functions in Table 5-2 as required.
Table 5-2 VPlayer Helper
|
Function |
Description |
| Logs | Download and save running logs and play logs to a specified location. |
| Clear Cache | Delete the temporary files created during system running (which can free up disk space). |
| System Information | Detect PC information and export the detailed information to a specified location. |
| Playback Environment | Optimize the playback environment with one click to ensure stable playback for VPlayer. |
Checking Software Information
Step 1 Open VPlayer.Step 2 In the top right corner of the page, click and select About.View information such as the version and copyright of VPlayer.
FAQ
How to deal with the problem that a video cannot be played normally?
QuestionHow to deal with the problem that VPlayer cannot play a video normally?
AnswerStep 1 Use a third-party driver tool to check whether the video card driver, sound card driver and Inter bus driver are normal.
- Yes: Go to Step 2.
- No: Update the driver.
Step 2 Check whether other players can play the video normally.
- Yes: Contact NovaStar.
- No: There is a problem with the video file.
How to set the inbound firewall rules?
Step 1 Click in the Windows Start menu.Step 2 Choose Update & Security.Step 3 Choose Windows Security.Step 4 Click Open Windows Defender Security Center.Step 5 Click Firewall & network protectionStep 6 Click Advanced Settings and then click Yes to open the Windows Defender Firewall with Advanced Security dialog box
Figure 6-1 Advanced settings
Step 7 Click Inbound Rules.Figure 6-2 Inbound rules
Step 8 On the right of the page, click New Rule to open the New Inbound Rule Wizard dialog box.Step 9 Select Program and click Next.
Figure 6-3 Rule type
Step 10 Click Browse, select Proto.exe from the local PC and then click Next.Figure 6-4 Program selection
Step 11 Select Allow the connection and click Next.Step 12 Select Domain, Private and Public and click Next.Step 13 Enter a name and click Finish.
Copyright © 2021 Xran NovaStar Tech Co., Ltd. All Rights Reserved. No part of this document may be copied. reproduced. extracted or transmitted in any form or by any means without the prior written consent of Van NovaStar Tech Co.. Ltd.
 report this ad
Trademark m4,1St4 ft is a trademark of Van NovaStar Tech Co.. Ltd.Statement Thank you for choosing NovaStar’s product. This document is intended to help you understand and use the product. For accuracy and reliability. NovaStar may make improvements and/or changes to this document at any time and without notice. If you experience any problems in use or have any suggestions, please contact us via the contact information given in this document. We will do our best to solve any issues, as well as evaluate and implement any suggestions.
References
[xyz-ips snippet=”download-snippet”]