
PRESTO Pressure Cooker Plus Instruction Manual

IMPORTANT SAFEGUARDS
To reduce the risk of personal injury or property damage when using electrical appliances, basic safety precautions should always be followed, including the following:
- Read all instructions. Improper use may result in bodily injury or property damage.
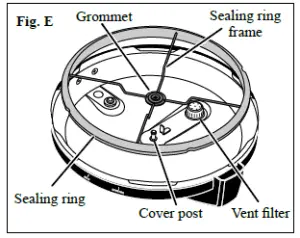
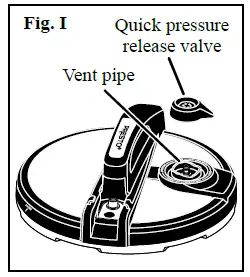
- Before each use, check both the vent pipe (see Fig. A, page 3) and vent filter (see Fig. E, page 3) to be certain they are free of any blockage. Remove the filter and clean any debris from both the vent pipe and filter (see cleaning instructions on page 8).
- Always check the air vent/cover lock to be sure it moves freely before use.
- To protect against electrical shock, do not immerse cord, plug, or cooker body in water or other liquid.
- Do not let children handle or put electrical cords or plugs in their mouths.
- Always attach plug to appliance first, then plug cord into the wall outlet. To disconnect, press cancel, then remove plug from wall outlet.
- Unplug cord from unit and outlet when not in use and before cleaning. Allow unit to cool before putting on or taking off parts and before cleaning.
- Do not operate any appliance with a damaged cord or plug or in the event the appliance malfunctions or has been damaged in any manner. Return the appliance to the Presto Factory Service Department for examination, repair, or electrical or mechanical adjustment.
- WARNING! Spilled food can cause serious burns. Keep appliance and cord away from children. Never drape cord over edge of counter or table. Never plug cord into outlet below counter or use an extension cord. Do not let cord touch hot surfaces.
- To guard against electrical shock, cook only in the removable cooking pot provided.
- The use of accessory attachments not recommended by the appliance manufacturer may cause injuries. Use only genuine Presto® accessories and replacement parts.
- Intended for countertop use only.
- Do not place on or near a hot gas or electric burner or in a heated oven.
- Do not fill above the ⅔ fill line. However, the cooking pot should never be filled above the ½ fill line when cooking foods that foam, froth, or expand, such as rice, grains, dry beans, peas, and lentils, or foods that are mostly liquids, such as soups. Overfilling may cause a risk of blocking the vent pipe and developing excess pressure. See food preparation instructions.
- Do not pressure cook applesauce, cranberries, rhubarb, cereals, pasta, split peas, and soup mixes containing split peas, pasta, or grains. These foods tend to foam, froth, and sputter and may block the vent pipe, vent filter, and air vent/cover lock.
- This appliance cooks under pressure. Improper use may result in scalding injury. Make certain pressure cooker is properly closed before operating. See “How to Use” instructions (page 7).
- Air bubbles may form when cooking certain foods (see the WARNING information on page 4). After cooking these foods, disperse any air bubbles by rocking the cooker from side to side as described on page 4.
- Do not attempt to open the pressure cooker until all internal pressure has been released, the air vent/cover lock has dropped, and no steam escapes when the quick pressure release valve is rotated to the STEAM OUT position. Any pressure in the cooker can be hazardous. Never force open the temperature sensor arm. See “How to Use for Pressure Cooking” instructions (page 7).
- Extreme caution must be used when moving a pressure cooker containing hot liquids. Do not touch hot surfaces. Always use appliance handles.
- To ensure safe operation and satisfactory performance, replace the sealing ring if it shrinks, becomes hard, deformed, cracked, or torn. Use only genuine Presto® replacement parts.
- Close supervision is necessary when the pressure cooker is used near children. It is not recommended that children use the pressure cooker.
- Do not use this appliance for other than intended use.
- Do not use this appliance for deep fat frying.
- Do not use outdoors.
SAVE THESE INSTRUCTIONSTHIS APPLIANCE IS FOR HOUSEHOLD USE ONLY.
IMPORTANT CORD INFORMATION
To reduce the risk of electric shock, this appliance has a 3-prong grounded plug. If the plug on this appliance does not fit into your outlet, contact a qualified electrician. Do not attempt to modify the plug in any way. A short detachable power supply cord is provided to reduce the risk of becoming entangled in or tripping over a longer cord. DO NOT USE WITH AN EXTENSION CORD. Connectthe power supply cord to a 120VAC electrical outlet only.
INTRODUCTION
With your new Presto® Multi-use Programmable Pressure Cooker Plus, you’ll discover how fast and easy it is to prepare a wide variety of delicious meals. The unit is pre-programmed for pressure cooking. It automatically maintains the proper temperature while cooking then reduces pressure and switches to the keep warm mode when cooking is complete.The innovative technology senses the temperature inside the cooker to assure the exact pressure is maintained for precise cooking no matter where you live. No altitude adjustments are needed. There are 9 built-in safety features, including a cover locking system that allows pressure to build only when the cover is closed. It also prevents the cover from being opened until pressure is safely reduced.In addition to pressure cooking, this appliance can be used to brown, sauté, slow cook, and keep cooked foods warm.
BEFORE FIRST USE
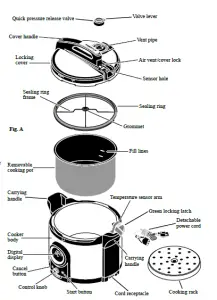
As received, your pressure cooker will be fully assembled. Before removing the cover, you will need to unlock the green locking latch according to the instructions below. Before use, remove all packaging material, including the protective liner which is on the heating plate inside the cooker body. Disassemble the cooker parts and clean them as directed below. Become familiar with the various parts (Fig. A) and read all instructions carefully.
COOKER PARTS
Remove the Cooker Cover
- Before removing the cover, you will need to unlock the green locking latch. Begin by positioning the cooker so the digital display faces you. To unlock the latch, grasp the sides of the latch and turn it towards you until it stops (Fig. B). Lift the temperature sensor arm out of the sensor hole in the cover (Fig. C).
- Once you have released the temperature sensor arm from the cover, rotate the cover counterclockwise until the INSTALL/REMOVE vertical mark is within the mark on the cooker body (Fig. D). Then lift the coverstraight up off the cooker body.
Disassemble Cooker Parts for Cleaning
It is recommended that the pressure cooker be thoroughly washed before first use to remove any manufacturing lubricants.
- Lift the cooking rack and removable cooking pot out of the cooker body. Remove all packaging.
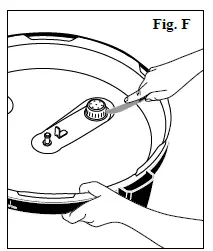
- Invert the cover and pull the sealing ring frame out from the cover (Fig. E). Then remove the vent filter for cleaning. To remove, place the inverted cover on the counter, then rest a table knife on the rim of the cover and insert the tip into one of the filter slots (Fig. F); lift the filter up. NOTE: Although you will not need to remove the filter after every use, you should periodically remove it for cleaning.
- Remove the sealing ring from the sealing ring frame. Wash the sealing ring, sealing ring frame, vent filter, cookingrack, and removable cooking pot in warm, soapy water. Rinse and dry thoroughly.
- Clean the cooker cover with a damp, soapy cloth. Do NOT immerse the cooker cover in water. CAUTION! To prevent electrical shock, never pour water into the cooker body or immerse it or the powercord in water. Always be sure the cooking pot is COMPLETELY DRY before placing it back in the cooker body.
- After cleaning, reassemble the cover. Be sure the filter is placed over all 3 clips (Fig. G) when reattaching the vent filter. Then push it in place. You will hear a snap when it is in the proper position. It should fit tightly.Place the sealing ring back onto the sealing ring frame. Reattach the frame to the cover by fitting the grommet over the cover post (Fig. E, page 3). Rotate the frame so the bars do not interfere with thepositioning tab (Fig. G). Then push the frame down until it is securely positioned in the cover
IMPORTANT INFORMATION
In order for the unit to function properly, always follow these instructions:
IMPORTANT INFORMATIONIn order for the unit to function properly, always follow these instructions:
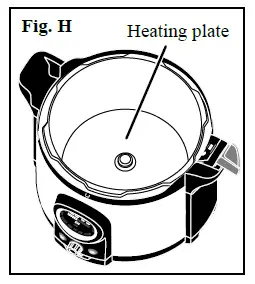
- Be sure the bottom of the removable cooking pot and the heating plate within the cooker body (Fig. H) are free of debris before placing the cooking pot in the cooker body.CAUTION! To prevent electrical shock, NEVER USE THE UNIT WITHOUT THE REMOVABLE COOKING POT. Also, be sure the outside of the cooking pot is COMPLETELY DRY before placing itinto the cooker body.
- Check both the vent pipe and vent filter to be sure they are clear. In order to check the vent pipe, you will need to remove the quick pressure release valve from the cover (Fig. I). Then hold the cover up to the light and make sure you can see light coming through the vent pipe. If you cannot, remove the sealing ring frame and vent filter (see page 3) and clean the vent pipe with a small brush or pipe cleanerto remove the blockage. Reattach the sealing ring frame to the cover.
- Always verify that the sealing ring frame is attached to the pressure cooker cover before cooking.
- Make sure you have not overfilled the cooking pot. Do not fill above the ⅔ fill line when cooking most foods. When cooking foods that foam, froth, or expand, such as rice, grains, dry beans, peas, and lentils, or foods that are mostly liquids, such as soups, never fill the cooking pot above the ½ fill line. For your convenience, both the ⅔ and ½ fill lines are marked inside of the cooking pot (Fig. J). In addition, in each section of the recipes you will find instructions on the maximum fill level for each type of food.
- Always make sure cooking liquid has been added to the cooking pot. Two cups of liquid is the minimum amount.
- Always follow special procedures found on page 20 when pressure cooking dry beans, peas, and lentils. During cooking, these foods tend to froth and foam which could cause the vent pipe to become blocked.
- Always follow the special procedures found on page 22 when pressure cooking rice and grains.
- Never pressure cook applesauce, cranberries, rhubarb, cereals, pasta, split peas, and soup mixes containing split peas, pasta, or grains. These foods expand so much as a result of foaming and frothing that they should never be cooked under pressure.
- Do NOT use the quick pressure release method after cooking dry beans, peas, lentils, grains, or foods that are mostly liquid, such as soup, sauces ,and stews (see page 8).
- Always verify that the air vent/cover lock is down before attempting to open the cooker (see Fig. Q, page 7). If it is up, the cooker contains pressure which, if released, may result in burns and/or property damage.Check that no steam is emitted when the pressure release valve is rotated to the STEAM OUT position.
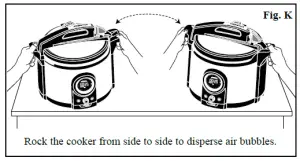
- WARNING! Air bubbles may form when pressure cooking foods with a higher fat content (such as meats with visible fat or poultry with skin and visible fat) or thicker foods (such as stews, sauces, heavy soups, driedbeans, lentils, and grains such as rice and barley). Even after all pressure has been released, those air bubbles can rise to the surface when the cover is opened, unless they are dispersed beforehand. If the air bubbles are not dispersed, hot food may erupt out of the cooker, which could cause serious burn injuries.To disperse the air bubbles, follow these steps: First, verify the pressure has been released (the air vent/cover lock will be in the down position). Next, prior to opening the cover, gently rock the cooker from side to side. To rock, grasp the handles and tilt the cooker to the left, so the right side of the cooker lifts 2 inches off the counter. Then rock to the right so the left side of the cooker lifts 2 inches off the counter (Fig. K). Repeat once. Verify the air vent/cover lock is still down before attempting to open the cover.

HOW TO OPERATE THE DIGITAL CONTROL PANEL
Whenever you plug in the unit, it will beep once and all of the program options will appear in the display window on the digital controlpanel. The KEEP WARM setting will be flashing. This is the “Ready State” (Fig. L).The following information describes how the control panel buttons and preset programs function.
The start button activates the unit once the cooking function and time have been selected.
CURRENT MODE INDICATORS
Once the start button is pressed, the modethe unit is currently in will illuminate. There are three modes: WARM UP, COOKING, and KEEP WARM.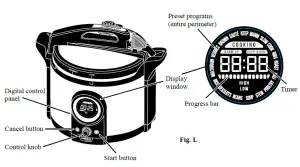
The cancel button allows you to end the cooking or keep warm function at any time. Simply press the cancel button once. When youpress cancel, the unit will return to the “Ready State.”
TIMER
When pressure cooking, the timer will not start counting down until the cooker reaches the correct temperature. When slow cooking, the timer immediately starts counting down once the slow cooking function is activated. When the unit is in the KEEP WARM mode, the timer will count up to indicate how much time the unit has been in this mode.
PROGRESS BAR
During the warmup period, the progress bar will scroll to indicate the unit is heating. Once cooking begins, the progress bar will start to light up. It will increase in length as cooking progresses to correspond with the cooking time (e.g., if 15 minutes of a 20 minute program have elapsed, 75% of the bars will be illuminated).
PRESSURE/SLOW COOK SETTING INDICATOR
Both pressure cooking and slow cooking have a HIGH and LOW setting. Whatever setting is being used will be illuminated in the lower half of the display window.
KEEP WARM FUNCTION
When the cooking time has expired, the unit will automatically switch to the keep warm mode. When in the keep warm mode, KEEPWARM will illuminate and the timer will begin to count up. The unit will remain on for 4 hours and then shut off automatically, unless the cancel button is pressed.The keep warm function can also be manually selected. Turn the control knob until the KEEP WARM setting on the perimeter of the display flashes. Then press the start button.
BROWN/SAUTÉ FUNCTIONS
Use these functions to brown or sauté foods prior to pressure cooking or slow cooking. Browning is typically used for meats and poultry. Sautéing is used for vegetables and to reduce liquid after pressure cooking to make a flavorful sauce for your food. Turn the control knob to the desired function, BROWN or SAUTÉ. Then press the start button. COOKING will illuminate and the progress bar will continuously scroll to indicate the function is active. Allow unit to preheat for 3 to 4 minutes before browning or sautéing your food.
SLOW COOK FUNCTION
For slow cooking, turn the control knob to the SLOW COOK setting. Note as you continue to turn the control knob, the unit will change between the LOW and HIGH options. The default cook time is 4 hours on high and 8 hours on low. You can manually adjust the slow cooking time in 30-minute increments by pressing the control knob once and then turning the knob to the desired time.The maximum slow cooking time at both the high and low settings is 9 hours and 30 minutes and the minimum slow cooking time is 30 minutes. When the time is set, press the start button to activate the unit. COOKING will illuminate and the timer will immediately begin counting down. As cooking progresses, the number of bars lit on the progress bar will increase.
PRESSURE COOKING PRESET PROGRAMS
The digital control panel includes 12 pressure cooking presets. Turn the control knob to select the desired program. NOTE: VEGGIES has two presets, HIGH and LOW. Simply turn the knob to select one or the other.Once the program is selected it will flash and the time and pressure for that program will be displayed, unless you have selected KEEPWARM, BROWN, or SAUTÉ. Press the start button to activate the unit. For pressure cooking, the maximum cooking time is 2 hours and the minimum cooking time is 0 minutes.Because of the great variety of foods within a food grouping, the preset time may need to be adjusted manually. If you desire a time different than that displayed for the program, press the control knob and the default cook time will begin to flash. Then turn the control knob to increase or decrease the time. Once the time you desire is displayed, press the start button to activate the unit. NOTE: If you fail to change the time, press the cancel button and try again. Use the cooking charts included in the recipe section as a guide for recommended cooking times.
| PRESET PROGRAMS | PRESET TIME | PRESET PRESSURE |
| RICE | 1 minute | LOW |
| MULTIGRAIN | 4 minutes | LOW |
| RIBS | 20 minutes | HIGH |
| ROAST | 45 minutes | HIGH |
| POULTRY | 9 minutes | HIGH |
| FISH | 1 minute | LOW |
| SOUP | 10 minutes | HIGH |
| STEW | 5 minutes | HIGH |
| VEGGIES (HIGH) | 5 minutes | HIGH |
| VEGGIES (LOW) | 1 minute | LOW |
| DESSERTS | 20 minutes | LOW |
| BEANS | 4 minutes | LOW |
NOTE: Once the start button is pressed, the cooking time will disappear from the display. The time will reappear about a minutebefore cooking begins. The unit begins counting down when the correct temperature is reached.
ADJUSTING PRESSURE MANUALLY
You can manually set the pressure instead of using the preset programs, if you prefer. Simply press and hold the control knob for a few seconds. All of the preset cooking programs will disappear in the display window and the unit will reset to 00:00 and HIGH pressure.The cook time will be flashing to indicate the unit is in adjustment mode. Turn the control knob to adjust the time. Once you have set the desired time, if you want to adjust the pressure from HIGH to LOW, press the control knob again. HIGH will flash. Turn the control knob until LOW is flashing. Press the start button to activate the unit. If you accidentally select the wrong pressure setting or time, simply press cancel to reset the cooker and try again. High pressure is suitable for meat, poultry, soups, and stews. Use low pressure for fish, some vegetables, beans, multigrains, and desserts
HOW TO USE FOR PRESSURE COOKING
Before you begin cooking, review the “Important Information” instructions on page 4 and always verify that the unit is properly assembled.
- Place the pressure cooker on a dry, level surface. To avoid steam damage to cabinets, position the cooker so the quick pressure release valve is not directly under cabinets.
- Place the removable cooking pot into the cooker body. NEVER USE THE UNIT WITHOUT THE REMOVABLE COOKING POT.
- Attach power cord to cooker, making sure to fully insert it in the cooker receptacle. Then plug into a 120VAC wall outlet.
- Prepare ingredients according to the directions in the recipe you have selected. If the recipe states to brown or sauté food, select the BROWN or SAUTÉ function (see page 5) and press the start button to activate the unit. Preheat the unit for 3 to 4 minutes and brown or sauté food according to recipe. When browning/sautéing is complete, press the cancel button so you can select another cooking function.
- If recipe calls for using the cooking rack, place cooking rack into the cooking pot. See “Helpful Hints” on page 9 for guidance on when to use rack. Add ingredients to the cooking pot, being sure not to overfill (see page 4 for information on filling).
- Pour liquid into the cooking pot, as specified in the recipe or timetable. If not stated, add 2 cups of liquid to the pot.
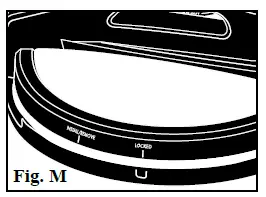
- Place the cover on the cooker body, aligning the INSTALL/REMOVE vertical mark within the mark on the cooker body (Fig. D, page 3). Rotate the cover clockwise until it stops. The pressure cooker cover is properly installed when the LOCKED vertical mark is within the mark on the cooker body (Fig. M).
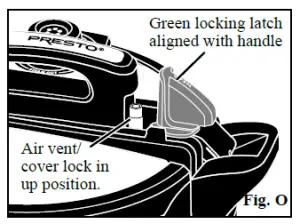
- With the digital display facing you, lower the temperature sensor arm and insert the sensor into its hole in the cover (Fig. N). It may be necessary to rotate the cover slightly so the hole aligns with the sensor. Lock the cover by grasping the green latch. Using a slight downward pressure, turn the latch clockwise until it is aligned with the handle (Fig. O).
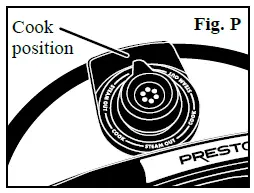
- Push the quick pressure release valve onto the vent pipe and point the lever to any of the three COOK positions (Fig. P). There is no difference between the three positions.
- Using the control knob, scroll to select the appropriate preset for the desired function and/ortype of food. Adjust the cooking time as necessary (see page 6). Or, if preferred, manually set the pressure and time (see page 6).
- Press the start button to activate the unit. WARM UP will illuminate. As the unit is heating, air will automatically exhaust around the air vent/cover lock. You will hear this venting.When pressure begins to build, the air vent/cover lock will slide up (Fig. O), so the locking latch cannot be turned and the cover cannot be opened. Once the unit reaches the correct temperature, COOKING will illuminate and the timer will start to count down. During cooking you may notice some steam releasing from the quick pressure release valve. This is normal. NOTE: Occasionally you may hear a ticking sound. This is the unit cycling on and off during cooking to maintain the pressure or heat.
- When the cook time has expired, the unit will beep 10 times and automatically switch to the keep warm mode. KEEP WARM will be illuminated.
- Reduce pressure according to the recipe or timetable instructions. (See instructions on page 8 for releasing pressure.)Do not open the cooker until all internal pressure has been released. You will know the pressure is completely reduced when the air vent/cover lock drops and no steam is emitted when the pressure release valve is in the STEAM OUT position (Fig. Q). WARNING! Never attempt to open the cooker when the air vent/cover lock is up. Doing so could result in severe burns and/or property damage from the release of pressurized contents.Next, if cooking thicker or higher fat foods as described on page 4, rock the cooker from side to side as illustrated to ensure all air bubbles are dispersed. Verify the air vent/cover lock is still down before attempting to open the cover.
- After pressure is completely reduced and potential air bubbles dispersed, unlock the cover as described on page 3. When removingn the cover, lift it toward you to keep any steam away from you. Place cover upside down on counter.CAUTION! Steam may escape and hot liquid may drip from the cooker cover when removing it. Steam and hot liquid can cause burns.
- Remove food from cooker using a heat-resistant plastic, nylon, rubber, or wooden utensil. Do not use metal utensils as they may scratch the nonstick surface.
- When cooking is complete, unplug power cord from wall outlet and then from pressure cooker. Allow cooker to cool completely before cleaning.

 type of food. Adjust the cooking time as necessary (see page 6). Or, if preferred, manually set the pressure and time (see page 6).
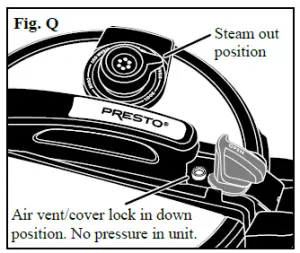 Next, if cooking thicker or higher fat foods as described on page 4, rock the cooker from side to side as illustrated to ensure all air bubbles are dispersed. Verify the air vent/cover lock is still down before attempting to open the cover.
PRESSURE RELEASE METHODS
- Quick Pressure Release. This method is used when cooking vegetables, seafood, and other delicate foods. WARNING! To prevent the risk of severe personal injury and property damage, do NOT use the quick pressure release method after cooking dry beans, peas, lentils, grains, or foods that are mostly liquid, such as soup, sauces, and stews. When cooking time is up, press the cancel button and immediately move the lever on the quick pressure release valve to any of the three STEAM OUT positions (Fig. Q, page 7). You will hear sputtering and steam will release for approximately 2 to 3 minutes.Pressure is completely reduced when the air vent/cover lock has dropped (Fig. Q).CAUTION! To prevent steam burns, keep hands and face away from the top of the pressure cooker as pressure is being released.
- Natural Pressure Release. This method is used when cooking most foods. When cooking time is up, keep the quick pressure release valve in the COOK position. Let the pressure cooker cool for15 minutes. The unit will beep 2 times to indicate that 15 minutes has passed. Then move the pressure release valve to any of the STEAM OUT positions.NOTE: If desired, the food may be left in the cooker, which automatically switches to the keep warm mode. Prior to opening the cooker, be sure to disperse any air bubbles by rocking it from side to side (see instructions on page 4).
HOW TO USE FOR SLOW COOKING
- Follow steps 1 through 8 of the “How to Use for Pressure Cooking” instructions on page 7.
- Push the quick pressure release valve onto the vent pipe. IMPORTANT: Point the lever to any of the three STEAM OUT positions.
- Using the control knob, scroll to select the SLOW COOK LOW or HIGH function. Adjust the slow cooking default time, if desired (see page 6). Press the start button to activate the unit. COOKING will illuminate and the timer will begin counting down.
- When the cook time has expired, the unit will beep 10 times and automatically switch to the keep warm mode.
- Press the cancel button. Unlock the cover as described on page 3. When removing the cover, lift it toward you to keep any steam away from you. Place cover upside down on counter.CAUTION! Steam may escape and hot liquid may drip from the cooker cover when removing it. Steam and hot liquid can cause burns.
- Remove food from cooker. Use a heat-resistant plastic, nylon, rubber, or wooden utensil. Do not use metal utensils as they may scratch the nonstick surface.
- When cooking/keep warm are complete, unplug power cord from wall outlet and then from pressure cooker. Allow cooker to cool completely before cleaning.
CLEANING
After every use
- After the cooker has cooled completely, remove the quick pressure release valve from the cover. Then detach the sealing ring frame from the cover (Fig. E, page 3). Remove the sealing ring from the frame. Do not remove the center grommet on the sealing ring frame. If the vent filter appears dirty or contains debris, remove it from the underside of the cover, following the instructions on page 3.
- Clean the cooker cover with a damp, soapy cloth and then dry completely. Do NOT immerse the cooker cover in water. Wash the sealing ring, sealing ring frame, and vent filter in warm, soapy water. Do NOT wash these parts in the dishwasher. Thoroughly dry all cover parts after cleaning.
- To be sure the vent pipe is clear, hold the cover up to the light and look through the vent pipe. Clean it with a small brush or pipe cleaner if it is blocked or partially blocked. If necessary, clean the vent filter with a small brush to remove any food particles from the slots and holes. Rinse and dry all parts thoroughly and reassemble.
- Wash the cooking rack in warm, soapy water. Do NOT wash in the dishwasher.
- Remove the cooking pot from the cooker body. Wash the pot in the dishwasher or in warm water and a mild detergent.The nonstick surface may be cleaned with a non-metal cleaning pad, such as Scotch-Brite* Multi-Purpose Scrub Sponge or Scotch-Brite* Dobie* Cleaning Pad. Do not use steel wool or abrasive cleaners on the cooking pot or the cooker body. Soaking the cooking pot to loosen food residue is not necessary. If, however, soaking the pot is desired, do not soak for more than2 hours as this may damage the nonstick finish. CAUTION! To prevent electrical shock, never pour water into the cooker body or immerse it or the power cord in water. Always besure the pot is COMPLETELY DRY before placing it back in the cooker body.
- Clean the sensor, sensor arm, and plastic rim of the cooker body with a damp cloth. Avoid getting water inside the cooker body.
Occasionally
- Remove the air vent/cover lock for cleaning. Place your finger over the top of the air vent/cover lock on the cover (Fig. R) and remove the gasket from the underside of the cover (Fig. S). Push theair vent/cover lock through the top of the cover. Wash it and the gasket in warm, soapy water. The metal shaft may be cleaned with a nylon mesh pad. Clean the cover hole with a small brush. After cleaning, reinsert the metal shaft from the top side of the cover down through the cover hole. Placea finger over the top of the air vent/cover lock and push the gasket onto the end of the metal shaft, fitting it into the groove.
- Carefully remove the gasket on the sensor (Fig. T) and wash it in warm, soapy water. Clean the sensor with a damp cloth and place the gasket back on the sensor.
- Wipe the outside of the cooker body with a damp cloth.
CARE AND MAINTENANCE
- When not in use, store your pressure cooker in a dry place. To prevent unpleasant odors from lingering, store the unit with the cover inverted on the cooker body.
- As is the case with all cookware, avoid chopping or cutting food inside the cooking pot with a knife or other sharp utensil. Do not use metal utensils as they may scratch the nonstick surface.
- Do not strike the rim of the cooking pot with any cooking utensil. This could damage the rim which may allow steam to escape and prevent the pressure cooker from sealing.
- The sealing ring and gasket for the air vent/cover lock may shrink, become hard, deformed, cracked, or torn with normal use. When this happens, replace the sealing ring and/or the air vent/ cover lock gasket. This is routine replacement and not covered under the warranty. Leakage between the cover and cooker body is usually caused by deterioration of the sealing ring after prolonged use.
- Periodically check the vent pipe nut for looseness. If necessary, retighten with a ½ʺ wrench.
- If for any reason the pressure cooker cannot be opened, contact the Consumer Service Department in Eau Claire, WI at 1-800-877-0441 for assistance.
- Any maintenance required for this product, other than normal household care and cleaning, should be performed by the Presto Factory Service Department (see page 28).
HELPFUL HINTS
- Your favorite recipes may be adjusted for cooking in the pressure cooker by following the general directions in this manual. Use the included timetables and recipes as a guide for specific foods and cooking times. There is very little evaporation during pressure cooking, so the amount of liquid used should be decreased. A minimum of 2 cups of water or cooking liquid should always be used for pressure cooking.Of course, the easiest way to adapt your favorite conventional recipe is to find a similar recipe for pressure cooking in this book and use it as a guide.
- Use the cooking rack when it is desirable to cook foods out of the cooking liquid. When foods are pressure cooked out of the liquid, flavors will not intermingle. Therefore, it is possible to cook several foods at once, as long as they have similar cooking times. If it is desirable to blend flavors, do not use the cooking rack.
- Many different cooking liquids can be used in a pressure cooker. Wine, beer, broth, fruit juices, and water all make excellent cooking liquids.
- It is the size and shape of the food pieces, rather than the quantity, that affects pressure cooking time. For example, 1 potato will have the same cooking time as 6 potatoes of similar size. It is important to note the size of the food specified in the cooking timetables; if the pieces of food being cooked are of a size different than those noted, it will be necessary to adjust the cooking time.
- If you have any questions on recipes, cooking times, or the operation of your pressure cooker, call our Test Kitchen at 1-800-368-2194 or contact us via our website www.GoPresto.com. *Scotch-Brite and Dobie are registered trademarks of 3M Company. Presto is not affiliated with 3M Company.
QUESTIONS AND ANSWERS
- Sometimes when pressure cooking, I notice beads of moisture forming in the area of the pressure release valve and hear what sounds like escaping steam before the timer begins to count down. Is there something I am doing wrong? No. Both are normal and can be expected as part of pressure cooking.
- I accidentally selected the wrong program and pressed the start button and the cooker is not allowing me to select the right program. What can I do? Press the cancel button. This will enable you to start over and select the correct program.
- When I try to adjust the time, nothing happens. What should I do? Press the cancel button and begin again by selecting the desired program. Then press the control knob once and adjust the time asneeded.
- I can see steam escaping from around the cover. Why? The sealing ring was not positioned on the sealing ring frame or the sealing ring frame was not installed in the cooker cover.NOTICE: If either of these parts are not in place during cooking, the cooker will leak, pressure will not build, and you may damage the unit.Leakage may also occur if the sealing ring needs to be replaced. The sealing ring may shrink, become hard, deformed, cracked, or torn with normal use. When this happens, replace the sealing ring before using the unit again for pressure cooking.
- I can hear steam venting from the quick pressure release valve and pressure is not building. Why? The quick pressure release valve is in the STEAM OUT position. The quick pressure release valve must be in the COOK position in order for pressure to build and the cooker to seal.
- It appears from the display that cooking is taking place, but the air vent/ cover lock is not up and I can hear steam venting. Why?The gaskets are either missing or improperly positioned on the air vent/cover lock and/or the sensor. This will prevent the pressure cooker from building pressure. Refer to page 9 for instructions on positioning the gaskets. If one of the gaskets is missing, contact our Consumer Service Department. Call weekdays 8:00 AM to 4:00 PM (Central Time) at 1-800-877-0441 or email us through ourwebsite at www.GoPresto.com/contact.
- What does it mean when E3 appears in the display window and the unit stops working? The cooker has overheated. You likely operated the unit in pressure cooking mode with insufficient or no liquid. If this occurs,unplug the unit and allow it to cool. Then remove the cover and add liquid to the cooker. Plug the unit back in, place the cover on, and reprogram the cooker.
- What does it mean when E1, E2, E4, or E5 appear in the display window and the unit stops working? Something internally has become damaged, been tampered with, or is defective. The unit will be inoperable if you get one of these codes. You should unplug the unit and contact our Consumer Service Department. Call weekdays 8:00 AM to 4:00 PM (CentralTime) at 1-800-877-0441 or email us through our website at www.GoPresto.com/contact.
- Occasionally the cover is hard to open. What causes this? What should I do? If the cover seems difficult to open, there may still be pressure in the cooker. Verify the air vent/cover lock has dropped before trying to open the cooker. Be sure you have unlocked the green locking latch and lifted the temperature sensor arm away from the cover. The cover will notopen if the temperature sensor arm is still positioned in the cover. If the cover rotates but it seems to catch on the rim of the body, you are not lifting the cover straight up off the cooker body.
- Sometimes my food is not completely done after the recommended cooking time. When I try to put the cover back on the cooker, so I can cook it longer, the cover will not close. How can I get the cover closed?Allow the pressure cooker to cool slightly. When the cooker is still hot, the air vent/cover lock will lift, preventing you from closing the cover. Before placing the cover back on, be sure the quick pressure release valve is in the STEAM OUT position. Once the cover is closed, move the lever to the COOK position.
- What can be done after pressure cooking if the food has more liquid than desired? With the cover removed, select the SAUTÉ function, press the start button, and allow the excess liquid to evaporate. Next time youprepare the same recipe, you may want to use less liquid.
- I believe I am thoroughly cleaning my cooker, but sometimes I notice the odor of my last meal remains in the cooker. What can I do to remove the odor?The sealing ring is made of silicone. Silicone has many wonderful properties but it does tend to retain odors. Unfortunately, there is no good way to remove the odors, but over time they will dissipate.
- I live at a high altitude and normally need to adjust my pressure cooking times. What adjustments should I make with this pressure cooker?No adjustments are needed. The temperature sensor automatically assures the correct temperature is maintained for precise cooking no matter where you live.
PRESSURE COOKING RECIPES
Soups and StewsThis pressure cooker is perfect for preparing delicious soups and stews. Included are a few favorite recipes. If you have a favorite recipe of your own, try it using one of the recipes in this book as your guide. If adding dry beans and peas, they first must be soaked according to the directions on page 20.CAUTION! Do not pressure cook soups or soup mixes containing barley, rice, pasta, grains, or split peas because they have a tendency to foam, froth, and sputter and could block the vent pipe. These foods should be added to the soup AFTER pressure cooking. FOR SOUPS AND STEWS, DO NOT FILL COOKING POT OVER ½ FULL!
Classic Chicken Soup3½ pounds bone-in chicken breasts, skinned3 cups coarsely chopped celery3 cups coarsely chopped onion6 cloves garlic, smashed1 bay leaf2 teaspoons dried thyme2 teaspoons salt1 teaspoon black peppercorns10 cups water • • • • • • •3 cups sliced carrots2 cups sliced celery • • • • • • •6 ounces thin egg noodles4 green onions, thinly sliced
Add chicken, celery, onion, garlic, bay leaf, thyme, salt, peppercorns, and water to cooking pot. Close and secure cover. Place quick pressure release valve on vent pipe. Select the SOUP function, adjust time to 8 minutes, and press start.When time is up, use natural pressure release. Press cancel. Remove chicken to a cutting board and allow to cool. Strain stock by pouring through a large sieve; discard solids. Return stock to cooking pot;add carrots and celery. Close and secure cover. Place quick pressure release valve on vent pipe. Select the VEGGIES–HIGH function, adjust time to 3 minutes, and press start. Meanwhile, remove chicken from bones and cut into bite-size pieces.When cooking time is up, quickly release pressure. Return chicken to cooking pot and add egg noodles. Place cover on cooker but do not rotate to close. Allow noodles to heat for 10 minutes or until tender. Stir in greenonions. 15 servings (serving size 1 cup)
Hearty Vegetable Beef Soup
3 pounds beef stew meat, cut into1-inch cubes2 tablespoons vegetable oil2 (14.5-ounce) cans diced tomatoes, undrained4 cups chopped cabbage3 cups sliced carrots2 cups whole kernel corn1 cup chopped onion1 cup sliced celery2 teaspoons dried oregano1 teaspoon dried thyme1 teaspoon black pepper5 cups beef broth • • • • • • •
With cooking pot in cooker body, select the BROWN function, press start, and preheat cooker. Add oil; brown one-half of beef at a time, removing the first batch from pot when done. Press cancel. Return first batch of beef, including juices, to cooker. Add tomatoes, cabbage, carrots, corn, onion, celery, oregano, thyme, pepper, and broth. Close and secure cover. Place quick pressure release valve on vent pipe. Select the SOUP function, adjust time to 5 minutes, and press start.When time is up, use natural pressure release. Season to taste with salt. 16 servings (serving size 1 cup)
Tuscan Bean Soup
3 cups dry Great Northern beans2 tablespoons olive oil2½ cups chopped onion5 large garlic cloves, minced6 cups kale, coarsely chopped3 cups sliced carrots1½ teaspoons dried rosemary½ teaspoon dried thyme½ teaspoon black pepper13 cups chicken broth • • • • • • •¼ cup plus 1 tablespoon tomato paste Salt
Soak beans according to instructions on page 20.With cooking pot in cooker body, select the SAUTÉ function, press start, and preheat cooker. Add oil, onion, and garlic. Sauté until onions are translucent. Press cancel. Add drained beans, kale, carrots, rosemary,thyme, pepper, and broth. Close and secure cover. Place quick pressure release valve on vent pipe. Select the BEANS function and press start.When time is up, use natural pressure release. Stir in tomato paste until well blended. Season to taste with salt. 18 servings (serving size 1 cup)
Traditional Beef Stew
6 slices thick-sliced bacon, diced¾ cup all-purpose flour1 teaspoon salt4 pounds beef stew meat, cut into1-inch cubesVegetable oil4 cups beef broth¼ cup plus 2 tablespoons tomato paste1½ pounds small red potatoes, halved8 ounces fresh mushrooms, sliced3 cups sliced carrot2 cups chopped onion3 large cloves garlic, minced1½ teaspoons dried thyme3 bay leaves • • • • • • • Salt and pepper
With cooking pot in cooker body, select the BROWN function, press start, and preheat cooker. Add bacon; fry until crisp. Remove bacon from cooker, leaving drippings in pot. Mix flour and salt in a large bowl. Add beef and toss to coat; shake off excess flour mixture. Brown one-third of beef at a time, removing each batch from pot when done. Add oil for browning, as necessary, between batches.Add 1 cup broth to the cooking pot. Scrape the bottom of the pot with a wooden utensil to release stuck-on browned bits of meat and flour. Add remaining broth and tomato paste; stir. Press cancel.Return beef, including juices, and bacon to the cooker. Add potatoes, mushrooms, carrots, onions, garlic, thyme, and bay leaves. Close and secure cover. Place quick pressure release valve on vent pipe. Select the STEWfunction and press start. When time is up, use natural pressure release. Season to taste with salt and pepper. 12 servings (serving size 1½ cups)
Chicken and White Bean Chili
3 cups dry Great Northern beans3 tablespoons olive oil1½ cups chopped onion1½ cups sliced carrot6 cloves garlic, minced2 jalapeño peppers, seeded,deveined, minced2 tablespoons chili powder2 teaspoons dried oregano½ teaspoon ground allspice2 pounds boneless, skinless chickenbreasts, cut into ¾-inch pieces1½ tablespoons packed brown sugar1 tablespoon white wine vinegar9 cups chicken broth • • • • • • • Salt and pepper
Soak beans according to instructions on page 20.With cooking pot in cooker body, select the SAUTÉ function, press start,b and preheat cooker. Add oil, onion, carrot, garlic, jalapeño, chili powder, oregano, and allspice. Sauté for 2 minutes. Press cancel. Stir in drainedbeans, chicken, brown sugar, vinegar, and broth. Close and secure cover. Place quick pressure release valve on vent pipe. Select the BEANS function and press start.When time is up, use natural pressure release. Season to taste with salt and pepper. 16 servings (serving size 1 cup)
Meat and Poultry
With cooking pot in cooker body, select the BROWN function, press start, and preheat cooker. Brown meat or poultry. Remove from cooker and press cancel. Pour liquid into cooking pot. Place meat or poultry on rack in cooker. Close and secure cover. Place quick pressure release valve on vent pipe. Select the RIBS, ROAST, STEW, or POULTRY function. Adjust the time, if necessary, according to the timetable below, and press start. Release pressure as indicated in the timetable.
Keep the following tips in mind when pressure cooking meat and poultry:
- Browning meat and poultry before pressure cooking, although not necessary, will add a richer flavor and color to the finished dish.Browning is easily done in the pressure cooker. Select the BROWN function and press start. Allow unit to preheat for 3 to 4 minutes and brown meat or poultry as desired.
- Meat and poultry can be placed on the grill or under the broiler after pressure cooking to give it last minute browning.
- Cooking time, especially for meat, will vary depending on the size and thickness of the cut, the distribution of fat and bone, and the grade and cut of meat. Because of this variability, the timetable below should be used as a general guide only.
- When cooking larger pieces of meat, such as roasts, keep in mind that thickness rather than weight is the most important factor in determining cooking time. The cooking times found in the meat and poultry timetable are for roasts that are 2 to 3 inches thick. If the roast is thicker than 3 inches, add 5 additional minutes to the cooking time.
- Cooking liquid or sauce can be thickened after pressure cooking, if desired. Select the SAUTÉ function and press start. Allow liquid to simmer for 5 to 10 minutes with the cover removed. Another option is to add a thickening agent to the liquid. Stir 1 to 2 tablespoons of flour or cornstarch into ¼ cup cold water. Select the SAUTÉ function, press start, and slowly add this mixture to the hot liquid. Stir and heat to boiling. Allow to boil for 1 minute or until desired consistency.
- Cooking meat and poultry from a frozen state should be reserved only for emergencies and considered only for smaller cuts of meat, such as chops, ribs, and steak. When cooking from frozen, add about 50% more time than indicated in the timetable.
FOR MEAT AND POULTRY, DO NOT FILL COOKING POT OVER ⅔ FULL!
Meat and Poultry Timetable
| Brisket* or Corned Beef (5–5½ pounds) | ROAST | 60–70 | Natural |
| Chuck Roast (5–5½ pounds) | ROAST | 45–50 | Natural |
| Rump Roast (5–5½ pounds) | ROAST | 60–65 | Natural |
| Oxtail | ROAST | 45–50 | Natural |
| Shank | RIBS | 22–24 | Natural |
| Short Ribs | RIBS | 27–30 | Natural |
| Stew Meat (1-inch cubes) | STEW | 5 | Natural |
| LAMB | |||
| Shoulder Roast (5–5½ pounds) | ROAST | 45–50 | Natural |
| Stew Meat (1-inch cubes) | STEW | 5 | Natural |
| POULTRY | |||
| Chicken
(whole, 3½–4 pounds) |
POULTRY | 11–12 | Natural |
| Chicken (pieces with bone) | POULTRY | 9 | Natural |
| Chicken Breast (boneless, 5–6 ounces each) | POULTRY | 6–7 | Natural |
| Cornish Game Hen | POULTRY | 8 | Natural |
| Turkey (whole, up to 8 pounds frozen) | POULTRY | 36–39 | Natural |
| Turkey Breast (bone-in, up to 8 pounds frozen) | POULTRY | 36–39 | Natural |
| Butt Roast (5–5½ pounds) | ROAST | 50–55 | Natural |
| Shoulder Arm Roast (5–5½ pounds) | ROAST | 50–55 | Natural |
| Chops (¾–1 inch thick) | RIBS | 6–8 | Natural |
| Steak (¾–1 inch thick) | RIBS | 8–10 | Natural |
| Spareribs | RIBS | 17–20 | Natural |
| Stew Meat (1-inch cubes) | STEW | 5 | Natural |
Savory Pot Roast
2 tablespoons vegetable oil1 (5- to 6-pound) boneless beef chuck roast2 small onions, sliced2 cups water2 (2-ounce) cans anchovy fillets, drained and chopped2 tablespoons cider vinegar2 tablespoons packed brown sugar18 whole peppercorns2 bay leaves
With cooking pot in cooker body, select the BROWN function, press start, and preheat cooker. Add oil; brown roast on all sides. Remove from cooker and press cancel. Add onions to pot; select the SAUTÉ function, press start, and stir until onion is slightly softened. Remove from pot. Press cancel.Mix water, anchovies, vinegar, brown sugar, peppercorns, and bay leaves in pot. Place roast on cooking rack in pot. Arrange onions evenly on top of roast. Close and secure cover. Place quick pressure release valve on ventpipe. Select the ROAST function, adjust time to 55 minutes, and press start. When time is up, use natural pressure release. Press cancel.If desired, select the SAUTÉ function, press start, and reduce cooking liquid to make sauce to serve with roast. 14 to 17 servings (serving size 4 ounces)
Korean Barbecued Ribs
2 tablespoons vegetable oil6 pounds St. Louis-style pork ribs, trimmed of excess fat1 cup ketchup½ cup packed brown sugar½ cup rice vinegar4 thinly sliced green onions (about ½ cup)¼ cup soy sauce2 tablespoons sesame oil1 tablespoon plus 1 teaspoon minced ginger1 tablespoon fish sauce2 cloves garlic, finely minced2 teaspoons sesame seeds1 teaspoon hot red pepper flakes½ teaspoon black pepper½ cup water
With cooking pot in cooker body, select the BROWN function, press start, and preheat cooker. Add oil; working in batches, brown ribs on two sides. Between batches, remove ribs to a plate. Press cancel. Whisk ketchup, brown sugar, vinegar, onions, soy sauce, sesame oil, ginger, fish sauce, garlic, sesame seeds, red pepper flakes, and black pepper in a bowl until mixed. Return ribs to the cooker. Pour water and half of the sauce over the ribs in the cooking pot. Close and secure cover. Place quick pressure release valve on vent pipe. Select the RIBS function, adjust time to 25 minutes, and press start.When time is up, use natural pressure release.Remove ribs to a baking sheet. Brush ribs generously with reserved sauce. Place ribs under broiler for approximately 3 minutes or until lightly browned. 12 to 14 servings
Italian-Style Beef Shanks
6 beef shanks (about 5 pounds),1¼ inches thick2 teaspoons salt½ teaspoon black pepper1 tablespoon olive oil2 medium carrots, chopped1 large onion, chopped5 cloves garlic, minced1 tablespoon tomato paste½ cup red wine1 tablespoon za’atar seasoning*1 (14.5-ounce) can diced tomatoes • • • • • • • Gremolata (recipe below)
Season meat with salt and pepper. With cooking pot in cooker body, select the BROWN function, press start, and preheat cooker. Add oil; brown meat on both sides. Remove from cooker and press cancel.Add carrots, onion, garlic, and tomato paste to cooking pot; select the SAUTÉ function, press start, and sauté 3 minutes. Press cancel.Place shanks on top of vegetables. Add wine, za’atar, and tomatoes. Close and secure cover. Place quick pressure release valve on vent pipe. Select RIBS function, adjust time to 30 minutes, and press start.When time is up, use natural pressure release. Remove shanks and vege- tables to a warm dish. Press cancel. Skim excess fat from surface of the sauce. Select the SAUTÉ function and press start. Simmer for 10 minutes or until liquid is reduced to desired consistency. Serve sauce with shanks. Top with gremolata. 6 servings
*Tip: Za’atar is a Middle-Eastern spice blend. If za’atar is not available, make your own using the following recipe. Za’atar substitute:Combine 1¾ teaspoon dried thyme, ½ teaspoon sesame seeds, ½ teaspoon lemon zest, ⅛ teaspoon dried oregano, and ⅛ teaspoon salt.
Gremolata
¼ cup chopped fresh parsley2 cloves garlic, minced1 tablespoon lemon zest2 teaspoons capers, chopped Stir parsley, garlic, zest, and capers together. Top each shank with gremolata.6 servings
Pulled Pork
1 tablespoon vegetable oil6 pounds boneless pork shoulder, trimmed and cut into 3-inch pieces1 (14.5-ounce) can diced tomatoes¼ cup red wine vinegar2 medium onions, coarsely chopped6 cloves garlic2 tablespoons Worcestershire sauce2 tablespoons packed brown sugar2 tablespoons adobo seasoning¼ teaspoon black pepper • • • • • • •¼ cup tomato paste
With cooking pot in cooker body, select the BROWN function, press start, and preheat cooker. Add oil; brown pork pieces on two sides. Press cancel. Combine tomatoes, vinegar, onion, garlic, Worcestershire, brown sugar, adobo seasoning, and pepper in blender; purée until smooth. Pour over pork. Close and secure cover. Place quick pressure release valve on vent pipe. Select the ROAST function, adjust time to 50 minutes, and press start.When time is up, use natural pressure release. Press cancel.Remove pork to baking sheet. Remove and discard any fat or connective tissue. Using two forks, shred meat; set aside.Skim excess fat from surface of the sauce. Select the SAUTÉ function, stir tomato paste into sauce, and press start. Heat until sauce boils and thickens. Press cancel. Return shredded pork to cooking pot; stir until pork is evenly coated with sauce. Let stand 10 to 15 minutes until meat has absorbed most of the sauce. 20 servings (serving size ½ cup)
Ropa Vieja
1 (5- to 5½-pound) beef chuck roast, trimmed of excess fat2 teaspoons salt1 teaspoon black pepper1 tablespoon vegetable oil1 (14.5-ounce) can diced tomatoes1 cup red wine3 red peppers, thickly sliced3 onions, thickly sliced8 garlic cloves, sliced4 bay leaves1 tablespoon plus 1 teaspoon oregano1 tablespoon plus 1 teaspoon ground cumin1 tablespoon plus 1 teaspoonpaprika • • • • • • •1½ cups sliced green olives⅓ cup tomato paste2 tablespoons vinegar
Season roast with salt and pepper. With cooking pot in cooker body, select the BROWN function, press start, and preheat cooker. Add oil; brown roast on all sides. Press cancel. Add tomatoes, wine, peppers, onions, garlic, bay leaves, oregano, cumin, and paprika to pot. Close and secure cover. Place quick pressure release valve on vent pipe. Select the ROAST function, adjust time to 60 minutes, and press start.When time is up, use natural pressure release. Press cancel.Remove meat to a baking sheet and shred with two forks. Add olives, tomato paste, and vinegar to pot and stir. Select the SAUTÉ function and press start. Heat about 10 minutes to reduce cooking liquid slightly. Return shredded beef to cooking pot and stir.Serve with rice, if desired. 15 to 17 servings (serving size 4 ounces)
California Chicken
1 tablespoon olive oil12 boneless, skinless chicken breasts (about 6 ounces each)9 cloves garlic, sliced1 cup white wine1 cup chicken broth¾ cup chopped, fresh Italian parsley1 tablespoon dried rosemary• • • • • • • Salt and pepper1 lemon, thinly sliced
With cooking pot in cooker body, select the BROWN function and preheat cooker. Add oil; brown chicken. Press cancel. Cover chicken with garlic slices. Add wine, broth, parsley, and rosemary. Close and secure cover.Place quick pressure release valve on vent pipe. Select the POULTRY function, adjust time to 6 minutes, and press start.When time is up, use natural pressure release.Season to taste with salt and pepper. Garnish with lemon slices. 12 servings
Herbed Chicken Thighs
1 tablespoon olive oil12 chicken thighs(4 to 5 ounces each), skinned1½ cups chicken broth1½ cups chopped onion¾ cup chopped celery leaves9 cloves garlic, minced3 tablespoons chopped, fresh Italian parsley1½ teaspoons dried oregano1½ teaspoons dried basil• • • • • • •½ cup sliced black olives Salt and pepper
With cooking pot in cooker body, select the BROWN function and preheat cooker. Add oil; brown chicken. Press cancel. Add broth, onion, celery leaves, garlic, parsley, oregano, and basil to pot. Close and secure cover. Place quick pressure release valve on vent pipe. Select the POULTRY function and press start.When time is up, use natural pressure release.Remove chicken to a warm dish. Press cancel. Select the SAUTÉ function, add olives to liquid, and press start. Simmer for 10 minutes until liquid is reduced. Season to taste with salt and pepper. Serve sauce over chicken. 12 servings
Hard-cooked Eggs10 to 12 large eggs
Pour 2 cups water into cooking pot. Place eggs on cooking rack in pot. Close and secure cover. Place quick pressure release valve on vent pipe. Select the POULTRY function, adjust time to 4 minutes, and press start.When time is up, wait 4 minutes and then use quick pressure release. Immediately remove eggs and place in a pan containing ice water. Allow eggs to cool 4 minutes. If not using immediately, refrigerate until ready to use.
Fish and Seafood
Fish/seafood cook very quickly under pressure, and the cooking time required is directly related to the thickness of the food. To prevent over- cooking, do not cook fish/seafood that is less than ¾ inch thick. For fish/seafood more than 1 inch thick, cook for the suggested time in the timetable below and then allow the cover to remain on the pressure cooker for another minute after the air vent/cover lock has dropped.With cooking pot in cooker body, pour 2 cups of water or other cooking liquid into the cooking pot. If using the cooking rack, position it in the cooking pot and then place fish/seafood on the rack. Close and secure cover. Place quick pressure release valve on vent pipe. Select the FISH function, adjust time as necessary, and press start. To prevent overcooking, use the quick pressure release method after cooking fish/seafood (see page 8).
FOR FISH AND SEAFOOD, DO NOT FILL COOKING POT OVER ⅔ FULL!
Fish and Seafood Timetable
| FISH/SEAFOOD | PRESET | COOKING TIME | PRESSURE RELEASE | |
| (Fresh or Thawed) | PROGRAM | (Minutes) | METHOD | |
| Fish Fillets (1 inch thick) | FISH | 1–2 | Quick | |
| Salmon Fillets (1 inch thick) | FISH | 1–2 | Quick | |
| Shrimp (jumbo, 21–25 count) | FISH | 1 | Quick | |
| Tuna Fillets (1 inch thick) | FISH | 2–3 | Quick |
Vegetables
Pressure cooking is a preferred method for preparing vegetables. Because of the fast cooking time and super-heated steam, vegetables retain most of their natural color, texture, flavor, and nutrients.Pour 2 cups liquid into cooking pot. Place vegetables on rack in cooking pot. Close and secure cover. Place quick pressure release valve on vent pipe. Select the VEGGIES LOW or HIGH function. Adjust time, if necessary, according to the following timetable. Cook the minimum amount of time indicated in the timetable if crisper vegetables are preferred. Cook the maximum amount of time if vegetables are more ma- ture. Press start. To prevent overcooking, use the quick pressure release method after cooking (see page 8).
FOR VEGETABLES, DO NOT FILL COOKING POT OVER ⅔ FULL!
| Fresh Vegetable Timetable | ||
|
VEGETABLE |
PRESET
PREPARATION PROGRAM |
COOKING TIME
(Minutes) |
| Artichoke | Whole, 10–11 ounces VEGGIES (HIGH) | 12–14 |
| Asparagus | Stems, cut into 1-inch pieces VEGGIES (LOW) | 0–1 |
| Beans (green, wax) | Whole or sliced VEGGIES (LOW) | 2–3 |
| Beets | Whole, 2½-inch diameter VEGGIES (HIGH) | 18–20 |
| Broccoli | Florets VEGGIES (LOW) | 0–2 |
| Brussels Sprouts | Small, 1-inch diameter VEGGIES (LOW) | 3–4 |
| Cabbage (red, green) | Wedges, 1 inch thick VEGGIES (HIGH) | 4–5 |
| Carrots | Baby cut VEGGIES (HIGH) | 3–4 |
| ½-inch slices VEGGIES (HIGH) | 3–4 | |
| Cauliflower | Florets VEGGIES (LOW) | 2 |
| Collards* | Leaves coarsely chopped, VEGGIES (HIGH) stems thinly sliced | 3–5 |
| Corn-on-the-cob | Whole, 2½-inch diameter VEGGIES (HIGH) | 3–5 |
| Eggplant | Cubed, 1–1½ inches thick VEGGIES (LOW) | 2–3 |
| Sliced, ½ inch thick VEGGIES (LOW) | 2–3 | |
| Kale* | Leaves coarsely chopped, VEGGIES (HIGH) stems thinly sliced | 1–3 |
| Parsnips
(2-inch diameter) |
Sliced, ½ inch thick VEGGIES (LOW) | 3–4 |
| Potatoes (sweet) | Sliced, ½–¾ inch thick VEGGIES (HIGH) | 3–4 |
| Potatoes (white) | Whole, 2½-inch diameter VEGGIES (HIGH) | 17–18 |
| Whole, 1½-inch diameter VEGGIES (HIGH) | 8–10 | |
| Sliced, ¾ inch thick VEGGIES (HIGH) | 5–6 | |
| Rutabaga | Cubed or sliced, 1 inch thick VEGGIES (HIGH) | 7–8 |
| Squash, summer (yellow, zucchini) | Sliced, ½ inch thick VEGGIES (LOW) | 0–1 |
| Squash, winter (acorn) | Halved VEGGIES (HIGH) | 12 |
| Squash, winter (buttercup) | Cut into 3- to 4-inch chunks VEGGIES (HIGH) | 8–9 |
| Squash, winter (spaghetti) | Halved, crosswise VEGGIES (HIGH) | 12–13 |
| Swiss Chard | Whole leaves VEGGIES (LOW) | 4 |
| Turnips | Sliced or cubed, ½–¾ inch thick VEGGIES (HIGH) | 3–4 |
Mashed Cauliflower
2 cups water2 large heads cauliflower, cut into florets • • • • • • •2 teaspoons olive oil½ teaspoon salt¼ teaspoon black pepper
Pour water into cooking pot. Place cauliflower on cooking rack in pot. Close and secure cover. Place quick pressure release valve on vent pipe. Select the VEGGIES–LOW function, adjust time to 3 minutes, and press start. When time is up, use quick pressure release.Remove cauliflower to a bowl and add olive oil, salt, and pepper. Mash to desired consistency. 16 servings (serving size ½ cup)
Braised Kale with Bacon
5 slices bacon, diced1½ cups chopped onion1½ bunches kale (about 25 ounces)2 cups chicken broth• • • • • • •2 tablespoons red wine vinegar½ teaspoon black pepper
With cooking pot in cooker body, select the BROWN function, press start, and preheat cooker. Add bacon; fry until crisp. Remove bacon from cooker, leaving drippings in pot. Press cancel. Select the SAUTÉ function, press start, and add onion; sauté until translucent. Press cancel. Return bacon to pot and add kale and broth. Close and secure cover. Place quick pressure release valve on vent pipe. Select the VEGGIES–HIGH function, adjust time to 3 minutes, and press start.When time is up, use quick pressure release. Stir in vinegar and pepper. 10 servings (serving size ½ cup)
Dry Beans, Peas, and Lentils
The pressure cooker is ideal for preparing dry beans, peas, and lentils quickly. However, these foods have a tendency to froth and foam during cooking, which could cause the vent pipe to become blocked. Therefore, it is necessary to follow these procedures:
SOAKING
Soaking before pressure cooking is strongly recommended for dry beans and peas, but not lentils. Benefits of soaking include eliminating some of the water soluble starches that produce gas and create froth and foam during cooking, decreasing the cooking time, and producing beans and peas that are more evenly cooked.
Soaking can be done using the traditional or the quick-soak method.Traditional method: Clean and rinse beans and peas; cover with three times as much water as beans or peas. Soak 8 hours to overnight.Quick method: Clean and rinse beans or peas. With cooking pot in cooker body, add beans or peas to cooking pot. Cover with three times as much water as beans or peas. Select BROWN function, press start, and heat cooker. Bring water to a boil and boil for 2 minutes. Press cancel. Carefully lift cooking pot from cooker and place on a heat-resistant surface. Place pressure cooker cover on pot. Let stand for 1 hour.After soaking, drain beans, rinse, and remove any loose skins.
COOKING
Place beans, peas, or lentils in cooking pot in cooker body. Cover with fresh water and add 1 tablespoon vegetable oil to help minimize the amount of froth and foam during cooking. The cooking pot should never be more than ½ full with beans, peas, lentils, water, and other ingredients.After cooking is complete, use natural pressure release (see page 8).
Dry Beans, Peas, and Lentils Timetable
Soak beans and whole peas, according to information on page 20. Lentils do not require soaking. Add 1 tablespoon vegeta- ble oil to cooking liquid. DO NOT COOK SPLIT PEAS.Close and secure cover. Place quick pressure release valve on vent pipe. Select the BEANS function. Adjust time, if nec- essary, according to the times indicated in the timetable below and press start. After cooking is complete, use natural pressure release (see page 8).NOTE: The timetable is meant to be a guide. Adjust time as necessary to produce beans you and your family prefer.FOR DRY BEANS, PEAS, AND LENTILS, DO NOT FILL COOKING POT OVER ½ FULL!
BEANS, PEAS, AND LENTILS
COOKING TIME
(Minutes)
Black Beans 3–5Black-Eyed Peas 2–3Chickpeas (garbanzo) 7–10Great Northern Beans 3–6Kidney Beans 2–4Lentils (brown, green)* 3–4Lima Beans (large) 2–3Lima Beans (baby) 2–4Navy Beans (pea) 2–4Peas (whole yellow, green)** 7–10Pinto Beans 4–7Red Beans 4–7*It is not necessary to soak.**Do not cook split peas.
Lentil Curry
2 tablespoons olive oil2 cups chopped onion1 tablespoon ground coriander1 tablespoon curry powder1 teaspoon ground ginger3 cups lentils1 teaspoon salt9 cups chicken broth
With cooking pot in cooker body, select the SAUTÉ function, press start, and preheat cooker. Add oil, onion, coriander, curry powder, and ginger; sauté for 2 minutes. Press cancel. Add lentils, salt, and broth. Close and secure cover. Place quick pressure release valve on vent pipe. Select the BEANS function and press start.When time is up, use natural pressure release. 12 servings (serving size ½ cup)
Savory White Beans
4 cups Great Northern Beans2 tablespoons olive oil2 cups chopped onion1 tablespoon minced garlic2 cups sliced carrots2 small bay leaves1 teaspoon salt1 teaspoon dried thyme½ teaspoon dried rosemary½ teaspoon black pepper6 cups chicken broth
Soak beans according to instructions on page 20.With cooking pot in cooker body, select the SAUTÉ function, press start, and preheat cooker. Add oil, onion, and garlic; sauté until onions are translucent. Press cancel. Add beans, carrots, bay leaves, salt, thyme,rosemary, pepper, and broth. Close and secure cover. Place quick pressure release valve on vent pipe. Select the BEANS function and press start.When time is up, use natural pressure release. 14 servings (serving size ½ cup)
Savory White Beans
4 cups Great Northern Beans2 tablespoons olive oil2 cups chopped onion1 tablespoon minced garlic2 cups sliced carrots2 small bay leaves1 teaspoon salt1 teaspoon dried thyme½ teaspoon dried rosemary½ teaspoon black pepper6 cups chicken broth
Soak beans according to instructions on page 20.With cooking pot in cooker body, select the SAUTÉ function, press start, and preheat cooker. Add oil, onion, peppers, and garlic; sauté until onions are translucent. Stir in flour, chili powder, cumin, paprika, and salt. Cook 1 minute. Press cancel. Add beans and broth. Close and secure cover. Place quick pressure release valve on vent pipe. Select the BEANS function, adjust time to 6 minutes, and press start.When time is up, use natural pressure release. 18 servings (serving size ½ cup)
Grains
Grains are an important, but often little recognized, part of a healthy diet. They contribute complex carbohydrates, soluble and insoluble fiber, and other nutrients. Grains are low in fat and can be prepared quickly and conveniently with no soaking required. However, some grains foam and froth during cooking, so the following precautions should be observed.
- Do not cook more than 4 cups of grains at one time.
- After pressure cooking, use natural pressure release (see page 8).
Grains Timetable
Combine the desired grain and the amount of liquid (water or broth) indicated in the timetable below in the cooking pot. Close and secure cover. Place quick pressure release valve on vent pipe. Select the RICE or MULTIGRAIN function, adjust time as necessary, and press start.
Before serving, separate the grains by lifting gently with a fork while steaming. It may be necessary to allow excess moisture to evaporate from some grains. If excessive moisture remains, drain before using grains.FOR GRAINS, DO NOT FILL COOKING POT OVER ½ FULL!
| GRAINS
(Qty: 4 cups) |
CUPS OF LIQUID PER 4 CUPS OF GRAIN | PRESET BUTTON | COOKING TIME
(Minutes) |
| Amaranth | 7 | MULTIGRAIN | 1–2 |
| Barley (hull-less)* | 7 | MULTIGRAIN | 3–5 |
| Barley (pearl)* | 8 | MULTIGRAIN | 4–6 |
| Buckwheat | 7 | MULTIGRAIN | 1–2 |
| Farro (pearl) | 7 | MULTIGRAIN | 2–4 |
| Millet | 7 | MULTIGRAIN | 1–2 |
| Oats (steel cut) | 6 | MULTIGRAIN | 2–4 |
| Rice (brown) | 6 | RICE | 7–9 |
| Rice (white) | 6 | RICE | 1–2 |
| Sorghum | 7 | MULTIGRAIN | 17–20 |
| Wheat Berries | 6 | MULTIGRAIN | 17–20 |
| Wild Rice | 5 | MULTIGRAIN | 12–14 |
Desserts
There are some desserts that the pressure cooker does remarkably well: custards, puddings (especially bread pudding), and cheesecake. These desserts may be prepared in oven-safe custard cups, ramekins, or any oven-safe mold or form which will fit loosely in the cooking pot. This pressure cooker will hold a 9-inch springform pan or up to 8 ramekins, depending on their shape and size. Fill molds ⅔ full and cover thetop securely with aluminum foil. Place the mold or ramekins on the cooking rack in the cooking pot. To position more than 4 ramekins in the cooking pot, you will need to place 4 of the ramekins on the cooking rack and then position the remaining ramekins on top of the first layer,making sure to stagger the top layer. Do not cook applesauce, cranberries, or rhubarb in the pressure cooker.FOR DESSERTS, DO NOT FILL COOKING POT OVER ⅔ FULL!
Custard
4 eggs, beaten⅓ cup sugar1 teaspoon vanilla extract½ teaspoon salt3 cups milk2 cups water
Mix eggs, sugar, vanilla, and salt in a medium bowl. Add milk and mix well. Pour ½ cup of the custard mixture into each of eight 5-ounce ramekins. Cover the top of each ramekin securely with aluminum foil.Add water and cooking rack to cooking pot. Place four of the ramekins on the cooking rack and then stack the remaining ramekins opposite the bottom layer of ramekins. Close and secure cover. Place quick pressurerelease valve on vent pipe. Select the DESSERTS function, adjust time to 7 minutes, and press start.When time is up, use quick pressure release.Remove ramekins to cool on a wire rack. Refrigerate until chilled. 8 servings
Variations:
Coconut CustardFollow the custard directions above but, before pouring custard mixture into ramekins, place1 tablespoon of shredded coconut into each of the ramekins.Chocolate CustardFollow the custard directions, mixing eggs, sugar, vanilla, and salt. Then heat milk and 2 ounces of grated bakingchocolate just until chocolate is melted. Allow to cool slightly and then add to the egg mixture. Follow the rest of thecustard directions.Orange Cheesecake1 (11-ounce) can mandarinoranges, well drained20 ounces cream cheese(2½ eight-ounce packages)¾ cup sugar3 eggs¾ cup crushed vanilla wafers2 cups water
Cut aluminum foil to fit bottom of 9-inch springform pan. Place foil into pan and lightly grease foil. Decoratively arrange orange sections on pre- pared bottom of springform pan.Beat cream cheese until smooth using an electric mixer. Beat in sugar. Beat in eggs, one at a time. Pour mixture over orange sections. Sprinkle top with vanilla wafers. Cover pan with aluminum foil and secure around the rim of the pan (do not wrap the entire pan).Add water and cooking rack to cooking pot. Place pan on cooking rack. Close and secure cover. Place quick pressure release valve on vent pipe. Select the DESSERTS function, adjust time to 40 minutes, and press start.When time is up, use quick pressure release. Remove pan and cool on wire rack. Refrigerate 4 hours or overnight. Loos- en edges. Position a large plate upside down over pan; turn plate and pan over. Remove side of springform pan, remove bottom of pan, and carefully pull off foil. 12 servings
SLOW COOKING RECIPES
Due to the nature of slow cooking, meat does not brown as it would if cooked in a skillet or oven. It is not necessary to brown meat or poultry before slow cooking, but you may prefer the flavor and appearance of browned meat.Browning ground beef, bacon, and sausage before slow cooking may be desirable to remove excess fat. Avoid removing the cover during slow cooking because it will result in significant loss of heat and steam. If you must open the cover to check on cooking progress, do so quickly. Some dense and crisp vegetables like carrots, potatoes, and turnips take longer to cook than meat, so cut vegetables into smaller pieces whenadding to meat dishes. IMPORTANT: When slow cooking, place the quick pressure release valve on the vent pipe in the STEAM OUT position.
Southwest Chicken Soup
8 boneless, skinless chicken breasts,cooked and shredded2 (16-ounce) cans pinto beans, drained2 (14.5-ounce) cans diced tomatoes2 cups whole kernel corn2 (4-ounce) cans chopped green chilies*2 cups chopped onion2 red peppers, cut into ½-inch pieces2 jalapeño peppers, chopped4 cloves garlic, minced2 tablespoons chili powder2 teaspoons cumin4 cups chicken broth2 (28-ounce) cans enchilada sauce • • • • • • • Avocado slices for serving Tortillas chips for serving
Add chicken, beans, tomatoes, corn, chilies, onion, peppers, garlic, chili powder, cumin, broth, and enchilada sauce to cooking pot. Close and secure cover. Place quick pressure release valve on vent pipe. Turn lever to STEAM OUT position for slow cooking.Select the SLOW COOK–LOW function and press start. Cook for 7 to 8 hours. Or select the SLOW COOK–HIGH function and press start. Cook for 3 to 5 hours.Serve with avocado slices and tortilla chips. 24 servings (serving size 1 cup)
Apricot Barbecue Pork Chops
3 tablespoons vegetable oil3 cups chopped onion¾ cup teriyaki sauce¾ cup ketchup¾ cup apricot preserves⅓ cup cider vinegar⅓ cup packed brown sugar1½ teaspoons hot red pepper1½ teaspoons dry mustard1 teaspoon black pepper12 boneless pork chops, 1 inch thick
With cooking pot in cooker body, select the SAUTÉ function, press start, and preheat cooker. Add oil; sauté onion until translucent. Press cancel. Combine teriyaki sauce, ketchup, preserves, vinegar, brown sugar, red pepper, mustard, and black pepper in a small bowl. Place pork chops in the cooking pot on top of the onions. Pour barbecue sauce over chops. Close and secure cover. Place quick pressure release valve on vent pipe. Turn lever to STEAM OUT position for slow cooking. Select the SLOW COOK– LOW function and press start. Cook for 6 to 7 hours. 12 servings
CONSUMER SERVICE INFORMATION
If you have any questions regarding the operation of your Presto® appliance or need parts for your appliance, contact us by any of these methods:
- Call 1-800-877-0441 weekdays 8:00 AM to 4:00 PM (Central Time)
- Email us through our website at GoPresto.com/contact
- Write: National Presto Industries, , Consumer Service Department 3925 North Hastings Way, Eau Claire, WI 54703-3703
Inquiries will be answered promptly by email, telephone, or letter. When emailing or writing, please include a phone number and a time when you can be reached during weekdays if possible.When contacting the Consumer Service Department or when ordering replacement parts, please indicate the model and series numbers for the pressure cooker. The model number can be found on the back of the cooker body and the series number can be found on the bottom of the cooker body. Please record this information:
With cooking pot in cooker body, select the SAUTÉ function, press start, and preheat cooker. Add oil; sauté onion until translucent. Press cancel. Combine teriyaki sauce, ketchup, preserves, vinegar, brown sugar, redpepper, mustard, and black pepper in a small bowl. Place pork chops in the cooking pot on top of the onions. Pour barbecue sauce over chops. Close and secure cover. Place quick pressure release valve on vent pipe. Turnlever to STEAM OUT position for slow cooking. Select the SLOW COOK– LOW function and press start. Cook for 6 to 7 hours. 12 servings
Model
Series
Date Purchased
The Presto Factory Service Department is equipped to service Presto® appliances and supply genuine Presto® parts. Genuine Presto® replacement parts are manufactured to the same exacting quality standards as Presto® appliances and are engineered specifically to function properly with its appliances. Presto can only guarantee the quality and performance of genuine Presto® parts. “Look-alikes” might not be of the same quality or function in the same manner. To ensure that you are buying genuine Presto® replacement parts, look for the Presto® trademark.Canton Sales and Storage Company, Presto Factory Service Department, 555 Matthews Dr., Canton, MS 39046-3251
Product Registration
IMPORTANT: Please go online and register this product within ten days of purchase. Proper registration will serve as proof of purchase in the event your original receipt becomes misplaced or lost. Registration will not affect warranty coverage, but may expedite the processing of warranty claims. The additional information requested will help us develop new products that best meet your needs and desires. To register the product, visit www.GoPresto. com/registration or simply scan this QR code. If you do not have computer access, contact the Consumer Service Department at 1-800-877-0441.
Presto®Limited Warranty
(Applies only in the United States)
 report this ad
This quality Presto® appliance is designed and built to provide many years of satisfactory performance under normal household use. Presto pledges to the original owner that should there be any defects in material or workmanship during the first year after purchase, we will repair or replace it at our option. Our pledge does not apply to normal wear and tear including scratches, dulling of the polish, or staining; the repair or replacement of moving and/or perishable parts such as the sealing ring, quick pressure release valve, or air vent/cover lock gasket; or for any damage caused by shipping. Outside the United States, this limited warranty does not apply. To obtain service under the warranty, please call our Consumer Service Department at 1-800-877-0441. If unable to resolve the problem, you will be instructed to send your Presto® appliance to the Presto Factory Service Department for a quality inspection; shipping costs will be your responsibility. When returning an appliance, please include your name, address, phone number, and the date you pur- chased the appliance as well as a description of the problem you are encountering with the appliance. We want you to obtain maximum enjoyment from using this Presto® appliance and ask that you read and follow the instructions enclosed. Failure to follow instructions, damage caused by improper replacement parts, abuse, misuse, disassembly, alterations, or neglect will void this pledge. This warranty gives you specific legal rights, and you may also have other rights which vary from state to state. This is Presto’s personal pledge to you and is being made in place of all other express war- ranties.National Presto Industries, Inc. Eau Claire, WI 54703-3703
Read More About This Manual & Download PDF:
References
[xyz-ips snippet=”download-snippet”]