What installation accessories are in the box?
| Item name | Image | Dimensions | With Din Rail Transformer | With Plug-In Adapter |
| Long Mounting Screws | 3.5cm | 2 | 2 | |
| Wall Anchors | 5mm | 2 | 2 | |
| Security Screws | 0.47cm | 2 | 2 | |
| Short Mounting Screws |  |
1.58cm | 2 | 2 |
| Wire Nuts | |
5 | 2 | |
| Wire Extenders | 2 | 2 | ||
| Cable Clips | |
0 | 10 | |
| Ring Screwdriver | 1 | 1 |
Step 1: Download the Ring AppStep 2:Start the setup in the Ring AppStep 3:Powering your DeviceStep 4: Uninstalling your existing doorbellStep 5: Installing your device with the included Corner MountStep 6: Installing your device without the included Corner MountStep 7: Restore power at the consumer unitStep 8: In-app SetupStep 9: Securing your device
Step 1: Download the Ring AppThe Ring app walks you through setting up and managing your Ring Doorbell. Search for “Ring” in one of the app stores below, or visit ring.com/app.Step 2: Start the set up in the Ring AppIn the Ring app, select Set Up a Device and follow the in-app instructions. The app will guide you through the setup, but you can refer to the below steps for additional guidance.If you’re setting up with the Plug-In Adapter, you can choose to temporarily connect your doorbell to your home wifi network before physically installing your device.Click here for more information on setting up your Device in the Ring App.Step 3: Powering the DeviceWays to power your Doorbell Pro 2
- No existing doorbellIf you don’t have an existing doorbell, the Video Doorbell Pro 2 can either be powered with: The Plug-In Adapter (skip to this step)Din-Rail Transformer (electrician recommended)
- Existing wired doorbellIf you have an existing doorbell, your new device can be installed with the included Din-Rail Transformer.
To install with the included Din-Rail Transformer:If like most doorbells in Europe, your doorbell only works at 8-12 Volts AC, your existing transformer won’t have enough power to support your Ring device and will need to be replaced by the included 24 Volt Ring transformer.
1. Find your doorbell chimeYour Doorbell Pro 2 is designed to replace an existing doorbell button and gets its power from the doorbell system. Ring your existing doorbell and listen for the chime. If it rings, you’ll know your existing doorbell system is working. Follow the sound to find your chime and make a mental note of the location.We’ll return to your chime soon.2. Locate your existing transformerYour existing transformer can be found in one of the following places and can be found with the label of having 8-12 Volts AC powerYour consumer unit
Combined with your existing Chime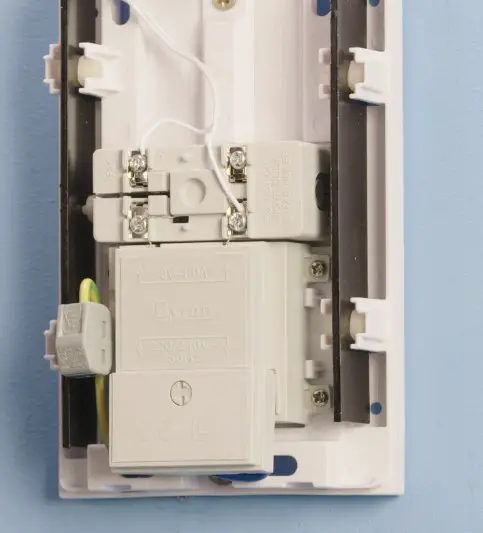 Mounted separately in your home
3. Turn off power at the consumer unitThis can be done by turning off the Mains power switch, or by turning off the power coming into your home at your electric meter.4. Bypass your existing ChimeIf your transformer is in your consumer unit or mounted separately to a wall, make sure to follow this step.Your existing chime needs to be bypassed because the new (included) transformer is powerful and runs on DC rather than AC current. Not bypassing will cause damage to your existing Chime.Click here to learn more about Ring Chime/how to hear your doorbell. 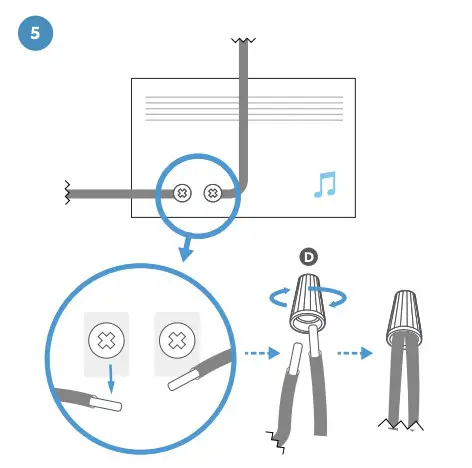
To bypass your existing Chime, unscrew the wires from your existing Chime. Thereafter, twist them together using the provided wire nut.5. (Optional) If required, remove your transformer from its housing unit.Traditional Din Rail transformers are 35 mm wide. The provided transformer is narrower than traditional transformer units and can be removed from its housing to be a more compact 17.5 mm.To remove, spread the two sides of the housing outwards, and push the transformer unit up from below.
6. Remove the wires from your existing transformerFirst, locate the output cables that are connected to your doorbell. These may be connected to the terminals marked ‘output’, ‘8-12Volts AC’, or a similar low voltage. Disconnect these cables and put them to one side.Next, remove the 230 Volt high voltage line (brown) and neutral (blue) cables from the input terminals and place them to one side, ensuring that these are not touching any other cables, metal, or conductive surfaces.Depending on the age of the home, the wires may not match the colors described. Consult an electrician if you are unsure.7. Remove your existing transformerThen, remove the existing transformer by unclipping it from the mounting rail. You may need to use a flat head screwdriver to do this.8. Replace your existing transformer with the new one
- Pull down the white tab at the bottom of the unit.
- Place the unit at an angle on top of the rail.
- Push the unit flush against the rail.
- Push the tab up to lock-in.
9. Reconnect the wires
- Connect the previously disconnected 230V high voltage line (brown) and neutral (blue) cables to terminals L & N on the bottom of the transformer. (ensure these are going into the correct input terminals).
- Connect the doorbell wires to + & – (doorbell wires can go in either terminal).
- Ensure the terminals are tightened properly with a screwdriver.

(Anchor from Plug-In install step)
Remove your doorbell from the wall. Disconnect the wires. Make sure they don’t fall back inside your wall so you can access them later.Remove the faceplate of your the Video DoorbellGrasp the bottom of the faceplate and pull to remove.
Install the included Corner Mount. (optional)
The Corner Mount can angle your Ring Video Doorbell to improve motion detection and provide a better view.To skip this step, click here (set anchor)To install the Corner Mount:
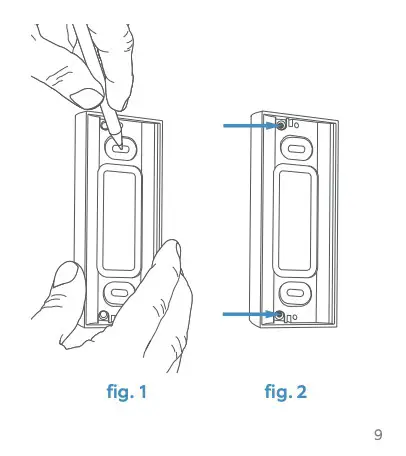
- Mark two mounting holes on your wall through the slots on your Corner Mount (fig 1).If you are replacing a Ring Doorbell, align the two small screw holes with two of the existing holes in your wall (fig 2).
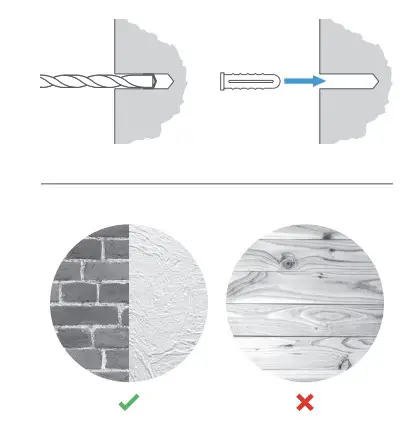
- Install the anchors (optional).On stucco, brick, or concrete, use a 6mm masonry bit to drill holes in your wall, then insert the included wall anchors. (If you’re installing on wood or siding, you can skip this step.)Note: Do not use any screw other than the included long mounting screws when securing your Ring Doorbell.
- Screw-in the Corner MountUsing the long mounting screws, secure the Corner Mount to the wall through the slots (fig. 3). If you’re re-using existing holes, secure it with the adjacent screw holes (fig. 4).
- Connect the doorbell wiresLoop one doorbell wire around each of the screw terminals on the rear of your Ring Doorbell, then tighten the terminals to secure. If your doorbell wires are too short to reach your new Ring Doorbell, you can attach the included wire extenders using the included wire nuts.
- Mount your Ring Doorbell to the Corner MountSecure your Ring Doorbell to the Corner Mount with the two included short mounting screws. Be sure to feed any excess wiring back into the wall first. If you used the wire nuts, push them through the hole as well.Note: Do not use any screw other than the included long mounting screws when securing your Ring Doorbell.Once your device has been installed with the Corner Mount, click here to skip to the next step (Restore power at the Breaker)
 Note: Do not use any screw other than the included long mounting screws when securing your Ring Doorbell.
 Note: Do not use any screw other than the included long mounting screws when securing your Ring Doorbell.
To install your device without the included Corner Mount
- Mark the screw holes.Using your Ring Doorbell as a template, mark the location of the two mounting holes on your wall.
- Install the anchors (optional).On stucco, brick, or concrete, use a 0.6cm masonry bit to drill holes in your wall, then insert the included wall anchors. (If you’re installing on wood or siding, you can skip this step.)Note: Do not use any screw other than the included long mounting screws when securing your Ring Doorbell.
- Screw-in your Ring DoorbellMount your Ring Doorbell with the two included long mounting screws. Be sure to feed any excess wiring back into the wall first. If you used the wire nuts, push them through the hole as well.
 Note: Do not use any screw other than the included long mounting screws when securing your Ring Doorbell.
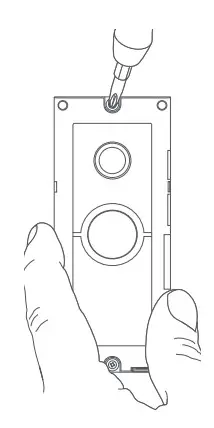
Restore power at the consumer unit

Complete the in-app Setup
Your doorbell will take a few minutes to start up. Once the blue light starts spinning, you’ll be able to connect the doorbell to your wireless network. Follow the in-app steps.
Secure your Ring Doorbell.
Re-attach the faceplate, then use the included screwdriver to drive the small security screw into the bottom of your Ring Doorbell.CAUTION! If you use the wrong screws to secure the Video Doorbell, you could damage the battery during installation, create a fire hazard, and be seriously injured.
report this adYour installation is complete!Need assistance? Contact our Support Team
References
[xyz-ips snippet=”download-snippet”]