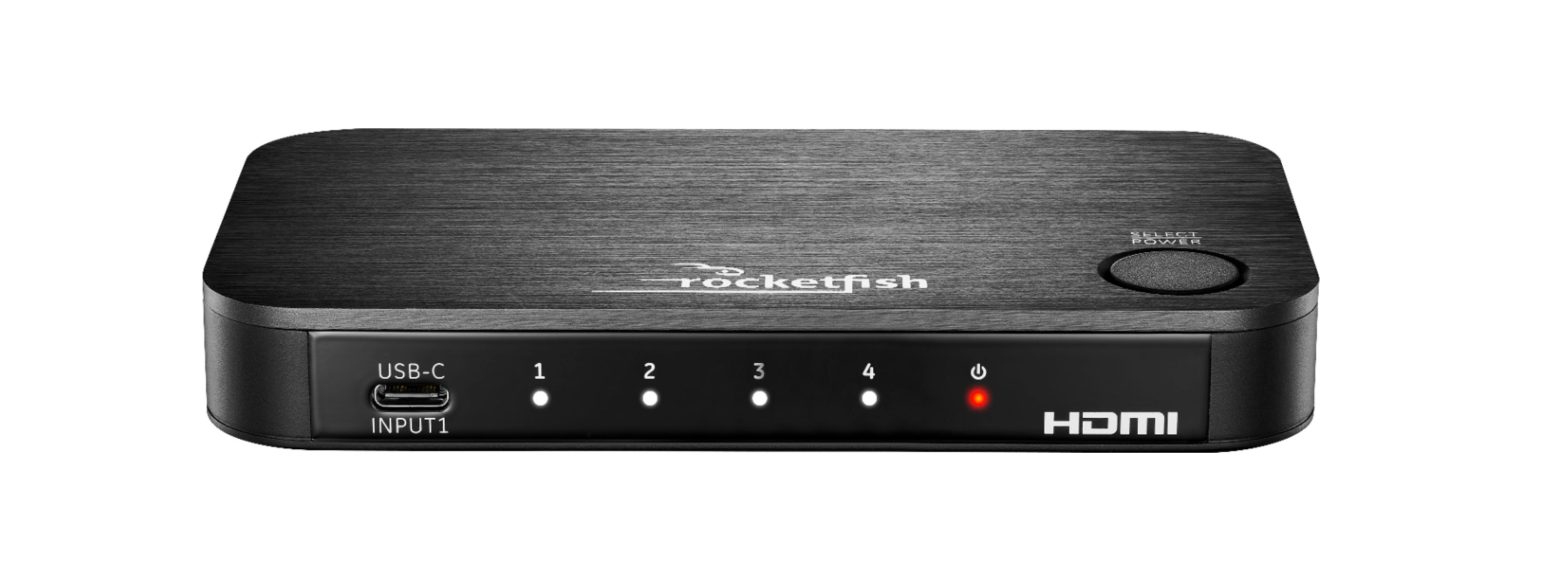
rocketfish 4-Port HDMI Switch with USB-C RF-G1480 User Guide
PACKAGE CONTENTS
- 4-Port HDMI Switch with USB-C
- IR Remote control with battery
- 6 ft. (1.8 m) AC adapter
- Quick Setup Guide
FEATURES
- Three HDMI ports let you watch video in stunning 4K quality
- One USB-C port for watching content from devices requiring a USB-C connection
- Change inputs via either the SELECT/POWER button or the included remote control
- Auto switch function detects when an HDMI and USB-C source is turned on and automatically changes to it
- Solid aluminum top plate looks great alongside premium home theater accessories
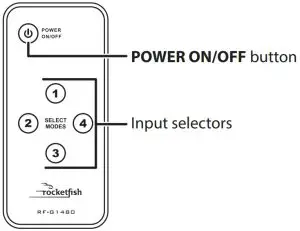
REMOTE
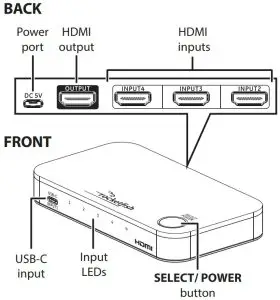
SETTING UP YOUR HDMI SWITCH
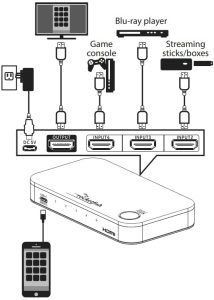
- Connect up to three HDMI cables and one USB-C cable from your source devices to the switch’s INPUT ports.
- Connect an HDMI cable* from your TV (or projector) to the switch’s OUTPUT port.
- Connect the power adapter from the DC 5V port to a power outlet. The power LED (
 ) and an input LED light up.Note: To fully support 4K resolution, connect the input and output channels using HDMI PREMIUM certified cables (within 9.8 ft. (3 m)
USING YOUR HDMI SWITCH
- Turn on your TV and source device.
- To turn on your switch, press thePOWER ON/OFF button on your remote control or press theSELECT/POWER button on your switch.Notes:
- When the switch is turned on, it automatically switches to the last input that was used.
- When the switch is turned on, the whiteLED turns on or flashes to indicate the auto function is on or off.
- To select a source device:
- Press the number on your remote that matches the input of the source device you want. OR
- Press the SELECT/POWER button onyour switch until the LED corresponding to the device you want lights.
- Use your source device as usual to play video and audio.
- When you are finished, press the POWER ON/OFF button on your remote control or press and hold theSELECT/POWER button on your switch to turn off your switch.Note: Power can be left on while not in use.
PS
- If the output of the HDMI port (input 2-4) is stable, the LED light turns on.If there’s no output, the LED flashes.
- If the USB-C input signal is stable, theLED light turns on. If the USB-C device is charging, the LED light turns on. If there’s no USB-C input, the LED flashes.Notes:
- Make sure that the mobile phone or device supports the use of a USB 3.1 GEN1 C-C cable.
- Make sure that the mobile phone or devices support USB-C video output format (DP Alt Mode).
SETTING UP THE AUTO SWITCH FUNCTION
The auto switch function setting is on by default.
- You can turn the auto switch function off or back on by pressing and holding the SELECT/POWER button on the top of your switch for three seconds while the switch is turned off.
- The LEDs on the front panel flash twice to indicate that the auto switch function is turned off. OR
- The LEDs on the front panel turn on for two seconds to indicate that the auto switch function is turned on.Note: Some devices don’t output an on/off detection signal to activate the auto switch function on your switch. If this causes signal confusion, turn off the auto switch function.
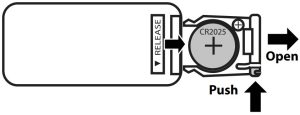
REPLACING THE REMOTE BATTERY
- Push in the tab on the battery tray, then pull out the tray.
- Remove the old battery, insert a new CR2025 battery with the + facing up, then slide the tray closed.
SPECIFICATIONS
- Dimensions (H×W×D): .8 × 5.3 × 2.9 in. (2 × 13.5 × 7.5 cm)
- Weight: .4 lbs. (.2 kg)
- Power supply with micro USB
- connector: 5V DC/2AHDMI
- Video amplifier bandwidth: 18 Gbps
- Operation pixel frequency range: 25 MHz~600 MHz
- Single link range: 4K at 60 Hz maximum
- HDMI standard: HDMI 2.0,HDCP 2.2 Compliant
- Supports video signal: 12-bit deep full HD, Full 3D, 4K 2K video
- Recommended maximum cable length: 9.8 ft. (3 m)
USB-C
- Mirror/extend source screen: 1080p or UHD (3840 × 2160) at 60 Hz
- Power delivery charging: USB 2.0 5 V/1.5 A
TROUBLESHOOTING
No video and/or audio:
- Make sure that all connections are correct and secure.
- Make sure that the switch is plugged in and turned on.
- Make sure that the switch is set to the correct source device.
- Make sure that your TV (or projector) is set to the input/source that your switch is connected to.
- Make sure that the audio and video formats (such as a Blu-ray disc) are supported by the source device and display that you are using.
- Unplug the switch’s power cable, wait 10 seconds, then plug it back in again.
- Make sure that your TV or projector supports the video resolution that your source device is using.
- Make sure that your HDMI or USB-C cable is not damaged. Try connecting a different cable.
- Make sure that the USB-C cable is USB 3.1 GEN1 C-C cable
- Long cables may cause signal loss. Try a different, shorter cable.
- Higher resolution settings require higher quality HDMI cables. Try using lower resolution settings if you are using standard HDMI cables (within 9.8 ft. (3 m)).
- To fully support 4K resolution, connect the input and output channels using HDMI PREMIUM certified cables.Input source will not change: If you are changing the source with the switch:
- Press more firmly and touch the button longer.
- Make sure that you are not wearing gloves and that your fingers are clean and dry.
- Try changing the source with a remote.If you are changing the source with a remote:
- Move closer to the switch and make sure that there is a line of sight between the switch and remote sensors.
- Replace your remote control’s battery.
- Try changing the source with the controls on the switch.Video output, but no audio:
- Make sure that the HDMI cable is secure.
- Make sure that your source output is DVI.
- Restart your switch.No 4K output:
- Make sure that your source device supports 4K (3840 × 2160) resolutions.
- Make sure that your HDMI cable supports the 4K specification.Notes:
- When the CEC (Consumer Electronics Control) function fails, make sure that your source and output devices support CEC.
- When CEC malfunctions cause screen output abnormalities, turn off the CEC function of your source or output devices.
- CEC is a feature of HDMI designed to allow users to command and control multiple devices connected via HDMI using a single remote control. CEC also lets individual CEC-enabled devices command and control each other without user input.
- If the CEC function fails after switching ports, turn on the source device again to enable the CEC function.
LEGAL NOTICES
FCC Statement
- FCC Caution – §15.21: Changes or modifications not expressly approved by the party responsible for compliance could void the user’s authority to operate the equipment.
- FCC Statement – §15.105(b): This equipment has been tested and found to comply with the limits for a Class B digital device, pursuant to part 15 of the FCC Rules. These limits are designed to provide reasonable protection against harmful interference in a residential installation. This equipment generates, uses, and can radiate radio frequency energy and, if not installed and used in accordance with the instructions, may cause harmful interference to radio communications. However, there is no guarantee that interference will not occur in a particular installation. If this equipment does cause harmful interference to radio or television reception, which can be determined by turning the equipment off and on, the user is encouraged to try to correct the interference by one or more of the following measures:
- Reorient or relocate the receiving antenna.
- Increase the separation between the equipment and receiver.
- Connect the equipment into an outlet on a circuit different from that to which the receiver is connected.
- Consult the dealer or an experienced radio/TV technician for help.
- The terms HDMI and HDMI High-Definition Multimedia Interface, and the HDMILogo are trademarks or registered trademarks of HDMI Licensing Administrator, Inc. in the United States and other countries.
LIFETIME PARTS AND LABOR WARRANTY
Visit www.rocketfishproducts.com for details.
CONTACT ROCKETFISH:
For customer service call 1-800-620-2790www.rocketfishproducts.com
 report this ad
ROCKETFISH is a trademark of Best Buy and its affiliated companiesDistributed by Best Buy Purchasing, LLC 7601 Penn Ave South, Richfield, MN 55423 U.S.A. ©2021 Best Buy. All rights reserved.
[xyz-ips snippet=”download-snippet”]