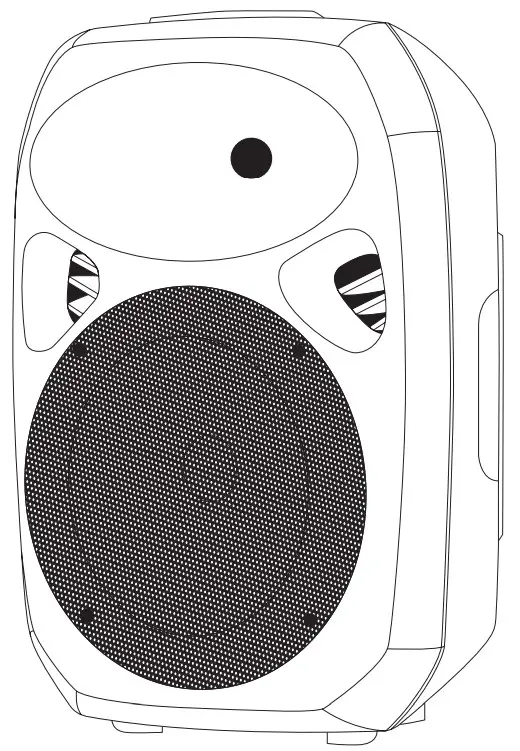
![]() RPG152K V2 15-ACTIVE DJ/PA SPEAKERSOWNER’S MANUAL
RPG152K V2 15-ACTIVE DJ/PA SPEAKERSOWNER’S MANUAL
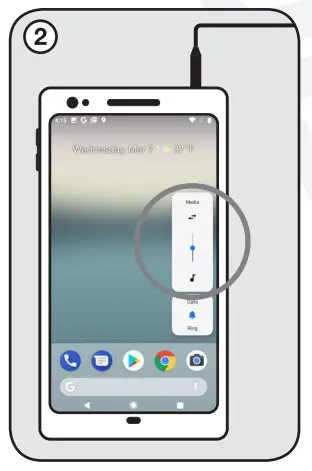
Who reads manuals?Instead, go to vimeo.com/440117699 or scan the OR code and watch a short video, which shows you how to set this item up and how to use it.

Thank you for purchasing this Rockville Power Gig RPG152K V2 Bluetooth pro audio speaker system.Please read this owner’s manual carefully for proper use of your Power Gig RPG152K V2 Bluetooth pro audio speaker. Should you need technical assistance, please call our technical helpline at 1-646-758-0144, Monday through Friday, 9 am to 5 pm EST.IMPORTANT SAFETY INSTRUCTIONS
- To reduce the risk of electric shock, never open the unit. There are no user-serviceable parts. Refer service to an authorized Rockville service center.
- Do not expose this unit to any kind of moisture.
- Please ensure that the unit is situated in a properly ventilated area.
- Make sure the unit is placed on a level and stable surface.
Setting Up Your Power Gig Professional Sound System
Your Power Gig is set up to produce the full spectrum of sound from its woofer and tweeter horn combination. The lower frequencies seek out the floor of the room that they are playing in and travel along the floor and walls. The tweeter horn is more directional. Hence when setting up your system its more important to make sure that the tweeter horns are not blocked by any furniture and are located/aimed at ear level to the listening audience. Woofer aiming is not as critical as explained previously due to the nature of the woofer sounds, allowing them to travel through various paths even when blocked.It is therefore recommended that when setting up your system you set up your speakers on provided stands so that the tweeter sounds will radiate above the listening crowd. This will guarantee optimum sound dispersion and achieve clear vocal sound reproduction.
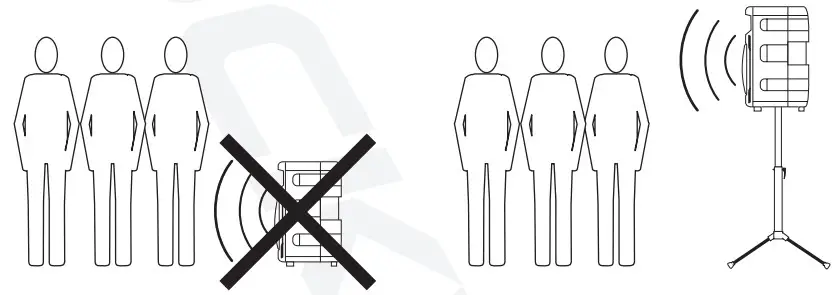
How To Avoid Irritating Feedback
The placement of your microphone is critical in avoiding feedback through your Power Gig system. Never set up your microphone in front of the speaker. Always set up your microphone behind the speaker. When approaching the speaker to make any adjustments. we recommend approaching the speaker from the rear and not walking directly towards the front of the speaker.
Assembling Your Power Gig Professional Sound System Stands
- Remove the stands from their packaging.
- Loosen up the adjustment knob (fig. a) and spread the legs to the desired width (fig. b). We recommend spreading the legs to the point that the support bars are parallel to the floor. Retighten the leg adjustment knob so that the legs are securely positioned (fig. c). Do not overtighten.

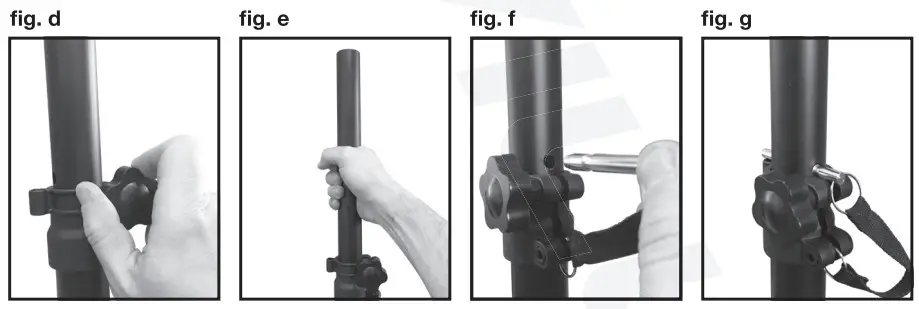
- Loosen the stand extension by loosening the locking knob (fig. d). Lift the extension to the desired height (fig. e). Now insert the safety detent pin (fig. f). Make sure the pin goes all the way through the extension pole (fig. g). If you retighten the locking knob, do not overtighten it.

Mounting the Speaker
- Unpack the speakers from their packaging.
- Carefully lift the speaker above the stand, lining up the extension pole with the mounting hole at the bottom of the speaker (fig. h). This step may require a second person for assistance.
- Once the speaker is mounted on the stand, secure it by tightening the locking knob located behind the pole opening at the bottom of the speaker (fig. i).
Connecting the Passive Speaker
To connect the passive speaker to the active unit, use the Included 1/4″ to IA” cable. Connect one end of the cable to the W port on the active unit marked Speaker Out (fig. D. Now connect the other end to the W port on the passive unit marked Speaker In (fig. k). Make sure that the power to the active unit is turned off before you connect the passive unit.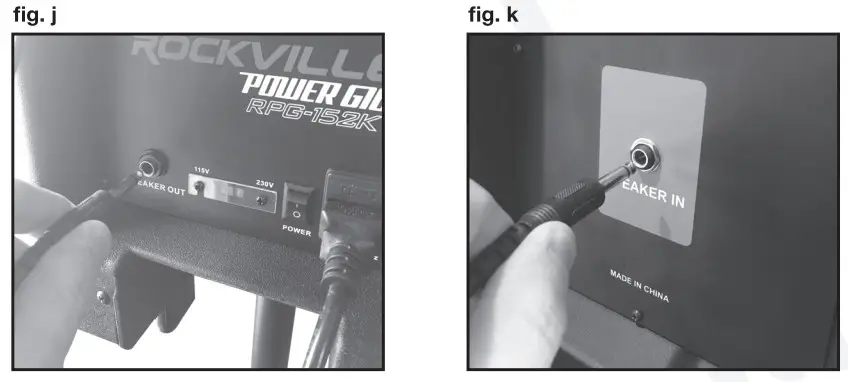
Setting Level Controls
It is best practice to set your input level controls (gains) in this manner:
- Unplug WI inputs except for the one you wish to set the gain for. In this instance, the Line In RCA inputs.
- Set the line-level input device volume (smartphone, tablet, MP3 player, etc.) to 60%.
- Set the RPG152Kv2 Master Level to 75%.
- Slowly turn up the level on the selected input (in this case, the Line/USB As soon as the clip indicator LED goes on or you hear any distortion – turn it down one or two notches.
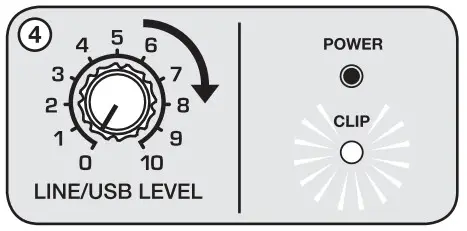
After you set the levels on all input devices, you can readjust the RPG152Kv2 levels as necessary.![]() PLEASE NOTEBecause mixers feature two volume controls (channel and master), when connecting one via the XLR line-in port, the procedure is slightly different. The RPG152Kv2 Master Level should be set to 50% and the Line/USB Level control should be set to 50%. Set the mixer master volume to 50% and make the adjustments in step 4 on the mixer channel level control. If after making these adjustments the signal still isn’t strong enough, you can additionally boost the signal by turning up the Line/USG Level control. When adjusting the Mic Level control, you must speak into the micophone and adjust the level control as needed. This is because adjustments to the mic input are a matter of mic volume in relation to the music volume and not necessarily a clipping issue.
PLEASE NOTEBecause mixers feature two volume controls (channel and master), when connecting one via the XLR line-in port, the procedure is slightly different. The RPG152Kv2 Master Level should be set to 50% and the Line/USB Level control should be set to 50%. Set the mixer master volume to 50% and make the adjustments in step 4 on the mixer channel level control. If after making these adjustments the signal still isn’t strong enough, you can additionally boost the signal by turning up the Line/USG Level control. When adjusting the Mic Level control, you must speak into the micophone and adjust the level control as needed. This is because adjustments to the mic input are a matter of mic volume in relation to the music volume and not necessarily a clipping issue.
APPLICATION USES
Microphone PresentationsYour Power Gig features ultra-low noise Mic input via an XLR port and 1/4″ TRS stereo jack.
- Make sure the Power switch is in the OFF position.
- Plug your microphone into either the XLR port or’/: jack (never use both at once).
- Switch on the Power Gig unit.
- Refer to the “Setting Level Controls” section of this manual for instructions on how to properly adjust the Mic Level controls.
Always stand behind the Power Gig when making your microphone adjustments to avoid feedback distortion.
Line Input
You can use the Line In XLR input to connect a mixer or the RCA inputs to connect an additional stereo signal source such as a smartphone, tablet, MP3 player, CD player, etc.
- Make sure the Power switch is in the OFF position.
- Connect the mixer to the XLR input or line-level signal source to the RCA inputs (never use both at once).
- Switch on the Power Gig unit.
- Make sure the MP3/Line Input button is set to the Line In position.
- Refer to the ‘Setting Level Controls” section of this manual for instructions on how to properly adjust the line input level control (gains).
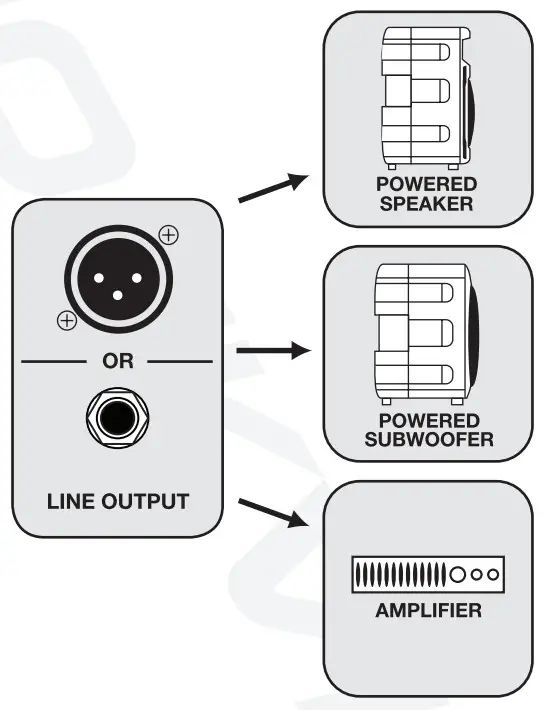
Line Out Balanced Connection.
The XLR/’/ Line Outputs allow you to output the amplified signal to a powered subwoofer, another powered speaker, or an amp, which will, in turn, power other speakers. Simply connect the output device to the RPG152Kv2 using an XLR to XLR, XLR toW TRS, or a to cable to share the signal. We recommend you use high-quality cables such as Rockville’s RCXFM20E-B XLR to XLR cable, the RCXMB20-B XLR to’/: TRS cable, or the RCTR series V4-TRS toW TRS cables. Do not use both outputs at once.
Speaker Output Connection.
 Speaker Output Connection.
The ¼ ” TRS output marked Speaker Out is used to connect the active unit to the passive unit. Passive speaker impedance must always be 8 ohms.

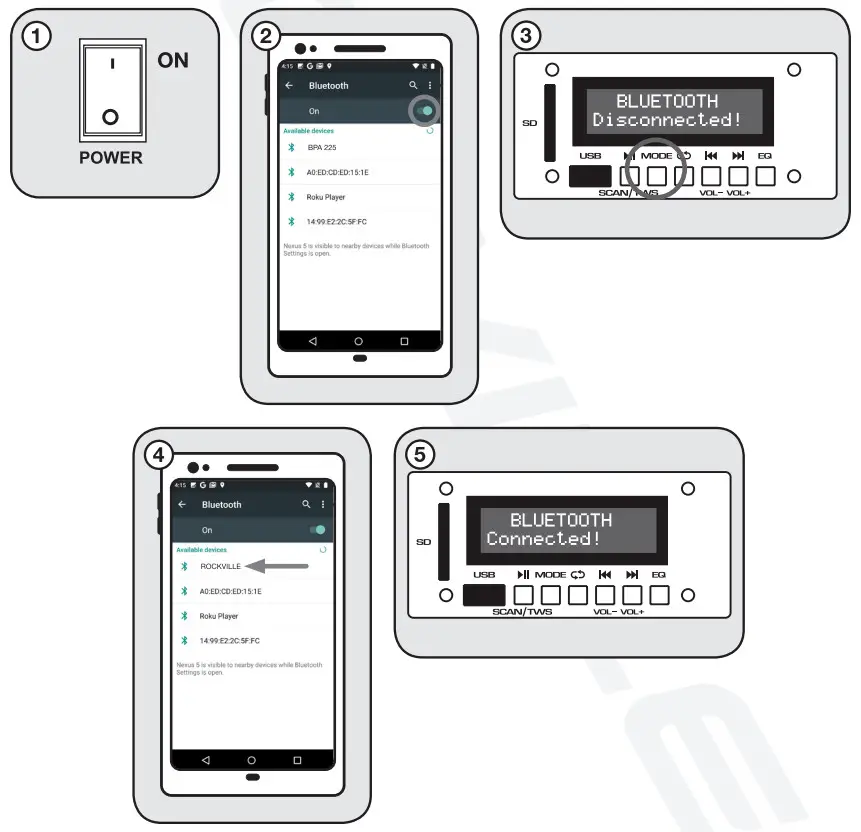
Bluetooth Pairing
To connect your iPod, iPhone, MP3 player, Android phone, or any other Bluetooth-capable device, follow the steps listed below.
- Make sure the RPG unit’s power switch is in the ON position.
- Turn on the Bluetooth feature on your device.
- Push the Mode button on your RPG unit until you are in Bluetooth mode. The LCD screen will read “BLUETOOTH Disconnected”
- Once in Bluetooth mode, the unit should show up on your device as “ROCKVILLE” Select it from your list of available devices.
- If pairing is successful, the LCD screen will read ‘BLUETOOTH Connected” You can now begin to stream music.
Wireless Speaker Linking
The RPG152K v2 features True Wireless Stereo (TWS) Bluetooth linking. This means you can purchase 2 of these speakers and link them together to play in stereo wirelessly.
- Make sure both RPG unit’s power switches are in the ON position and that they are within 32 feet of each other.
- Press the Mode button on both of the units to enter Bluetooth mode. The LCD screens should show that the speakers are not connected via Bluetooth or to another speaker.
- Press the SCAN/TWS button on one of the units for 3 seconds (3a). If pairing is successful the unit’s LCD screen will read “BLUETOOTH BT-A Connected’ (3b). This Is the primary and all functions will be controlled by this unit.
- The secondary unit’s LCD screen will read ‘BLUETOOTH BT-B Connected’.
- Once the speakers are connected, go to your phone’s Bluetooth interface and select ‘ROCKVILLE’ from the list of devices. If the connection is successful, you will hear the same audio from both units. You are now ready to enjoy the true wireless stereo sound!

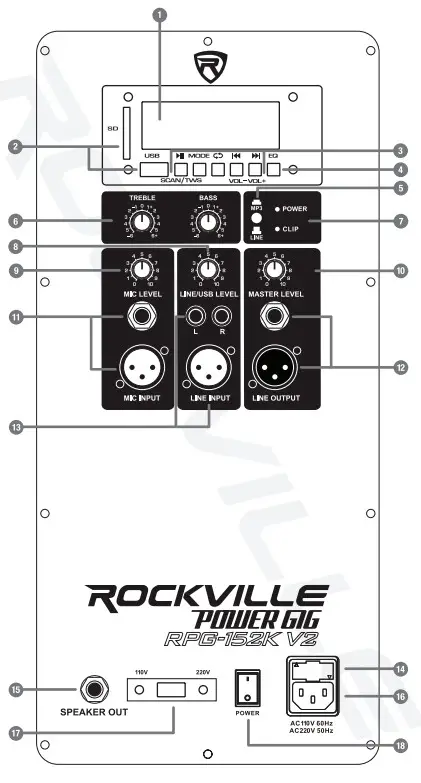
- LCD display screen
- USB and SD Card input
- MP3 Player controls:a. (VOL-)/ (VOL+) – In USB/SD/Bluetooth mode press these buttons to skip tracks. In FM mode press these buttons to skip stored stations. In any mode, press and hold to adjust the MP3 module volume.b. Play/Pause, Scan, TWS – Press this button once to start music playback; press again to pause. In FM radio mode press and hold for 5 seconds to automatically scan and save all available stations. See page 11 for the TWS pairing procedure.c. Repeat – Press to repeat current track. Press again to repeat all tracks. Press once again to exit repeat mode.d. Mode – Switch between modes (FM Radio, Bluetooth, USB, and SD).
- Ea button allows you to toggle between the 5 Presets.
- MP3/Line Input selector button
- 2 band equalization control panel.
- Bass adjusts the low frequencies to *6dB.
- Treble adjusts high frequencies to t6d8
- Power LED indicator and amplifier clip limit LED indicator
- Line/USB Level control
- Mic Level control
- Master volume
- The Mic input panel accepts XLR type connectors and balanced and unbalanced TRS plugs. When you use an unbalanced VI TS plug, the line input automatically turns the ring into the ground
- XLR/1/4″ Line output
- The XLR Line Input port accepts signals from a variety of sources such as keyboards, electronic drums, mixers, etc. Use the RCA plugs to connect stereo signal sources such as CD players. DVD music players. MP3 players, etc.
- User serviceable fuse (see page 14 for replacement procedure).
- Output to passive speaker
- 1EC AC power socket
- Voltage selector switch
- Power switch
Features
- 1500 Watts Peak/375 Watts RMS/750 Watts Program Power
- Mic Input XLR +
- Mic Level
- Line Input XLR + RCA
- Line Level
- Line Output XLR +14″
- Master Volume
- 2 Band Ea: Bass and Treble
- MP3/Line Input selector button
- Power LED
- Clip LED
- USB/SD Input. Acceptable file formats: MP3, WAV, WMA
- FM Radio Built-In
- 5-Mode Preset EQ
- Bluetooth Connectivity
- True Wireless Stereo (TWS) linking
- Wireless Remote Control
- LCD Display Screen for MP3 Player Functionality
- Output to Second Passive Unit with Included Cable
- Includes One Wired Microphone
- Includes 1 Pair of Speaker Stands
- 110/220 Volt Switchable
- Fuse: T5AL 250V
- 375 Watts RMS/750 Watts Program Power/1500 Watts Peak
- High Power 15– Long-throw Woofer
- 25mm Piezo Compression Horn Tweeter
- Frequency Response: 45Hz – 20KHz
- Maximum SPL fd 1w/1m: 125dB
- Impedance: 8 Ohm
Troubleshooting
| PROBLEM | SOLUTION |
| No power
|
1. Make sure the unit is plugged in and the power switch is in the ON position.2. Check that the power cable is plugged in tightly to the unit.3. Check and replace the fuse if necessary. See fuse replacement diagram on page 14.4. If people or equipment tend to step on and roll over or stretch your power cable it can get damaged. Always try a second cable to test for shorts in the original cable. Dispose of original damaged power cables immediately. |
| PROBLEM | SOLUTION |
| No sound/ distorted sound |
|
| Buzzing sound | Make are you we using a proper cable. For W cables. there are 3 types: instrument. TS (unbalanced). and TRS (balanced). Check the requirements of the connected gear and the input of the speaker and make are you are using the appropriate cable. |
| MC feedback | Point the mics away from the speaker. Make sure the mics are behind the speaker, not In front of It (see page 7). |
| Poo min sound |
|
| Not enough bass | Add a subwoofer to your setting – PA speakers do not play deep frequencies as well as a subwoofer. Regardless of c4 brand or M0631. if you want deep thumping bass you must add a subwoofer. |
| Bluetooth paring fails |
|
| TWS pairing fails |
|
| No SD or VSt3 playback |
|
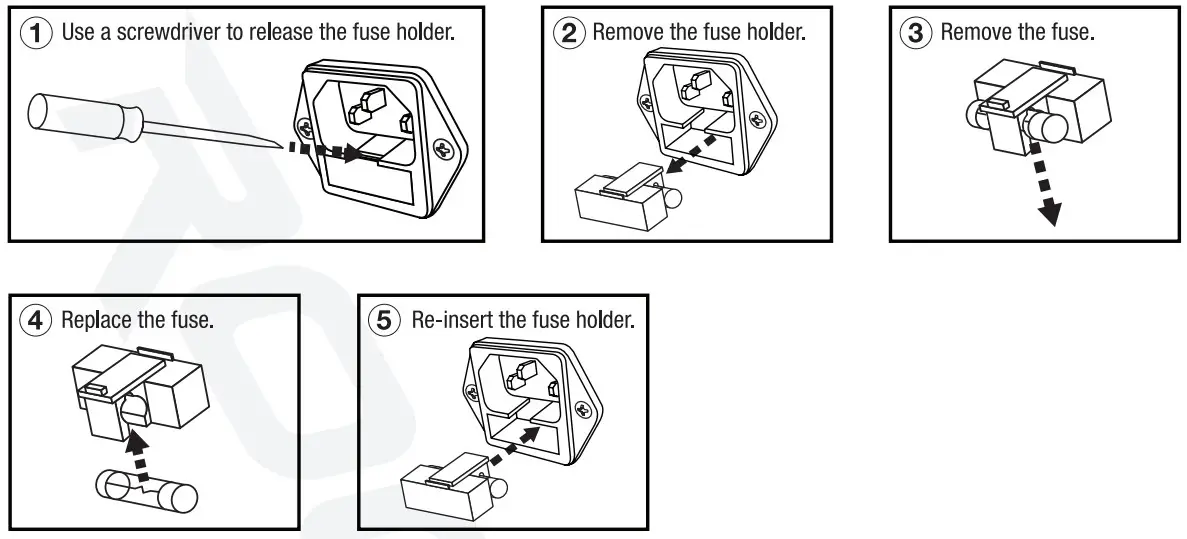
Fuse replacement Diagram
Fuse type: T5AL 250V
FEDERAL COMMUNICATIONS COMMISSION COMPLIANCE INFORMATION
Responsible party name: RockvilleAddress: 600 Bayview Ave, Entrance A, Inwood, NY 11096Hereby declares that the product(s) Power Gig RPG152K V2 pro audio speaker system complies with FCC rules as mentioned in the following paragraph:This device complies with Part 15 of the FCC rules. Operation is subject to the following two conditions: (1) this device may not cause harmful interference, and (2) this device must accept any interference received, including interference that may cause undesired operation.Note: This equipment has been tested and found to comply with the limits for a Class B digital device, pursuant to Part 15 of the FCC rules. These limits am designed to provide reasonable protection against harmful interference in a residential installation. This equipment generates, uses, and can radiate radio frequency energy and, if not installed and used in accordance with the instructions, may cause harmful interference to radio communications. However, there is no guarantee that interference will not occur in a particular installation. If this equipment does cause harmful interference to radio or television reception, which can be determined by turning the equipment off and on, the user is encouraged to try to correct the interference by one or more of the following measures:
- Reorient or relocate the receiving antenna.
- Increase the separation between the equipment and receiver.
- Connect the equipment to an outlet on a circuit different from that to which the receiver is connected.
- Consult the dealer or an experienced radio/TV technician for help.
 report this ad
![]()
RockvilleAudio.com2019 ROCKVILLE /1 Features and specifications are subject to change and or improvement without notice.
[xyz-ips snippet=”download-snippet”]