![]() TSL-PC-BL4/ TSL-PC-BL4 CTESLA SMART PETFEEDER/CAMERAQUICK GUIDE
TSL-PC-BL4/ TSL-PC-BL4 CTESLA SMART PETFEEDER/CAMERAQUICK GUIDE
QUICK GUIDE
Please read this manual carefully before use to ensure safe use of the intelligent automatic feeder.
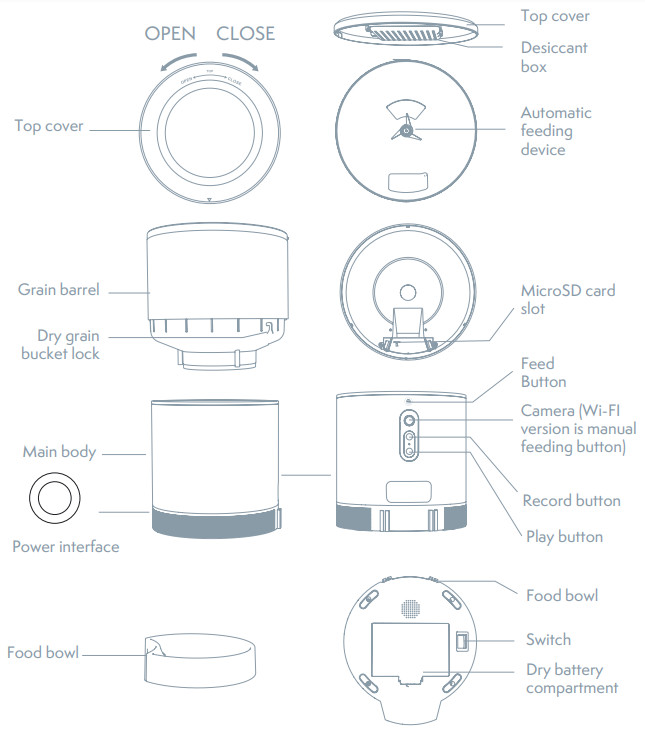
LIST OF ACCESSORIES

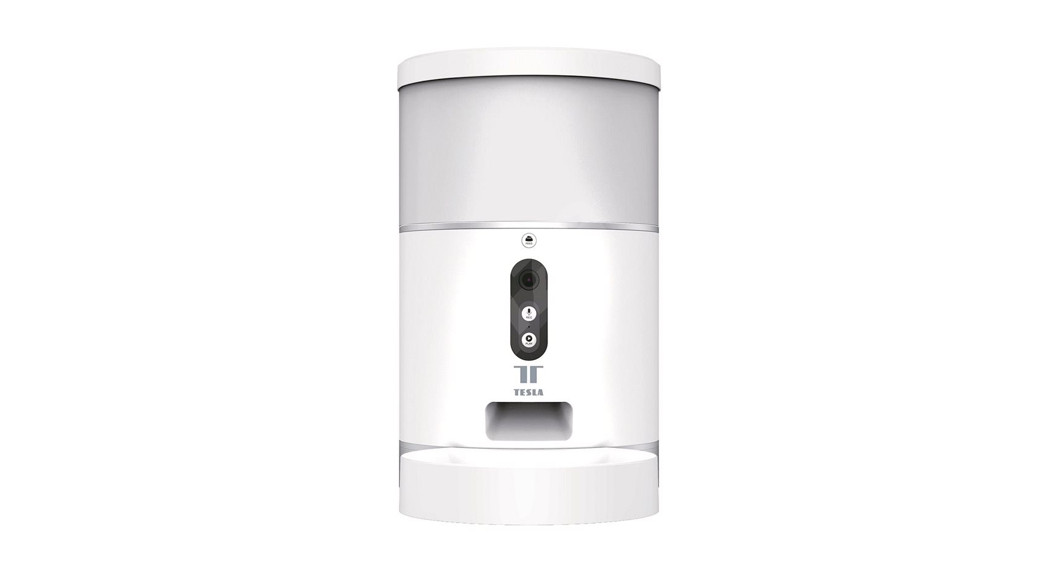
PRODUCT INTRODUCTION
Battery use instructions: When the external power fails, the device will automatically enable the installed battery to power the device. (Note: the device cannot charge the battery)
OPERATION GUIDE
THE FIRST USE
- Open the top cover of the feeder and remove the power cord adapter from the bucket.
- Plug the power cord into the power connector on the rear of the main unit and connect the adapter to power.
- Place the main unit in a horizontal position and the food bowl is installed at the corresponding position of the main unit.
- Add pet dry food to the feeder bucket.
- The desiccant is placed in the desiccant box by default. Please replace it regularly for long-term use (do not use cleaning)
- The battery compartment can be installed with 3sections of No. 1 battery for manual feeding when there is no electricity (optional).
- Bind the feeder to the Smart Life app to set up the feeding and planning of the pet.
THE FUNCTION DESCRIPTION
Feed button: Short press to eat one, long press for 5 seconds to restore the factory settings.Record button: Press and hold the “Record button” to record the sound to remind the pet to eat before feeding.Play button: Plays the recorded sound.Rocker switch: Feeder switch.Dry battery compartment: Three 1st batteries can be installed for the power supply.
CONNECT AND DOWNLOAD
Tesla Smart is available for both iOS and Android OS. Search the name ‚Tesla Smart‘, in App Store or Google Play, or scan the QR-Code to download the App.

REGISTRATION PROCESS
Step 1 Open the Tesla Smart App, click „Register“, read the „Privacy Policy“ and click „Agree“.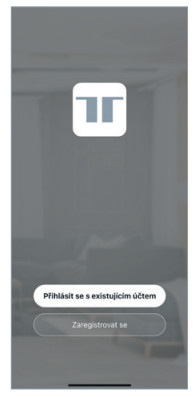 Step 2 Input a legal and valid Mobile number or Email address and click „Continue“. Input Verification Code, then log in to the app.
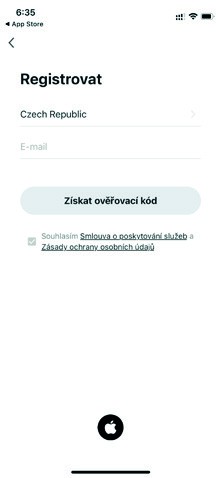
QUICK CONFIGURATION

VIDEO VERSION PET FEEDER CONFIGURATION

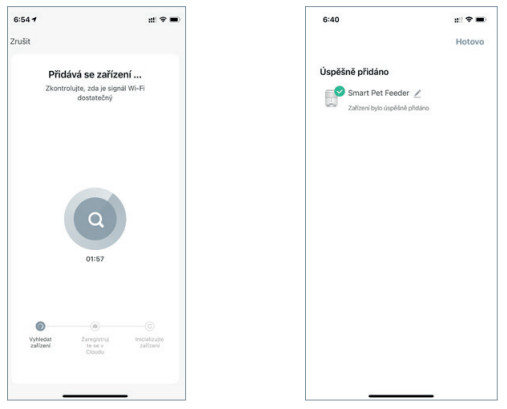
Open the APP, click „add device“- enter wifi password and confirm, connecting till „device added successfully“.

VIDEO FEEDER APP INTERFACE INTRODUCTION
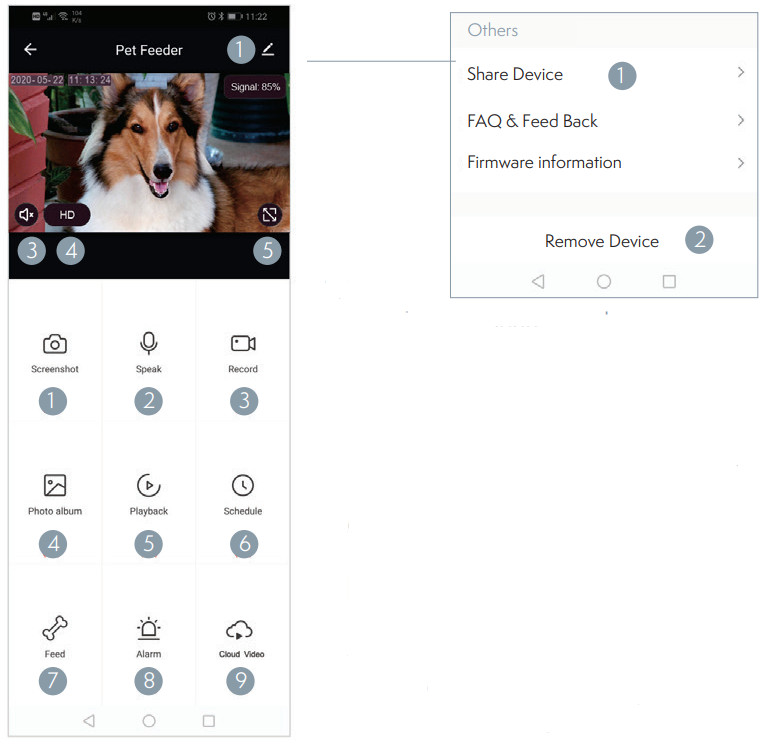
Setting
- Share device: Share the device with others
- Remove device and unbind
Monitoring Screen Introduction
- Screenshot: také a picture from the video
- Talk: 2 voice intercom
- Record: record and save into the mobile phone
- Photo Album: Store photos
- Play: SD card video playback
- Timed Feeding: Delivery food at regular intervals
- Feeding: Click to feed
- Alarm: Motion detection on/off
- Cloud playback: Cloud storage video playback
WIFI FEEDER APP INTERFACE INTRODUCTION
CLEANING/MAINTENANCE
After the feeder has been used for a period of time, the bowl and the bucket should be cleaned with a cleaning agent to avoid the occurrence of bacteria that affect the health of the pet due to the long time left by the food residue.Grain drum separation switch
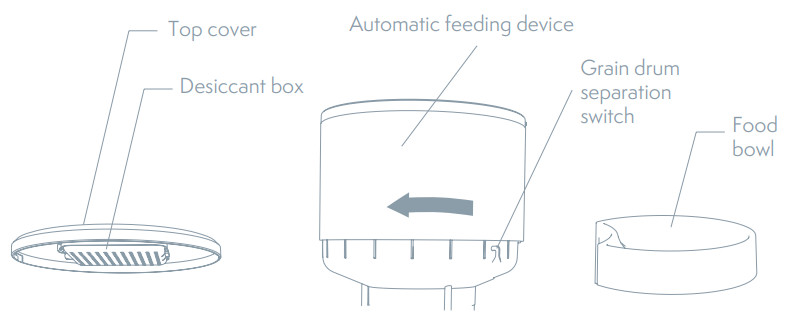
- The upper showed machine parts can be removed from the main feeder and cleaned with detergent and water.
- Open the desiccant box in the top cover.
- Grain barrel dissembled by turning the Grain drum separation switch.
- pull up to remove the food bowl.
- After cleaning, it must be dried or air-dried before being assembled into a whole main feeder for use.▲ This feeder is suitable for dry foods smaller than 12 mm. Freeze-dried food is not available. Please keep the environment dry.
ATTENTIONS
- Please place the device correctly; prevent the pet from tipping over the device. This device is only suitable for small and medium pets under 20kg.
- Please replace the desiccant in the storage lid regularly. No desiccant is needed.
- Please keep the food bucket dry and sealed, and check regularly to ensure food residue Precautions
- Do not drop all substances other than pet dry food into the grain bin. Otherwise, the device may be used abnormally or even cause pet safety problems.
- To prevent the pet from falling over the product, it is recommended to place the corner or against the wall.
- The product anti-battering line should be installed as concealed as possible to prevent the equipment from being damaged by the pet biting the wire.
- If children are using this device, be sure to use it under adult guidance.
- After installing the spare dry battery, you can manually operate the device to provide a normal power supply during power failure.
- Regularly clean the food bucket and food bowl.
- This device is not recommended for young pets within three months
FAQ
Q.The feeder is not connected, what is the problem, what to do.A. 1: Check if the machine is normal: Check the status of the device indicator. After the power is turned on, the blue indicator light flashes. When the network is connected, it will be on. There will be a drop tone before the network is configured.2. Check if the Wi-Fi username and password are normal: Wi-Fi username and password cannot have special characters. It is recommended to use English letters + number signs.3. Uninstall the software and reinstall the software: Please authorize the APP to obtain the location information and access the network permissions during the installation process. Follow the above steps, and enter the correct wifi password. If you still have difficulties, please contact customer service.Q. When connecting the feeder, sometimes it can be connected normally, sometime s not, how to deal with it.1. Check if the machine‘s food outlet is blocked. At this time, the blue indicator is always on.Q. Why does the feeding time differ by tens of seconds from the current time.A. The parameters set on the APP will have an error of about 30 secondsdepending on the timing of the network environment.Q. How to quickly reconnect after the machine is disconnected.A 1: Exit the APP and re-enter, wait for the data update2: Switches from the feeding interface to the video interface and waits for the video to refresh.Q. About SD card support capacity.A.Support 8-64GQ. Feeder requirements for network typeA.The feeder must use a wifi signal that satisfies the wifi 802.11bgn protocol.
INFORMATION ABOUT DISPOSAL AND RECYCLING
This product is marked with the symbol for a separate collection. The product must be disposed of in accordance with the regulations for disposal of electrical and electronic equipment (Directive 2012/19/EU on waste electrical and electronic equipment). Disposal together with regular municipal waste is prohibited. Dispose of all electrical and electronic products in accordance with all local and European regulations at the designated collection points which hold the appropriate authorization and certification in line with the local and legislative regulations. Correct disposal and recycling help to minimize impacts on the environment and human health. Further information regardingthe disposal can be obtained from the vendor, authorized service center, or local authorities.
EU DECLARATION OF CONFORMITY
Hereby, Witty Trade s.r.o. declares that the radio equipment type TSL-PC-BL4/TSL-PC-BL4C is in compliance with EU directives. The full text of the EU declaration of conformity is available at the following internet address:teslasmart.com/declarationConnectivity: Wi-Fi 2,4 GHz IEEE 802.11b/g/nFrequency band: 2.400 – 2.4835 GHzMax. radio-frequency power (EIRP): < 20 dBm
 ManufacturerTesla Global Limited108 Lok Shan Road, Tokwawan,KowloonHong Kong, 85200www.teslasmart.com
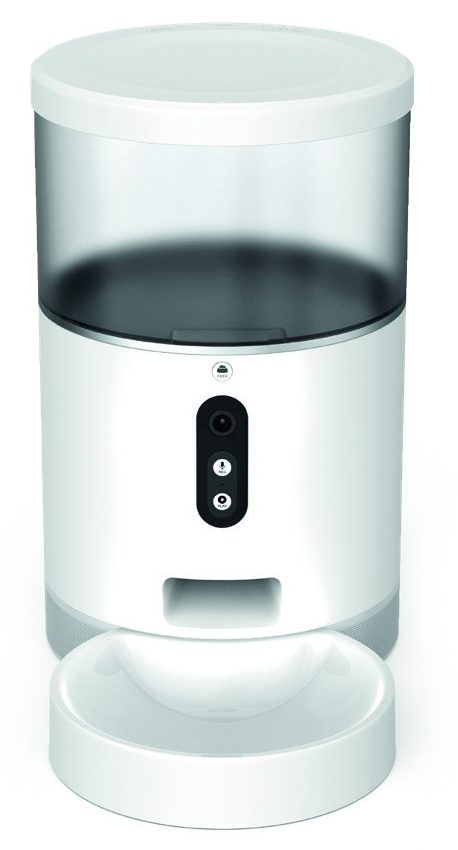
ManufacturerTesla Global Limited108 Lok Shan Road, Tokwawan,KowloonHong Kong, 85200www.teslasmart.com
![]()
TESLA SMART PETFEEDER CAMERAManufacturerTesla Global Limited 108 Lok Shan Road, Tokwawan,KowloonHong Kong, 85200www.teslasmart.com
References
[xyz-ips snippet=”download-snippet”]